How to Make 3D Paper Butterflies Artwork

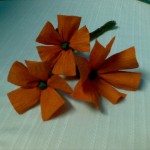
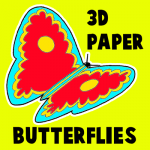
Here is a great craft to make around Springtime. Unfortunately it isn’t Springtime, I just like butterflies. These paper butterflies will add a three-dimensional effect to any display or bulletin board. This is a great classroom or group project as each child can do a butterfly and add it to the board. These butterflies are made out of paper and turn out great as the wings are folded to look as if the butterfly is in flight.

How to Make 3D Paper Butterflies Artwork


How to Make 3D Paper Butterflies Artwork


Crafts Materials Needed:

Paper

Scissor

Coloring Items such as Crayons or Markers

Optional (Decorative Items such as glitter, pipe cleaners, sequins)

Dark Construction Paper

How to Make a Butterfly

Step 1


Fold Paper


Turn a piece of paper so it is on its side like in the picture above. In the center of the sheet of paper, lightly draw 2 lines about an inch apart from each other. Than fold towards you on both of those lines…then unfold.

Step 2


Draw Butterfly


Now draw the butterfly wings on the outside parts (the wings look like a number 3 shape)…and the butterfly;s body in the center.


Step 3


Cut butterfly out


Cut out the butterfly.

Step 4


Decorate the butterfly


Now draw designs on the butterfly wings and body. You can add design elements such as pipe cleaner antennae, or sparkly glitter on the body…I will leave the creative aspects up to you.

After decorating, re-fold the paper along the two sides of the body.

Step 5


The butterfly is ready to be pasted down by either one wing, or the body.


The butterfly is ready to be pasted down by either one wing, or the body. The illustration at the top shows how effective these butterflies appear, mounted on sheets of black paper, and tacked together for a panel. This makes a great group classroom project.

Technorati Tags: , , , , , ,

How to Make Tissue Paper Flower Bracelets for Mom on Mothers Day or Easter

This versatile, large and beautiful flower can be used as a basket topper, bracelet or hair decoration. They are simple to make and you’ll be amazed to see your own flower bloom right in front of you. Since Mother’s Day is coming up, and we didn’t post this craft for Easter, I thought it might also be good to make as a gift for your Mom.


Flower Bracelets to Make for Mom on Mothers Day or For Easter


How to Make Tissue Paper Flower Bracelets for Mom on Mothers Day or Easter


Crafts Materials list:
  • 1 large sheet of tissue paper (2’6″ X 20″)


  • Pipe Cleaner (Green for the stem, but could be any color)


  • Scissors


  • Ruler


Step 1: Cut sheet into eight equal pieces. Then stack the pieces, putting any smaller ones on top.


Step 2: Fold the stack like an accordion, length-ways


Step 3: Wrap the pipe cleaner around the middle of your folded stack, twisting it tightly.


Step 4: Separate the sheets, pulling up to the center, one piece at a time. This is the fun part and you shouldn’t worry about making it perfect.


Step 5: Marvel at your new flower. Try to hold yourself back from making an entire garden.

Technorati Tags: , , , , , , , , , , , , ,

How to Make a Paper Rose

Today I’m going to show you how to make a paper rose.  Knowing how to make a rose out of paper can came into handy on special days like Mother’s Day, Valentine’s Day or even on someone’s Birthday.  With only a few materials you can learn how to make a beautiful rose that is good enough to give out on these special days.  So, grab the few materials needed and let’s get started.

Check out these other Flower Crafts.


How to Make a Paper Rose


Materials Needed

Any Color Paper

Green Paper

Pencil

Scissors

Ruler

Stapler


Step 1


Draw a spiral like this.


Draw a spiral like this.


Step 2


Cut out the spiral.


Cut out the spiral.


Step 3


Roll paper with ruler


Roll paper with ruler… then when flexible roll with hands.


Step 4


The outside edge is now pushed down thru center.


The outside edge is now pushed down thru center.


Step 5


Staple base together.


Staple base together.


Step 6


Fold a piece of paper in half and cut half of a leaf shape


Fold a piece of paper in half and cut half of a leaf shape (as seen above).


Step 7


Roll leaves a bit.


Roll leaves a bit.


Step 8


Staple or tape leaves on rose.


Staple or tape leaves on rose.

And, that’s it…. you just made a paper rose.  Isn’t it beautiful?  Now, the real question is…. who are you going to give it to?  hmmmmmm……

Technorati Tags: , , , , , , , , , , , , ,

How to Make a Flower Stand for Mother’s Day

Mother’s Day is coming up in less than a couple of weeks.  Do you know what you are giving your Mother yet?  If you know you would like to give her a flower…. why not make this flower stand craft to go with it.  First of all, you know she loves when you make her things yourself.  Second of all, this way you don’t have to just hand her a single flower all by itself…. with this flower stand craft you have something to hand your flower in.  You can choose to print off the color template flower stand or the black and white template and decorate the flower stand yourself…. the choice is yours.  So, let’s get started.

Check out our other Mother’s Day Crafts.


How to Make a Flower Stand for Mother's Day


Materials Needed

Printer & Paper

Scissors

Flower

Crayons or Markers (optional)


Click on template images below to make larger and to print off.

Black & White Template


Black & White Template


Color Template


Color Template


Step 1


Print out template.


Print out template.


Step 2


Cut on solid lines.


Cut on solid lines.


Step 3


Fold on dotted lines.


Fold on dotted lines.


Finished flower stand


Put a flower in the hole.  And, that’s it…. you just finished making your flower stand for Mother’s Day.  Present this flower stand and flower to your Mother for Mother’s Day…. she is sure to love it!!

Technorati Tags: , , , , , , , , , , ,

How to Make Cone May Baskets

I have a fun craft for you that will totally get you in the Spring mood.  I’m going to show you how to make a Cone May Basket.  May is all about the Spring flowers.  Well, imagine how beautiful a basket will be filled with some of those magnificent flowers.  Or, perhaps you want to give this Cone May Basket to someone special…. well, why not fill it with candy.  The receiver will surely love it!!  Either way this Cone May Basket will surely be enjoyed.  So, grab the materials needed and let’s get started.

Check out our other Spring Crafts.


How to Make Cone May Baskets


Materials Needed

Printer

Paper

Scissors

Crayons or Markers

Paste

Items to Fill the Basket With


Click on template images below to make larger and to print.

8×11 Template


May Basket Template 8x11


Larger Template


May Basket Larger Template


Step 1


Print out template.


Print out template.


Step 2


Cut out pattern.


Cut out pattern.


Step 3


Decorate paper.


Decorate paper.


Step 4


Fold to look like image above.  Paste the tab to the other edge.


Fold to look like image above.  Paste the tab to the other edge.


Step 5


Cut a long strip of paper and use for the handle.


Cut a long strip of paper and use for the handle.  Paste the handle.


Step 6


Fill with flowers or treats.


Fill with flowers or treats.  Now your basket is finished.  What did you fill your basket with?  Are you keeping it for yourself or are you giving it away as a gift this May?  Let me know in the comments below.

Technorati Tags: , , , , , , , , , , , ,

How to Make a May Basket

I have a fun and easy craft for you today.  In this post I’m going to show you how to make a May Basket.  This craft is a great craft for even the youngest of crafters as we will be using a template for this craft.  Simply print out the template, cut, fold and glue and that’s it.  Of course, you are going to want your May Basket to be pretty so make sure to color and decorate it the way you see fit.  So, grab the materials needed for this craft and let’s get started.

Check out our other Spring Crafts.


How to Make a May Basket


Materials Needed

Printer & Paper

Scissors

Markers or Crayons

Paste


Click on the template images below to make larger and to print.

8×11 Size Paper

May Basket Template


Larger Paper

May Basket Template Large


Step 1


Print out template.


Print out template.


Step 2


Cut out the pattern on the black lines.


Cut out the pattern on the black lines.


Step 3


Decorate the basket.


Decorate the basket.


Step 4


Fold on the dotted lines.  Paste edges.


Fold on the dotted lines.  Paste edges.

You finished your May Basket….. great job!!  Now, fill your basket with something for Spring.  How about fill it with some beautiful flowers…. you can’t get more Spring than that.

Technorati Tags: , , , , , , , ,

How to Make Drinking Straw Flowers

I have a fun craft for you today.  In this post I will show you how to make Drinking Straw Flowers.  The supplies are for just one flower, but make a whole bunch and you have yourself a bouquet.  They would look fun and festive this Spring in a vase or pot.  Any age child will enjoy making these flowers even the youngest of crafters.  So, grab the materials needed and let’s get started with this craft.

Check out our other Drinking Straw Crafts.


How to Make Drinking Straw Flowers


Materials Needed

Drinking Straw

Scissors

Green Pipe Cleaner

Colored Pom Pom

Glue


Step 1


Cut the end of the straw about 1/2 inch down.


Cut the end of the straw about 1/2 inch down.  Do many of these cuts.


Step 2


Cut a bit down from the slits you made.


Cut a bit down from the slits you made.


Step 3


Spread out petals.  Push green pipe cleaner up thru bottom.


Spread out petals.  Push green pipe cleaner up thru bottom.


Step 4


Bend green pipe cleaner so it won't fall out of flower.


Bend green pipe cleaner so it won’t fall out of flower.  Then glue colored pom pom in center.


Finished Drinking Straw Flowers


And, there you have it…. you just finished your Drinking Straw Flower.  How did it turn out for you.  Now, make a few and put together a beautiful bouquet of Drinking Straw Flowers.

Here is our video on how to Make Drinking Straw Flowers.

Technorati Tags: , , , , , , , , , ,

How to Make Egg Carton Tulips for Spring

I have a fun and creative Spring craft for you today.  I’m going to show you how to make Egg Carton Tulips for Spring.  This craft is a great way to use up all those egg cartons you have laying around after Easter.  Nothing like recycling items and using them to create something beautiful.  And these tulips are no exception….. they come out looking so colorful.  Just the perfect craft to make and give to you Mom or Grandma to help them celebrate Spring.  They will surely love this item….. so let’s get started.

Check out our other Spring Crafts.


How to Make Egg Carton Tulips for Spring


Materials Needed

Egg Carton

Scissors

Different Color Paints

Pipe Cleaners

Tissue Paper same Color as Paint

Green Construction Paper

Pot full of Dirt


Step 1


Cut out egg carton cups so they look a bit like this.


Cut out egg carton cups so they look a bit like this.  Cut the 4 corners like above.


Step 2


Paint egg cups beautiful colors.


Paint egg cups beautiful colors.


Step 3


Poke hole in bottom of egg cups.


Poke hole in bottom of egg cups.  Stick pipe cleaner up this hole.


Step 4


Put a small square of tissue paper into the egg cup and let pipe cleaner push thru tissue paper.


Put a small square of tissue paper into the egg cup and let pipe cleaner push thru tissue paper.  Bend pipe cleaner to keep it on.


Step 5


Cut out a green leaf and stick it on bottom of pipe cleaner.


Cut out a green leaf … poke a hole in it… stick it on bottom of pipe cleaner.


Step 6


Stick pipe cleaners in vase full of dirt


Stick pipe cleaners in vase full of dirt … and leaves will stay on and flowers will stand up tall.  Give to Mom or Grandma.

Technorati Tags: , , , , , , , , , ,

How to Make a Clothespin Butterfly

Spring is right around the corner…. it is literally days away.  In honor of Spring today I’m going to show you how to make a Clothespin Butterfly.  This craft is super simple, but it is equally that much fun too.  Make a few of these Clothespin Butterflies and decorate your house or your entire bedroom.  These Clothespin Butterflies when hung up are sure to get you in the Spring mood.  So, grab the materials needed and let’s get started.

Check out our other Spring Crafts.


How to Make a Clothespin Butterfly


Materials Needed

Paper

Clothespin

Pencil

Scissors

Crayons or Markers

Glue

Pipe Cleaner


Step 1


Fold paper.


Fold paper.


Step 2


Draw butterfly by drawing a number 3 for each wing.


Draw butterfly by drawing a number 3 for each wing.


Step 3


Cut it out.


Cut it out.


Step 4


Now color in butterfly on both sides.


Now color in butterfly on both sides.


Step 5


Paste onto clothespin.


Paste onto clothespin.


Like this.


Like this.


Step 6


Cut pipe cleaner in half and push 2 in between paper and clothespin for antennae.


Cut pipe cleaner in half and push 2 in between paper and clothespin for antennae.

Now your Clothespin Butterfly is all finished.  Didn’t it turn out adorable?  Make a few and decorate your house this Spring.  These butterflies are sure to get you in the Spring spirit.

Technorati Tags: , , , , , , , , ,

How to Make a Nature Treasure Bowl

Mother nature is absolutely beautiful….. just breathtaking.  Did you ever wish you could hold some of nature in a jar so you can look at it whenever you want?  Well, today I’m going to show you how to do just that.  In this post I’m going to show you how to make a Nature Treasure Bowl.  Simply take a walk in a park or in the woods and collect some of the things you find along the way like acorns, stones, pine cones…. whatever you want to place in a jar.  So, let’s get started.

Laura from Dacian Moon Handmade will show you how to make this decorative bowl step by step.


Materials Needed

– transparent bowl
– moss – or you can use decorative green scented sand from the store, like me.
– 2 acorns
– 2 stones
– 1 pine cone
– 1 little twig


Step 1

Take the transparent bowl …


… and place the moss / green sand in it (about a half of bowl)


Step 2

Let’s start with the twig.


It should be in the middle and we’ll decorate around it.


Step 3

Place the stones on the sides of the twig.


Step 4

Add the acorns…


And in the middle of it place the pine cone.


Now it looks complete. You have a little piece of the woods in your home.


Feel free to use your own creativity to make your Nature Treasure Bowl how you see fit.  You can even do this project using normal sand, shells, starfish… to bring the sea home to you.

Technorati Tags: , , , , , , , , , , ,

How To Make a Fresh Flower Bracelet

Spring is so close you could almost taste it.  And, with that being said I thought we would celebrate Spring with doing a craft that is totally about flowers.  Today I’m going to show you how to make a Fresh Flower Bracelet.  If you would prefer you could make this into a garland by making the Fresh Flower bracelet even longer.  The choice is yours.  I used the Temple Flower for this craft.  Fresh flowers look best.  So, let’s get started.

Check out our other Spring Crafts.


Materials Needed

8-10 pieces of fresh flowers (per bracelet, more for garland)
string
needle (medium hole)
scissors


Step 1

Clean flowers, make sure bugs or insects are not present. You do not necessarily need to wash them.


Step 2

Place string inside the needle hole and poke it inside the flower, with its petals facing towards you.


Step 3

With the needle point slightly out on the back, gently pull it out and do the same procedure until the desired length.


Step 4

Check length if it is enough to cover the wrist. With a scissors, cut the string.


Step 5

Make a knot to securely tie both ends. Adjust accordingly.

And, your gorgeous Fresh Flower Bracelet is complete.  Doesn’t it look absolutely beautiful…. and if you used fresh flowers like I did it should smell equally lovely.  Enjoy!!

Technorati Tags: , , , , , , , , , ,

How to Make a Sunflower Full of Seeds

Spring is literally right around the corner.  And, I thought since Spring is almost here that we could make a beautiful sunflower full of seeds to hang up in your house to get you in the Spring spirit.  If you are feeling a bit of the early spring blah’s, or simply want an easy craft to do with your children, then this is the perfect craft for you.  The finished sunflower was made by a 4 year old so this is an excellent preschool craft.  So, grab the materials needed and let’s get this fun Spring craft started.

Check out our other Spring Crafts.


sunflower-finished


Materials Needed

  • Construction paper (brown, yellow (I used light yellow), green)
  • Scissors
  • White Glue
  • Seeds (I used a mixed seed but you can use sunflower seeds only)
  • Small Plate (to create a circle)
  • Markers


supplies


Step 1

After you have gathered your supplies, place the plate on the brown construction paper.  If you have a compass, you can use that but many times, I find that people don’t have some things handy.  Using a marker, trace around the plate to make a circle.  Cut out the circle and set aside.


circle


Step 2

With the yellow paper, cut out small finger shaped (or petal shaped) strips with a rounded edge on the top.  Cut about a dozen of the shapes and set aside for later. If your child is skilled at cutting, you can draw out the shapes and then have her cut them for you.


Sunflower Leaves


Step 3

Draw the stem and leaves in the green construction paper and either cut it out yourself or have your child cut it.


sunflower-stem


Step 4

Once you have everything cut out, it is time to assemble the sunflower.  Start by gluing the “petals” around the outer edge of the circle.  Once your child has placed all the petals, have them place a small dot of glue onto the front of the stem and then attach it to the back of the sunflower.


supplies-2


Step 5

Spread glue to the center of the sunflower on the front and then spread seeds across the glued surface.  Tap off the excess and then lay it flat to dry.


seeds


Once the artwork is dry, you can hang it on the wall or in a window to bring a bit of sunshine into your house…. even if it is raining outside.  Enjoy!!

Technorati Tags: , , , , , , , , , , ,

How to Make a Leaf Print Picture

Spring will be here before you know it.  And this activity is a great excuse to spend some time outdoors.   With this activity you will need to go outdoors and collect leaves of different shapes and sizes.  You will paint them and use them as a stamp to create a picture of your choosing.  This craft is a lot of fun and the cool part is that no Leaf Print Picture will ever be the same.  Use your creativity to paint a bunch of different pictures.  So, grab some leaves and let’s get started.

Check out our other Garden & Plant Crafts.


Materials Needed

Leaves

Tempera paints

Paintbrush

Paper


Step 1

Collect leaves of different shapes and sizes.  Arrange them to form a design that you like.


Step 2

Apply paint on the underside of a leaf.


Step 3

Press it on the paper to form a print.


Step 4

Print more leaves similarly to form a design.


Step 5

Add a border and other details.


And, there you have it….. now, put it up on your wall and celebrate the coming of Spring!!  How did your Leaf Print Picture turn out?  Let me know in the comments below.  And, make sure to take a picture of it and add that to the comments as well…. I’d love to see it.

Technorati Tags: , , , , , , , , , ,

How to Make Crepe Paper Flowers

Crepe paper flowers are very beautiful, but usually require a lot of skill to make. But here’s a type of crepe paper flowers that are easy to make and look very pretty.   You don’t have to use the colors I did…. instead pick out a bunch of Spring colors to get in the Spring spirit.  After all, Spring will be here in just a couple of weeks.   These Crepe Paper Flowers are perfect for an upcoming party…. or better yet just decorate your child’s room with beautiful colors.  Either way…. let’s have fun making this craft.

Check out our other Crepe Paper Crafts.


Image093


Materials Needed


Crepe paper

Black color paper

Pipe cleaners- brown or green

Scissors

Ruler


Image091


Step 1

Cut out a piece of crepe paper about 15 inches  long and 10 inches wide. Make sure that the creases are from top to bottom along the width of the paper as shown.


Image082


Step 2

Fold the paper into half as shown.


Image079


Step 3

Cut out pieces of paper as shown (about 1 inch wide)


Image081


Image080


Step 4

Cut out a square of black paper, each side measuring about 1 inch. Place a small ball of paper inside it as shown.


Image084


Step 5

Use the paper to cover the ball and form a shape as shown.


Image085


Step 6

Arrange 5- 6  flower petals and black center like this. Hold it all together in your hand to arrange it. Make sure each petal is about 1.5 in long above the place you are holding it.


Image086


Step 7

Hold the bottom together and wind the pipe cleaner around it a few times as shown.


Image088


Step 8

Fold the pipe cleaner back to make a thick stem.

Fold each petal outwards.

Use your fingers to stretch the end of each petal, making it wider and curving it outward


Image092


Step 9

Make a bunch of flowers like this and use it to decorate your house this Spring.


Image093


And, there you have it….. you just completed making a bunch of crepe paper flowers.  Great job!!  Now, you are ready to decorate for a party this Spring…. or better yet just decorate the child’s bedroom with beautiful Spring color flowers…. it will be beautiful.

Technorati Tags: , , , , , , , , , , ,

How to Make a Miniature Garden Craft

We are right smack in the middle of Winter…. and if you are anything like me you are missing Spring pretty badly about now.  Well, I have a way to bring a little bit of Spring into your house.  Today I’m going to show you how to make a Miniature Garden for your house.  We are going to build this miniature garden in an ice cube tray.  So, ask your Mom or Dad if they have an extra ice cube tray for you to borrow.   You can follow my miniature garden step-by-step or you can be creative and come up with your own variations.  Either way….. let’s get started.


Materials Needed

Ice cube tray

Popsicle sticks

Twigs

Craft paper

Crepe paper- green

Cellophane paper/ transparent plastic

Scissors

Tape


Step 1

Cut bits of blue paper and use it to line a few cubes to make a pond.


Step 2

Cut a few pieces of cellophane paper and put it in the cubes. Seal the top with a layer of tape to give it a shining top.


Step 3

Take brown and black paper and make small balls. Fill up a few cubes to make a rockery.


Step 4

Cut out strips of green crepe paper and make slits on the top as shown and put them in the rest of the cubes for grass. Cut wider strips at the back to make taller grass.


Step 5

Cut out outlines of trees and tape the back to a Popsicle stick to make trees. Tape them to the edge of the cubes.


Step 6

Cut out flowers and tape them to the back of twigs and tape these to the sides of the cube.


Step 7

Your garden is ready.


And there you go…. you have just finished your very own miniature garden craft.  You now have a little touch of spring for your house.  Put it on a window sill where you can see it often…. it will remind you that Spring is on its way.

Technorati Tags: , , , , ,

How to Make Wallpaper Wax Flower Sculptures

This craft is all about taking ugly wallpaper and transforming it into beautiful 3-dimensional flowers. This craft only has 3 steps and is pretty simple to complete once you get the hang of it. You will need an adult, such as mom or dad, to assist you with dipping the wallpaper flower structures into hot wax. But other than that, you can complete these on your own.

How to Make Wallpaper Wax Flower Sculptures


How to Make Wallpaper Wax Sculptures


CRAFTS MATERIALS NEEDED

Flowers cut from Wallpaper

Melted candles or parafin wax (adult supervision / assistance needed)

2 Pronged Paper Fasteners

MAKING THE WAX SCULPTURES

Step 1


wallpaper-wax-sculptures-01


Cut out flower cluster from wall paper, as in Figure 1.

Step 2


wallpaper-wax-sculptures-02


Cut out several single flowers of the same design. Cut hides of flower petals into center, as shown by broken line in Figure 2.

Step 3


wallpaper-wax-sculptures-03


With a two-pronged paper fastener, attach single flowers to center flower in flower cluster. (Figure 1) Bend petals of top flowers upward.

An adult should do this next part. Ask an adult to dip assembled flower into melted wax. These flower. will float, as in Figure 3.

Technorati Tags: , , , , , , , ,