How to make a Painted Stone or Rock 4th July Paper Weight or Decoration

Here is a fun way to celebrate America’s Independence Day – Find a nice flat Rock and paint it in red, white, and blue. Laura from Dacian Moon Handmade  will show you, step by step, how to make this lovely stone decoration.

How to make a Painted Stone or Rock 4th July Paper Weight or Decoration


How to make a Painted Stone or Rock 4th July Paper Weight or Decoration


CRAFTS MATERIALS NEEDED:

– rounded stone
– red, white and blue paint
– pencil
– toothpick
– paintbrush


IMG_5961


Step 1.

We begin by drawing the desired shape on the stone with a pencil.


IMG_5962


We draw a star, like this.


IMG_5963


Step 2.

Fill the star with blue paint…


IMG_5964


… like this.


IMG_5965


Color the rest of the stone with white.


IMG_5966


Like this.


IMG_5967


Next, draw the red lines around the star.


IMG_5968


It will look like this.


IMG_5969


Step 3.

Using the toothpick and white paint, write “4 July” on the star.


IMG_5970


Let it dry well.


IMG_5971


Now you have a beautiful 4th of July decoration…you can even use it as a paper weight. Or you can put it in front of your garden as a patriotic gesture.

Technorati Tags: , , , , , , , , , ,

How to Make Gourd Rattles and Maracas

I have an awesome fall craft for you today.  In this post I’m going to show you how to make Gourd Rattles and Maracas.  When you fill these gourds with pebbles they make the most playful sounds.  It is a festive way to use these gourds this fall season.  The kids will love playing with these noise makers…. Not to mention the great fun they will have making this craft.  So, grab the materials needed and let’s get started.

Check out our other Fall Crafts.


How to Make Gourd Rattles and Maracas


Materials Needed

Gourds (2 Round or 1 Oblong)

Large Bowl & Water

Awl (Parental Supervision)

Pebbles

Paper

Glue

2 Sticks (for Round Gourds)

Acrylic or Tempera Paints

Paintbrush

1/2 Glue & 1/2 Water Mixture


Step 1


Soak the dry gourd for 24 hours.


Soak the dry gourd for 24 hours.


Step 2


Using an Awl.... punch a hole in the gourd.


Using an Awl…. punch a hole in the gourd.  (Parental help needed for younger kids.)


Step 3


Shake out seeds.


Shake out seeds.


Step 4


Drop in pebbles.


Drop in pebbles.


Step 5


Glue paper over the hole.


Glue paper over the hole.


For Round Gourds

Step 6


Punch holes in both ends.  Shake out the seeds.


Punch holes in both ends.  (Parental Supervision)   Shake out the seeds.


Step 7


Put stones in the gourd.  Insert stick.


Put stones in the gourd.  Insert stick.


Step 8


Paint bright designs with acrylics or tempera paints.


Paint bright designs with acrylics or tempera paints.  Let dry.  Make a mixture of half glue and half water.  Brush it over gourd.  Let dry.  Re-apply.


And, there you have it…. you have a gourd rattle or gourd maracas.  What did you decide to make?  Let me know in the comments below.  And, don’t forget to take a picture of your finished gourd craft…. add it to the comment too.  I’d love to see it.

Technorati Tags: , , , , , , , , , , , , , , , , ,

How to Make Crepe Paper Mache Rock Sculptures

HAVE you ever wished you could suggest a use for the interesting stones that children bring home? Here is an idea. By adding crepe-paper mache to these rocks, the children can produce interesting creatures of the imagination. These can be used for paperweight gifts, but the experience of making them has its own reward. With crepe-paper mache children can make rocks into birds, animals, vehicles, fruit, vegetables, holiday novelties.  Sounds fun, right?  Sure does.  So, let’s get started.

Check out our other crafts made from stones and rocks.


How to Make Crepe Paper Mache Rock Sculptures


Materials Needed

Crepe Paper of Different Color

1 Cup Measuring Cup

Bowl

Water

Mixing Spoon

Flour

Salt

Rock


Step 1


Cut up crepe paper into tiny pieces.


Cut up crepe paper into tiny pieces.


Step 2


Make about one cupful of crepe paper.


Make about one cupful of crepe paper.


Step 3


Add enough water to cover paper... soak overnight.


Add enough water to cover paper… soak overnight.


Step 4


Mix and rub wet paper into into fine pulp.


Mix and rub wet paper into into fine pulp.


Step 5


Mix in 4 or 5 tablespoons of flour and 2 tablespoons of salt.


Mix in 4 or 5 tablespoons of flour and 2 tablespoons of salt.  Work until texture of clay.  Add more flour or salt as needed.  Make a different batch for each color.


Step 6


Use the mixture as if it were clay.


Use the mixture as if it were clay.  Use rock as base, and crepe clay as head, wings, feet, tails, or whatever else your sculpture needs.  It will dry as hard as the rock.


Here are more ideas


Here are some more ideas.


And, there you have it.  A great way to mold many different items simply by making Crepe Paper Mache Rock Sculptures.  What did you land up sculpting?  Let me know in the comments below.  And, don’t forget to take a picture of your item as well…. you can add the picture to the comment.  I’d love to see it.

Technorati Tags: , , , , , , , ,

How to Make a Nature Treasure Bowl

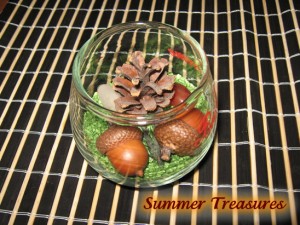
Mother nature is absolutely beautiful….. just breathtaking.  Did you ever wish you could hold some of nature in a jar so you can look at it whenever you want?  Well, today I’m going to show you how to do just that.  In this post I’m going to show you how to make a Nature Treasure Bowl.  Simply take a walk in a park or in the woods and collect some of the things you find along the way like acorns, stones, pine cones…. whatever you want to place in a jar.  So, let’s get started.

Laura from Dacian Moon Handmade will show you how to make this decorative bowl step by step.


Materials Needed

– transparent bowl
– moss – or you can use decorative green scented sand from the store, like me.
– 2 acorns
– 2 stones
– 1 pine cone
– 1 little twig


Step 1

Take the transparent bowl …


… and place the moss / green sand in it (about a half of bowl)


Step 2

Let’s start with the twig.


It should be in the middle and we’ll decorate around it.


Step 3

Place the stones on the sides of the twig.


Step 4

Add the acorns…


And in the middle of it place the pine cone.


Now it looks complete. You have a little piece of the woods in your home.


Feel free to use your own creativity to make your Nature Treasure Bowl how you see fit.  You can even do this project using normal sand, shells, starfish… to bring the sea home to you.

Technorati Tags: , , , , , , , , , , ,

How to make a Pet Rock

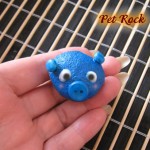
Pet Rocks became popular in the 1970’s.  It would be our equivalent of the virtual pet.  It really doesn’t do much.  It sits and keeps you company.  But, one thing is for sure…. they are always super cute.  Today I’m going to show you how to make your very own Pet Rock.  You don’t have to follow the craft word-for-word if you don’t want to…. feel free to use your own imagination to make your Pet Rock however you see fit.

Laura from Dacian Moon Handmade will show you how to make your Pet Rock.


CRAFT MATERIALS NEEDED:

– stone
– acrylic paints
– paintbrush
– a button
– two plastic antennas (or anything you want to use – you can make ears, horns, hair …)
– craft glue


Step 1

Wash the stone and wait for it to dry… That way the paint will adhere better.

Then add glue where you want to place decorations.

Place button in the middle for the snout.


Take the antennas…


… and place them on their place.


Step 2

Let the glue dry.


Step 3

Choose the color you want your pet to be. I went with blue.


Carefully cover all with paint – including the antennas and snout…


… like that.


Step 4

Next, paint its eyes and make him blush.

I use night glow paint for the eyes so I can see him in the dark  too.


There you have it.  Easy Peasy Lemon Squeezy.  How did you decide to make your Pet Rock?  Let me know in the comments below.  Don’t forget to add your picture in the comment, so I can see how your Pet Rock turned out.

Technorati Tags: , , , , , , , , ,

How To Make A Blarney Stone Craft for Saint Patrick’s Day Celebrations

Blarney Stones are for the luck of the Irish and this Blarney Stone is super simple to make too. St. Patrick’s Day is coming up in the middle of March so it is time to star thinking about the arts and crafts projects that you can make to celebrate the grand occasion. Have fun.

You Might Like Our Other St. Patrick’s Day Crafts Ideas


How To Make A Blarney Stone Craft for Saint Patrick's Day Celebrations


How To Make A Blarney Stone Craft for Saint Patrick’s Day Celebrations

Blarney Stone Crafts Materials and Supplies

* Smooth river rock or other smooth rock, medium sized
* Green paint
* Paint brush
* Glue
* Googly eyes
* Green glitter
* Sequins or jewels, small sized
* Black marker

Blarney Stone Instructions

Step 1.


Wipe the rock off to remove any debris that might be on it.


Wipe the rock off to remove any debris that might be on it.


Step 2.


Paint the entire rock green with the green paint.


Paint the entire rock green with the green paint. While the paint is wet, sprinkle on a bit of the green glitter.

Let the rock dry completely.


Step 3.


While the paint is wet, sprinkle on a bit of the green glitter.


Once dry, glue on the googly eyes…or paint eyes.


Step 4.


Let the rock dry completely.


Draw a letter ‘J’ for the nose.

Draw a smiley face by drawing a letter ‘u’ for the mouth….and draw a curved line on both sides of the ‘u’.


Step 5.


Once dry, glue on the googly eyes and use the marker to dry eyebrows.


Paint an orange beard on it.


You Might Like Our Other St. Patrick’s Day Crafts Ideas

Technorati Tags: , , , , , , , , , , ,

Thanksgiving Greeting on Pebbles & Stones Table Decoration Craft for Kids


Image133


Thanksgiving Greeting on Pebbles & Stones Table Decoration Craft for Kids


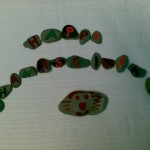
Have a free afternoon? Go out for a walk, pick up some pebbles them and use them to make a thanksgiving greeting. Its so easy that even pre- school kids can do it!! This crafts activitiy would make a great Thanksgiving table decoration or even centerpiece. Below you will find instructions for this Thanksgiving table decoration.

Materials required:

Poster paints

Pebbles

Paint brush


Image127


Step 1

Collect pebbles of a similar size.


Image126


Step 2

Arrange them the way you want. Paint a letter on each pebble.

On some you can paint the letter straight like this.


Image136


Step 3

On others, you can first do a background colour, let it dry, and then paint a letter like this.


Image134


Step 4

You can also paint pictures or faces like this.


Image138


Step 5

Allow it all to dry. Place it in your backyard, on your fireplace or any other place where people can see it.


Image133


MORE THANKSGIVING ARTS AND CRAFTS IDEAS BELOW

It is almost Thanksgiving time so check out our Thanksgiving Coloring Pages & Thanksgiving Crafts for Kids Page to find some great turkey and thanks-giving crafts project ideas for kids to celebrate Thanksgiving such as

Autumn / Fall Crafts ..
Cornucopia Crafts
..
Indian Corn Crafts
..
Pilgrim Crafts
..
Preschoolers & Toddlers Thanksgiving Crafts
..
Scarecrow Crafts
..
Thanksgiving Coloring Pages & Printouts
..
Thanksgiving Decorations Crafts
..
Thanksgiving Table Decorations Crafts ..
Thanksgiving Turkey Crafts ..
Thanksgiving Worksheets & Printouts

Technorati Tags: , , , , , , , , , , , , , , , , , ,