How to Make a Stand-Up Dress-Up Doll

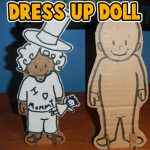
When I was a little girl I would have so much fun dressing up paper dolls.  You know…. the paper dolls you buy in a book at the store where you cut out the clothes to put on them?  I loved them.  I used to spend hours dressing up the paper dolls and changing their clothes over and over again.  Well, today I’m going to show you how to make with your children a stand-up dress-up doll.  I got the idea from a post I saw on another site ( ikatbag.com). You are going to make the doll out of cardboard… it is much stiffer and will hold up to many, many clothes changes.  Also, in this craft you will find 4 different template sheets of different accessories for your dress-up doll.  That means hours of fun for you and your children dressing up the doll.  So, grab the few materials needed and let’s get started.

Check out our other Doll Making Crafts.


How to Make a Stand-Up Dress-Up Doll


Materials Needed

Printer & Paper

Scissors

Black Marker

Cardboard

Paste or Glue (optional)

Glue Dots


Click on template images below to open and to print off.

Accessories Template 1


Accessories Template 1


Accessories Template 2


Accessories Template 2


Accessories Template 3


Accessories Template 3


Accessories Template 4


Accessories Template 4


Stand Up Dress Up Doll Template


Stand Up Dress Up Doll Template


Step 1


Print out template.  Cut it out.  Then trace it or paste it onto cardboard.


Print out template.  Cut it out.  Then trace it or paste it onto cardboard.


Step 2


Draw a face on the doll.


Draw a face with ovals for eyes.  A letter “C” for the nose.  A curved line for the smile.


Step 3


Cut around the figure.


Cut around the figure.


Step 4


 Cut two cardboard rectangles out.  Cut slits as the image shows you.


Cut two cardboard rectangles out.  Then cut the following slits out…. On one cardboard cut a slit on the top and a slit on the bottom.  On the other cardboard rectangle cut two slits on the top.


Step 5


Now put the cardboard rectangle's slits into the doll's feet slits.


Now put the cardboard rectangle’s slits into the doll’s feet slits.


Step 6


Turn doll around.  Put these two slits into each other.


Turn doll around.  Put these two slits into each other.  One rectangle has a slit on the bottom and one has a slit on the top.


It should look like this.


Like this.


Here is a different view.


Here is a different view.


Step 7


It should stand.


It should stand.


Step 8


Print out accessories.


Print out accessories.


Step 9


Cut them out.


Cut them out.


Step 10


I used glue dots to stick the clothes on the doll.


I used glue dots to stick the clothes on the doll.  They stay sticky time after time of changing clothes.


Here are some examples of how to dress up your new stand up dress up doll.

Example 1


Example 1


Example 2


Example 2


Example 3


Example 3


Example 4


Example 4


Example 5


Example 5


I bet you and your children had fun making these stand up dress up dolls….. but wait till you see the amount of fun they have dressing them up too.  They will love it.  I gave you 5 examples of ways to dress up your doll…. How many other ways can your child come up with?  Have fun!!

Technorati Tags: , , , , , , , , , , , , , , , , , ,

How to Make a Christmas Paper Toy

I have a fun Christmas craft for even the youngest of crafters.  Today I’m going to show you how to make a Christmas Paper Toy.  With just some paper, printer, scissors and a few other materials you and your child will be able to make this cute Christmas paper toy that they will enjoy playing with…. just as much fun as they will have making the craft.  If you want, feel free to color the templates before cutting them out to add even more fun to this craft.  So, let’s get started.

Check out our other Christmas Crafts.


How to Make a Christmas Paper Toy


Materials Needed

Printer

White Paper

Green Paper

Scissors

Tape

Pen

Glue

Cereal Box


Click on the template images below to open a new page and to print.

Christmas Background Template


Christmas Background Template


Christmas Presents Template


Christmas Presents Template


Christmas Table Template


Christmas Table Template


Christmas Characters Template


Christmas Characters Template


Christmas Tree Extras Template


Christmas Tree Extras Template


Step 1


Print templates


Print Templates.


Step 2


Cut out items from template.


Cut out items from template.


Step 3


This is the background.


This is the background.


Bend both dotted lines away from you.  Crease.


Bend both dotted lines away from you.  Crease.


Now fold the next line (solid) towards you.


Now fold the next line (solid) towards you.  Crease.  Do this on both sides.


Fold both of these tabs away from you so it acts as a stand.


Fold both of these tabs away from you so it acts as a stand.


Cut slits.


Cut slits.


Fold tabs up.


Fold tabs up.


Place the paper in the slits on both sides.


Place the paper in the slits on both sides.


Step 4


 Place each character in the stands.


Place each character in the stands.


Step 5


To make the Christmas tree... get some green paper and... Fold green paper in half twice.


To make the Christmas tree… get some green paper and… Fold green paper in half twice.


Use the template to... draw half of the tree along fold.


Use the template to… draw half of the tree along fold.


Cut both trees apart between both of them.


Cut both trees apart between both of them.


Cut down center... one on top of one and one at bottom of the other.


Cut down center… one on top of one and one at bottom of the other.


Now use the slits to slide the tree together to look like the tree above.


Now use the slits to slide the tree together to look like the tree above.


Tape some seams together.  Draw on tree if you want to.


Tape some seams together.  Draw on tree if you want to.


Write family member's names on ornaments or draw a design on each one.


Write family member’s names on ornaments or draw a design on each one.


Glue both stars together and put on top of tree.  Glue ornaments on tree.


Glue both stars together and put on top of tree.  Glue ornaments on tree.


Step 6


Cut out each of the legs.


Cut out each of the legs.


Glue on cereal box cardboard.


Glue on cereal box cardboard.


Cut out and fold and crease very well.


Cut out and fold and crease very well.


Cut out cardboard long and wide enough for legs.


Cut out cardboard long and wide enough for legs.


Glue on white paper like this.


Glue on white paper like this.


Have adult cut slits in the top of the table.


Have adult cut slits in the top of the table.


Put the food tabs in the slit.


Put the food tabs in the slit.


On the bottom of table push tabs in opposite directions.


On the bottom of table push tabs in opposite directions.


Step 7


 Cut out presents.


Cut out presents.


Fold on dotted lines and cut on slits.


Fold on dotted lines and cut on slits.


Put tab in slit.


Put tab in slit.


Completed present.


Completed present.


Step 8


Finished.


Finished.

Awesome job!!  You just finished making your Christmas Paper Toy.  Have fun playing with it…. Christmas will be here in no time.

Technorati Tags: , , , , , , , , , , , , , , , ,

How to Make a Hanukkah Dinner Paper Craft Toy

Hanukkah will be here before you know it.  After all, Hanukkah begins on the evening of December 8th.  Today I will show you how to make a craft that is perfect for Hanukkah.  I’m going to show you how to make a Hanukkah Dinner Paper Craft Toy that any child will enjoy playing with.  Your children will enjoy cutting out all the characters and images from the template…. folding them and gluing them together.  Even the youngest of crafters will enjoy this craft…. with just a little help from an adult.  So, let’s get started.

Note to everyone…I know in the picture the menorah only has 7 candles…I used the wrong type of menorah. A Hanukkah menorah has 9 candles…I updated it in the template. Thank you!

Check out our other Hanukkah Crafts.


How to Make a Hanukkah Dinner Paper Craft Toy


Materials Needed

Printer & Paper

Scissors

Glue


Click on template images below to open a new window and to print off.

Hanukkah Paper Characters Template


Hanukkah Paper Characters Template


Hanukkah Presents Template


Hanukkah Presents Template


Hanukkah Room Template


Hanukkah Room Template


Hanukkah Table & Menorah Template


Step 1


 Print out templates.


Print out templates.


Step 2


Fold the background scene.


Fold the background scene.


Step 3


Cut out characters and rectangles.


Cut out characters and rectangles.


Cut slits.


Cut slits.


Fold tabs up.


Fold tabs up.


Put a character in the slits... This is a stand for the character.


Put a character in the slits… This is a stand for the character.


Step 4


Cut out table, rug and menorah.


Cut out table, rug and menorah.


Fold on dotted lines.  Cut on slits.


Fold on dotted lines.  Cut on slits.


Glue together.


Glue together.


Step 5


Fold and glue together bottom of table.


Fold and glue together bottom of table.


Here it is from the side.


Here it is from the side.


Have an adult cut a slit in middle of table.


Have an adult cut a slit in middle of table.


Place menorah in the slit.


Place menorah in the slit.


Bend one tab forward and one tab back.


Bend one tab forward and one tab back.


Now the menorah should stand up.


Now the menorah should stand up.


Step 6


Cut out presents.


Cut out presents.


Fold on dotted lines and cut on slits.


Fold on dotted lines and cut on slits.


Put tab in slit.


Put tab in slit.


Completed present.


Completed present.


Step 7


Completed present.


Finished paper toy.

And there you have it…. you just made a Hanukkah Dinner Paper Craft Toy.  Enjoy it.

Technorati Tags: , , , , , , , , , , , , , ,

How to Make Paper Thanksgiving Table Toys

Many people wonder how to keep the kids at the children’s Thanksgiving table entertained.  Sure, you will have the Thanksgiving meal which will occupy them for a little bit.  But, what about all the other time they will spend at the table?  How do you keep them entertained and safe from boredom?  Well, today I have a craft for you and the children that will keep the little ones entertained.  In this post I will show you how to make Paper Thanksgiving Table Toys.  This will surely keep them happy…. for a little while anyway.

Check out our other Thanksgiving Crafts.


How to Make Paper Thanksgiving Table Toys


Materials Needed

Printer & Paper

Scissors

Tape

Glue

Cereal Box

White Paper


Click on template images below to make larger and to print.

People Template 1


People Template 1


People Template 2


People Template 2


People Template 3


People Template 3


People Template 4


People Template 4


People Template 5


People Template 5


Pilgrims Table Food Template


Pilgrims Table Food Template


Step 1


Print out the templates.


Print out the templates.


Step 2


Cut out each individual piece.


Cut out each individual piece.


Step 3


Fold on each line.


Fold on each line…


Fold like this.


Fold like this.


Step 4


Tape in back.


Tape in back.


Step 5


Now it stands.


Now it stands.


Step 6


For the two guys who have arms... glue together.


For the two guys who have arms… glue together.


Glue basket on hands.


Glue basket on hands.

Step 7


Print template.


Print template.


Step 8


Cut out each of the legs.


Cut out each of the legs.


Step 9


Glue on cereal box cardboard.


Glue on cereal box cardboard.


Step 10


Cut out and fold and crease very well.


Cut out and fold and crease very well.


Step 11


Cut out cardboard long and wide enough for legs.


Cut out cardboard long and wide enough for legs.


Step 12


Glue on white paper.


Glue on white paper.


It should look like this.


Like this.


Step 13


Have an adult cut a few slits on the table top... spaced out.


Have an adult cut a few slits on the table top… spaced out.


Step 14


Cut out bowls of food and put tabs into slit.


Cut out bowls of food and put tabs into slit.


On bottom of table push tabs in.


On bottom of table push tabs in.


It should look like this.


Like this.

Step 15


Finished Paper Thanksgiving Table Toy


And, there you go…. you just finished your Paper Thanksgiving Table Toy.  This will be perfect for the children at the Thanksgiving kids table to play with.  They will really enjoy it.

Technorati Tags: , , , , , , , , , , , , ,

How to Make Cardboard Little People Figures

Yesterday I showed you how to make a Glue Stick Man out of your recycled glue sticks.  Today I’m going to continue showing you how to make toy figures out of recycled materials.  In this post I’m going to show you how to make Cardboard Little People Figures.  Just simply use pieces of used cardboard boxes.  This craft is a great way to recycle those cardboard boxes that you would normally throw away.  These Cardboard Little People Figures are fun to make…. almost as much fun as they will be to play with.  So, let’s get started.

Check out our other Green Environmental Crafts.


How to Make Cardboard Little People Figures


Materials Needed

Thin Cardboard

Small Circles to Trace…. One Smaller than the Other (like buttons)

Pencil

Scissors

Glue

A Couple Different Colors of Paint

Button


Step 1


Trace a bunch of circles onto thin cardboard.


Trace a bunch of circles onto thin cardboard.


Step 2


The thinner the cardboard, the more circles you will need to cut.


The thinner the cardboard, the more circles you will need to cut.

Step 3


Cut them out.


Cut them out.


Step 4


Glue together all pieces.


Glue together all pieces.


Step 5


Press down until dry.


Press down until dry.


Step 6


Get a smaller circle to trace and trace a bunch of these circles.


Get a smaller circle to trace and trace a bunch of these circles.


Step 7


Glue together.


Glue together.


Step 8


Glue smaller circles on top of large circles.


Glue smaller circles on top of large circles.


Step 9


Paint it.


Paint it.


Step 10


Paint other details.


Paint other details…


Step 11


Add button or other item for hat or hair.


Add button or other item for hat or hair.


Step 12


Make them all different sizes.


Make them all different sizes.

Aren’t these adorable little people?  Make a whole family of little people figures to play with your friends.  They will surely love it.

Technorati Tags: , , , , , , , , , , ,

How to Make a Glue Stick Man out of your Recycled Glue Sticks

With all the crafts that I do  I go through a lot of glue sticks.  I always hate the idea of throwing them away…. I always try to find crafts that I can make out of recycled items.  And, glue sticks are no exception.  Here is a great craft you can make with your used glue sticks.  Today I’m going to show you how to make a Glue Stick Man out of your recycled glue sticks.  You will see what a great feeling you get from making something out of recycled materials.  Plus, you get a very cool toy man.

Check out our other Green Environmental Crafts.


How to Make a Glue Stick Man


Materials Needed

Empty Glue Stick

Glue

Paint, Paper, Foam or Felt

Black & White Paint


Step 1


Take an empty Glue Stick and peel the label off of it.


Take an empty Glue Stick and peel the label off of it.


Step 2


Glue the cap in place like this.


Glue the cap in place like this.


Step 3


Paint on clothes or glue on clothes with paper, foam or felt.


Paint on clothes or glue on clothes with paper, foam or felt.


Step 4


If painted clothes, then use black paint to outline.


If painted clothes, then use black paint to outline.


Step 5


Paint a sleeve on each side.


Paint a sleeve on each side.  Also, draw a dot for each eye.


Step 6


Draw a circle for each hand.


Draw a circle for each hand.


Step 7


Paint each hand white.


Paint each hand white.  Also, paint white buttons on the shirt.

How adorable is this little guy?  So adorable!!  Make a few of these Glue Stick people and you can have a small family.  What a great way to recycle those used glue sticks.

Technorati Tags: , , , , , , , , ,

How to Make Crepe Paper Mache Rock Sculptures

HAVE you ever wished you could suggest a use for the interesting stones that children bring home? Here is an idea. By adding crepe-paper mache to these rocks, the children can produce interesting creatures of the imagination. These can be used for paperweight gifts, but the experience of making them has its own reward. With crepe-paper mache children can make rocks into birds, animals, vehicles, fruit, vegetables, holiday novelties.  Sounds fun, right?  Sure does.  So, let’s get started.

Check out our other crafts made from stones and rocks.


How to Make Crepe Paper Mache Rock Sculptures


Materials Needed

Crepe Paper of Different Color

1 Cup Measuring Cup

Bowl

Water

Mixing Spoon

Flour

Salt

Rock


Step 1


Cut up crepe paper into tiny pieces.


Cut up crepe paper into tiny pieces.


Step 2


Make about one cupful of crepe paper.


Make about one cupful of crepe paper.


Step 3


Add enough water to cover paper... soak overnight.


Add enough water to cover paper… soak overnight.


Step 4


Mix and rub wet paper into into fine pulp.


Mix and rub wet paper into into fine pulp.


Step 5


Mix in 4 or 5 tablespoons of flour and 2 tablespoons of salt.


Mix in 4 or 5 tablespoons of flour and 2 tablespoons of salt.  Work until texture of clay.  Add more flour or salt as needed.  Make a different batch for each color.


Step 6


Use the mixture as if it were clay.


Use the mixture as if it were clay.  Use rock as base, and crepe clay as head, wings, feet, tails, or whatever else your sculpture needs.  It will dry as hard as the rock.


Here are more ideas


Here are some more ideas.


And, there you have it.  A great way to mold many different items simply by making Crepe Paper Mache Rock Sculptures.  What did you land up sculpting?  Let me know in the comments below.  And, don’t forget to take a picture of your item as well…. you can add the picture to the comment.  I’d love to see it.

Technorati Tags: , , , , , , , ,

How to Make a Cork Bunny

I have a fun and creative craft for you in this post….. today I’m going to show you how to make a Cork Bunny.  Made from a cork, toothpicks and a template this craft turns out really cute.  It is a perfect craft for Easter.  Make a few and decorate your house in time for Easter.  You will need some help from an adult as there is a part in this craft that a knife is needed.  An Adult should do this section of the craft.  So, grab the materials needed and let’s get started.

Check out our other Easter Crafts.


How to Make a Cork Bunny


Materials Needed

Cork

Knife (for adults only)

Printer & Paper

Cardboard

Scissors

Glue

Cotton Ball or Pom Pom

2 Toothpicks


Click on template image to make larger and to print.


Bunny head template


Step 1


Ask parent to cut small slit in cork for head to fit.


Ask parent to cut small slit in cork for head to fit.


Step 2


Print out bunny head or draw a small head.


Print out bunny head or draw a small head.


Step 3


Glue 1 head on to cardboard.


Glue 1 head on to cardboard.


Cut out bunny on cardboard


Cut out bunny on cardboard… turn over and paste other head on this.


Step 4


Push bunny head tab into cork slit.


Push bunny head tab into cork slit.


It should look like this.


To look like this.


Step 5


Glue on cotton ball or pom pom.


Glue on cotton ball or pom pom.


Step 6


Break 2 toothpicks in half... use each half for a leg.


Break 2 toothpicks in half… use each half for a leg.


Finished cork rabbit


Remember you can make a bunny with your own drawn head…. or use the template.

And, that’s it…. you just finished your Cork Bunny.  Doesn’t he look cute?!  Make a few and decorate your house for Easter.  Let me know how your Cork Bunny turned out… take a picture of it and leave it with your comment in the comments section below.

Technorati Tags: , , , , , , , , , , ,

How to Make Easter Standup Animals

I have a fun and easy craft for you today.  I’m going to show you how to make Easter Standup Animals.  These Easter Standup Animals are a perfect decoration for inside your house this Easter.  And, the youngest of crafters will enjoy making these as they are made from a template.  You can choose to print off the colored templates or print off the black & white templates and color them yourself.  The choice is yours.  So, grab the materials needed and let’s get started.

Check out our other Easter Crafts.


How to Make Easter Standup Animals


Materials Needed

Printer & Paper

Scissors

Glue

Crayons


Click on template images below to make larger and to print.

Baby Chick Black & White


Baby Chick Black & White


Baby Chick Color Template


Baby Chick Color Template


Baby Chick 2 Black & White


Baby Chick 2 Black & White


Baby Chick 2 Color Template


Baby Chick 2 Color Template


Bunny Rabbit Black & White


Bunny Rabbit Black & White


Bunny Rabbit Color Template


Bunny Rabbit Color Template


Step 1


Print out template.


Print out template.


Step 2


Cut the figures out.


Cut the figures out.


Step 3


If you printed out the black and white template..... color them now.


If you printed out the black and white template….. color them now.


Step 4


Paste and fold where images above tell you to.


Paste and fold where images above tell you to.  Spread paste near the top on the back of each figure, and paste them together. The bottom part should not be pasted, as it spreads apart. Fold the bases (bottoms) outwards, each side in an opposite direction.


Step 5


Then stand your figures up for Easter.


Then stand your figures up for Easter.

There you go…. you did it.  You finished making your Easter Standup Animals.  Now you are all set to begin decorating your house for Easter.  Enjoy!!

Technorati Tags: , , , , , , , , , , , , , ,

How to Make an “I Don’t Want to Stay Down” Doll

Today I’m going to show you how to make a traditional Romanian Toy.  It is called a “Hopa Mitica” Doll.  But, we will call it an “I Don’t Want to Stay Down” Doll because this doll will not stay down.  When you try to lay it down it will pop right back up.  It’s a cute, funny toy that will be a ton of fun to make…. almost as much fun as it will be playing with the Doll.  So, grab the materials needed and let’s get started with the crafting fun.

Check out our other Doll Making Crafts.

Laura from Dacian Moon Handmade will show you this craft step-by-step.


Our doll will not be made of wood, so …


Materials Needed

– round top (I use a round top from a roll-on)
– scissors
– a red marker and a black one
– 2 cloth pieces – one white or light pink for the face and one colored for the dress
– anti-shock wrap (bubble wrap)
– yarn (whatever color you want her hair to be) and needle
– 1 toothpick
– weights (could be anything heavy but small, it should stay on the bottom of the round top.)
– one piece of ribbon


Step 1

Make a ball (not perfect, of course) from the bubble wrap…


… roll up the white cloth around it…


… and tie it with a piece of yarn. This will be the head.


Step 2

Use the needle to add hair to the head, like in the picture.


Cut the yarn near the needle…


… and make a knot (or two) with the two parts of yarn.


Add as many yarn pieces until you are happy with the result. An alternate method is to glue the yarn to the head of the doll.


Step 3

Now we will place the weights in the round top. They should stay on the bottom of it. You can place there just enough weights to keep the round top up. If you will add more, the doll will not work.


Step 4

Make another ball of bubble wrap …


… and stuff it in the round top, in order to keep the weights in place.


Step 5

Place the toothpick on the lower part of the head, like in the picture.


Step 6

Roll up the rest of the bubble wrap around the toothpick…


… and fix it on top of the other bubble wrap, on the round top.


Step 7

Take the colored cloth …


… and wrap it around the doll, keeping out the head.


Step 8

Tie the cloth with the ribbon, at the base of the head. Take care to let her hair out too.


The doll will look like that.


Step 9

Using the markers, draw eyes and mouth.


And that’s it.


Now try to put her down.


She will jump up …


… waiting to play with you.


And that is how you make your “I Don’t Want to Stay Down” Doll.  Try and knock her over and see what happens…. she pops right back up again ready to play some more.  Have fun!!

Technorati Tags: , , , , , , , , ,

How to Make a Stand-up Santa Claus Paper Craft

Christmas will here before we know it.  And, with Christmas comes the fun part of decorating.  You can help your parents decorate for Christmas with this next craft.  I am going to show you how to make a Stand-up Santa Claus Paper Craft perfect for decorating for the Christmas holiday.  The cool thing is all you need is a printer, paper, scissors and a glue stick…. so let’s get started.

Check out our other Christmas Crafts.


How to Make a Stand-up Santa Claus Paper Craft


Materials Needed

Paper

Printer

Scissors

Glue Stick


Below are printable templates for this craft. Click on template image to make larger and to print.

Santa Claus Template


Santa Claus template


Hat Template


Santa Claus hat template


How To:

  1. Print out the Santa template.
  2. Cut out the items on the template.
  3. Cut out the white slits.  Fold the tabs inward.
  4. Now, dab glue stick on each of the tabs.  Glue the tabs to the inside of the Santa figure to make him a standing figure.
  5. Fold the arms in half… glue together.
  6. Place arms in the cut slits….


    Santa without his hat.


    …This is what Santa should look like so far.
  7. Print out the hat template.
  8. Cut out the hat.
  9. Fold the tabs inwards.
  10. Dab glue stick on each of the tabs.  Glue the tabs to the inside of the hat.
  11. Place Santa hat on top of Santa.


Finished Santa Paper Craft


You just finished making your Stand-up Santa Claus Paper Craft.  How did your Santa turn out?  Now you can help your parents decorate for Christmas.  Have fun!!

Technorati Tags: , , , , , , , , , , ,

How to Make Standing Ghosts for Halloween

I have a craft that kids will love to make.  It’s a Standing Ghosts craft and it is perfect for Halloween.  The craft is easy enough that in no time you could have several of these ghosts made….. ideal for decorating the House for Halloween.

Check out our other Halloween Crafts.


How to Make Standing Ghosts for Halloween


Materials Needed

Cardboard

Scissors

Clothespin

Tissues

Rubber Band or String


Step 1


Cut an oval from cardboard


Cut an oval from cardboard.


Step 2


Close the clothespin onto the bottom of the cardboard oval


Close the clothespin onto the bottom of the cardboard oval.


Step 3


Place some tissues on top of the clothespin and cardboard you made


Place some tissues on top of the clothespin and cardboard you made.


Step 4


Use a rubber band or string to form the head


Use a rubber band or string to form the head.


Finished Standing Ghosts


Wasn’t that fun to make?  I told you your kids would love making a standing ghost.  Now, make a few more and use them to decorate your house for Halloween.

Technorati Tags: , , , , , , , ,

How to Make Standing Witches for Halloween

Today we are going to be making Standing Witches for Halloween.  You can choose to either use the printable template and cardstock to make this item.  Or, if you want the craft to be a little more difficult you can use such items as yarn, sticks, construction paper and straw to make the Standing Witch from scratch.  The choice is your own.

Check out our other Halloween Crafts.


How to Make Standing Witches for Halloween


Materials Needed

Heavy Paper, Cardstock or Construction Paper

Yarn or Thread (optional)

Stick & Straw (optional)

Paste

Scissors


If you choose follow the printable template below to make the Standing Witch.

CLICK ON IMAGE TO OPEN IT UP BIGGER TO PRINT.


Printable template for standing witches


Directions:

  1. In making this standing Halloween witch, the hat and coat must be drawn on rather heavy paper for it to stand well (with normal paper, if you walk past the witches, they might blow over from the slight breeze otherwise). So you can use normal paper if you want to, but I suggest tracing the patterns onto cardstock or construction paper.
  2. As for the hair, you can either use the template provided or use yarn or thread for the hair. It could even be straw pasted on the other side of the hat to hang down. The back of the witch is shown, so that no face will be needed to be drawn. This was intentional, as younger children might get frustrated with drawing a face. Plus, I think the silhouette of the witch is quite nice to look at. If the hair is made with thread, a vertical strip of paper will be needed to fasten the hat at a proper distance from the body, so it might just be easier to use the drawing of hair or paste the thread / yarn on to the cut-out-drawn hair provided. The lower part of the hair will then be pasted on to the coat.
  3. The broom may be made either of two ways. A stick may serve as the handle with a few real broom straws tied in a bunch at the end, or the broom may merely be cut from the paper template given like the rest of the witch. It is then pasted on the other side (front side, really) so that it would seem as if the witch was carrying it in her hand.

So, as you can see you can make this Standing Witch as easy or as complicated as you would like.  This is great for all different age groups.

Technorati Tags: , , , , , ,

How to Make a Halloween Skull Mummy Figure

Today I’m going to show you how to make a Halloween Skull Mummy Figure with movable arms and legs.  This Skull Mummy is super creepy and totally perfect for Halloween.  Made with pipe cleaners and bandage tape your child is going to love putting together this creative Halloween Skull Mummy Figure.

Check out our other Halloween Crafts.


How to Make a Halloween Skull Mummy Figure


Materials Needed:

White or Orange Bead

Permanent Marker

2 White Pipe Cleaners

Self Stick Bandage Tape


Step 1


Draw ovals for eyes on a white or orange bead


Draw ovals for eyes on a white or orange bead.


Step 2


Draw a triangle nose and lines underneath


Draw a triangle nose and lines underneath.


Step 3


Draw question mark cheek bones


Draw question mark cheek bones.


Step 4


Fold two pipe cleaners in half


Fold two pipe cleaners in half.


Step 5


Now twist one of the pipe cleaners... from last step... and wrap it around the 1st pipe cleaners a few times


Now twist one of the pipe cleaners… from last step… and wrap it around the 1st pipe cleaners a few times.


Step 6


Use self stick bandage tape and wrap around legs and arms like a mummy


Use self stick bandage tape and wrap around legs and arms like a mummy.


Step 7


It should look like this


It should look like this.


Step 8


Place bead over top of pipe cleaner and then push back in bead's hole to keep on


Place bead over top of pipe cleaner and then push back in bead’s hole to keep on.


Step 9


Wrap around the chest and neck and even the head if you want


Wrap around the chest and neck and even the head if you want.


Finished Skull Mummy


Totally creepy, huh?!  I did warn you.  Don’t let the creepiness fool you though….. this Halloween craft is still a ton of fun to make.  Trust me… give it a whirl.

Technorati Tags: , , , , , , , , ,

Sheep or Lamb Stand-Up Paper Toy Model to Print Out Craft for Kids

Today, we will show you how to make some stand up paper-figure animals. This one is a standing lambs / sheep paper figure. There is only a black and white version to print out since sheep are white.


Sheep or Lamb Stand-Up Paper Toy Model to Print Out Craft for Kids


Today we will show you how to make paper lambs / sheep that can stand up on their own. You can use them as models or to play with. Click on the image below to open up a new page with the sheep picture. You should then print that page out….cut it out…and then fold on the line. It is as easy as that.

Print Out Black and White Sheep figure (for Coloring In)


Print Out Black and White Sheep figure (for Coloring In)


I hope you enjoyed this craft. If you did, visit our other Origami / Paper Folding Crafts or Printout Standing Figures

Technorati Tags: , , , , , , , , , , , , , , , , , , ,

Wolf Stand-Up Paper Toy Model to Print Out Craft for Kids

Today, we will show you how to make some stand up paper-figure animals. This one is a standing wolf paper figure. You can choose a black and white version to color in, or you can choose the one that is already colorized. Either way … have fun.


Wolf Stand-Up Paper Toy Model to Print Out Craft for Kids


Today we will show you how to make paper wolves that can stand up on their own. You can use them as models or to play with. Click on the image below to open up a new page with the wolf picture. You should then print that page out….cut it out…and then fold on the line. It is as easy as that.

Print Out Black and White Wolf figure (for Coloring In)


Print Out Black and White Camel figure (for Coloring In)


Click on the Image Above to Open up the Black and White Wolf Stand up to Print Out

Print Out Color Version


Colorized Wolf Standing Up Paper Toy to Print Out


Click on the Image Above to Open up the Colorized Wolf Stand up to Print Out


I hope you enjoyed this craft. If you did, visit our other Origami / Paper Folding Crafts or Printout Standing Figures

Technorati Tags: , , , , , , , , , , , , , , , , ,