How to Decorate a Notebook with Yarn or Crepe Paper

I have a super fun craft for you today!!  And, it’s totally perfect for back to school.  In this craft I will show you how to decorate a notebook with yarn or crepe paper.  Your notebook will be an original…. no one else will have a notebook like yours.  This craft is not only a lot of fun, but it is really simple.  Simply use crepe paper or yarn to make a one of a kind design on the front of your back to school notebook.  So, grab the materials needed and let’s get started.
Check out our other Back to School Crafts.


How to Decorate a Notebook with Yarn or Crepe Paper


Materials Needed

Yarn or Crepe Paper

Glue

Scissors

Notebook


Step 1


Put glue down where you are going to glue yarn or paper.


Put glue down where you are going to glue yarn or paper.


Step 2


Place yarn or crepe paper on glue.


Place yarn or crepe paper on glue.

And, that’s it!!  What kind of awesome design for your notebook did you come up with?  Let me know in the comments below.  And, don’t forget to take a picture of the notebook and share that too in the comment.

Here is our video on How to Decorate a Notebook with Yarn or Crepe Paper

Technorati Tags: , , , , , , , ,

How to Make Crepe Paper Mache Rock Sculptures

HAVE you ever wished you could suggest a use for the interesting stones that children bring home? Here is an idea. By adding crepe-paper mache to these rocks, the children can produce interesting creatures of the imagination. These can be used for paperweight gifts, but the experience of making them has its own reward. With crepe-paper mache children can make rocks into birds, animals, vehicles, fruit, vegetables, holiday novelties.  Sounds fun, right?  Sure does.  So, let’s get started.

Check out our other crafts made from stones and rocks.


How to Make Crepe Paper Mache Rock Sculptures


Materials Needed

Crepe Paper of Different Color

1 Cup Measuring Cup

Bowl

Water

Mixing Spoon

Flour

Salt

Rock


Step 1


Cut up crepe paper into tiny pieces.


Cut up crepe paper into tiny pieces.


Step 2


Make about one cupful of crepe paper.


Make about one cupful of crepe paper.


Step 3


Add enough water to cover paper... soak overnight.


Add enough water to cover paper… soak overnight.


Step 4


Mix and rub wet paper into into fine pulp.


Mix and rub wet paper into into fine pulp.


Step 5


Mix in 4 or 5 tablespoons of flour and 2 tablespoons of salt.


Mix in 4 or 5 tablespoons of flour and 2 tablespoons of salt.  Work until texture of clay.  Add more flour or salt as needed.  Make a different batch for each color.


Step 6


Use the mixture as if it were clay.


Use the mixture as if it were clay.  Use rock as base, and crepe clay as head, wings, feet, tails, or whatever else your sculpture needs.  It will dry as hard as the rock.


Here are more ideas


Here are some more ideas.


And, there you have it.  A great way to mold many different items simply by making Crepe Paper Mache Rock Sculptures.  What did you land up sculpting?  Let me know in the comments below.  And, don’t forget to take a picture of your item as well…. you can add the picture to the comment.  I’d love to see it.

Technorati Tags: , , , , , , , ,

How to Make a Wire Giraffe

I have a fun and creative craft for you today.  In this post I’m going to show you how to make a Wire Giraffe using a wire hanger and some crepe paper.  This craft is a great way to use those wire hangers that you have, but no longer use to hang up your clothes.  You will need a little bit of adult supervision for cutting the wire so make sure to have an adult around during this craft.  So, grab the materials needed and let’s get started.

Check out our other Wire Hanger crafts.


How to Make a Wire Giraffe


Materials Needed

Cutting and slip joint pliers

Scissors

Wire coat hangers

Raffia or crepe paper

Glue, Paste, or Rubber cement


Step 1


Cut the hanger.


(Parental Supervision / Help for younger children) Using cutting pliers cut a wire coat hanger in the following places: (1) at each end of the straight bottom piece (2) one side, at the point where the sides join to form the hook. This cutting results in three pieces of wire.


Step 2


Using piece that has the hook on one end, shape to form the body of giraffe.


Using piece that has the hook on one end, shape to form the body of giraffe.


Step 3


Cut longest wire in half and form legs.


Cut longest remaining piece of wire in half.  Each piece is bent in half and placed in the proper place over the body to form the legs.  Make one complete turn of each wire around the body and with pliers squeeze tightly in place.


Step 4


Using raffia or narrow strips of crepe paper completely wrap each wire.


Using raffia or narrow strips of crepe paper completely wrap each wire.  Ends of paper or raffia may be secured in place by pasting.


for additional thickness to appropriate portions of the figure, merely wrap with additional layers of raffia or crepe paper


In order to provide for additional thickness to appropriate portions of the figure, merely wrap with additional layers of raffia or crepe paper.


Step 5


To make mane wrap with more raffia.


The mane of the giraffe is constructed by using a 24-inch length of raffia or one-quarter inch strip of crepe paper. Paste one end of strip on top of head and form one-inch high loop.


Finishing making mane by wrapping loops.


Using second piece of raffia or one-quarter inch crepe paper strip, wrap loop in place. Continue making loops down neck of giraffe until 24-inch length of raffia or crepe paper is consumed. Eyes can be cut from appropriately colored raffia or crepe paper and glued in place.


Finished Wire Giraffe


Awesome job!!  You just finished your wire giraffe…. didn’t it turn out cute?  Let me know how your wire giraffe turned out for you in the comments below.  And, don’t forget to take a picture too… you can add that to the comment as well.

Technorati Tags: , , , , , , , , , , , ,

How to Make a 3D Carnation Mother’s Day Card

Mother’s Day is coming up next month.  That will be here before you know it.  So, in honor of the upcoming Mother’s Day Holiday today I will show you how to make a 3D Carnation Mother’s Day Card.   Any mom would love receiving a homemade card from their child.  And, this card is no exception.  Not only is this card made by you, but it is also 3D which makes it really cool.  You will use crepe paper to give this card a 3D effect.  So, grab the materials needed and let’s get started.
Check out our other Mother’s Day Crafts.


How to Make a 3D Carnation Mother's Day Card


Materials Needed

Red and Pink Crepe Paper

Construction Paper or Card Stock

Paste or Tape

Markers

Scissors


Step 1


Cut out a circle on red and pink crepe paper.


Cut out a circle on red and pink crepe paper.


Step 2


Fold in halves and then quarters.


Fold in halves and then quarters.  Snip edges irregularly to resemble a carnation.


It should look like this.


It should look like this.


Step 3


Take a piece of construction paper or card stock and draw 2 stems.


Take a piece of construction paper or card stock and draw 2 stems.  You will be pasting the carnations to the top of these stems.


Step 4


Paste or tape on carnations


Cut top of stem as shown and tuck in flower.  Paste or tape on carnations.  Write “Mom” or “Mommy” or “Mother”.


Finished Mothers Day Carnation Card


There you go….. you just finished making a 3D Carnation Mother’s Day Card.  Your mom is going to absolutely love it.  Do you know why?  Because you made it yourself.

Technorati Tags: , , , , , , , , , , , , , , , , , , , ,

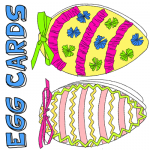
How to Make Easter Egg Cards

Easter is just around the corner.  So, to get ready for the upcoming Easter Holiday I thought we would do a craft in honor of Easter.  Today I will show you how to make beautiful Easter Egg Cards.  These cards turn out really lovely.  They will be perfect to hand out to your loved ones and friends…. so make quite a few.   Each card can be written with a unique saying inside.  So, grab the materials needed and let’s get started with this craft.

Check out our other Easter Crafts.


How to Make Easter Egg Cards


Materials Needed

Printer & Paper

White Paper

2 Pieces of Colorful Paper

Crepe Paper, Sequins, Glitter (Items to Decorate Eggs)

Marker

Hole Punch

Scissors

Ribbon


Click on template image below to make larger and to print.


Easter Egg Card Template


Step 1


Print out template.


Print out template.


Step 2


Use egg template to trace 2 eggs on colorful paper and 1 egg on white paper.


Use egg template to trace 2 eggs on colorful paper and 1 egg on white paper.


Step 3


Decorate the Easter egg with crepe paper, sequins, glitter


Decorate the Easter egg with crepe paper, sequins, glitter or however you wish to.


Step 4


Write a message on the white egg.


Write a message on the white egg.


Step 5


Punch 2 holes on wide part of eggs.


Punch 2 holes on wide part of eggs.


Step 6


Now push ribbon thru both holes (in all 3 eggs) and tie a bow above the top egg


Now push ribbon thru both holes (in all 3 eggs) and tie a bow above the top egg… as seen above.

And, there you have it….. you just finished making an Easter Egg Card.  Now, make a few more and hand them out to loved ones or friends this Easter.  The receiver will be sure to love them.

Technorati Tags: , , , , , , , , , , ,

How to Make Crepe Paper Flowers

Crepe paper flowers are very beautiful, but usually require a lot of skill to make. But here’s a type of crepe paper flowers that are easy to make and look very pretty.   You don’t have to use the colors I did…. instead pick out a bunch of Spring colors to get in the Spring spirit.  After all, Spring will be here in just a couple of weeks.   These Crepe Paper Flowers are perfect for an upcoming party…. or better yet just decorate your child’s room with beautiful colors.  Either way…. let’s have fun making this craft.

Check out our other Crepe Paper Crafts.


Image093


Materials Needed


Crepe paper

Black color paper

Pipe cleaners- brown or green

Scissors

Ruler


Image091


Step 1

Cut out a piece of crepe paper about 15 inches  long and 10 inches wide. Make sure that the creases are from top to bottom along the width of the paper as shown.


Image082


Step 2

Fold the paper into half as shown.


Image079


Step 3

Cut out pieces of paper as shown (about 1 inch wide)


Image081


Image080


Step 4

Cut out a square of black paper, each side measuring about 1 inch. Place a small ball of paper inside it as shown.


Image084


Step 5

Use the paper to cover the ball and form a shape as shown.


Image085


Step 6

Arrange 5- 6  flower petals and black center like this. Hold it all together in your hand to arrange it. Make sure each petal is about 1.5 in long above the place you are holding it.


Image086


Step 7

Hold the bottom together and wind the pipe cleaner around it a few times as shown.


Image088


Step 8

Fold the pipe cleaner back to make a thick stem.

Fold each petal outwards.

Use your fingers to stretch the end of each petal, making it wider and curving it outward


Image092


Step 9

Make a bunch of flowers like this and use it to decorate your house this Spring.


Image093


And, there you have it….. you just completed making a bunch of crepe paper flowers.  Great job!!  Now, you are ready to decorate for a party this Spring…. or better yet just decorate the child’s bedroom with beautiful Spring color flowers…. it will be beautiful.

Technorati Tags: , , , , , , , , , , ,

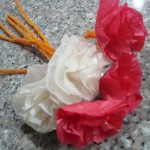
How To Make Paper Carnations

Today I’m going to show you how to make Paper Carnations.  Paper Carnations can be used for many things…. Valentine’s Day, for example.  Valentine’s Day is coming up in just a couple of weeks.  These carnations would be beautiful in a bouquet as a gift for your someone special.  Or, for Mother’s Day…. what mother wouldn’t love receiving a bouquet of hand made paper carnations from their child?   They would certainly love it.  Or, just make these Paper Carnations any day of the week to give to someone special as a surprise.  No one could resist them!  So, let’s get started.

Check out our other Valentine’s Day Crafts.


Materials Needed

tissue papers (the one used for wrapping presents)

pipe cleaners/fuzzy wires

scissors


Step 1

Fold tissue paper into portions, enough to make 3 to 4-inch circles.


Step 2

Stack 7-10 pieces of circles and by folding it, make two small slits in the middle. This is where you slip in the tip of the pipe cleaner, then fold it to lock it in place.


Step 3

Starting in the middle, gently fold the paper up, until all the side are pulled upwards.  Continue doing the same for the other papers underneath.


Step 4

When all the papers are up, gently arrange it to form blooming petals of your carnation flowers.


Step 5

Make a bunch of these flowers and you can place it a flower vase for a more attractive look.

Or better yet, make a bouquet of carnation flowers and give it to somebody for Valentine’s Day.  They are sure to love it.  How did your carnation flowers turn out?  Let me know in the comments below.

Technorati Tags: , , , , , , , , , , , ,

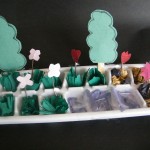
How to Make a Miniature Garden Craft

We are right smack in the middle of Winter…. and if you are anything like me you are missing Spring pretty badly about now.  Well, I have a way to bring a little bit of Spring into your house.  Today I’m going to show you how to make a Miniature Garden for your house.  We are going to build this miniature garden in an ice cube tray.  So, ask your Mom or Dad if they have an extra ice cube tray for you to borrow.   You can follow my miniature garden step-by-step or you can be creative and come up with your own variations.  Either way….. let’s get started.


Materials Needed

Ice cube tray

Popsicle sticks

Twigs

Craft paper

Crepe paper- green

Cellophane paper/ transparent plastic

Scissors

Tape


Step 1

Cut bits of blue paper and use it to line a few cubes to make a pond.


Step 2

Cut a few pieces of cellophane paper and put it in the cubes. Seal the top with a layer of tape to give it a shining top.


Step 3

Take brown and black paper and make small balls. Fill up a few cubes to make a rockery.


Step 4

Cut out strips of green crepe paper and make slits on the top as shown and put them in the rest of the cubes for grass. Cut wider strips at the back to make taller grass.


Step 5

Cut out outlines of trees and tape the back to a Popsicle stick to make trees. Tape them to the edge of the cubes.


Step 6

Cut out flowers and tape them to the back of twigs and tape these to the sides of the cube.


Step 7

Your garden is ready.


And there you go…. you have just finished your very own miniature garden craft.  You now have a little touch of spring for your house.  Put it on a window sill where you can see it often…. it will remind you that Spring is on its way.

Technorati Tags: , , , , ,

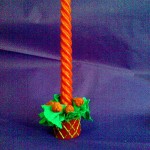
How to Make a Christmas Candle Arrangement

Today I’m going to show you how to make a Christmas Candle Arrangement.  This Christmas Candle Arrangement makes for a beautiful tabletop decoration this Holiday Season.  Make more than one candle arrangement and put them around the house as decorations.  Or, better yet….. make a few of these Christmas Candle Arrangements and give them as a gift this Christmas.  Whatever you decide to do with this craft it is sure to be a big hit this Christmas Season.

Check out our other Christmas Crafts.


Image027


Materials required:

Old toilet paper roll

Crepe paper – red, green

Glitter glue – gold

Glue

Paint – Red

Paintbrush

Scissors

A candle


Step 1

Cut through the toilet paper roll as shown below.


Image008


Step 2

Cut out a small ring of toilet paper roll about 6 cm wide.


Image009


Step 3

Overlap the ends to make a smaller roll. Tape the ends in place as shown.


Image010


Step 4

Place the candle inside the ring and stuff it with bits of torn green crepe paper. Tear the paper long enough that it comes out of the ring as shown below.


Image018


Step 5

Paint the toilet paper roll with red acrylic paint.


Image019


Step 6

Make a design on it with gold glitter glue as shown.


Image023


Step 7

Make small balls out of torn red crepe paper as shown.


Image025


Step 8

Glue the balls near the base of the candle as shown


Image026


Step 9

Place the candle on your table and you’re ready for Chistmas dinner!!


Image027


There you go…. you just finished making a Christmas Candle Arrangement.  Now, make a few more to decorate your house with this Holiday Season.  Or, have you decided to give them away as gifts?  Good for you…. either way they are sure to be enjoyed.

Technorati Tags: , , , , , , , , , , ,

Making a Valentines Day Pinwheel Sweet Candy Gift Box Craft for Kids – Part 1

Laura from Dacian Moon Handmade will show you today how to make a complex looking, but very easy to do, Valentine’s Day Candy Gift box with sweets or candies. This is a two part, step by step crafts tutorial for kids or someone of any age. In this part we will make the lower part of this candy box….(the one with candies).

GO TO PART 2

Here are Even More Valentines Day Crafts Ideas


Making a Valentines Day Pinwheel Sweet Candy Gift Box Craft for Kids – Part 1


Making a Valentines Day Pinwheel Sweet Candy Gift Box Craft for Kids – Part 1

CRAFTS MATERIALS NEEDED (for part 1 and 2):

– colored paper (not too thin) – two squares ~15 cm and two other of ~5 cm
– scissors
– paint marker (red)
– glitter glue (to match the paper colors, in my case, gold and blue)
– 1 flexible straw (is not important to be flexible)
– one piece of crepe
– 1 pin
– pencil
– candies


Step 1

Take one of the large pieces of paper and fold it in half, then unfold.


Do the same in the other direction. It will look like that:


Step 2

Bring one corner to the middle and press well.


Do the same with all the corners.


Step 3

Turn the new square on the other side.


Bring the corners to the center again…


… like that.


Step 4

Place it to the table with one corner to you (keep it on the same side)


And bring the upper corner over the lower one. Press well.


Step 5

Now, keeping immobile the lowest corner, bring the right corner over it.


It will look like this.


Turn on the other side and bring again the right corner over the lowest one…


… like this.


Step 6

Open the edges.


Then pull gently the other ones…


… and we have the lower part ready to be filled with candies 🙂


Note: you can use this to store various things and it will look pretty on your desk.

GO TO PART 2

Here are Even More Valentines Day Crafts Ideas

Technorati Tags: , , , , , , , , , , , , , ,