This craft project is perfect for a unique back to school project. It is very simple and fun, as well as a great way to store your packed lunch.
How to Make Cool Stuff
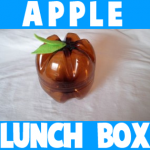
This craft project is perfect for a unique back to school project. It is very simple and fun, as well as a great way to store your packed lunch.
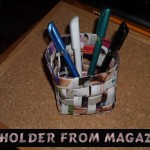
Each of us have at home a lot of magazines that we do not need anymore, how about you recycle them by making something useful out of them. This is called upcycling. Here’s a useful way to use them…this would make a great gift for Mom or Dad on Mother’s Day or Father’s Day. It would also be good for your desk when you are doing your homework

I have a fun girly craft for you today. In this post I’m going to show you how to make a festive Halloween bracelet that any girl would love to wear this Halloween season. Made from a recycled soda bottle and some paint this bracelet craft is an easy and fun one. Plus, you will get a good feeling from recycling an old soda bottle instead of throwing it away. Isn’t that wonderful?! So, grab that cleaned out used soda bottle and let’s get this fun craft started.

Yesterday I showed you how to make a Glue Stick Man out of your recycled glue sticks. Today I’m going to continue showing you how to make toy figures out of recycled materials. In this post I’m going to show you how to make Cardboard Little People Figures. Just simply use pieces of used cardboard boxes. This craft is a great way to recycle those cardboard boxes that you would normally throw away. These Cardboard Little People Figures are fun to make…. almost as much fun as they will be to play with. So, let’s get started.

With all the crafts that I do I go through a lot of glue sticks. I always hate the idea of throwing them away…. I always try to find crafts that I can make out of recycled items. And, glue sticks are no exception. Here is a great craft you can make with your used glue sticks. Today I’m going to show you how to make a Glue Stick Man out of your recycled glue sticks. You will see what a great feeling you get from making something out of recycled materials. Plus, you get a very cool toy man.

I had no idea how many super cool crafts are out their for Halloween using Milk Jugs. There are just so many…. and they all are just so cool. I was searching the internet for some awesomely creepy Halloween crafts and I found some doozies for you. In this post I have listed 14 spooky Halloween crafts using Milk Jugs. What’s so wonderful about these Halloween crafts is that they all use milk jugs…. an item that most of us use every day. So, you are sure to at least have the most important material for these crafts. Scroll through all 14 of these Halloween milk jug crafts to find some to do with your kids at home. They will love it.
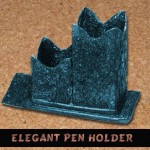
Since school is back in session I decided to show you how to make an Elegant Pen Holder. This elegant pen holder will look wonderful on any desk and it is so useful. No longer will you have pens and pencils floating around your desk…. you will now have a spot for all your pens and pencils. This craft is so easy and a lot of fun. It is made from recycled boxes so it is a great green craft too. Add style to your desk with this elegant pen holder. Let’s get started.
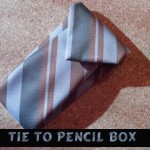
Today I have a super creative and fun craft for you. I’m going to show you how to make a pencil box using a tie. Ask your Dad for one…. I’m sure he has some that he doesn’t even wear anymore. And, what a great way to recycle those ties that aren’t worn anymore. After you make this craft you will have a functioning pencil box… and one that no one else has. How cool is that?! So, grab the materials needed and let’s get started.
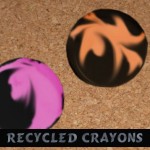
I have a super fun craft for you that is perfect for the back to school season. Today I am going to show you how to make Recycled Crayons. If you are unsure what to do with all those tiny crayons left over this is the perfect craft for you. Take those tiny crayons and shred them into little pieces…. as many colors as you would like…. we will melt them down into colorful recycled crayon cupcakes. You will need help from an adult for this craft. So, let’s get started.

Earth Day will be here in just a couple of weeks. In honor of Earth Day I thought I would scour the internet looking for cool ideas for Earth Day crafts. All of the crafts that I found and have listed here are made from recycled materials. Earth Day is a special day to celebrate the Earth and to increase awareness and appreciation of the Earth’s natural environment. And, I think making crafts from recycled materials such as the ones found here is a great way to teach children about recycling and the importance of doing that to help save our Earth. So, without further ado….

Today I have a super easy craft that is very useful. I’m going to show you how to make an Organizer out of Old Plastic Bottles or Jars. This craft is a great way to recycle those old plastic bottles and jars. And, the outcome is a beautiful organizer. You will need a little bit of adult help as you will need to use a cutter to cut the plastic bottles all different sizes. So, grab the materials needed and let’s get this craft started.
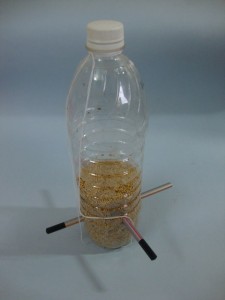
Welcome birds into your neighborhood this spring…. Make your own bird feeder with recycled materials and place it on your windowsill, porch or garden. The birds can perch on the pencils and pull out seeds from the holes on the sides of the water bottle. Plus, it is super easy to refill your Bird Feeder by the cap of the top of the water bottle. Imagine watching the birds feed off of the Bird Feeder you made yourself…. wouldn’t that be so wonderful?! So, grab the materials needed and let’s get started with the craft.

I have a fun and creative craft for you today. I’m going to show you how to make paper from rags. The craft is a lot of fun…. a lot of work, but tons of fun. At different steps in this craft you will need parental help. There are quite a few parts where you will be using adult tools and they will need to help you through this…. each of these steps are marked in red. So, grab some white cotton or linen rags and the rest of the craft materials and let’s get started.

While roaming the internet the other day I came across quite a few cool crafts made from old, worn out books….. 10 of them to be exact. They were so cool I had to show them to you. All of them have instructions so that you too can make these creative items. From Wreaths to a Kindle Case you are going to be surprised in the things you can do with books to upcycle them…. I know I was.

Christmas has come and gone. And, with Christmas comes the mountains of used wrapping paper from all those gifts you received. Most of the time we land up throwing it away…. we don’t even think twice about throwing it away. Or, how about all those Holiday Greeting Cards you received this year….. what do you land up doing with them once the Holiday is over? Throw them away, right? Well today I’m going to show you crafty ways to reuse these items. From Christmas decorations for next year to decorative gift boxes there are plenty ideas for reusing your wrapping paper & greeting cards. You are sure to find an idea for yours.
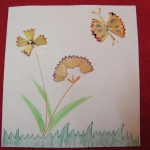
Today I have a fun and creative craft for you. I’m going to teach you how to make beautiful pictures out of pencil shavings. Its a great way to recycle waste. These pictures are amazing enough to frame and hang up on your wall. The simple steps to make it are given below, but be careful while you do this activity… pencil shavings are delicate and need to be handled gently. So, let’s get started.