Open Hands Father’s Day Card for Dad

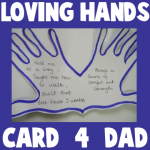
Impress your Dad this Father’s day with this personalized, creative Father’s day card. All you need is some thick white paper, markers, scissors, and your hands. The illustrated steps for this make-yourself-card are given below.


fathers-day-open-hands-cards


Open Hands Father’s Day Card for Dad


Craft Materials Required:

Thick paper

Markers

Scissors

Step 1


Cut out a piece of paper and fold it into half like a card. One half must be larger than the size of your hand.

Step 2:


Trace one hand on the paper as shown. make sure the base of your hand is at the folded edge of the paper.


Step 3:


Cut out along the lines. Outline the shape with markers, on the outsides as well as the inside of the card.

Step 4:


Write these words in the front of the card : ” Dad I love your hands,”

Step 5:


Write these words on the inside of the cards: ” held me as a baby, taught me how to walk, built that tree house that I wanted, Always a source of courage and strength”

Step 6:


Write these words on the back: “Thanks for being a wonderful Dad and so much more”

Technorati Tags: , , , , , ,

Number One Dad Badge Fathers Day or Mothers Day Gift Craft

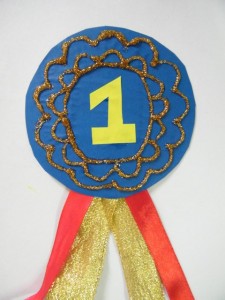
Is your dad the best in the world? Here’s a father’s day gift that will help him remember that. The simple instructions to make this Number 1 Dad badge are given below:

Number One Dad Badge Fathers Day Gift Craft


Craft materials required:

Thick card stock ( cereal box etc.)

ribbon

glue

scissors

glitter glue

colored paper


Step 1:


Cut out a circle on thick card paper as shown.

Step 2:


Glue colored paper on it as shown.


Step 3:


Cut out the number 1 and glue it in the center as shown.

Step 4:


Cut out 2 pieces of ribbon and fold them as shown below

Step 5:


Tape them to the back of the card as shown.

Step 6:


Decorate with glitter glue as shown.

Technorati Tags: , , , , , , , , , ,

Puppets for Thumb wrestling: Father’s Day Gift

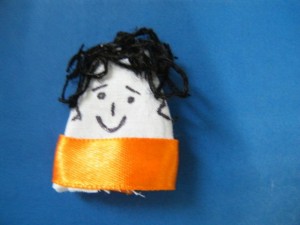
Here’s a Father’s day gift that guarantees hours of fun. Make a set of thumb puppets for your dad and yourself, and play thumb wrestling. The simple illustrated instructions to make the thumb puppets follow:


Craft materials required:

-White fabric

-black yarn

-ribbon

-scissors

-needle and thread

-fabric glue

-Permanent marker


Step 1:

Cut out a piece of cloth double the length of your thumb and about an inch wider than the width of your thumb.


Step 2:

Fold it into half and stitch along the two sides as shown.


Step 3:

Fold it inside out as shown:


Step 4:

Glue small pieces of yarn to make hair


Step 5:

Glue a strip of ribbon along the bottom as shown


Step 6:

Add facial features with a marker.


Make another one for your dad in the same way. Make sure its big enough for your dad’s thumb. Your dad is sure to enjoy this Father’s day gift.

Technorati Tags: , , , , , , , , , ,

How to Make an Organizer out of Old Plastic Bottles

Today I have a super easy craft that is very useful.  I’m going to show you how to make an Organizer out of Old Plastic Bottles or Jars.  This craft is a great way to recycle those old plastic bottles and jars.  And, the outcome is a beautiful organizer.  You will need a little bit of adult help as you will need to use a cutter to cut the plastic bottles all different sizes.  So, grab the materials needed and let’s get this craft started.

Check out our other Plastic Bottle Crafts.


Materials Needed

Old plastic bottles and jars

Fabric

Glue

Scissors, cutters (Adult Help)

Ribbon


Step 1

Collect a few jars and cut them in different heights as shown.


Step 2

Cover the jars with fabric and glue it in place as shown. Place the jars together and glue them on a piece of cardboard.


Step 3

Draw around the jars and cut it out so that the base looks like it is shown


Step 4

Add a ribbon and your Organizer is finished.


And, that is it…. you have a beautiful organizer made simply out of old Plastic Bottles and Jars.  Now, the question is….. what are you going to organize?  What are you waiting for… get started.

Technorati Tags: , , , , , , , , , , ,

How to Make a Leaf Print Picture

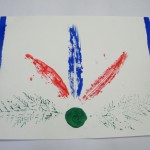
Spring will be here before you know it.  And this activity is a great excuse to spend some time outdoors.   With this activity you will need to go outdoors and collect leaves of different shapes and sizes.  You will paint them and use them as a stamp to create a picture of your choosing.  This craft is a lot of fun and the cool part is that no Leaf Print Picture will ever be the same.  Use your creativity to paint a bunch of different pictures.  So, grab some leaves and let’s get started.

Check out our other Garden & Plant Crafts.


Materials Needed

Leaves

Tempera paints

Paintbrush

Paper


Step 1

Collect leaves of different shapes and sizes.  Arrange them to form a design that you like.


Step 2

Apply paint on the underside of a leaf.


Step 3

Press it on the paper to form a print.


Step 4

Print more leaves similarly to form a design.


Step 5

Add a border and other details.


And, there you have it….. now, put it up on your wall and celebrate the coming of Spring!!  How did your Leaf Print Picture turn out?  Let me know in the comments below.  And, make sure to take a picture of it and add that to the comments as well…. I’d love to see it.

Technorati Tags: , , , , , , , , , ,

How to Make a Cardboard Box Lantern

I have a fun and creative craft for you today.  In this post I will be showing you how to make a Cardboard Box Lantern.  That’s right…. it is a lantern that you can use outside that it made from a cardboard box.  The box is simply decorated with colored sheets of paper and the box is fitted over a light bulb.  This Cardboard Box Lantern will be a great addition to any light fixtures you use outside during a party.  It is sure to help get the festivities going.  So, let’s get started with the craft.

Check out our other Cardboard Box Crafts.


Materials Needed

A square box

scissors

glue

butter paper

some wire

colored paper


Step 1

Draw lines as shown on two opposite flaps of the box.


Step 2

Cut the edges of the cardboard box equally on two opposite sides as shown.


Step 3

Now, when you bring all 4 flaps together, it will form a shape as shown below.


Step 4

On the bottom of the box, cut out a small square as shown below.


Step 5

On every side of the box, draw and cut out a diamond shape as shown below.


Step 6

Cover the box with butter paper


Step 7

Cut out colored paper strips as shown below


Step 8

Fix some wire on the top as shown to hang the lantern.


Step 9

Cover the lantern with paper strips as shown.


Step 10

Put a bulb in the lantern and hang it up on your porch.  That’s it…. the Cardboard Box Lantern is finished.  Now, set it outside for your next party….. it is sure to be a conversation piece.

Technorati Tags: , , , , , , , , ,

How to Make a Mail Holder from a Wire Hanger

Today I’m going to show you a great craft that you can make from an old wire hanger.  That’s right…. I’m going to show you how to make a Mail Holder from an Old Wire Hanger.  This mail holder can be given to your parents so that they have a place to hold onto their bills, or save it for yourself to hang on your door so that you can receive notes from your siblings or parents.  Either way this Mail Holder is sure to be enjoyed.  So, let’s get started.

Check out our other Wire Hanger Crafts.


Materials Needed

wire Hanger

thick card paper

paints

glue

brush

scissors


Step 1

Cut a piece of thick card paper as long and wide as desired, but the width should be less than that of the hanger.


Step 2

Fold about 2 inches from the edge of the paper as shown


Step 3

Tape or glue the end to fix it as shown.


Step 4

Cut another piece of paper, smaller than the first piece to hold the mail.


Step 5

Glue the two sides and the bottom on to the first piece of card as shown to form a pocket.


Step 6

Decorate the paper with paint.


And, that’s it….. you made a Mail Holder from an old Coat Hanger.  How did your mail holder turn out?  Now hang it on your door to receive mail from your siblings or give it to your parents for a place for them to save their bills.

Technorati Tags: , , , , , , , , , ,

How to Make Crepe Paper Flowers

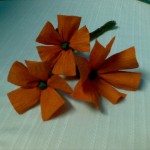
Crepe paper flowers are very beautiful, but usually require a lot of skill to make. But here’s a type of crepe paper flowers that are easy to make and look very pretty.   You don’t have to use the colors I did…. instead pick out a bunch of Spring colors to get in the Spring spirit.  After all, Spring will be here in just a couple of weeks.   These Crepe Paper Flowers are perfect for an upcoming party…. or better yet just decorate your child’s room with beautiful colors.  Either way…. let’s have fun making this craft.

Check out our other Crepe Paper Crafts.


Image093


Materials Needed


Crepe paper

Black color paper

Pipe cleaners- brown or green

Scissors

Ruler


Image091


Step 1

Cut out a piece of crepe paper about 15 inches  long and 10 inches wide. Make sure that the creases are from top to bottom along the width of the paper as shown.


Image082


Step 2

Fold the paper into half as shown.


Image079


Step 3

Cut out pieces of paper as shown (about 1 inch wide)


Image081


Image080


Step 4

Cut out a square of black paper, each side measuring about 1 inch. Place a small ball of paper inside it as shown.


Image084


Step 5

Use the paper to cover the ball and form a shape as shown.


Image085


Step 6

Arrange 5- 6  flower petals and black center like this. Hold it all together in your hand to arrange it. Make sure each petal is about 1.5 in long above the place you are holding it.


Image086


Step 7

Hold the bottom together and wind the pipe cleaner around it a few times as shown.


Image088


Step 8

Fold the pipe cleaner back to make a thick stem.

Fold each petal outwards.

Use your fingers to stretch the end of each petal, making it wider and curving it outward


Image092


Step 9

Make a bunch of flowers like this and use it to decorate your house this Spring.


Image093


And, there you have it….. you just completed making a bunch of crepe paper flowers.  Great job!!  Now, you are ready to decorate for a party this Spring…. or better yet just decorate the child’s bedroom with beautiful Spring color flowers…. it will be beautiful.

Technorati Tags: , , , , , , , , , , ,

How to Make Leaf Print Gift Wrap Paper

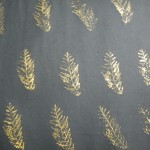
Celebrate spring by making this pretty wrapping paper with leaves from the garden. All you need is some paper, paint and a leaf.  It’s lots of fun to do, and it will be great to wrap your next birthday gift in.  I don’t know about you, but I never seem to have enough wrapping paper in the house.  Or, I have wrapping paper, but it is the same wrapping paper I use for everyone’s gift.  You can be rest assured that no one else will have this Leaf Print Gift Wrap.  So, let’s get started.


Materials Needed

Gold paint

Leaf

Black chart paper

Paintbrush


Step 1

Take a leaf with a pretty design and paint gold paint on the underside.


Step 2

Press the painted side on the black paper. You can use a piece of newspaper to press it on to the black paper.


Step 3

Repeat this process many times to make a beautiful pattern.


Step 4

Your gift paper is ready. Let it dry and store it for later use.  Imagine how impressed the receiver of this gift wrap will be?!  So impressed!!  The paper really turns out beautiful.

Technorati Tags: , , , , , , , ,

How to Make a Trinket Box out of Popsicle Sticks

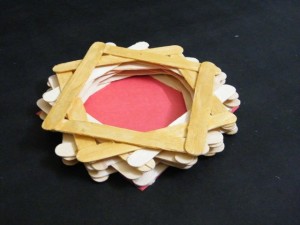
I have a fun and easy craft for you today.  I’m going to show you how to make a Trinket Box out of Popsicle Sticks.  A trinket box is great for holding little things like rings, earrings, candy, coins…. those type of little things.  These type of things are called trinkets and a trinket box is kept to store these small things as to not lose them.  This trinket box makes for a great gift for someone special or keep it for yourself.  The choice is yours.  Now let’s get started.

Check out our other Popsicle Stick Crafts.


Materials Needed

Popsicle sticks

Thick colored paper

Glue

Gold acrylic paint

Brush

Scissors


Step 1

Glue four sticks together to form a square. Make about 20 squares like this.


Step 2

On top of the first square, glue a second square as shown.


Step 3

Keep gluing the squares on top of each other in the same manner to form a design.


Step 4

Cut out a piece of paper in the size of the square and glue it to the bottom most square.


Step 5

Turn it over, paint the top two squares with gold acrylic paint. Your box is ready.


And, there you have it…. easy peasy lemon squeazy.  How did your Trinket Box turn out?  Now, the real question is this….. are you going to keep it for yourself or give it to someone else as a gift?   Hmmmmm…..

Technorati Tags: , , , , , , , , , ,

How to Make a Shamrock Greeting Card for St. Patrick’s Day

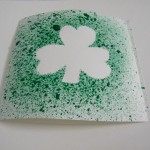
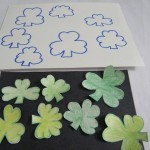
In this post I’m going to show you how to make a Shamrock Greeting Card Craft for St. Patrick’s Day. You can make it to wish your friend, teacher or mother (or whoever you would like) a wonderful St. Patrick’s Day.  All you need is some paint, paper and an old toothbrush.   The craft is an easy one, but it is sooooo…. much fun.  So, grab those materials needed and your St. Patrick’s spirit and let’s get started.  Have fun!!

Check out our other St. Patrick’s Day Crafts.


Materials Needed

Thick white paper

Paint

Toothbrush

Scissors

Marker


Step 1

Fold a piece of thick white paper to make a card of the size you want.


Step 2

Draw out a shamrock smaller than the card and cut it out.


Step 3

Take an old toothbrush and dip it in some tempera paint.


Step 4

Place the shamrock in the center of the card.  Use the toothbrush to spray paint on it.  Make sure you spray plenty of paint around the edges of the shamrock.


Step 5

When you are done lift the shamrock off carefully… and surprise!!… you have a beautiful shamrock card underneath.


Step 6

Allow it to dry, write a special message inside, and spread a little love this St. Patrick’s Day.  The receiver of this card will absolutely love it!!

Technorati Tags: , , , , , , , , , , , ,

How to Make a St. Patrick’s Day Matching Game

St. Patrick’s Day will be here before you know it…. so in the spirit of that this craft is all about St. Patrick’s Day.  In this post I will be showing you how to make a St. Patrick’s Day Matching Game.  This craft is perfect for the Preschool crafter as this game is all about matching the size of each shape of the shamrocks.  Get a couple Preschoolers together and listen to them giggle as they try to match the shape of the shamrocks.  So, with that being said…. let’s get started.

Check out our other St. Patrick’s Day Crafts.


Materials Needed

Crayons

Markers

Scissors

Thick paper

Cardboard/ thick paper for base


Step 1

Draw and color shamrocks of different shapes and sizes.


Step 2

Cut them out as shown below.


Step 3

Place them on your cardboard/ thick paper which is going to be your base and trace the outline of each shamrock on it.


Step 4

The game is to match each shamrock to its outline.


Now grab some friends or your parents and start playing the St. Patrick’s Day Matching Game.  Enjoy!!

Technorati Tags: , , , , , , , , , , , , , ,

How to Make a Plastic Bottle Bird Feeder

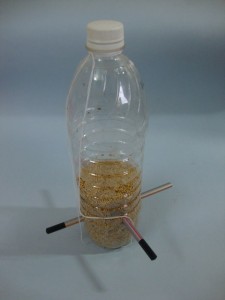
Welcome birds into your neighborhood this spring…. Make your own bird feeder with recycled materials and place it on your windowsill, porch or garden. The birds can perch on the pencils and pull out seeds from the holes on the sides of the water bottle. Plus, it is super easy to refill your Bird Feeder by the cap of the top of the water bottle.  Imagine watching the birds feed off of the Bird Feeder you made yourself…. wouldn’t that be so wonderful?!  So, grab the materials needed and let’s get started with the craft.

Check out our other Plastic Bottle Crafts.


Materials Needed

plastic bottle

pencils

bird seed

knife/ blade (use with an adult’s help)

twine


Step 1

Make 2 holes (adult help) opposite to each other near the bottom of the bottle to allow the pencil to go through it as shown.


Step 2

Pierce another two holes (adult help) to put another pencil through it at 90 degree angles.


Step 3

Pierce holes (adult help) above the perches a little larger than the size of the seeds.


Step 4

Tie some twine on top of the bottle to hang it.


Step 5

Fill the bottle with bird seed.


Step 6

Hang your bird feeder on a branch, or outside your window and enjoy the chirping of the birds.


And, there you have it….. your very own Plastic Bottle Bird Feeder.  Now go hang it up outside and enjoy watching the birds feed off of the bird feeder you made yourself.  Enjoy!!

Technorati Tags: , , , , , , , , , ,

How to Make a St. Patrick’s Day Shamrock Streamer Decoration

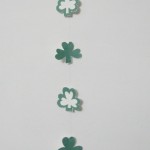
St. Patrick’s Day is coming up in just a few weeks…. March 17th to be exact.  Have you started decorating yet?  If you haven’t, but you’d like to start…. then I have the craft for you today.  I’m going to show you how to make a St. Patrick’s Day Shamrock Streamer Decoration.  It is a super easy craft, so this is a great craft for the youngest of crafters.  But, it is also fun enough to keep the attention of all age crafters.  So, no matter what your age is…. grab the materials needed and let’s get started.

Check out our other St. Patrick’s Day Crafts.


Materials Needed

Green colored paper

Thick white paper

Nylon/ transparent thread

Scissors

Glue


Step 1

Draw out a few shamrocks


Step 2

Cut them out.


Step 3

Draw some more shamrocks, slightly smaller than the first set.  This time, draw a second outline around them as shown below.


Step 4

Cut along the inside and outside line to form an outline of a shamrock.


Step 5

Glue both types of shamrocks on the thick white paper.


Step 6

Cut them all out .  On each shamrock pierce two holes , one at the top and the other at the bottom, as shown below.


Step 7

Tape a piece of ribbon to the most top shamrock as shown below.


Step 8

Use the nylon thread to tie the bottom hole of one shamrock and the top hole of the next shamrock as shown below.  When you are tying together the shamrocks, make sure that you alternate one fully colored shamrock with one outline shamrock .


Step 9

Make it as long as you like.  Hang it up on a wall.  Let the festivities begin!!


There you go…. you just finished your St. Patrick’s Day Shamrock Streamer Decoration.  How did it turn out for you?  Let me know in the comments below.   And, take a picture of the streamer hung up and share that in the comment as well…. I’d love to see it.

Technorati Tags: , , , , , , , , , , ,

How to Make a Paper Bead Bracelet

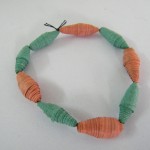
If you love making jewelry I have a fun craft for you today.  I’m going to show you how to make a Paper Bead Bracelet.  That’s right…. it’s a bracelet made out of paper.  With paper you actually make the beads that make up this bracelet.  Surprisingly enough….. by simply rolling paper and adding glue it creates a very strong and durable bead.  Choose your favorite color paper to make the beads and the result is a beautiful bracelet you will be proud to wear with your favorite outfit.  So, let’s get started.

Check out our other Jewelry Crafts.


Materials Needed

Colored paper

Scissors

Glue

Ruler

Pencil

Needle

Thread


Step 1

Using a ruler, on one edge of a rectangular piece of paper, mark points that are 1.5 inches apart… starting from the edge.


Step 2

On the other end of the paper, mark a point 0.8 inch away from the edge of the paper. Draw a second point 1.5 inches from this point. Mark a few more points, each 1.5 inch away from the last point. After you are done, draw lines joining the points on both ends as shown below.


Step 3

Cut along the lines to get long triangles as shown below.


Step 4

Fold the edge near the wide end of the triangle and start rolling it as tight as possible.


Step 5

Apply some glue to the end of the triangle and roll to form a bead as shown below.


Step 6

Make many beads as shown below and thread them together into a bracelet using a needle and thread.


Step 7

Wear the pretty bracelet around your wrist and show it off to all your friends.


Isn’t it unbelievable that you can make such an awesome bracelet simply out of paper and glue?  How did your Paper Bead Bracelet turn out?  Let me know in the comments below.  Take a picture of your bracelet and share it in the comment as well…. I’d love to see it.

Technorati Tags: , , , , , , , , ,

How to Make a Miniature Garden Craft

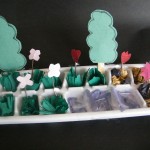
We are right smack in the middle of Winter…. and if you are anything like me you are missing Spring pretty badly about now.  Well, I have a way to bring a little bit of Spring into your house.  Today I’m going to show you how to make a Miniature Garden for your house.  We are going to build this miniature garden in an ice cube tray.  So, ask your Mom or Dad if they have an extra ice cube tray for you to borrow.   You can follow my miniature garden step-by-step or you can be creative and come up with your own variations.  Either way….. let’s get started.


Materials Needed

Ice cube tray

Popsicle sticks

Twigs

Craft paper

Crepe paper- green

Cellophane paper/ transparent plastic

Scissors

Tape


Step 1

Cut bits of blue paper and use it to line a few cubes to make a pond.


Step 2

Cut a few pieces of cellophane paper and put it in the cubes. Seal the top with a layer of tape to give it a shining top.


Step 3

Take brown and black paper and make small balls. Fill up a few cubes to make a rockery.


Step 4

Cut out strips of green crepe paper and make slits on the top as shown and put them in the rest of the cubes for grass. Cut wider strips at the back to make taller grass.


Step 5

Cut out outlines of trees and tape the back to a Popsicle stick to make trees. Tape them to the edge of the cubes.


Step 6

Cut out flowers and tape them to the back of twigs and tape these to the sides of the cube.


Step 7

Your garden is ready.


And there you go…. you have just finished your very own miniature garden craft.  You now have a little touch of spring for your house.  Put it on a window sill where you can see it often…. it will remind you that Spring is on its way.

Technorati Tags: , , , , ,