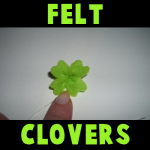
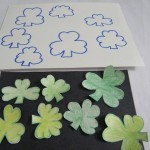
How to Make a Clover with Felt for Saint Patricks Day for Kids

Here are some cute instructions for making felt four leaf clovers Saint Patrick’s Day. Laura from  Dacian Moon Handmade will show you today, how to make a clover out of felt…perfect for Saint Patty’s Day. You can use it to make decorations, or to tie it to a headband or… actually you can make a lot of beautiful things with it.


How to Make a Clover with Felt for Saint Patricks Day for Kids


How to Make a Clover with Felt for Saint Patricks Day for Kids

CRAFTS MATERIALS NEEDED:

– a piece of green felt
– scissors
– needle and thread


IMG_4564


Step 1.

Cut the felt in 4 equal pieces.


IMG_4565


Make a “v” on the middle of top edge of one…


IMG_4566


… then round the corners beside it.


IMG_4567


Do the same for all 4 pieces.


IMG_4568


Step 2.

Start sewing them like in the picture.


IMG_4569


Add the other pieces.


IMG_4570


Bring the two ends together…


IMG_4571


… pull and make a knot. Like this. Make another knot just to be sure.


IMG_4572


Open the “flower” and the clover is ready 😀


IMG_4573


And there you have it, a realistic looking felt clover (or shamrock) to wear on St. Patrick’s Day. I hope that you had fun!

Technorati Tags: , , , , ,

How to Sew a “Lucky Cat” for Saint Patrick’s Day

This is a cute and funny toy made especially for St. Patrick’s Day! 
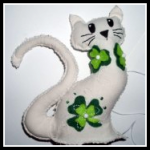
Do you want to learn how to make and sew a stuffed animal named “Lucky Cat” for Saint Patrick’s Day? This stuffed cat is covered in shamrocks and isn’t too tough to make. Learn how to make this kitty cat in the following craft tutorial.

Laura from Dacian Moon Handmade  will show you how to make it, step by step.


How to Sew a Shamrock Lucky Cat


CRAFTS MATERIALS NEEDED:

– white or cream-colored fabric
– light green and dark green felt
– filling material (I use some cotton pads broken into pieces)
– scissors
– needle and threads (white and black)
– black paint marker
– pen
– 3 small white beads
– pencil
– green beads (optional)


IMG_4668


Step 1.

Fold the fabric in half.


IMG_4669


Draw a cat outline, like this…


IMG_4673


… and the tail.


IMG_4674


Cut them out, without unfolding the fabric. This way you will have two cats and two tails.


IMG_4675


Step 2.

Place one cat over the other and start sewing them together. Start on the lower part.


IMG_4676


Go up until you reach the ear.


IMG_4678


Step 3.

Draw one big clover and some smaller on dark green felt. Also, draw them a little bit smaller on light green felt.


IMG_4679


Cut them out.


IMG_4680


Group one big dark clover with one big light clover, and the smaller ones in the same way.


IMG_4681


Step 4.

Choose one place for the big clover…


IMG_4683


… and sew it in place, using white thread.


IMG_4685


Add one white bead in the middle. Be careful not to sew both cats when you sew decorations.


IMG_4687


You can let it like this or you can make some decorative stitches with white thread and green beads


IMG_4689


Like this.


IMG_4691


Choose a place for the small clovers also.


IMG_4693


I put two of them around the cat’s neck, just like a necklace. Don’t forget to add white beads in the middle and to sew only one cat.


IMG_4696


Step 5.

Is time to decorate the head. Place a folded paper or a piece of cardboard between the two cats…


IMG_4698


… and color the eyes and nose with black paint marker.


IMG_4699


Like this.


IMG_4700


Change the thread, and using the black one…


IMG_4701


Sew the whiskers.


IMG_4702


Like this.


IMG_4703


Step 6.

Change the thread back to white and continue to sew the two cats together.


IMG_4705


When you reach the neck is time to fill the head.


IMG_4706


Tamp the filling to fill all the head and the ears. Like this.


IMG_4707


Continue to sew until you almost get down. Here will be the tail, so we must prepare it.


IMG_4709


Step 7.

Place the two tails one over the other…


IMG_4710


.. and start sewing them together from the lower part.


IMG_4711


Go until you reach the tip of the tail and start to sew the other part.


IMG_4712


Stop when you make about 10 cm. Take a piece of filling and roll it between your hands.


IMG_4713


Press it on the stitched part of the tail.


IMG_4714


Continue to fill the tail while sewing the two sides together. It will look like this.


IMG_4715


Step 8.

Place the tail between the two cats, like this.


IMG_4716


Sew it in place.


IMG_4717


Step 9.

Fill the cat’s body.


IMG_4718


sew the two parts together…


IMG_4720


And the cat is ready 😀


IMG_4721


Isn’t this cat adorable!!! I hope you enjoyed the tutorial!

Technorati Tags: , , , , , , , , , , , , ,

Pixelated Shamrock with Paper Weaving Craft for Saint Patricks Day

This is a great craft for Saint Patrick’s Day. Have you ever heard of pixel art…well it is drawing with blocks (pixels)…this is how graphic images that you see on the screen are made. Anyways, it is sort of like mosaics with tiles because tiles are square blocks as well. Even if you don’t understand what I’m trying to say, you can appreciate this craft for its coolness factor. This is an interesting form of paper weaving as you will see when you take a look at the steps. Happy St. Patrick’s Day everyone.


Pixelated Shamrock with Paper Weaving Craft for Saint Patricks Day


Crafts Materials Needed:

White Paper

Green Paper

Scissor

Tape

Template to Print


Pixelated Shamrock Template


Click on Image and It Will Open Larger. Then Save Image to Your Computer.

Step 1


step1


Firstly, cut strips of paper. You can cut them to any width, but I cut them each 1/2 inch wide. Cut about 15 of each color.

 Step 2


step2


Now lay strips of white paper down as seen above. Tape either the right or left side down. I taped it down on the right.


 Step 3


step3a


Then start weaving. You just look at the paper template provided and see how many green are needed on each line. In the pic above, 2 blocks are needed. (I taped too many white strips down and that is why the green starts 5 blocks away instead of 3 like in the template).

 Keep Going


step3b


Keep going.

 Until Completed


step3c


This is what the shamrock looks like when completed.

 Step 4


step4


I taped the white strips to the green strips on the bottom and top ( as seen in the picture ). Now that it is secured, you can turn it over and tape it in place on the back as well. You then have a really cool shamrock. I hope that this was fun for you.

Technorati Tags: , , , , , , , , , , , , , , , ,


How to Make a Woven Leprechaun Beard with a Cardboard Loom for St. Patricks Day

Today we are making a woven yarn Leprechaun beard and we are doing it with a simple cardboard loom. I have seen some crafts online for making crocheted or knitted bears and I figured I would show you a way that you, as a child, can make a fabric beard. This is something you can do, just by  making a cardboard loom. This will be a great homemade Saint Patrick’s Day craft that I know you will have fun making.


How to Weave a Leprechaun Beard


Crafts Materials Needed:

Yarn

Scissors

Cardboard

(Optionally) Packaging Tape

Sewing Needle

Rubber Bands or Hair Rubber Bands

Step 1


step1


Cut a sturdy piece of cardboard that is about 9 inches wide. The height depends on how long you want the beard to be.

 Step 2


step2


If your cardboard isn’t very sturdy and bends easily then you will want to strengthen it by wrapping it in packaging tape. Otherwise, skip this step.

 Step 3


step3


Cut slits, 1/2 inches apart, along the top of the cardboard. Then cut diagonally downwards to make a beard shape. See the picture above.

 Step 4


step4


Now cut a slit across from the slits that you made in the previous step.

 Step 5


step5


I used red yarn, but if you have orange yarn this would probably be better for a Leprechaun. Tape yarn in the first slit as seen in the picture above.

Step 6


step6


I wrapped the yarn in a slightly different way then illustrated here. I then decided this way would be easier so that is why I had to draw the yarn in the picture above. Anyways, this is easy so don’t make it harder than it is. You are simply just wrapping the yarn around the cardboard, and each time inserting the yarn in the slits.

 Step 7


step7


Thread yarn thru a needle.

 Step 8


step8


If you haven’t ever woven anything, you will need to know that you are just putting the yarn under the first thread, then over the next one, under the next one, and so on. Do this now.

 Step 9


step9


Pull yarn thru until there is just a tiny tail of yarn hanging out, as seen in the picture above. To push yarn up, you can use a fork.

 Step 10


step10


When you get to the end of the row, you just turn around and go the other way. If you ended by going over the yarn, then on the next row you will go under the yarn. If you ended the row going under the yarn, in the next row you will go over though.

 Step 11


step11


When your yarn runs out, you will want to push the needled up thru some loops and then cut the yarn loose.

 Step 12


step12


Now you can start a new piece of yarn, just weave it exactly the way you did previously.

 Step 13


step13


Remember we will need a hole in our beard so we can talk thru it and show our mouth. To do this, you just weave back and forth along a few of the outside lines like I did in the picture. After you do a few rows (maybe about 5-6 rows), then you can start weaving along the entire width of the cardboard loom again.

 Step 14


step14


This is what your beard should look like when you finish the entire length of the loom.

 Step 15


step15


I want you to know sew around the border of the mouth. Nothing fancy, just loop around the outside border of the mouth. This will ensure that the yarn won’t come loose. After this cut the inside lines of yarn that you see inside the mouth.

 Step 16


step16


Next cut in half all of the yarn lines in the back of the cardboard loom.

 Step 17


step17


Now you will see that there will be free threads of yarn. Tie them together into knots so your woven beard doesn’t come apart.

 Step 18


step18


Now your beard will look like this.

 Step 19


step19


Now you will need rubber bands. I couldn’t find any normal rubber bands so I used hair bands. However, I believe that normal rubberbands would work better.

Push a rubber band thru the top corner of the beard.

 Step 20


step20


Now push one end of rubber band thru the loop of the other end and pull.

 Step 21


step21


It should now look like this. Do the same exact thing on the other top corner of the beard. If your beard doesn’t fit, you might need two rubber bands looped together on both sides. You basically just put a second rubber band thru the first rubber band…then you loop one side thru the other side (like you did in the last step) and pull.  This is called a rubber band chain…find out how to make one here.


step22


Like in the above picture…

Wear Your Leprechaun Beard


How to Weave a Leprechaun Beard


Now just loop the rubber bands over your ears. Perhaps you would like to put a Leprechaun hat on your head and really play the part. Perhaps make a goofy face like my son did. 🙂 Have a Very Happy Saint Patrick’s Day!!!

How to Make an Origami Shamrock

St. Patrick’s Day is just days away.  And, when you think of St. Patrick’s Day what do you think of?  I know what I think of…. Shamrocks!!  So, in honor of Shamrocks and St. Patrick’s Day I’m going to show you how to make an Origami Shamrock.  This Origami Shamrock will be perfect to hang up for St. Patrick’s Day or even use as a bookmark.  So, grab some Origami Paper and some glue and let’s get started with this craft.

Check out our other Origami & Paper Folding Activities & St. Patrick’s Day Crafts.


How to Make an Origami Shamrock


Materials Needed

5 Sheets Green Origami Paper

Glue


Step 1


Fold paper in half.


Fold paper in half.


Step 2


Fold in half the other way now.


Fold in half the other way now.


Step 3


Turn over.


Turn over.


Step 4


Fold bottom up to middle crease.


Fold bottom up to middle crease.


Step 5


Turn over.


Turn over.


Step 6


Fold bottom right corner up to center crease.


Fold bottom right corner up to center crease.


Step 7


Fold bottom left corner up to center line too.


Fold bottom left corner up to center line too.


Step 8


Flip over.


Flip over.


Step 9


Bring top right corner to center line.


Bring top right corner to center line.


Step 10


Now bring left top corner over to center line too.


Now bring left top corner over to center line too.


Step 11


Fold top corner down to crease line without folding white triangles on sides.


Fold top corner down to crease line without folding white triangles on sides.


The paper should now look like this.


The paper should now look like this.  Notice white triangles are unfolded.


Step 12


Fold white triangles in on the inner edge of each triangle.


Fold white triangles in on the inner edge of each triangle.


Like this.


Like this.


Step 13


Fold 2 triangles on each side of heart.


Fold 2 triangles on each side of heart.


Like this.


Like this.


Step 14


Now fold down top a bit to make less pointy.


Now fold down top a bit to make less pointy.


Step 15


It should look like this.


It should look like this.


Step 16


Make four hearts and then place them like this.


Make four hearts and then place them like this.


Step 17


For stem, place origami paper green side down.


For stem, place origami paper green side down.


Fold corner A to B to make crease in center.


Fold corner A to B to make crease in center.


Fold both corner A and B to center line.


Fold both corner A and B to center line.


Now bring left and right top sides down to center line


Now bring left and right top sides down to center line like seen here.


Fold in half as seen in next picture.


Fold in half as seen in next picture.


Like this.


Like this.


Fold A down to B.


Fold A down to B.


Like this.


Like this.


Step 18


Now place triangle over hearts.


Now place triangle over hearts.


Step 19


Glue all together.


Glue all together.


Step 20


Turn over.


Turn over.


Finished Origami Shamrock


And, there you have it…. you just finished your Origami Shamrock.  Isn’t it adorable?  How did it turn out for you?  Let me know in the comments below.  And, don’t forget to take a picture of it too and post that as well in the comments…. I’d love to see it.

Technorati Tags: , , , , , , , , , , , , , , , ,

How to Make Jumping Jack Leprechauns for St. Patrick’s Day

I have a fun and easy craft for you today.  In this post I’m going to show you how to make a Jumping Jack Leprechaun for St. Patrick’s Day.  When made the way that I describe in this post the arms and legs are movable making this leprechaun actually do jumping jacks when the string is pulled.  The youngest of crafters will enjoy not only making this leprechaun craft, but also playing with it once it is finished.  So, grab the materials needed and let’s get started.

Check out our other St. Patrick’s Day crafts.


How to Make Jumping Jack Leprechauns


Materials Needed

Printer & Paper

Crayons (optional)

Scissors

Glue

Cardboard (optional)

Hole Punch

Paper Fasteners

String


Click on template image below to make larger and to print.

Color Template


Color Template


Black & White Template


Black & White Template


Step 1


Print out


Print out…. If you printed the black & white template then color it in.


Step 2


Cut out and glue to cardboard


Cut out and glue to cardboard if you want it really sturdy.


Step 3


Punch a hole in top hole on both arms and legs


Punch a hole in top hole on both arms and legs… Leave bottom hole on limbs unpunched.


Step 4


Now use paper fasteners and push thru body thru to bottom hole on legs and arms.


Now use paper fasteners and push thru body thru to bottom hole on legs and arms.


Step 5


String holes the way image says to


The red circles are where the paper fasteners have been placed.  Now, put string thru hole 1…. under and up into hole 2…. then tie knot.  Then pull under hole 3 and over and into hole 4.  Tie knot.


Like this


Like this… Make sure arms and legs are down before tying knot.


Tie knot.


Tie knot.


Do the same for leg holes.  Tie knot.


Do the same for leg holes.  Tie knot.


Step 6


Punch hole in hat and hang on door by string.


Punch hole in hat and hang on door by string.


Step 7


pull the string and his hands and legs pop up.


Hang it on a door knob…. pull the string and his hands and legs pop up.

And, there you go…. you just finished making a Jumping Jack Leprechaun for St. Patrick’s Day.  This is a wonderful decoration for St. Patrick’s Day and it is equally fun to play with.  Enjoy!!

Technorati Tags: , , , , , , , , ,

How to Make Sugar Cookie Leprechauns for St. Patrick’s Day

Today I’m going to show you how to make Sugar Cookie Leprechauns for St. Patrick’s Day.  We will be decorating Sugar Cookies with Icing.  In order to do this Sugar Cookie Craft correctly please check out the following post, “How to Decorate Cookies with Royal Icing”.  In that post, Sweetopia shows you how to decorate cookies with the Flood Icing technique…. that is the technique we will be using for these Leprechaun Cookies.  So, let’s get started.

Check out our other St. Patrick’s Day Crafts.


How to Make Sugar Cookie Leprechauns


Materials Needed

Sugar Cookies

Green Icing

Black Icing

Yellow Icing

Orange Icing (optional)


Step 1


Buy sugar cookies.


Buy sugar cookies.


Step 2


color half of a circle shape green at top of the cookie.


Firstly, color half of a circle shape green at top of the cookie.


Step 3


Draw a thick curved black line.


Draw a thick curved black line.


Step 4


Draw 2 ovals for eyes and a letter U shaped nose.


Draw 2 ovals for eyes and a letter U shaped nose.


Step 5


Draw yellow square over black belt.


Draw yellow square over black belt.


Step 6


Outline some items in black if you want to


Outline some items in black if you want to.  You could also add eyebrows and a beard if you wish.

And, there you have it… you just made your super yummy Sugar Cookie Leprechauns for St. Patrick’s Day.  Didn’t they come out cute?  They are almost too cute to eat….. almost.

Technorati Tags: , , , , , , , , , , , , , , , ,

How to Make a Leprechaun Hat for St. Patrick’s Day

I don’t know about you, but when I think of a Leprechaun I think of the big, green hat he wears.  Today I’m going to show you how to make your very own Leprechaun Hat for St. Patrick’s Day.  After all, St. Patrick’s Day is only a little over a week away.  Now is the time to get started making and displaying your St. Patrick’s Day crafts.  So, grab the materials needed and let’s get started with this fun St. Patrick’s Day craft.

Check out our other St. Patrick’s Day crafts.


How to Make a Leprechaun Hat


Materials Needed

Large Ice Cream Carton or Bucket

Green Craft Foam or Wrapping Paper

Paper Plate

Green Paint

Pencil

Scissors

Glue

Tape

Belt or Black Foam/Paper & Yellow Paper


Step 1


You need a large ice cream carton or bucket.


You need a large ice cream carton or bucket.


Step 2


Wrap with green craft foam or with green wrapping paper.


Wrap with green craft foam or with green wrapping paper.  Leave hole at bottom.


Step 3


Paint a paper plate green.


Paint a paper plate green.


Step 4


Trace carton in center of plate.


Trace carton in center of plate.


Step 5


Now draw tabs.


Now draw tabs.


Step 6


Cut out.... fold tabs inwards.


Cut out…. fold tabs inwards.


Step 7


Glue and tape tabs inside of container.


Glue and tape tabs inside of container.


Step 8


The easy way to add a belt is to borrow your Dad's belt and strap it on hat.


The easy way to add a belt is to borrow your Dad’s belt and strap it on hat.


Or..... just add black strip of foam or paper.  And, yellow square with center cut out.


Or….. just add black strip of foam or paper.  And, yellow square with center cut out.


Step 9


Wear the hat.


Wear the hat.

Isn’t this Leprechaun Hat adorable?  What child wouldn’t enjoy running around the house wearing this Leprechaun Hat for St. Patrick’s Day?  Enjoy.

Technorati Tags: , , , , , , , , , , , , ,

How to Make a Leprechaun Trap for St. Patrick’s Day

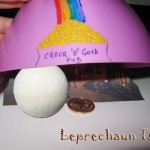
Everybody knows that leprechauns are very fond of money and parties, so let’s make a trap for him that will look like a pub, with the entrance marked by coins.  The craft is not only a lot of fun, but it will totally get you in the St. Patrick’s Day spirit.  After all, St. Patrick’s Day is in a little over a week.  The time is now to start decorating for the Holiday…. and this Leprechaun Trap makes for an adorable St. Patrick’s Day decoration.  So, let’s get started.

Check out our other St. Patrick’s Day Crafts.

Laura from Dacian Moon Handmade will show you, step by step, how to make a leprechaun trap.


Materials Needed

– any picture of a pub interior
– bowl
– scissors
– needle
– paints
– paintbrush
– coin
– a nut or a wooden ball
– a very thin wire (about 10 cm)


Step 1

Take the bowl and with the paintbrush and paints make some coins and a rainbow on one corner of the bowl (mine is rectangular… if yours is round, just paint on one side)…


… then write “Crock ‘O’ Gold Pub”, like in the picture.


Step 2

Take the wooden ball (or nut)


Stick the needle on it.


Wriggle one side of the wire around the needle…


… then the other side around the coin:


It will look like this:


Step 3

Take the picture and fold the upper corners, then place it on the bowl. It should stay like this:


Step 4

Place the bowl (with the picture inside) over the wooden ball (or nut), like this…


… and the trap is ready ! When the leprechaun will try to pass by the wooden ball (because the entrance is smaller than he) the nut will roll and the bowl will fall catching him beneath. The assurance is that even if the ball will not move (and the bowl falls) when he will try to take the coin, the ball will roll and the bowl will fall over him.


Now you have a Leprechaun Trap.  You will be able to catch a Leprechaun for sure this St. Patrick’s Day.

Technorati Tags: , , , , , , , , ,

How to Make a Leprechaun Finger Puppet for St. Patrick’s Day

Oh boy, do I have a fun craft for you today!!  I don’t know if the craft is more fun or the playing with the finished craft once it is done.  Today I’m going to show you how to make a Leprechaun Finger Puppet.  We give you the template… you just simply print it off and your craft is halfway done.  You can choose to print off the black & white template and color the Leprechaun yourself…. or, if you would prefer, you could print off the color template and continue with the craft from there.  The choice is yours.  So, let’s get started.

Check out our other St. Patrick’s Day Crafts.


How to Make a Leprechaun Finger Puppet


Materials Needed

Printer & Paper

Scissors

Cardboard

Glue


Click on the template image to make larger and to print.

Black & White Template


Black & White Template


Color Template


Color Leprechaun Template


Step 1


Print out template.


Print out template.


Step 2


Cut out Leprechaun.


Cut out Leprechaun.


Step 3


Glue him to cardboard.


Glue him to cardboard.


Step 4


Let dry.... then cut out.


Let dry…. then cut out.


Step 5


Finished Leprechaun


Now put your fingers thru the finger holes.  Your fingers are the little guy’s legs.  Have fun playing.

Technorati Tags: , , , , , , , , , , , , , ,

How to Make a Button Leprechaun for St. Patrick’s Day

St. Patrick’s Day is coming up in less than 2 weeks.  So, with that being said…. I thought that we could work on a fun craft in honor of St. Patrick’s Day.  In this post I will show you how to make a Button Leprechaun.  A Leprechaun is supposed to be a fairy type of being that takes the shape of an old man…. he usually wears a green jacket.  a Leprechaun is popular in Irish folklore.  So, in preparation of the upcoming St. Patrick’s Day Holiday let’s get this craft started.

Check out our other St. Patrick’s Day Crafts.


How to Make a Button Leprechaun


Materials Needed

Pipe Cleaner

4 Small Black Buttons

1 Large Black Button

2 Medium Black Buttons

6 Green Buttons

3 Pink Buttons

1 Large Orange Button

Black Marker or Paint


Step 1


Get a pipe cleaner.


Get a pipe cleaner.


Step 2


Start placing buttons on pipe cleaner.


Start placing buttons on pipe cleaner.


Step 3


Lace buttons on pipe cleaner in the following order


Lace buttons on pipe cleaner in the following order:  1 Black, 3 Greens, 1 Black, 3 Greens, 1 Large Orange, 3 Pinks, 1 Big Black, 4 Small Black.


Step 4


Push pipe cleaner down into hole diagonal to the hole that the pipe cleaner is coming out of.


Push pipe cleaner down into hole diagonal to the hole that the pipe cleaner is coming out of.


Step 5


Twist pipe cleaner at bottom.... cut.


Twist pipe cleaner at bottom…. cut.


Step 6


Draw eyes on the pink buttons.


Draw eyes on the pink buttons.


Finished Button Leprechaun


Check out the finished Button Leprechaun.  Isn’t he cute?  How did your Button Leprechaun turn out?  Let me know in the comments below.  And, make sure to take a picture of your finished craft and leave that in the comment as well…. I’d love to see it.

Technorati Tags: , , , , , , , , , , ,

How to Make a Shamrock Greeting Card for St. Patrick’s Day

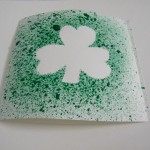
In this post I’m going to show you how to make a Shamrock Greeting Card Craft for St. Patrick’s Day. You can make it to wish your friend, teacher or mother (or whoever you would like) a wonderful St. Patrick’s Day.  All you need is some paint, paper and an old toothbrush.   The craft is an easy one, but it is sooooo…. much fun.  So, grab those materials needed and your St. Patrick’s spirit and let’s get started.  Have fun!!

Check out our other St. Patrick’s Day Crafts.


Materials Needed

Thick white paper

Paint

Toothbrush

Scissors

Marker


Step 1

Fold a piece of thick white paper to make a card of the size you want.


Step 2

Draw out a shamrock smaller than the card and cut it out.


Step 3

Take an old toothbrush and dip it in some tempera paint.


Step 4

Place the shamrock in the center of the card.  Use the toothbrush to spray paint on it.  Make sure you spray plenty of paint around the edges of the shamrock.


Step 5

When you are done lift the shamrock off carefully… and surprise!!… you have a beautiful shamrock card underneath.


Step 6

Allow it to dry, write a special message inside, and spread a little love this St. Patrick’s Day.  The receiver of this card will absolutely love it!!

Technorati Tags: , , , , , , , , , , , ,

How to Make a St. Patrick’s Day Matching Game

St. Patrick’s Day will be here before you know it…. so in the spirit of that this craft is all about St. Patrick’s Day.  In this post I will be showing you how to make a St. Patrick’s Day Matching Game.  This craft is perfect for the Preschool crafter as this game is all about matching the size of each shape of the shamrocks.  Get a couple Preschoolers together and listen to them giggle as they try to match the shape of the shamrocks.  So, with that being said…. let’s get started.

Check out our other St. Patrick’s Day Crafts.


Materials Needed

Crayons

Markers

Scissors

Thick paper

Cardboard/ thick paper for base


Step 1

Draw and color shamrocks of different shapes and sizes.


Step 2

Cut them out as shown below.


Step 3

Place them on your cardboard/ thick paper which is going to be your base and trace the outline of each shamrock on it.


Step 4

The game is to match each shamrock to its outline.


Now grab some friends or your parents and start playing the St. Patrick’s Day Matching Game.  Enjoy!!

Technorati Tags: , , , , , , , , , , , , , ,

How to Make a St. Patrick’s Day Shamrock Streamer Decoration

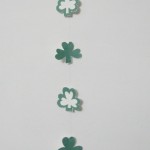
St. Patrick’s Day is coming up in just a few weeks…. March 17th to be exact.  Have you started decorating yet?  If you haven’t, but you’d like to start…. then I have the craft for you today.  I’m going to show you how to make a St. Patrick’s Day Shamrock Streamer Decoration.  It is a super easy craft, so this is a great craft for the youngest of crafters.  But, it is also fun enough to keep the attention of all age crafters.  So, no matter what your age is…. grab the materials needed and let’s get started.

Check out our other St. Patrick’s Day Crafts.


Materials Needed

Green colored paper

Thick white paper

Nylon/ transparent thread

Scissors

Glue


Step 1

Draw out a few shamrocks


Step 2

Cut them out.


Step 3

Draw some more shamrocks, slightly smaller than the first set.  This time, draw a second outline around them as shown below.


Step 4

Cut along the inside and outside line to form an outline of a shamrock.


Step 5

Glue both types of shamrocks on the thick white paper.


Step 6

Cut them all out .  On each shamrock pierce two holes , one at the top and the other at the bottom, as shown below.


Step 7

Tape a piece of ribbon to the most top shamrock as shown below.


Step 8

Use the nylon thread to tie the bottom hole of one shamrock and the top hole of the next shamrock as shown below.  When you are tying together the shamrocks, make sure that you alternate one fully colored shamrock with one outline shamrock .


Step 9

Make it as long as you like.  Hang it up on a wall.  Let the festivities begin!!


There you go…. you just finished your St. Patrick’s Day Shamrock Streamer Decoration.  How did it turn out for you?  Let me know in the comments below.   And, take a picture of the streamer hung up and share that in the comment as well…. I’d love to see it.

Technorati Tags: , , , , , , , , , , ,

How To Make Hand Print Rainbows for St. Patrick’s Day Preschooler Activity

Rainbows bring smiles to faces everywhere and these hand print rainbow are very easy for children of all ages to make. This is a perfect activity for toddlers, preschoolers, and Kindergartners. They are fun to make and parents just love handprints from their children.

You Might Like Our Other St. Patrick’s Day Crafts Ideas


How To Make Hand Print Rainbows for St. Patrick's Day Preschooler Activity


How To Make Hand Print Rainbows for St. Patrick’s Day Preschooler Activity

Crafts Materials Needed

*Construction Paper in Rainbow Colors (Red, Yellow, Orange, Green, Blue, Indigo, and Violet)

* Pencils or Markers

* Scissors

* Glue


Hand Print Rainbow Instructions

Step 1

Teach the kids about the rainbow and the spectrum of light and all that jazz. If they are very young….teach them the order of the colors in a rainbow by telling them about the name Roy G. Biv (Red, Orange, Yellow, Green, Blue, Indigo, Violet)


Step 2

Have the child trace his or her hand on each color of paper (or trace it for them if they are very young)

Step 3


How To Make Hand Print Rainbows for St. Patrick's Day Preschooler Activity


Glue each hand together, in order (Red, Yellow, Orange, Green, Blue, Indigo, and Violet) in a rainbow-like arc.

You Might Like Our Other St. Patrick’s Day Crafts Ideas

Technorati Tags: , , , , , , , , , ,

How To Make Pot Of Gold Pins for Saint Patricks Day Arts and Crafts Project

Everyone wants their very own pot of gold decorative pins for St. Patrick’s Day and kids will love having their own to wear. Learn how to make this pot of gold and shamrock out of crafts foam.

You Might Like Our Other St. Patrick’s Day Crafts Ideas


How To Make Pot Of Gold Pins for Saint Patrick's Day Arts and Crafts Project


How To Make Pot Of Gold Pins for Saint Patrick’s Day Arts and Crafts Project

Pot Of Gold Pin Supplies

*Black craft foam

*Yellow or gold craft foam

*(optionol)Green craft foam

*Glue

*Latch pin, usually comes in bags from the craft stores

*Scissors

Pot Of Gold Instructions

Step 1


 ​Cut the black c​raft foam into the shape of a pot.


Cut the black c​raft foam into the shape of a pot by first cutting out a circle.


And then an oval


And then an oval


 And then putting them together to form a pot.


And then gluing them together to form a pot.

Step 2


Cut a smaller oval, in gold / yellow this time and glue it to the black oval...in the center.


Cut a smaller oval, in gold / yellow this time and glue it to the black oval…in the center.


Step 3


Cut the yellow or gold craft foam into small circles for the coins.


Cut the yellow or gold craft foam into small circles for the coins. Glue them on the pot.


Step 4


cut out 4 hearts


We are going to cut out 4 small hearts to make a 4 leaf clover. To do this fold a green scap piece of paper in half length-wise…and draw half of a heart on the fold…then cut it out.


4 hearts


Step 5


glue 4 hearts onto the pot


Glue the 4 hearts on to the pot as pictured above.

Step 6


cut out a stem


Cut out a letter ‘J’ to make the green stem.

Step 7


Take a pin and glue the pot and the gold onto the pin.


Take a pin and glue the pot and the gold onto the pin.


And you are done…now you have something festive and green to wear on St. Patrick’s Day.

You Might Like Our Other St. Patrick’s Day Crafts Ideas

Technorati Tags: , , , , , , , , ,