How to Make a Clip Bookmark

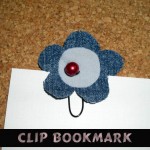
One thing I never can find when I need one is a bookmark.  And, you can always use a bookmark in school to mark your homework spot in your textbooks.  So because of that…. today I’m going to show you how to make a Clip Bookmark.  Not only is it super cute, but it is also super effective  in keeping your spot…. after all it is a clip that is sure to hold tight.  So, grab the materials needed for this craft and let’s get started.

Check out our other Bookmark Crafts.

Laura from  Dacian Moon Handmade  will show you, step by step, how to do this craft.


Materials Needed

– paper clip
– one piece dark denim
– one piece light denim
– glass pearl
– pen
– needle and thread


Step 1

Draw a flower on the dark denim…


… and a circle on light denim.


Cut them out.


Step 2

Take the flower…


… and sew the circle on it.


On the back we will place the clip and sew it there.


Turn the bookmark over. The stitches are visible, but we will mask that by sewing the glass pearl over them.


Like this. The bookmark is ready to use.


Wasn’t that easy?  And, so much fun!!  Now, you have an awesome Clip Bookmark perfect for bookmarking your homework spot in your textbooks.  Enjoy!!

Technorati Tags: , , , , , , , , , ,

How to Make a Bookmark of Memories

Throughout the year you have a lot of things that you do with your friends that you would probably like to remember.  For example…. School, Summer Camp, Sports, Work, etc.  With each of these things you make new friends and build new memories.  That is a wonderful thing….. but wouldn’t you like to remember each of these things?  Well, today I’m going to show you how to do just that….. I’m going to show you how to Make a Bookmark of Memories.  So, grab your friends and let’s get started.

Check out our other Keepsake Craft Ideas.

This tutorial offered by Laura from Dacian Moon Handmade.


Materials Needed

– yellow and green paper (or any other colors)
– crystal sticker
– ruler
– scissors
– colored pens
– glue
– friends


Step 1

Cut a piece of green paper, as big as your bookmark will be.


Cut a yellow piece of paper about 1cm shorter than the green one.


Step 2

Apply a layer of glue on the yellow paper…


… and place it on top of the green one.


Step 3

Cut a square of green paper, with the same size width of the bookmark.


Fold it two times on diagonal until you have this small triangle.


Cut one corner in zigzag…


… like this.


Unfold.


Glue this piece on the upper edge of the bookmark.


Step 4

Cut a yellow square about the size of the width of the yellow part of the bookmark and fold it like this.


Cut a heart shape from it.


Cut the margins like in the picture, but don’t cut the corner.


Unfold.


Glue the yellow flower on top of the green one.


Step 5

Place the crystal sticker in the middle of the flower.


Write on petals “Memories Bookmark” and the year.


Decorate it as you please.


Step 6

Ask your friends to write a quote and to sign your bookmark.


Isn’t this a great Keepsake Memories craft?  Keep this in your photo album, memory box or your favorite book to remember the good times you shared with your friends for years to come.

Technorati Tags: , , , , , , ,

How to make a Heart Bookmark

Valentine’s Day is coming up next month.  And, with Valentine’s Day what do you think of?  Hearts, of course.  Well, with that being said…. today I’m going to show you how to make a Heart Bookmark.  This Heart Bookmark would be perfect to give to someone special this Valentine’s Day.  You can imagine that every time he or she looked at it they would be reminded of the fact that you made it especially for them.  So, grab the materials needed and let’s get started.

Check out our other Valentine’s Day Crafts or our other Bookmark Making Crafts.

Tutorial offered by Laura from Dacian Moon Handmade).


Materials Needed

– paper
– scissors
– red paint marker
– pencil


Step 1

Make the paper square.


Step 2

Cut the paper in half.


Step 3

Fold in half, then unfold (because we need the crease).


Step 4

Fold every half in half again, like in the picture …


… and unfold.


Step 5

Fold the upper right corner until you reach the closest crease.


Unfold.


Step 6

Fold in the dotted line.


Step 7

Fold the right upper corner to meet the center crease.


Do the same with the left upper corner.


Step 8

Fold the new formed corner like in the picture (in half)


It will look like this.


Step 9

This could seem tricky but it is quite simple. Fold in the first crease on the right, lifting the corner and flattening it.


This will force another fold on the back.


Step 10

We are still working on the face. Do the same with the other side. It should look like this.


Step 11

Fold a little corner on all upper corners…


… like this.


Step 12

Turn over and… there is the heart!


Step 13

Use the paint marker to decorate it the way you like.


And, there you have it…. you just finished making your beautiful heart bookmark.  Didn’t it turn out just lovely?  Take a picture of your Heart Bookmark and post it in the comments below so I can see how awesome your bookmark turned out.

Technorati Tags: , , , , , , , , , , , ,

How to Make Cute Bookmarks

Do you love to read?  I love to read.  My only issue is I seem to never have a bookmark when I need one.  I don’t know what happens to my bookmarks, but they seem to disappear.  I land up just using a paper napkin…. or sometimes I even just fold down the corner of the book.  I hate doing that though… I like nice crisp pages in my books.  At any rate, I am getting to a point here…. Today I’m going to show you how to make cute bookmarks for your books.  So, grab the supplies needed and let’s get started.

Check out our other Bookmark Crafts.

Laura from  Dacian Moon Handmade  will show you, step by step, how to make two cute bookmarks.


Materials Needed

– colored cardboard (we will use blue and orange)
– scissors
– pencil
– colored pens


Step 1

Take the blue cardboard and fold it in half.


Use your pencil to draw a cloud on it, on the folded side.


Step 2

Cut the cloud out…


… taking care to not cut the upper part.


Step 3

Now, draw two cloud hands on it.


Step 4

Cut the hands on the front side, like this:


Step 5

Now you can decorate it using your colored pens. I will make him eyes and a mouth…


… and… actually I think it is a girl cloud, so I will add a bow too.


Isn’t she cute how she looks hanging over the book?

Now, let’s make the second bookmark.

Step 1

On the orange paper draw a flower with leaves and a stem.


Step 2

Cut it out.


Step 3

Using your colored pens, give life to this flower.


Now your bookmark is ready. Just put the stem behind the page and the leaves over it.


Now that you learned how to make these bookmarks you can make any bookmark you would want.  Aren’t these bookmarks adorable?  How did your bookmarks turn out?  Let me know in the comments below.

Technorati Tags: , , , , ,

How to Make a “Thank You” Bookmark for Thanksgiving

Thanksgiving is just around the corner.  Thanksgiving is a day to give thanks for all that you have… for all the love and support you have around you.  What better way to show your loved ones you are thankful for them than to give them a gift you made yourself.  Today I’m going to show you how to make a “Thank You” Bookmark perfect for giving as a gift for Thanksgiving.

Check out our other Thanksgiving Crafts and Bookmark Crafts.


Image172


Materials Needed

Thick White Paper

Colored Paper to Make Letters (you could also use stickers)

Glue

Scissors

Thread – Different Colors ( I used 6 stranded embroidery thread)

Hole Punch

Pencil


Image173


Step 1

Cut out letters in different colors (or use stickers, or print out letters and cut them out)


Image151


Step 2

Arrange them in a row and glue to the white paper as shown


Image152


Step 3

Draw a line around the letters according to the shape of the letters as shown


Image153


Step 4

On the top, make a semi circle and draw as shown


Image154


Step 5

Cut along the line and punch a hole in the top.


Image156


Step 6

Take threads of different colors


Image162


Step 7

Cut them out into pieces 6 inches long, and fold them in the middle as shown


Image165


Step 8

Push the folded end through the punched hole on top of the bookmark as shown


Image166


Step 9

Pull the loose ends of the threads up and put them into the loop that is formed as shown.


Image169


Step 10

Pull tightly, till it looks like this.


Image172


And, that’s it.  It is a simple craft, but it will go over big as a gift.  So, whose the lucky person who is going to get this gift from you?

Technorati Tags: , , , , , , , , , , ,

How to make a Monster Bookmark

Monsters can be scary, but some of them can be quite cute too.  There is nothing to be frightened of with the cute ones…. actually, they are very friendly.  In this post I will show you how to make a Monster Bookmark perfect for protecting over your spot when you are done reading.  And, this monster might look quite cute, but he is plenty tough to make sure your reading spot stays safe.

Check out our other Halloween Crafts.

Laura from  Dacian Moon Handmade  will show you, step by step how to make it.


CRAFT MATERIALS NEEDED:

– colored cardboard
– white cardboard
– ruler
– paints
– scissors
– paintbrush
– pencil
– pen (optional)
– glue


Step 1

Take the colored cardboard. Measure 10 cm on one side of it…


… and 10 cm on the other (near the same corner)


Measure 5 cm on both sides too, than draw two rectangles like in the picture.


Step 2

Unite two opposite corners on the exterior small rectangles…


… like this.


Later we will cut off the marked triangles.


Step 3

Cut out the drawing…


… and the two triangles.


Step 4

Using the paints and paintbrush decorate the central part.


I am making points with red paint…


Then, using a black pen I cover the space between the points…


… like that.


I want to create an illusion of scales, so I add some purple color.

Let it dry.


Step 5

Fold one triangle over the painted part…


… like this.


On the other triangle add a layer of glue…


… and bring it over the central part.


Step 6

Decorate this triangle too.


Step 7

Draw two circles on the white cardboard…


… cut them out…


… and glue them…


… on the new decorated triangle (after its dry, of course).


Step 8

Do the same with the colored cardboard (two circles a little smaller).


It will look like that.


Step 9

Now, we will make the monster teeth. You can measure with one colored triangle.


We must take care to have an extra place that will go inside. Apply a layer of glue on that extra place and fix it…


… like that.

Now you have a cute little monster who can’t wait to chew your book corners.


Isn’t that a terrific little bookmark?  You can count on the fact that no one will have the exact bookmark as you.  Stop turning down the corners of your books and instead make this Monster Bookmark.

Technorati Tags: , , , , , , , ,

How to Make a Chinese Fire Dragon Bookmark Craft for Kids

Because Chinese dragons are magnificent creatures and the Chinese New Year is approaching, let’s make a simple bookmark with dragon head. This beautiful bookmark that you will make in this arts and crafts project, will astound your friends and family members. And it is a LOT of fun to make. This crafts ideas was contributed by Laura from Dacian Moon Handmade

You Might Also Like Our Other Chinese New Year Crafts


How to make a Chinese Fire Dragon Bookmark for The Chinese New Year

CRAFTS MATERIALS NEEDED:

– paper (not too thin) – white and red
– scissors
– design template (uncolored dragon head)
– craft glue
– ribbon (about 25 cm)
– paints
– paintbrush
– yarn


Step 1

Print the head of the dragon (you get the file by clicking on the bolded word). Paint it in any way you want your dragon to be. Or Visit Our Chinese Dragon Head Drawing Tutorial if you want to draw it freehand.


I want this to be a dragon who will guard the fire so I use red, yellow, orange and green for it’s eye. Let the paint dry.


Step 2

With the scissor, cut out the dragon head.


It will look like this.


Step 3

Apply a layer of glue on the unpainted face …


… and then place it on one end of the ribbon. Let the glue dry.


Step 4

Use the scissor to cut 10 pieces of yarn of about 10 cm each.


Apply a layer of glue on the empty end of the ribbon…


… and place over it the threads, folded in two.


When you’ll finish, it will look like that. Let it dry.


Step 5

Cut a piece of the red paper, just big enough to cover the threads on the ribbon.


Apply a layer of glue on it…


… and place it over the threads, on the ribbon’s end. Let it dry well.


Now, our bookmark is finished and ready to make itself useful 🙂


Technorati Tags: , , , , , , , , ,