How to Make a Kawaii Hair Clip

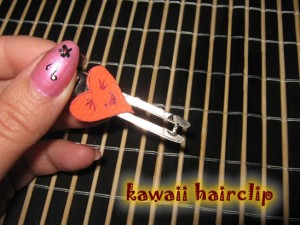
Kawaii means cuteness in Japanese culture (literally, adorable, precious, lovable, or innocent). So, in honor of that today we are going to make a Hair Clip that is totally Kawaii.  The craft is an easy one, but the outcome is a hair clip that you will love to wear.  Made from a piece of leather, a hair clip and a couple of other materials you’ll have this craft put together in no time.  So, grab the materials needed and let’s get started.

Laura from Dacian Moon Handmade will show you this tutorial step-by-step.


Materials Needed

– a piece of red leather (about 3 cm x 3 cm)
– hair clip
– scissors
– craft glue
– black, thin marker


Step 1

Draw a cute figure on the leather (I chose a heart).


Step 2

Cut out the figure with the scissor…


… like this.


Step 3

Draw on a super kawaii face with the marker.


Step 4

Apply a layer of glue on the back of your figure.


Step 5

Place the figure on the hair clip and that’s all. Now, you have a kawaii hair clip.


Doesn’t this Kawaii Hair Clip turn out quite adorable.  I guess it should…. after all that is what Kawaii is all about.  How did you Kawaii Hair Clip turn out?  Let me know in the comments below.  And, make sure to take a picture of your hair clip and add it to the comment…. I’d love to take a peek at it.

Technorati Tags: , , , , , , ,

Chinese New Year Crafts – Year of the Dragon


Chinese New Years Crafts


Chinese New Year falls on January 23rd this Year.  And, in honor of Chinese New Year I put together a list of crafts just about the Chinese New Year.  You will find that most of them are Dragon Crafts and you might wonder why….. well, I will tell you why.  This year is the Year of the Dragon.  So, to honor that fact the majority of the crafts I have listed here will be Dragon Crafts.  Not all of them…. there are plenty of fun other crafts that have nothing to do with Dragons.  So, check out the post and pick a few Chinese New Year Crafts to do with the kids….. they are sure to love them.  So, let’s get started.

Here are Even More Chinese New Years Crafts

Chinese New Year Crafts – Year of the Dragon

(1) Festive Ribbon Dragon


Festive Ribbon Dragon


Here is an adorable dragon perfect for this years Chinese New Years.  This is the mini sized version of the huge size dragon they use in parades for Chinese New Years.  Check out FamilyFun for all the crafting details.


(2) Pop-Up Greeting Card


Pop-Up Greeting Card


Isn’t this Chinese Pop-Up Greeting card gorgeous?  I think it is really beautiful.  Imagine giving this to someone to celebrate the Chinese New Year.  Go to FreePaperCraftTemplate for all the details on how to print off this free template.


(3) Origami Dragon


Origami Dragon


Since this Chinese New Year is the year of the Dragon how could I not include an Origami Dragon in this post.  And, look how awesome this Origami Dragon turns out.  You can get the full instructions for this Origami by going to Origami-Instructions.


(4) Chinese New Year Fish


Chinese New Year Fish


Fish is a very popular dish on Chinese New year.  Fish is a sign of prosperity…. so it is very common to see people eating fish on Chinese New Year.  With that being said I thought it was a good idea to include Fish in this Chinese New Year Post.  Go to Julie K in Taiwan for all the craft details.


(5) Chinese Dragon Door Hanger


Chinese Dragon Door Hanger


Here is a cute craft for the youngest of crafters.  If you go to NickJr they show you how to make a simple Chinese Dragon Door Hanger that is perfect for any kid’s room.  Plus, making this craft with them is the perfect time to explain to your kids a little bit about the Chinese New Year.


(6) Dragon Mask


Dragon Mask


Now, isn’t this Dragon Mask incredible?  What little one wouldn’t love wearing this Dragon Mask all over the house.  After all, children love dressing up.  Find all the Dragon Mask “how-to’s” over at AlphaMom.  This is such a great Chinese New Year craft!!


(7) Pull-A-Long Dragon Craft


Pull-A-Long Dragon Craft


Here is a great way to make a Dragon for Chinese New Year….. made out of paper cups.  How awesome is that?!  It turns out so cute too.  This is a great way to teach your children about the Chinese culture.  Make sure to check out the craft in its entirety over at FreeKidsCrafts.


(8) Toy Spinning Hand Drum


Toy Spinning Hand Drum


Here is a fun toy for the Chinese New Year.  Not only fun to play with…. but also fun to make.  This toy is a great way to make lots of noise during the Chinese New Year.  Make sure to check out 4CrazyKings for all the fun details.


(9) Paper Dragon


Paper Dragon


This is a fun craft for the Chinese New Year.  This Paper Dragon turns out so beautiful…. I just love the colors.  I found this craft over at CraftJr and I just love it.  She explains how this craft is really so easy that a toddler can do it.  And, trust me…. the kids will love maneuvering around the dragon with the sticks.


(10) Marbled Red Vinasse Eggs


Marbled Red Vinasse Eggs


This Marbled Egg  is an extremely popular Chinese snack…. and it is extremely popular during Chinese New Year as the egg represents fertility.  To get this marbled effect you first crack the egg and then simmer the egg in colored liquid.  Get the full details at Pig Pigs Corner.


(11) Paper Chain Dragons


Paper Chain Dragons


One of the easiest crafts to teach a young child is how to make a paper chain.  So, let’s use that technique to make a Paper Dragon.  The kids will have such a fun time making this craft.  The Chinese tradition is a rich tradition….. why not show this to your kids by creating this craft.  Check out NaturallyEducational for all the craft details.


(12) Flying Dragon Puppet


Flying Dragon Puppet


Okay, I officially love this craft…. I just love how it turns out.  It turns out so colorful and festive…. just like any New year should be.  Check out JellyFishJelly for the craft details and put this Flying Dragon Puppet together.  I don’t know what your kids will love more…. putting the craft together or playing with the puppet.

Technorati Tags: , , , , , , , , ,

A Bowl of Oranges Collage – Craft for Chinese New Year

Chinese New Year is just a few days away…. It falls on January 23, 2012.  Chinese New Year is the most important of the traditional Chinese Holidays.  In honor of Chinese New Year today we are going to make a Bowl of Oranges Collage.  Oranges are passed out freely on Chinese New Year because they represent luck and wealth.  So, I thought this craft would be a perfect craft for Chinese New Year.  You only need a few materials for this craft, so grab them and let’s get started.

Check out our other Chinese New Year Crafts.


Materials Needed

colored papers in different shades of orange

2 construction papers, any color prefered (of different colors)

toy cup

scissors

glue


Step 1

Choose a darker construction paper as your base. Using a toy cup, draw circles on the orange papers.  Using the scissors, cut out the circles. These will be your oranges.


Step 2

Using the other construction paper, cut a shape of a bowl.


Step 3

Arrange oranges on the bowl and glue.

You can add any  embellishments and designs to your bowl that you wish.  In my collage I added extra pieces of the orange papers to decorate the sides of the bowl.  How are you going to decorate your bowl?  Let me know in the comments below.  And, feel free to take a picture of your collage as well and add that to the comments…. I’d love to see it.

Technorati Tags: , , , , , , , ,

How To Make A Chinese Paper Lantern

Today I’m going to show you how to make a Chinese Paper Lantern.  This craft is ideally for Chinese New Year. But, you can also have your kids do this if you have a Chinese-themed party, or maybe a Chinese activity in school…. or perhaps you would just like to teach your children about the Chinese tradition.  What ever the reason may be your kids are sure to love making this craft.  So, grab the materials needed and let’s get started.

You can go with all red or mix it with other playful colors to have rainbow inspired lanterns. If you want bigger lanterns, you can just adjust paper size accordingly.

Check out our other Chinese New Year crafts.


Materials Needed

colored papers

scissors

glue


Step 1

Fold colored paper in half, lengthwise… then another half, crosswise.  Now you have 4 equal sides. Cut rectangles.


Step 2

Using one rectangle, fold it lengthwise.  On the folded side, cut strips of about 1/4 inch… be careful not to cut it all the way.  Leave about half an inch on the end.


Step 3

Open fold and using glue, attach both ends, with the strips vertically positioned.  You can cut a short strip of the same color paper and attach it on top of the standing lanterns, as its holder.


Step 4

Do the same steps to do some more lanterns, varying colors if preferred.

You can leave it on a table as a decoration  or you can get some string and hang them from the ceiling.  Whatever way you decide to present these lanterns they are sure to be a big hit.  How did your lanterns turn out?  Let me know in the comments below.

Technorati Tags: , , , , , , , , , , ,

Making Rabbit Chinese New Year Fan Arts and Crafts Project for Kids

2011 is the Year of the Rabbit, so today we will be making a Chinese-style fan with rabbits on it.  Included is a template with 3 rabbit outlines, but you can also draw your own.  Just make sure they aren’t too big.

Here are Even More Chinese New Years Crafts


Making Rabbit Chinese New Year Fan Arts and Crafts Project for Kids


Making Rabbit Chinese New Year Fan Arts and Crafts Project for Kids

CRAFTS MATERIALS NEEDED:

  • White paper
  • Colored pencils, crayons, or washable markers
  • Safety Scissors
  • Tape
  • 1-sheet of red construction paper
  • Ruler or yard stick at least 12 inches long.

STEP 1 – RABBIT OUTLINES

Print or draw three rabbit outlines.


STEP 2 – COLOR FACES

Color the faces on to your rabbits.  You can give them as much or as little detail as you want.  I added a nose, mouth, eyes, whiskers, and inside of ears.


STEP 3 – CUT OUT RABBITS

Using your safety scissors (or ask an adult to use sewing scissors) cut out all three rabbit faces.


STEP 4 – TAPE RABBITS ON TO FAN

Arrange the rabbits on the construction paper and tape them down.  For starters use one piece of tape on the bottom of the face, and one on the top of each ear.  You will need more tape later.


STEP 5 – MEASURE FOR FOLDS

Set your ruler down and lay your paper on top of it.  Mark each inch on the bottom of the construction paper so you will know where to fold.


STEP 6 – FOLD THE FAN

Starting at the first inch mark fold the fan up and inward then crease the edge.


On the second inch mark fold backward and crease again.


Keep going back and forth until you reach the end.  Now you can tape down any parts of the faces that didn’t fold down.


STEP 7 – SECURE BASE

Hold the bottom of the fan together and secure with a few pieces of tapes.


STEP 8 – FINISHING OFF

Pull the fan open as far as you can, and starting in the middle fold the top of the fan forward by about half an inch to and inch.  Work your way out to the edges of the fan.  This fold should keep the fan open for display.


Here are Even More Chinese New Years Crafts

Technorati Tags: , , , , , , , , , , , ,

How to Draw a Chinese Dragon Head Step by Step Drawing Tutorial

We just showed you how to make a very cool Chinese dragon bookmark for the Chinese New Year. We wanted to follow up this arts and crafts project with a Chinese dragon head lesson (the one used in the Chinese Bookmark Tutorial ).

Here are Even More Chinese New Years Crafts


How to Draw a Chinese Dragon Head Step by Step Drawing Tutorial

Step 1.

We will start drawing a simple circle. Is a very necessary step when drawing animals. To determine the direction the dragon is facing, draw lines horizontally and vertically across the circle to give it a 3-dimensional feel.


Step 2.

The next thing to add will be the basic parts of the dragon face : the jaw, neck, eyebrow and snout.


Step 3.

Now is time to give it some facial features 🙂
Draw an outline of the dragon’s face around the jaw, snout and eyebrow.
Next, draw a nose.


The feature that will make him look „alive” is the eye. Make sure you draw it along side the eyebrow shape (eyebrow shape = the shape we draw back in the last step). Draw around the eye too, so that it looks like it fits perfectly into the face.


Is time for the mouth. Do not draw the mouth in a straight line. We will draw it on the base of „snout shape”. We draw the dragon with his mouth open and we define better his nose.


Step 4.

On this moment we have drawn in the dragon’s basic facial features and will start to add details.
Because it looks kind of cute, let’s make him look fierce.
So, let’s draw his eyebrows. We will draw them oriented up and bushy.


The next thing to draw are it’s horns. We will draw them on the upper back part of the initial circle. We will use them to create a balance.


We know that chinese dragons have hair so, let’s make it. It will encircle his head as a lion (or chow-chow) mane. We will continue his mane with a beard. Now it looks like a dragon …


… without teeth.
We will add some fangs on the lower part of the mouth. It is a cheeky dragon so we will draw his tongue too 😀


Is almost ready. The only thing to add are his wiskers.
You can add more details that make sense. They will make your dragon unique.


Step 5.

He looks a bit dirty. It’s necessary to erase any extra lines to make your dragon look complete and… alive 🙂

Step by step tutorial offered by Laura from Dacian Moon Handmade.


Visit Our Chinese Bookmark Tutorial

Here are Even More Chinese New Years Crafts

Technorati Tags: , , , , , , , , ,

How to Make Origami Rabbits Heads Craft for Chinese New Year

On February 3rd is the Chinese New Year celebration. The year of the rabbit begins. Rabbit Years are fourth in the cycle, following Tiger Years, and recur every twelfth year. So, let’s celebrate that by making an origami rabbit head 🙂

You Might Also Like Our Other Chinese New Year Crafts

How to Make Origami Rabbits Heads Craft for Chinese New Year


CRAFTS MATERIALS NEEDED:

– paper
– markers (black and red)
– scissor


Step 1.

Take one corner of the paper and fold it to the opposite side, and, with the scissor you cut the remaining paper.


Put the paper triangle on the table with the large edge to you.


Step 2.

Fold the left corner to the right one …


… and then unfold.


Step 3.

Fold the bottom up approximately a quarter of the way.


Step 4.

Fold the bottom left towards the centre crease.


Press well. Then do the same with the right part.


Now it should look like that:


Step 5.

Fold the bottom tip upwards a little.


Flip the model over front to back. This is the rabbits face with the ears pointing up.


Fold the top of the rabbit’s head back and tuck behind the face.


Step 6.

With the black marker draw rabitt’s eyes.


And with the red one, his nose and mouth


That’s a cute little rabbit head! It will bring you luck all the year 🙂


Laura from Dacian Moon Handmade
I wish you a very good Year of the Rabbit 🙂

You Might Also Like Our Other Chinese New Year Crafts

Technorati Tags: , , , , , , , , , , ,

How to Craft a Chinese Dragon Fridge Magnet Craft for Chinese New Year

In ancient China, dragons did not breathe fire. Dragons were wise and caring. They guarded the wind, the rain, the rivers, precious metals and gems. So dragons are an important part of many Chinese festivals, including Chinese New Year. Let’s celebrate it by crafting this fridge magnet with the mini version of the dragon used during holiday parades and festivities.This crafts ideas was contributed by Laura from Dacian Moon Handmade

You Might Also Like Our Other Chinese New Year Crafts


How to Craft a Chinese Dragon Fridge Magnet Craft for Chinese New Year

CRAFTS MATERIALS NEEDED:

– paper (not too thin)
– scissors
– design template (uncoloured dragon head and tail)
– 4 magnets
– craft glue
– ribbon (about 15 cm)
– paints
– paintbrush


Step 1.

Print the Head and tail of the dragon, then paint them in any way you want your dragon to be. My dragon will guard the rain so it will have colours inspired by it. Blue and white like raindrops, red and yellow like lightnings and a little bit of dark red because of the storm 🙂


Here are my dragon head and tail painted. Let them dry well.


Step 2.

With the scissor, cut out the head and the tail.


Now we are ready to the next step.


Step 3.

Cut a piece of paper of about 7.5 cm length and the same width as the ribbon (or a little bit larger)


Fold it to form a triangle (2 cm x 2 cm x 1 cm) and fold the remaining 2.5 cm around the triangle


Apply a layer of glue on it,


press and it should look like this:


Step 4.

Lay flat the ribbon and mark the places where the magnets will be (the magnets are corresponding to his head, legs and tail). Take care that two of them must be close to ribbon ends.


Apply a layer of glue on one magnet…


… and place it on it’s place.


Do the same with the other magnets.


Step 5.

Turn the ribbon with the magnets down.
Apply a layer of glue on one large face of the triangle…


… and place it on the ribbon, where you want the head to be. Let it dry.


Apply some glue on the head (on unpainted face)…


… and stick it to the triangle, like in this photo.


Now, our dragon have a head 🙂


Step 6.

Apply a layer of glue on the first part of the tail (on unpainted face, of course).


And stick it where you want the tail to be (usually on the other end of the ribbon).


And… That’s it!
This is my Dragon, Guardian of Rain, in his place on the fridge 😀


Technorati Tags: , , , , , , , , , , ,

How to Make a Chinese Fire Dragon Bookmark Craft for Kids

Because Chinese dragons are magnificent creatures and the Chinese New Year is approaching, let’s make a simple bookmark with dragon head. This beautiful bookmark that you will make in this arts and crafts project, will astound your friends and family members. And it is a LOT of fun to make. This crafts ideas was contributed by Laura from Dacian Moon Handmade

You Might Also Like Our Other Chinese New Year Crafts


How to make a Chinese Fire Dragon Bookmark for The Chinese New Year

CRAFTS MATERIALS NEEDED:

– paper (not too thin) – white and red
– scissors
– design template (uncolored dragon head)
– craft glue
– ribbon (about 25 cm)
– paints
– paintbrush
– yarn


Step 1

Print the head of the dragon (you get the file by clicking on the bolded word). Paint it in any way you want your dragon to be. Or Visit Our Chinese Dragon Head Drawing Tutorial if you want to draw it freehand.


I want this to be a dragon who will guard the fire so I use red, yellow, orange and green for it’s eye. Let the paint dry.


Step 2

With the scissor, cut out the dragon head.


It will look like this.


Step 3

Apply a layer of glue on the unpainted face …


… and then place it on one end of the ribbon. Let the glue dry.


Step 4

Use the scissor to cut 10 pieces of yarn of about 10 cm each.


Apply a layer of glue on the empty end of the ribbon…


… and place over it the threads, folded in two.


When you’ll finish, it will look like that. Let it dry.


Step 5

Cut a piece of the red paper, just big enough to cover the threads on the ribbon.


Apply a layer of glue on it…


… and place it over the threads, on the ribbon’s end. Let it dry well.


Now, our bookmark is finished and ready to make itself useful 🙂


Technorati Tags: , , , , , , , , ,

How to Make Mini Paper Fan Earrings for the Chinese New Year

I have another funny way to celebrate Chinese New Year : let’s make a pair of earrings (you’ll need a little help on step # 4). These will be made of paper and will have two very important Chinese symbols : the fan and the cherry blossom. The fan is a traditional Chinese handicraft used for cooling and as prop in the “fan dance”. For the Chinese, the cherry blossom is a very significant symbol of power. It represent a feminine beauty and within the language of herbs and herbal lore of the Chinese the cherry blossom is often the symbol of love.

You Might Also Like Our Other Chinese New Year Crafts

This crafts ideas was contributed by Laura from Dacian Moon Handmade


How to Make Mini Paper Fan Earrings for the Chinese New Year : Arts and Crafts Project for Kids

CRAFTS MATERIALS NEEDED:

– paper (not too thin)
– scissors
– ribbon (about 10 cm)
– paints
– paintbrush
– 2 earrings findings
– 2 jumprings
– pencil


Step 1

Cut two square pieces from the paper (about 3 cm on each side)


With the pencil make a line like in this picture…


…then cut it out.


Repeat for the second square and your pieces of paper should look like this.


Step 2

Take black and pink paint (if you don’t have pink, just mix red and white) and paint black cherry branches and pink flowers on them.


Don’t worry if you don’t draw the same on the two paper pieces. Your earrings will be more funny.

Let the paint dry very well.


Step 3

Take one piece of paper, keep it with the curved side to you and fold the left corner.


Continue folding like in this photo…


… and one fan is ready.


Repeat for the second piece of paper.


Step 4

Cut the ribbon in half.


This is the part where you’ll need a little help from an adult. Ask him to make a hole on the top of the fan (with a needle)…


… and then open the jumpring, put it through the hole and through the earrings finding and then close the jumpring.

It should look like in this photo.


Step 5

Take one piece of ribbon and put it through the jumpring, like in the photo.


Make two knots…


… and then cut the ribbon letting just a little near the knot.


Repeat for the other earring and you just finished a beautiful and funny pair of earrings that you can wear on the Chinese New Year or you can give them to your mother / sister… on that ocasion, just to bring them luck 🙂


Technorati Tags: , , , , , , , , , , , , ,

How to Make Paper Lantern for The Chinese New Years Celebration

The Chinese New Year is coming up and this crafts project reminded me of a Chinese Paper Lantern. Today, we will show you how to make this easy-to-make arts and crafts project. These are also great for birthday parties, Christmas decorations, and other joyous get-together celebrations where you need fun decorations. Have fun..the instructions are below.

Here are Even More Chinese New Years Crafts


How to Make Paper Lantern for The Chinese New Years Celebration


How to Make Paper Lantern for The Chinese New Years Celebration

Crafts Materials Needed

– Sheet of colored paper 9 inches and 6 inches wide

– Scissors

– Ruler

– Glue or Paste

– ( Optional ) Jar Cover Lid and Tape

– String to String Up the Lantern to a Tree or Something Else

Step 1


Step 1 : Making Chinese Paper Lanterns Arts and Crafts Project Ideas


Take a sheet of colored paper 9 inches and 6 inches wide and draw 2 lines 1/2 inch from each edge as shown in Figure 1.

Step 2


Step 2 : Making Chinese Paper Lanterns Arts and Crafts Project Ideas


Then fold the paper in the middle lengthwise. Now cut the paper as shown by the dotted lines in Fig. 2. These lines measure 1/4 of an inch apart. After all the cuts have been made, cut off the left-hand strip marked A in Fig.2.


Step 3


Step 3 : Making Chinese Paper Lanterns Arts and Crafts Project Ideas


Now open the paper. Figure 3.


bend the cut paper to form a circle. Paste end tabs B and C to those marked D and E.


Put paste on the end tabs, marked B and C, and bend the cut paper to form a circle. Paste end tabs B and C to those marked D and E. When this has been done you will have a paper lantern like the one shown in Fig. 4. Add a handle to the lantern. It is then ready to be used for a Halloween, a Christmas tree, The Chinese New Year,  or garden party decoration.

If desired, a jar lid / cover may be used for a bottom to your paper lantern. This cover must fit exactly into the space at the bottom of the lantern, and be pasted or Scotch-taped into place.


String Up Your Paper Lanters for a Party


Now String up those paper lanterns to help celebrate The Chinese New Year, or other fun party get-together…such as a birthday party.

Here are Even More Chinese New Years Crafts

Technorati Tags: , , , , , , , , , , ,

How to Make Chinese Abacus for Chinese New Year or 100th Day of School

I noticed that there are 2 holidays / events coming up – The Chinese New Year and The 100th Day of School. I think that the Chinese Abacus could be a craft to tie both of these 2 celebrations together. The Abacus uses 100 beads and was created by the Chinese  people who called this calculating instrument a Swan-Pan. In face, in some countries an abacus is still widely used to add and subtract. The following step by step arts and crafts instructions will guide you the parent, teacher, child, or whomever through the process of making this Abacus. Have fun.


How to Make Chinese Abacus fro Chinese New Year or 100th Day of School


How to Make Chinese Abacus fro Chinese New Year or 100th Day of School

CRAFTS MATERIALS NEEDED:

square box

string

small colored beads

pencil

ruler

nail

Step 1

With a pencil and ruler, mark off 10 even spaces along one side of a medium-square box, about 1/2 inch down from the top. Do the same on the opposite side of the box.


With a pencil and ruler, mark off 10 even spaces along one side of a medium-square box, about 1/2 inch down from the top. Do the same on the opposite side of the box.


Step 2

With a nail, make a small hole at each mark.


With a nail, make a small hole at each mark.


Step 3

Pull one end of a piece of string through the first hole, and tie it securely with a knot.


Pull one end of a piece of string through the first hole, and tie it securely with a knot.


Step 4

String 10 colored beads on the string and fasten the other end of the string, across the box, to the first hole on the other side.


Step 4 Stringing Beads on the Abacus


Step 5

Do the same with 9 other pieces of string, placing 10 colored beads on each row. If you like, you may use a smaller box and string 7 colored beads on each row, which will make your counting toy like the ancient Roman abacus. On another note…you don’t have to use colored beads the way we did, you can use a different colored bead on each row…or vary different colors on every other row…it is completely up to you.


How to Make Chinese Abacus for Chinese New Year or 100th Day of School


Technorati Tags: , , , , , , , , , , , , , ,