How to Make a Paper Christmas Tree Craft for Children Tutorial

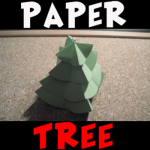
Learn how to use green construction paper and a pin to form a beautiful Christmas tree that really stands. Laura from Dacian Moon Handmade   will show you how to make a paper Xmas tree, step by step.

Check out our Christmas Crafts.


How to Make a Paper Christmas Tree Craft for Children Tutorial


How to Make a Paper Christmas Tree Craft for Children Tutorial

CRAFTS MATERIALS NEEDED:

– green paper
– scissors
– pencil
– sewing pin


Step 1.

Draw 4 circles on the green paper.


Cut them out.


Step 2.

Take one and fold it in half.


Unfold.


Fold it again in half, on the other side.


Unfold.


Step 3.

Unite two adjacent corners…


… like this.


Repeat for all sides.


Do the same for all discs.


Step 4.

Take the pin…


… and put it through the middle of the littlest one.


Put discs one on top of each other, in increasing order, and the tree is ready.


And there you have it…a stand-up, paper Christmas Tree. You can put it on a table, on a ledge, on a bookshelf, or anywhere else where people can see. Merry Christmas!

Check out our Christmas Crafts.

Technorati Tags: , , , , ,

How to Make a Mini Book Pendant Necklace Gift for Dad on Fathers Day

You will totally want to make this cute gift for your dad on Father’s Day. This step by step craft idea is to make a miniature little book (or journal) to wear around your dad’s neck. In this tiny book,  you can your dad how important he is to you. This step by step tutorial was created by Laura from Dacian Moon Handmade .

How to Make a Mini Book Pendant Necklace Gift for Dad on Fathers Day


Dad Mini Book Pendant Necklace Gift for Fathers Day


CRAFTS MATERIALS NEEDED:

– leather
– 5 jump rings
– perforating pliers
– scissors
– pliers
– pen
– paper
– cord


IMG_5430


Step 1.

First we draw pages as rectangles of 2.5 cm x 3 cm. Make as many as you want. I made 16.


IMG_5432


Cut them out.


IMG_5433


Take one page and measure it on leather to make the covers. Allow the cover to be slightly bigger than the page.


IMG_5434


Cut the covers out.


IMG_5436


Step 2.

Put the two covers one over the other.


IMG_5437


Using the perforating pliers make 4 holes on one side.


IMG_5438


Like this.


IMG_5439


Place one cover over a page …


IMG_5441


… and mark the holes.


IMG_5442


Use again the perforating pliers to make holes on the marks.


IMG_5443


Do the same for all the pages.


IMG_5444


Step 3.

Using pliers put an open jump ring through the first hole of one cover.


IMG_5446


Add a page…


IMG_5447


… then the others…


IMG_5448


… and finally the second cover.


IMG_5449


Close the jump ring.


IMG_5450


Put the other jump rings through the holes…


IMG_5451


… like this.


IMG_5452


Step 4.

Put another jump ring through the first one and close it. We will use it to tie the cord on it.


IMG_5453


Take the cord and fold it in half.


IMG_5454


Place the loop through jump ring…


IMG_5455


… then bring the ends through the loop.


IMG_5456


Pull the cord to tighten the knot.


IMG_5457


Step 5.

Now open the book and write what you want inside.


IMG_5458


I wrote “Best dad ever !” 🙂


IMG_5459


And this is the book pendant :D.


IMG_5460


Technorati Tags: , , , , , , , , , , , , ,

How to Make a Haunted House Treat Holder for Halloween

Halloween is coming up quickly.  Before you know it it will be the end of the month and Halloween will be here.  Today we are going to make a Halloween craft.  In this post I’m going to show you how to make a Haunted House Treat Holder for Halloween.  Load it with candy and use it as a Halloween party favor.  Or, if you would prefer…. use it as a Halloween decoration for inside the house.  The kids will love putting on display something they made themselves.  So, let’s get started.

Check out our other Halloween Crafts.


How to Make a Haunted House Treat Holder for Halloween


Materials Needed

Milk Carton

Candy

Tape

A Couple Pieces of White Paper

Colored Construction Paper

Paste / Glue

Scissors

Pencil

Crayons, Markers or Colored Pencils


Step 1


If your milk carton has a circle spout, we will take that out.


If your milk carton has a circle spout, we will take that out.


Step 2


Open up the carton


Open up the carton like this…


Step 3


Push out circle spout.


Push out circle spout.  Then add candy.  Tape shut.


It should look like this.


Like this…


Step 4


Wrap paper around base of carton.


Wrap paper around base of carton.  Paste in place.


It should look like this.


Like this…

Step 5


If there is a lot of excess paper at bottom... cut most of it off.


If there is a lot of excess paper at bottom… cut most of it off.


Push two opposite sides inwards and glue in place.


Push two opposite sides inwards and glue in place.


Then push other 2 sides in and paste.


Then push other 2 sides in and paste.


Step 6


Push corner of paper into triangle on milk carton.


Push corner of paper into triangle on milk carton.  Draw a line where you need to cut.


Cut off excess and glue triangle in place.


Cut off excess and glue triangle in place.

Step 7


 Cut out a long, thinnish piece of paper.


Cut out a long, thinnish piece of paper.  It should be long enough to be the roof.


Fold in half.... draw line on fold.  Then draw squiggly lines for roof's design.


Fold in half…. draw line on fold.  Then draw squiggly lines for roof’s design.


Center roof on top of carton


Center roof on top of carton.  Glue in place.


Step 8


Draw a design on the haunted house.


Draw a design on the haunted house.


Step 9


Finished Haunted House Treat Holder


And there you have you…. you just finished your Haunted House Treat Holder for Halloween.  If you want to use your Haunted House as a toy…. no problem.  You can even go to How to Make a Trick-or-Treat Paper Toy craft and print off the Trick-or-Treat figures you see in the above picture.

Technorati Tags: , , , , , , , , , , , , , , , , ,

How to Make a Potato Heart Stamp

I have a very unique craft for you today.  I’m going to show you how to make a Potato Heart Stamp for Valentine’s Day.  Yep, you read that right…. a stamp made from a potato.  It is such a clever idea, isn’t it?  And yet…. so simple.  You can make Valentines pictures and Valentines Cards with your Potato Stamp.  You will need a little help from an adult for this craft as it does call for a sharp knife.  An adult will use the knife to cut the top of the potato off.  So, make sure not to start this craft without an adult present.  So, with that being said grab an adult and the materials needed and let’s get started.

Check out our other Valentines Day Crafts.


How to Make a Potato Heart Stamp


Materials Needed

Potato

Sharp Knife (for an adult)

Butter Knife

Toothpick

Red Paint

Paintbrush

Paper


Step 1


Get a potato.


Get a potato.


Step 2


Ask an adult to cut the end off of potato.


Ask an adult to cut the end off of potato.


Step 3


Cut heart into the potato


Cut heart into the potato with butter knife and a toothpick.


Step 4


Brush paint onto the raised heart.


Brush paint onto the raised heart.


Step 5


Now push the heart against the paper


Now push the heart against the paper… repaint the potato between each print to get the best printed hearts.

Isn’t that a unique way to make hearts on a piece of paper?  I think it is…. plus it is a ton of fun.  Now, why don’t you use your Potato Heart Stamps to make some great Valentines pictures or cards to hand out to your friends and family.  I am sure they will absolutely love them!!

Here is our video on How to Make a Potato Heart Stamp.

Technorati Tags: , , , , , , , , , , ,

How to Make a Perler Bead American Flag for Veterans Day

Veterans Day is just around the corner… November 11th to be exact.  Veterans Day is a very special day honoring our Nation’s Veterans.  What better way to honor our Veterans than with the American Flag.  Today I’m going to show you how to make an American Flag out of Perler Beads for Veterans Day.  So, grab your Perler Beads and let’s get started.

Check out our other Perler Bead Crafts


How to Make a Perler Bead American Flag for Veterans Day


Materials Needed

Perler Beads and Board

Iron

Wax Paper


Below are printable templates for this craft.  You can choose to print off  a colored template or the black and white version.

Click on template image to make larger and to print.


Printable color template for American Flag Craft


Printable black & white template for American Flag Craft


Step 1


Use the template to place the Perler Beads on to the Perler Beads Tray.


Use the template to place the Perler Beads on to the Perler Beads Tray.


Step 2


Ask an adult to iron the first side on medium heat.


Ask an adult to iron the first side on medium heat.  Place wax paper over the beads.  Then for 30 seconds, iron in a circular motion.  Let cool for a few minutes and then come back to it.


Step 3


After cooled... Turn plate over and take item off of plate.


After cooled… Turn plate over and take item off of plate.  Now adult can place wax paper over back side of item and iron this side for 30 seconds as well.


Finished American Flag for Veterans Day


And there you have it…. The American Flag for Veterans Day made out of Perler Beads.  Isn’t it magnificent?  Remember to check out our other Perler Bead crafts.

Technorati Tags: , , , , , , , , ,

Make Easy Hanukkah Ornaments Crafts for Kids with Push pins

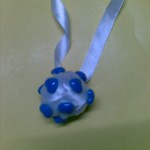
Celebrate Hanukkah by hanging these easy-to-make Hanukkah ornaments in your home…the best part is that they only take five minutes to make. Yay! You don’t have to have a Christmas tree to have fun, you and your children can decorate your home for Hanukkah and have just as much fun. These Hanukkah ornaments  are easy and fun to make and look very beautiful as well. If you have any ideas for other Hanukkah ornaments, please let us know (in the comments below) and we will post them and give credit to you as well.

You Might Also Like Our Star of David Hanukkah Ornament Craft for Kids


Image084


Hanukkah Ornament Craft for Kids

Easy to Make Hanukkah Ornaments with Push Pins : Arts and Crafts Activities for Kids for Kids, Teens, Preschoolers


Craft materials required:

Push pins- blue colored ( star shaped ones would be great)

White satin ribbon

Thin Paper

Tape

Scissors


Image087


Step 1

Crunch up a piece of thin paper to make a ball


Image063


Step 2

Use long pieces of tape to go around the ball and hold it together in the shape of a ball


Image064


Step 3

Tape one end of the ribbon to the ball


Image066


Step 4

Start wrapping up the ball as shown.


Image067


Step 5

Pin down the end of the ribbon after the whole ball is covered.


Image068


Step 6

Push in more pins all over the ball to decorate it.


Image069


Step 7

Take another piece of white ribbon and put it through one of the loops as shown.


Image070


Step 8

Hang it up in your house for everyone to enjoy!!


Image085


You Might Also Like Our Star of David Hanukkah Ornaments Crafts Idea for Kids

HANUKKAH CRAFTS ACTIVITIES & IDEAS FOR KIDS

It is almost Christmas time so check out Our Mega List of Hanukkah Crafts for KidsMega List of Crafts for Jewish Kids

Technorati Tags: , , , , , , , , , , , , , , , , ,

hanukkah ornaments, hanukkah ornament crafts, make hanukkah ornaments, make ornaments, making ornaments, star of david crafts, star of david arts and crafts, star of david, jewish crafts, hanukkah crafts, hanukkah crafts for kids, hanukkah arts and crafts, crafts for jewish kids, crafts for jews, crafts for jewish children

Hanukkah Hanging Star of David Ornaments : Easy Crafts Ideas for Jewish Kids

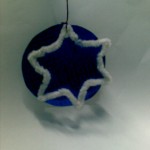
Celebrate Hanukkah by hanging these sweet decorative Star of David ornaments in your home. You don’t have to have a Christmas tree to have fun, you and your children can decorate your home for Hanukkah and have just as much fun. These Hanukkah ornaments  are easy and fun to make and look very beautiful as well. If you have any ideas for other Hanukkah ornaments, please let us know (in the comments below) and we will post them and give credit to you as well.

You Might Also Like Our Push Pin Hanukkah Ornament Craft Idea for Kids


Image102


Star of David Hanukkah Ornaments Craft for Kids

Easy to Make Hanukkah Ornaments (Star of David Ornaments) : Arts and Crafts Activities for Kids for Kids, Teens, Preschoolers


Craft materials required:

Scissors

Glue

Shiny blue paper

A small peice of card/ thick paper

A white pipe cleaner

Some thread


Image093


Step 1

Cut out 2 circles of the same size on card paper and the colored paper


Image094


Step 2

Glue the two together and punch a hole.


Image095


Step 3

Shape the pipe cleaner like a circle and twist the ends together.


Image096


Step 4

Shape the pipe cleaner into a triangle


Image097


Step 5

Fold the center of one side of the triangle outwards as shown


Image098


Step 6

Do the same with the other two sides. Adjust the shape to form a star.


Image100


Step 7

Use a thread to tie one end of the star and the circle together. Leave the other end of the thread free. Hang up the ornament to decorate your house.


Image101


You Might Also Like Our Push Pin Hanukkah Ornament Crafts Idea for Kids

HANUKKAH CRAFTS ACTIVITIES & IDEAS FOR KIDS

It is almost Hanukkah time so check out Our Mega List of Hanukkah Crafts for KidsMega List of Crafts for Jewish Kids

Technorati Tags: , , , , , , , , , , , , , , , , ,

hanukkah ornaments, hanukkah ornament crafts, make hanukkah ornaments, make ornaments, making ornaments, star of david crafts, star of david arts and crafts, star of david, jewish crafts, hanukkah crafts, hanukkah crafts for kids, hanukkah arts and crafts, crafts for jewish kids, crafts for jews, crafts for jewish children

Christmas Tree Angels Crafts for Kids : Easy to Make Angel Ornaments

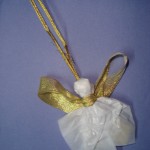
Here is a beautiful angel that you and your kids will love to be on your Christmas tree. The following crafts project includes simple instructions to make the Christmas angel ornaments arts and crafts project that  follows.


DSC04090


Easy to Make Christmas Tree Angel Ornaments Arts and Crafts Activities for Kids for Kids, Teens, Preschoolers


Craft materials required:

Wax paper

Gold wide ribbon

Gold Twine

Tape

Cotton


Image137


Step 1

Cut out a square of wax paper


Image103


Step 2

Put a ball of cotton in the center of the paper


Image105


Step 3

Fold around the cotton ball as shown


angel 5


Step 4

Tie the ribbon as shown, with the knot at the back


Image107


Step 5

Fold the wings backward and stick as shown


angel wings


Step 6

Cut a piece of twine as shown


Image108


Step 7

Tape the ends together as shown.


Image109


Step 8

Tape this to the back of the head.

angel wings

Your pretty angel is ready to hang on your tree


DSC04090


CHRISTMAS CRAFTS ACTIVITIES & IDEAS FOR KIDS

It is almost Christmas time so check out our Christmas Coloring Pages & Christmas Crafts for Kids Page to find some great Christmas crafts project ideas for kids to celebrate Xmas such as .. Advent Calendar Crafts ..Candy Cane Crafts ..Christmas Angel Crafts ..Christmas Cards Crafts ..Christmas Bells Crafts ..Christmas Coloring Pages .. Santa Coloring Pages .. Christmas Elf Crafts .. Christmas Gift Bags Crafts ..Christmas Gift Tags Crafts .. Christmas Games & Activities .. Christmas Nativity Scenes .. Christmas Soda Can Crafts .. Christmas Placemat Crafts ..Christmas Poinsettias Crafts .. Christmas Sewing Patterns .. Christmas Tree Crafts ..Christmas Tree Ornament Crafts ..Christmas Wreath Crafts ..Gingerbread House Crafts ..Gingerbread Man Crafts .. Mittens and Gloves Crafts ..Recycle Christmas Cards to Make Other Crafts ..Reindeer Crafts .. Winter Penguin Crafts .. Winter Snow Crafts .. Winter Solstice / Yule Crafts ..Santa Clause Crafts .. Santa Hats Crafts .. Santa’s Sleigh Crafts ..Snowflake Crafts ..Snowman Crafts .. Stocking Crafts .. Wrapping Paper Craft

Technorati Tags: , , , , , , , , , , , , , , , , , , , , , , ,