How to Make a Homework Caddy

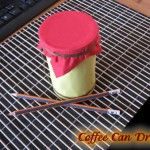
Did you ever feel like you were rummaging around to find your homework school supplies when it was time to do your homework?  Well, I have a craft for you today that will fix this problem.  In this post I’m going to show you How to Make a Homework Caddy.  This is a perfect way to keep all your homework school supplies in one place when you are ready to do your homework.  You can keep all your school supplies like crayons, pencils and scissors in once place and carry this caddy around where ever you want to do your homework.  So, grab the materials needed and let’s get started.

Check out our other Back to School Crafts.


How to Make Homework Caddy Cans


Materials Needed

4 Empty Cans

Glue

Yarn (4 different colors if you would like)

Cardboard Box (2 cans wide)

Scissors

Marker

Paint (optional)

Duct Tape


Step 1


Get 4 empty cans.


Get 4 empty cans.


Step 2


Take off the labels.


Take off the labels.


Step 3


 Add glue around bottom of the can.


Add glue around bottom of the can.


Step 4


Start winding yarn around can.


Start winding yarn around can.


Keep winding the yarn.


Keep winding the yarn.


Keep adding glue and winding until yarn is up to rim of can.


Keep adding glue and winding until yarn is up to rim of can.


Step 5


Find a box that is about 2 cans wide


Find a box that is about 2 cans wide… like this one.


Step 6


Cut the box in half.


Cut the box in half.


Step 7


Turn it so they are back to back.... like this.


Turn it so they are back to back…. like this.


Step 8


Draw a handle.


On the back of the box where the two boxes meet… Draw a handle.  This handle looks like a sideways letter ‘D’.


Step 9


Cut out handle and then trace handle onto back of the other box.


Cut out handle and then trace handle onto back of the other box.


Step 10


 If you want to... paint the box.


If you want to… paint the box.


Step 11


Roll up duct tape and place it on bottom of can and on one side of can.


Roll up duct tape and place it on bottom of can and on one side of can.


Step 12


Place cans in box.


Place cans in box.  Use duct tape to tape both handles together.

Now you have your homework caddy finished.  You are all ready to carry your homework caddy anywhere you want to do your homework.  Enjoy!!

Technorati Tags: , , , , , , , , , ,

Coolest Earth Day Craft Ideas – Crafts Made from Recycled Materials


Coolest Earth Day Craft Ideas - Crafts Made from Recycled Materials


Earth Day will be here in just a couple of weeks.  In honor of Earth Day I thought I would scour the internet looking for cool ideas for Earth Day crafts.  All of the crafts that I found and have listed here are made from recycled materials.  Earth Day is a special day to celebrate the Earth and to increase awareness and appreciation of the Earth’s natural environment.  And, I think making crafts from recycled materials such as the ones found here is a great way to teach children about recycling and the importance of doing that to help save our Earth.  So, without further ado….

Coolest Earth Day Craft Ideas

(1)  Newspaper Roses


Newspaper Roses


Look how beautiful these Roses are?  They really are lovely & they are completely made from recycled newspapers.  Check out the craft and all its details over at Zakka Life.


(2)  Serving Tray


Serving Tray


I love, love, love this idea!!  Crafty Nest went to a Salvage Yard and noticed that there were old cupboards there.  She picked up a white one and with a little creativity and a lot of fun she was able to make this beautiful serving tray.  Check out her website so you too can make this.


(3)  Can-Do Robots


Can-Do Robots


Made from tin cans these robots are so freakin cute.  What is really cool is that their features are made of magnets, so they can be removed.  Which makes these robots like a Mr. Potato Head…. How fun is that?!  Check out the craft details over at Family Fun.


(4)  Cardboard Ottoman or Side Table


Cardboard Ottoman or Side Table


What a clever and creative idea!!  Made from recycled cardboard tubes you can choose to make either a side table or an ottoman…. or even make both.  When you look at them from above they are actually daisies.   Check out Esprit Cabane for all the crafting details.


(5)  Smashed Soda Can Animals


Smashed Soda Can Animals


Ok, this cow is really cute, isn’t he?!  But, wait till you check out Fave Crafts….. they have not only a cow, but they will show you how to make a pig and a bear too.  Make all three recycled can crafts and you will have a beginning to your very own recycled animal farm.


(6)  Milk Jug Shade


Milk Jug Shade


Now, this recycled craft turns out beautiful, doesn’t it?  Honestly, if I saw this I would have no idea it was actually made from recycled milk jugs.  But, it is.  I found this craft over at Mother Earth News.  Check out their site for all the wonderful craft details.


(7)  Recycled Picnic Basket


Recycled Picnic Basket


I found this recycled picnic basket over at bron marshall and for the main basket it is actually made from a recycled beer six-pack.  Isn’t that a clever idea?  They other container is actually made from a recycled half dozen egg carton…. they simply added a handle.  Make sure to check out their site for the full craft details.


(8)  Newspaper Basket


Newspaper Basket


This is an amazing basket!!  And, it is completely made from Newspaper.  Look how sturdy it looks too…. I love it.   How About Orange shows you step-by-step how to make this basket yourself.


(9)  Recycled Glass Chandelier


Recycled Glass Chandelier


Oh I just love this recycled craft idea…. it might just be my favorite.  I found this recycled craft over at Casa Sugar.    With a few recycled materials and some tea lights  you too can have this stunning glass chandelier.  I love the way they show this chandelier being outside…. it would be perfect for a fun outside party.


(10)  Creative Notepads


Creative Notepads


Here is a creative way to recycle those leftover notebook pages and even those left over paper scraps.  Esprit Cabane shows us how to take those leftover paper products and make them into cute little pocket size notepads.  Check out her site for the full details.


(11)  Toilet Paper Tube Albums


Toilet Paper Tube Albums


These Toilet Paper Tube Albums are just precious.  They are a beautiful way to store special keepsakes and pictures of events that you don’t want to lose.  Those Northern Skies shows you step-by-step how you too can make these albums from recycled toilet paper tubes.


(12)  Magazine Boxes


Magazine Boxes


Here is a creative and imaginative way to recycle those stacks of magazines you keep at home.  When made like the tutorial on Abstract Octopus you can actually store things in these boxes.  Check out the site for the full craft details.


(13)  Plastic Cup Earrings


Plastic Cup Earrings


Aren’t these earrings adorable?  You would never realize they were made from a plastic cup unless I told you.  I found this idea over at Punk Projects and I think it is a great way to recycle plastic cups… plus the craft is fun to do.  Make sure to check out her website for the details.

Technorati Tags: , , , , , , , , ,

How to Make a Coffee Can Drum

I have a fun craft for the youngest of crafters.  Today I’m going to show you how to make a coffee can drum.  What child doesn’t love playing drums?  They all love playing the drums.  This drum is made from a coffee can, denim and some other materials you probably have at home.  Once you have made the drum simply grab a couple of pencils or any wooden sticks and your drums are good to go.  So, grab the materials needed and let’s get started.

Check out our other Can Crafts.

Laura from Dacian Moon Handmade will show you how to make this, step by step.


Materials Needed

– aluminum coffee can with plastic lid
– colored paper
– denim
– yarn
– glue
– pencil
– scissors


Step 1

Cut the paper the same height as the can.


Step 2

Apply a layer of glue on the paper…


… and place it on the can.


Step 3

Cut a rectangle out of the denim.


Step 4

Take the plastic lid and add a layer of glue on it’s exterior side…


… then place it on the denim rectangle. Let the glue dry.


Step 5

Close the coffee can.


Step 6

Cut a generous piece of yarn…


… and spin it around the can, just under the lid.


Step 7

Do the same on the lower part of the can.


Step 8

Your drum is ready. You can use two pencils or any wooden sticks to play it.


Wasn’t that easy peasy?!  Now, your drum is all ready to play all day long.  How did your Coffee Can Drum turn out?  Let me know in the comments below.  Also, you can add a picture of your drum to the comments as well… that way I can see how it turned out.

Technorati Tags: , , , , , , , , ,

How to Make a Magnetic Travel Board Games Set with Altoids Tins Craft for Kids

Today I will show you how to make a really cool travel board games kit out of magnets, paper and an altoids tin. This is a great travel game board system that you can stick in your pocket to bring to school with you to play on the bus, in the cafeteria, or what ever. You could even bring it in the car with you to play with your sisters and brothers with. Or you can just play solo since there are 2 different solitaire games to play.


How to Make a Magnetic Travel Board Games Set with Altoids Tins Craft for Kids


How to Make a Magnetic Travel Board Games Set with Altoids Tins Craft for Kids

Crafts Materials Needed

– Altoids Tin
– Magnetic Tape, Magnetic Sheets, or Old Unwanted Fridge Magnets
– Paper
– Paste / Glue
– Scissors

First Print Out These 2 Pages


Today I will show you how to make a really cool travel board games kit out of magnets, paper and an altoids tin.


Click on Image Above to Print Out Game Boards Inserts


Today I will show you how to make a really cool travel board games kit out of magnets, paper and an altoids tin.


Click on Image Above to Print Out Game Pieces


How to Make a Magnetic Travel Board Games Set with Altoids Tins Craft for Kids


See this altoids tin…soon it will be your favorite game to take with you in your pocket.

Step 2


Making Magnetic Chess Checkers and Dots and Squares Game Boards


Cut out the game boards and just place the ones that you want to use within the tin. You don’t even need to glue them in…they will just stay inserted.


Step 3


Making a Backgammon Game Boards Kids with Magnets


If you want to use backgammon, then glue both of them to the back of the tin…as I did in the picture above.

Step 4


Making Magnetic Chess Pieces


Cut out the game pieces and glue them to the magnets.  For the Dots and Square game…you can just cut out thin slits of magnet to use as the lines.

Step 5


Backammon, Pegs Solitaire, Pyramid Solitaire, Dots and Squares Checkers and Chess Games


Above you can see all of the game inserts that come with this craft.

Here are Instructions on How to Play the Following Games:

Peg Solitaire Cross

Peg Solitaire Pyramid

Dots and Squares

Checkers

Chess

Backgammon (needs dice)

Reversi

Tic Tac Toe

Technorati Tags: , , , , , , , , , , , , , ,

Halloween Spooky Ghostly Rattle Noise Maker House Decoration Craft

This is a fun arts and crafts project to use to scare Trick-or-Treaters when they get to your house. Hide behind a bush or something and pull the string to make a spooky, ghostly chains type of rattle every time a new visitor comes to your house. This can also be used to announce a new guest arrival to a Halloween party or to a Haunted House Party. Have fun.


How to Make a Scary Porch Decoration and Noise Maker for Halloween

CRAFTS MATERIALS THAT YOU WILL NEED:

– At least 3 large tin cans with removable lids

– Something to Punch a Hole in Cans (Parental Supervision and Guidance Recommended)

– Rope or Cord – about 5 inches in length

– Pebbles

– Glue or Tape

– (optional) Paint or Tin Foil

Step 1


Obtain at least 3 large tin cans each having a removable lid. Punch a hole in the center of the bottom of each and in the center of each lid with parental supervision. These holes should be large enough to permit the passage of a rope through them.

Step 2


Grab a rope or cord. The rope should be of clothesline thickness and about 5 feet in length. String the cans and their lids on the rope one at a time.


Step 3

To hold each can in place tie a knot outside the bottom of each one.

Step 4

After the cans have been strung in place put a handful of small pebbles in each can and clamp the covers in place somehow…with glue or another way, such as tape.

Step 5

If you have time, decorate the cans by painting them or wrap tin foil around them.

Step 6


Hang the rattle on a porch beam. Each time a guest arrives, grasp the tail end of the rope and shake the can rattle to annouch his arrival to the other guests .

Technorati Tags: , , , , , , , , , , , , , ,