How to Make an Earth Day Soda Bottle flower light

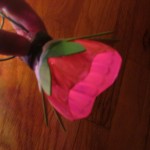
This flower light bulb craft is a great way to spend a rainy weekend, and also a terrific way to teach kids about recycling and reusing everyday objects. Explain to your child that there’s more than one way to recycle one thing into something else. You can turn used soda bottles into a string of flower lights for spring!

How to Make an Earth Day Soda Bottle Flower Light


flower-light-bulb-main


Crafts Materials Needed


flower-light-bulb-what-youll-need


String of small lights
A 16 oz soda bottle
Craft foam
Paint suitable for plastic (I used Calypso All-Purpose Acrylic Paint which dried nicely and fast)
Craft foam in green
Floral wire
Scissors
Tape (green tape or floral tape optional)


flower-light-bulb-step-one


1. Cut off the top section of the bottle.

2. Trim the cut end into petal shapes. Child-size scissors (and hands!) are good for this as they can maneuver more easily inside the bottle.


flower-light-bulb-step-three


3. Paint the outside of the bottle and allow to dry.


flower-light-bulb-step-four


4. While the paint is drying, cut two 5″ pieces of floral wire. Wrap around the base of the flower as shown, twisting the ends on each side of the base.


flower-light-bulb-step-five


5. Cut petal shapes into a 2″ x 5″ piece of green craft foam.


flower-light-bulb-step-six


6. When paint is dry, wrap petal piece around the base of the flower as shown. I used green floral tape to cover the regular clear tape I had used to make it look neater and prettier.


flower-light-bulb-step-seven


7. Insert a light into the hole in the base. Then take each set of two floral wire ends and wrap around the light string as seen above.


flower-light-bulb-finished-product


Voila, you have your own flower light! Repeat the process as many times as you’d like to string the lights around the yard for a party or in your child’s room.

Technorati Tags: , , , , , , ,

How to Make Cardboard Little People Figures

Yesterday I showed you how to make a Glue Stick Man out of your recycled glue sticks.  Today I’m going to continue showing you how to make toy figures out of recycled materials.  In this post I’m going to show you how to make Cardboard Little People Figures.  Just simply use pieces of used cardboard boxes.  This craft is a great way to recycle those cardboard boxes that you would normally throw away.  These Cardboard Little People Figures are fun to make…. almost as much fun as they will be to play with.  So, let’s get started.

Check out our other Green Environmental Crafts.


How to Make Cardboard Little People Figures


Materials Needed

Thin Cardboard

Small Circles to Trace…. One Smaller than the Other (like buttons)

Pencil

Scissors

Glue

A Couple Different Colors of Paint

Button


Step 1


Trace a bunch of circles onto thin cardboard.


Trace a bunch of circles onto thin cardboard.


Step 2


The thinner the cardboard, the more circles you will need to cut.


The thinner the cardboard, the more circles you will need to cut.

Step 3


Cut them out.


Cut them out.


Step 4


Glue together all pieces.


Glue together all pieces.


Step 5


Press down until dry.


Press down until dry.


Step 6


Get a smaller circle to trace and trace a bunch of these circles.


Get a smaller circle to trace and trace a bunch of these circles.


Step 7


Glue together.


Glue together.


Step 8


Glue smaller circles on top of large circles.


Glue smaller circles on top of large circles.


Step 9


Paint it.


Paint it.


Step 10


Paint other details.


Paint other details…


Step 11


Add button or other item for hat or hair.


Add button or other item for hat or hair.


Step 12


Make them all different sizes.


Make them all different sizes.

Aren’t these adorable little people?  Make a whole family of little people figures to play with your friends.  They will surely love it.

Technorati Tags: , , , , , , , , , , ,

How to Make a Glue Stick Man out of your Recycled Glue Sticks

With all the crafts that I do  I go through a lot of glue sticks.  I always hate the idea of throwing them away…. I always try to find crafts that I can make out of recycled items.  And, glue sticks are no exception.  Here is a great craft you can make with your used glue sticks.  Today I’m going to show you how to make a Glue Stick Man out of your recycled glue sticks.  You will see what a great feeling you get from making something out of recycled materials.  Plus, you get a very cool toy man.

Check out our other Green Environmental Crafts.


How to Make a Glue Stick Man


Materials Needed

Empty Glue Stick

Glue

Paint, Paper, Foam or Felt

Black & White Paint


Step 1


Take an empty Glue Stick and peel the label off of it.


Take an empty Glue Stick and peel the label off of it.


Step 2


Glue the cap in place like this.


Glue the cap in place like this.


Step 3


Paint on clothes or glue on clothes with paper, foam or felt.


Paint on clothes or glue on clothes with paper, foam or felt.


Step 4


If painted clothes, then use black paint to outline.


If painted clothes, then use black paint to outline.


Step 5


Paint a sleeve on each side.


Paint a sleeve on each side.  Also, draw a dot for each eye.


Step 6


Draw a circle for each hand.


Draw a circle for each hand.


Step 7


Paint each hand white.


Paint each hand white.  Also, paint white buttons on the shirt.

How adorable is this little guy?  So adorable!!  Make a few of these Glue Stick people and you can have a small family.  What a great way to recycle those used glue sticks.

Technorati Tags: , , , , , , , , ,

Coolest Earth Day Craft Ideas – Crafts Made from Recycled Materials


Coolest Earth Day Craft Ideas - Crafts Made from Recycled Materials


Earth Day will be here in just a couple of weeks.  In honor of Earth Day I thought I would scour the internet looking for cool ideas for Earth Day crafts.  All of the crafts that I found and have listed here are made from recycled materials.  Earth Day is a special day to celebrate the Earth and to increase awareness and appreciation of the Earth’s natural environment.  And, I think making crafts from recycled materials such as the ones found here is a great way to teach children about recycling and the importance of doing that to help save our Earth.  So, without further ado….

Coolest Earth Day Craft Ideas

(1)  Newspaper Roses


Newspaper Roses


Look how beautiful these Roses are?  They really are lovely & they are completely made from recycled newspapers.  Check out the craft and all its details over at Zakka Life.


(2)  Serving Tray


Serving Tray


I love, love, love this idea!!  Crafty Nest went to a Salvage Yard and noticed that there were old cupboards there.  She picked up a white one and with a little creativity and a lot of fun she was able to make this beautiful serving tray.  Check out her website so you too can make this.


(3)  Can-Do Robots


Can-Do Robots


Made from tin cans these robots are so freakin cute.  What is really cool is that their features are made of magnets, so they can be removed.  Which makes these robots like a Mr. Potato Head…. How fun is that?!  Check out the craft details over at Family Fun.


(4)  Cardboard Ottoman or Side Table


Cardboard Ottoman or Side Table


What a clever and creative idea!!  Made from recycled cardboard tubes you can choose to make either a side table or an ottoman…. or even make both.  When you look at them from above they are actually daisies.   Check out Esprit Cabane for all the crafting details.


(5)  Smashed Soda Can Animals


Smashed Soda Can Animals


Ok, this cow is really cute, isn’t he?!  But, wait till you check out Fave Crafts….. they have not only a cow, but they will show you how to make a pig and a bear too.  Make all three recycled can crafts and you will have a beginning to your very own recycled animal farm.


(6)  Milk Jug Shade


Milk Jug Shade


Now, this recycled craft turns out beautiful, doesn’t it?  Honestly, if I saw this I would have no idea it was actually made from recycled milk jugs.  But, it is.  I found this craft over at Mother Earth News.  Check out their site for all the wonderful craft details.


(7)  Recycled Picnic Basket


Recycled Picnic Basket


I found this recycled picnic basket over at bron marshall and for the main basket it is actually made from a recycled beer six-pack.  Isn’t that a clever idea?  They other container is actually made from a recycled half dozen egg carton…. they simply added a handle.  Make sure to check out their site for the full craft details.


(8)  Newspaper Basket


Newspaper Basket


This is an amazing basket!!  And, it is completely made from Newspaper.  Look how sturdy it looks too…. I love it.   How About Orange shows you step-by-step how to make this basket yourself.


(9)  Recycled Glass Chandelier


Recycled Glass Chandelier


Oh I just love this recycled craft idea…. it might just be my favorite.  I found this recycled craft over at Casa Sugar.    With a few recycled materials and some tea lights  you too can have this stunning glass chandelier.  I love the way they show this chandelier being outside…. it would be perfect for a fun outside party.


(10)  Creative Notepads


Creative Notepads


Here is a creative way to recycle those leftover notebook pages and even those left over paper scraps.  Esprit Cabane shows us how to take those leftover paper products and make them into cute little pocket size notepads.  Check out her site for the full details.


(11)  Toilet Paper Tube Albums


Toilet Paper Tube Albums


These Toilet Paper Tube Albums are just precious.  They are a beautiful way to store special keepsakes and pictures of events that you don’t want to lose.  Those Northern Skies shows you step-by-step how you too can make these albums from recycled toilet paper tubes.


(12)  Magazine Boxes


Magazine Boxes


Here is a creative and imaginative way to recycle those stacks of magazines you keep at home.  When made like the tutorial on Abstract Octopus you can actually store things in these boxes.  Check out the site for the full craft details.


(13)  Plastic Cup Earrings


Plastic Cup Earrings


Aren’t these earrings adorable?  You would never realize they were made from a plastic cup unless I told you.  I found this idea over at Punk Projects and I think it is a great way to recycle plastic cups… plus the craft is fun to do.  Make sure to check out her website for the details.

Technorati Tags: , , , , , , , , ,

How to Make an Ant Farm Jar and Watch an Ant Colony Build Mazes

This is a great project for kids who are interested in nature and bugs. This is an easy project for kids of any age and you get to watch ants build an underground city…so it is pretty cool. This ant farm has no openings, so you don’t have to worry about the ants escaping. You can open the jar outside to feed the ants, and then close it back up and bring it inside to observe.


How to Make an Ant Farm Jar and Watch an Ant Colony Build Mazes Craft Activity for Kids


How to Make an Ant Farm Jar and Watch an Ant Colony Build Mazes Craft Activity for Kids

Crafts Materials Needed

– 2 Jars – One Big, One Smaller
– Loose, Sand-Like Soil
– Water
– Sugar

Step 1

Clean both jars out, and dry them out. Take the outside wrappers off so you will be able to see inside the ant jar.

Step 2


Put the smaller jar, without its lid, upside down, within the bigger jar. Try to center it.


Put the smaller jar, without its lid, upside down, within the bigger jar. Try to center it. Poke a few tiny holes in the jar lid, small enough for ants to not escape.


Step 3


Fill the outside area between both jars, with the sandy-soil.


Fill the outside area between both jars, with the sandy-soil. Make sure that the entire area is filled, but don’t pack it tightly or the ants will not be able to dig their way through it.

Step 4 : Finding and Trapping the Ants

Now you must find the ants for your ant farm jar. Go looking in your back yard or in the local park. If you still can not find any ants then you can build an ant trap. Ants love sugar, so what you should do is put some sugar, mixed with a tiny bit of water, into a jar or can. Put it on its side and keep an eye on it…when you have about 20 ants. Don’t get more than 20 ants…crowding too many ants in the jar will make them less active and less fun to watch. You can close the jar and put them in your ant farm jar (DO THIS OUTSIDE – NOT INSIDE YOUR HOUSE).  Important : Make sure that these ants are from the same colony or they will land up fighting and killing each other.


Step 5 : Close That Jar Tight

Make sure to close that jar tight. Don’t worry about the ants getting enough air because you will be opening it to put food in there. Believe it or not, that is plenty of air for your ants.


How to Make an Ant Farm Jar and Watch an Ant Colony Build Mazes


Feeding Your Ants

Do the feeding of your ants outside to keep them from escaping into your house (or I will get a lot of nasty emails from your Moms). 🙂

Once a week (no more than this) feed the ants a few drops of sugar water. You can put it directly into the soil. You can also drop in there a few grains of bird or grass seed.

FEEDING ANTS TOO MUCH CAN KILL THEM!

Keep Your Ants Safe

– Keep your ant jar away from direct blow of air conditioners, radiators, and heaters…keep them at normal room temperature.

– Keep them out of the direct glare of sunlight.

The Fun Part is Watching Your Ants Build an Underground City

Now just watch and observe your ants build their own littler underground city. They can build them most amazing, intricate mazes. I hope you enjoyed this project.

Technorati Tags: , , , , , , , , , , , , ,