How to Make a Mini Puppet Theater with a Matches Box

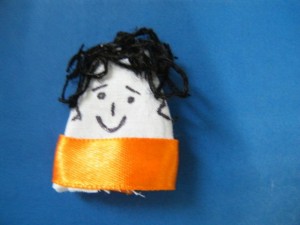
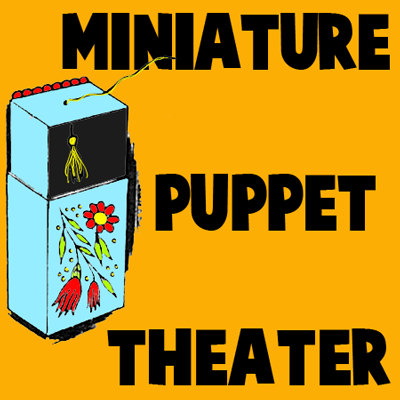
I be you will want this miniature puppet playhouse and its tiny dancing puppet for a pocket toy or to use  in your doll houses. This is a mini yarn puppet that is controlled with a matches box puppet theater. Find out how to make this little mini toy below.


How to Make a Mini Puppet Theater with a Matches Box


CRAFTS MATERIALS NEEDED:

Sliding drawer matches box

Scissors

Nail

Black paint or ink

Black thread

Paints  & brush

Colored yarn

Screw eye

How to Make These Miniature Puppet Shows

Step 1


Remove the sliding drawer from the matchbox.


Remove the sliding drawer from the matchbox. Paint the inside of the drawer with black paint or ink and allow it to dry thoroughly. Paint the outside of the drawer and the matchbox cover with a neutral color paint, and allow them to dry thoroughly.


Step 2


make the dancing puppet


To make the dancing puppet, cut several 2-inch pieces of colored yarn. Fold the yarn over the head of an ordinary screw eye, and wind a piece of black thread under the head to make the neck.

Step 3


Tie a short piece of black thread to the top of the puppet's head to make the control-thread.


Tie a short piece of black thread to the top of the puppet’s head to make the control-thread.

Step 4


Slip the end of the control-thread attached to the puppet through the hole.


With a nail, punch a small hole in the center of one of the short ends of the sliding drawer. Slip the end of the control-thread attached to the puppet through the hole. Replace the sliding drawer in the matchbox cover so that the control-thread is at the top, and the puppet is in the drawer.

Step 5

Decorate the front of the puppet playhouse with paints or wax crayons. To make the puppet perform, slide the drawer about halfway out of the cover and pull the control-thread up and down. If you want to make a larger playhouse for more puppets, use a kitchen size matchbox with a sliding drawer, and make 2 or 3 yarn puppets the same way.

Technorati Tags: , , , , , , ,

How to Make Macaroni Weavers or Looms for Kids

This is a very unique weaving loom craft…and you probably haven’t seen it anywhere else. Here is a craft idea for making weaving looms out of 3 inch long macaroni noodles, string, buttons, and a few other items. Macaroni noodles work perfectly for making a loom as the noodles are hallow and allow string to be pushed through them. Find out how to put this unique loom together…the sooner you start, the sooner you can begin your weaving projects.

Here are More Weaving Crafts.

How to Make Macaroni Weavers or Looms


How to Make Macaroni Weavers or Looms


Crafts Materials Needed:

5 pieces of macaroni each 3″ long

5 pieces of heavy string each 3-feet long

5 buttons slightly larger than hole in macaroni

yarn

5″ needle

How to Make the Macaroni Loom

Step 1


Pull a length of string through each of the macaroni pieces.


Pull a length of string through each of the macaroni pieces.

Step 2


Fasten a button to the top end of each string to prevent string from slipping through macaroni hole.


Fasten a button to the top end of each string to prevent string from slipping through macaroni hole.


Step 3


Thread the needle with yarn, and starting with the middle macaroni piece, weave the yarn over and under the macaroni pieces.


Thread the needle with yarn, and starting with the middle macaroni piece, weave the yarn over and under the macaroni pieces.

Step 4


Slide yarn onto strings as weaving progresses, pulling macaroni downward.


Slide yarn onto strings as weaving progresses, pulling macaroni downward. Add additional yarn by overlapping ends.


Woven scarf


When desired length of belt is reached, remove macaroni pieces and tie ends of yarn

Here are More Weaving Crafts.

Technorati Tags: , , , , , , ,

Puppets for Thumb wrestling: Father’s Day Gift

Here’s a Father’s day gift that guarantees hours of fun. Make a set of thumb puppets for your dad and yourself, and play thumb wrestling. The simple illustrated instructions to make the thumb puppets follow:


Craft materials required:

-White fabric

-black yarn

-ribbon

-scissors

-needle and thread

-fabric glue

-Permanent marker


Step 1:

Cut out a piece of cloth double the length of your thumb and about an inch wider than the width of your thumb.


Step 2:

Fold it into half and stitch along the two sides as shown.


Step 3:

Fold it inside out as shown:


Step 4:

Glue small pieces of yarn to make hair


Step 5:

Glue a strip of ribbon along the bottom as shown


Step 6:

Add facial features with a marker.


Make another one for your dad in the same way. Make sure its big enough for your dad’s thumb. Your dad is sure to enjoy this Father’s day gift.

Technorati Tags: , , , , , , , , , ,

How to Make a Woven Leprechaun Beard with a Cardboard Loom for St. Patricks Day

Today we are making a woven yarn Leprechaun beard and we are doing it with a simple cardboard loom. I have seen some crafts online for making crocheted or knitted bears and I figured I would show you a way that you, as a child, can make a fabric beard. This is something you can do, just by  making a cardboard loom. This will be a great homemade Saint Patrick’s Day craft that I know you will have fun making.


How to Weave a Leprechaun Beard


Crafts Materials Needed:

Yarn

Scissors

Cardboard

(Optionally) Packaging Tape

Sewing Needle

Rubber Bands or Hair Rubber Bands

Step 1


step1


Cut a sturdy piece of cardboard that is about 9 inches wide. The height depends on how long you want the beard to be.

 Step 2


step2


If your cardboard isn’t very sturdy and bends easily then you will want to strengthen it by wrapping it in packaging tape. Otherwise, skip this step.

 Step 3


step3


Cut slits, 1/2 inches apart, along the top of the cardboard. Then cut diagonally downwards to make a beard shape. See the picture above.

 Step 4


step4


Now cut a slit across from the slits that you made in the previous step.

 Step 5


step5


I used red yarn, but if you have orange yarn this would probably be better for a Leprechaun. Tape yarn in the first slit as seen in the picture above.

Step 6


step6


I wrapped the yarn in a slightly different way then illustrated here. I then decided this way would be easier so that is why I had to draw the yarn in the picture above. Anyways, this is easy so don’t make it harder than it is. You are simply just wrapping the yarn around the cardboard, and each time inserting the yarn in the slits.

 Step 7


step7


Thread yarn thru a needle.

 Step 8


step8


If you haven’t ever woven anything, you will need to know that you are just putting the yarn under the first thread, then over the next one, under the next one, and so on. Do this now.

 Step 9


step9


Pull yarn thru until there is just a tiny tail of yarn hanging out, as seen in the picture above. To push yarn up, you can use a fork.

 Step 10


step10


When you get to the end of the row, you just turn around and go the other way. If you ended by going over the yarn, then on the next row you will go under the yarn. If you ended the row going under the yarn, in the next row you will go over though.

 Step 11


step11


When your yarn runs out, you will want to push the needled up thru some loops and then cut the yarn loose.

 Step 12


step12


Now you can start a new piece of yarn, just weave it exactly the way you did previously.

 Step 13


step13


Remember we will need a hole in our beard so we can talk thru it and show our mouth. To do this, you just weave back and forth along a few of the outside lines like I did in the picture. After you do a few rows (maybe about 5-6 rows), then you can start weaving along the entire width of the cardboard loom again.

 Step 14


step14


This is what your beard should look like when you finish the entire length of the loom.

 Step 15


step15


I want you to know sew around the border of the mouth. Nothing fancy, just loop around the outside border of the mouth. This will ensure that the yarn won’t come loose. After this cut the inside lines of yarn that you see inside the mouth.

 Step 16


step16


Next cut in half all of the yarn lines in the back of the cardboard loom.

 Step 17


step17


Now you will see that there will be free threads of yarn. Tie them together into knots so your woven beard doesn’t come apart.

 Step 18


step18


Now your beard will look like this.

 Step 19


step19


Now you will need rubber bands. I couldn’t find any normal rubber bands so I used hair bands. However, I believe that normal rubberbands would work better.

Push a rubber band thru the top corner of the beard.

 Step 20


step20


Now push one end of rubber band thru the loop of the other end and pull.

 Step 21


step21


It should now look like this. Do the same exact thing on the other top corner of the beard. If your beard doesn’t fit, you might need two rubber bands looped together on both sides. You basically just put a second rubber band thru the first rubber band…then you loop one side thru the other side (like you did in the last step) and pull.  This is called a rubber band chain…find out how to make one here.


step22


Like in the above picture…

Wear Your Leprechaun Beard


How to Weave a Leprechaun Beard


Now just loop the rubber bands over your ears. Perhaps you would like to put a Leprechaun hat on your head and really play the part. Perhaps make a goofy face like my son did. 🙂 Have a Very Happy Saint Patrick’s Day!!!

How to Make Clothespin People Figures

I have a fun craft for you today that you can make out of any kind of wooden clothespin.  In this post I’m going to show you how to make a Clothespin People Figure.  Grab a few clothespins and you can even make an entire clothespin family.  Simply use your imagination to make each figure a little bit different.  The kids will love this craft because it is so much fun and you will love how your children use their imagination to create their clothespin figures.

Check out our other Clothespin Crafts.


How to Make Clothespin People Figures


Materials Needed

Wooden Clothespin (Any Type)

Glue

Paint (Colors for Face, Clothes & Skin)

Black Paint

Paintbrush

Yarn


Step 1


Get either type of clothespin


Get either type of clothespin as above picture.


Step 2


If you have the clothespin with the metal parts take it apart like above.


If you have the clothespin with the metal parts take it apart like above.


glue the pieces like this.


And then glue the pieces like this.


If you have the above type you don't have to do anything.


If you have the above type you don’t have to do anything.


Step 3


 Paint clothes and skin.


Paint clothes and skin.


Step 4


Paint a face.


Paint a face.


Step 5


It looks good to outline shirt in black.


It looks good to outline shirt in black.


Step 6


Draw three sides of rectangle for sleeve.


Draw three sides of rectangle for sleeve.


And a circle for hand.  Color it the same color as face.


And a circle for hand.  Color it the same color as face.


Step 7


Paint details you want.


Paint details you want.


Step 8


Wind some yarn up like above.


Wind some yarn up like above.


Step 9


Wind some yarn up like above.


Glue on top of head and cut loops at bottom.

And, there you have it…. you just finished a Clothespin people figure.  Make a few more and you got yourself a Clothespin family.

Technorati Tags: , , , , , , ,

Giving Thanks Thanksgiving Crafts Roundup


Giving Thanks Thanksgiving Crafts Roundup


Thanksgiving is coming up quickly.  This month wouldn’t it be a great idea to fill it with crafts that remind us what this Holiday is all about….. being thankful.  We all have so much to be thankful for.  So, in this link roundup I have scoured the internet to find crafts that all have to do with being thankful.  Each craft is a lot of fun and all can be used as a Thanksgiving decoration…. but most of all they remind us to be thankful.  With these crafts you will be doing them as a family…. and family is one of the most important reasons to be thankful.  So, get ready to spend some time looking at some amazing Thanksgiving “Giving Thanks” Crafts….. you are sure to find one that you will love.

Check out our other Thanksgiving Crafts.

Giving Thanks Thanksgiving Crafts Roundup

(1)  Thanksgiving Countdown Calendar


Thanksgiving Countdown Calendar


This Thanksgiving craft is kind of like a Holiday Advent Calendar.  You and your family can express your thanks and gratitude simply by writing your thanks on your color piece of paper and adding it to the envelopes.  Look at them each day to remind each other what you are Thankful for.  I found this great Thanksgiving craft at Parents.com.


(2)  Give Thanks Napkin Rings


Give Thanks Napkin Rings


In this Thanksgiving thankful craft Jeanne Winters shows you how to create these amazing napkin rings that inspire your Thanksgiving guests to go around the Thanksgiving table before the feast and let everyone know what they are thankful for.


(3)  Give Thanks Yarn Turkey


Give Thanks Yarn Turkey


This Thanksgiving thankful craft was one of our crafts posted last Thanksgiving Season.  It’s a craft that your children will love putting together.  Plus, it is part finished when it is presented at the Thanksgiving table and finished by the guests adding to each feather what they are thankful for.  Check it out.


(4)  Gratitude Tree Advent Calendar


Gratitude Tree Advent Calendar


Here is another advent calendar idea using this time a tree.  Trees are great for this Thanksgiving craft because they have many branches to add your thankful ideas to…. plus trees are perfect for this fall craft.  Oopsey Daisy came up with this Thanksgiving craft and I love it.  Check it out to see how she uses a magnetic sheet and bottle caps for this craft.


(5)  Give Thanks Board


Give Thanks Board


This Thanksgiving thankful craft is similar to the first one, but instead of it being a garland it is actually all out on a board.  What is really cool about this Thanksgiving thankful craft is the use of  a variety of coordinating scrapbook paper giving it an amazing look.  Check it out for yourself at JellybeanJunkyard.


(6)  Thankful Bucket


Thanksgiving Thankful Bucket


Here one family shows you how they use a Thankful Bucket to remind each other what they are thankful for this Thanksgiving season.  Here The Idea Room shows us how to put together this festive bucket.  Have the family fill it with things they are thankful for…. after dinner share these things with the rest of the family.  Great idea.


(7)  Changeable Frames for Thankfulness


Changeable Frames for Thankfulness


Here is a clever idea by Flamingo Toes.  Here the writer of this post shows you how to make a place that your family can write down what they are thankful for.  This particular Thanksgiving thankful craft is made with glass over the embroidery so they can write different things all month long.  They can wipe it clean and start over as often as they would like.


(8)  Thankful Leaf Garland Decoration


Thankful Leaf Garland Decoration


Here is a cute Thanksgiving thankful craft.  And, one that looks awesome as a Thanksgiving decoration.  Full Circle shows you how to make this festive craft.  Simply string together construction paper leaves and have family members write on the leaves what they are thankful for.  String together as garland for all to see.


(9)  Thankful Tree


Thanksgiving Thankful Tree


Here is a great Thanksgiving thankful craft that is perfect for even the youngest of crafters with just a lit bit of help from you.  Playful Learning shows you how to make one of these Thankful Trees for your houses.  Simply have the kids make leaves, color them and cut them out.  Have the children write down what they are thankful for.  She will show you how to finish it off with a tree branch.  Check it out for yourself.


(10)  Thanksgiving Hat


Thanksgiving Hat


Here is a fun Thanksgiving thankful craft that the little kiddies will love.  Dim Sum, Bagels and Crawfish shows you how to make this craft.  The kids will love making it, but even more so love wearing it.  If you are having a Thanksgiving dinner at your house considering doing this craft with the little ones at your feast…. they will love it.


(11)  Paper Cornucopia of Thanks


Paper Cornucopia of Thanks


Flip Flops and Applesauce shows you how to take some paper and posicle sticks and make it into a beautiful and meaningful table centerpiece for Thanksgiving.  Make sure to involve the whole table…. have your guests each write down what they are thankful for and read them out loud.


(12)  Thanksgiving Clothespin Wreath


Thanksgiving Clothespin Wreath


Here is a cool Thanksgiving thankful craft that also works as an awesome Thanksgiving wreath decoration for the Holidays.  I found this Thanksgiving craft over at Chica and Jo.  This amazing Thanksgiving wreath is made from Clothespins.  Add a sharpie to your wreath and let your visitors add what they are thankful for.  Save it for years to come.

Technorati Tags: , , , , , , , , , , , , ,

How to Make a Milk Jug Vampire Candy Holder

I have a wonderfully fun Halloween craft for you today.  In this post I’m going to show you how to make a Milk Jug Vampire Candy Holder for Halloween.  What is really cool about this craft is that you probably have all the craft materials needed in your house.  This vampire candy holder is made from a Milk Jug…. just simply wash it out and you are good to go.  You will need a bit of help from an adult cutting the milk jug as it can be difficult to cut.  So, grab the materials needed and let’s get started.

Check out our other Halloween Crafts.


How to Make a Milk Jug Vampire Candy Holder


Material Needed

Milk Jug

Black Marker

Scissors

Paint (color of your choice)

White, Black & Red Paint

Glue

Yarn

Paper Plate

Candy


Step 1


Clean out a milk jug.


Clean out a milk jug.  Take the labels off too.


Step 2


There are indentions in the plastic... I drew lines there for the mouth.


There are indentions in the plastic… I drew lines there for the mouth.


Step 3


Cut out this line.


Cut out this line.  Ask parents for help.


Step 4


 Draw eyes behind the handle.  Draw a nose too.


Draw eyes behind the handle.  Draw a nose too.


Step 5


Paint everything other than the eyes.


Paint everything other than the eyes.  I chose purple… choose any color.


Step 6


Paint eyes white.


Paint eyes white.  I decided to paint the nose a lighter purple… it’s optional.


Step 7


Remember the piece you cut out for the mouth?  Paint it black now.


Remember the piece you cut out for the mouth?  Paint it black now.


Step 8


Draw two triangles.


Draw two triangles on a paper plate.


Step 9


Cut them out.


Cut them out.


Step 10


Glue them in mouth.


Glue them in mouth.


Step 11


Glue black cloak to back of jug.  Outline parts in black.


Glue black cloak to back of jug.  Outline parts in black.


Step 12


Fold lots of yarn in half several times


Fold lots of yarn in half several times…. like this.


Step 13


Tie a string around the middle


Tie a string around the middle…


It should look like this.


Like this.


Step 14


There will be loops on both sides... cut them in half


There will be loops on both sides… cut them in half…


It should look like this.


Like this.


Step 15


Cut off top of jug.  Glue yarn to top of jug for hair.


Cut off top of jug.  Glue yarn to top of jug for hair.


Step 16


Add red paint for blood.... also add candy.


Add red paint for blood…. also add candy.

Isn’t this Milk Jug Vampire Candy Holder so cool?  It is perfect for holding candy this Halloween Season.  You are sure to get lots of comments on this candy holder.

Also, Check out How to Make a Pumpkin Milk Jug Candy Holder.… it’s another great Candy Holder for Halloween.

Technorati Tags: , , , , , , , , , , , , ,

How to Make Clothespin Witches

Halloween is later this month.  It is coming up quickly….. so now is the time to decorate your house for Halloween.  Today I’m going to show you how to make Clothespin Witches.  The craft calls for a wooden clothespin.  My suggestion to you is to use the old-fashioned clothespins…. not the “pinch-to-open” ones.  Make a few of these Clothespin Witches to decorate your whole house.   Grab the materials needed and let’s get started.

Check out our other Halloween Crafts.


How to Make Clothespin Witches


Materials Needed

Wooden Clothespin

Green and Red Paint

Black Felt, Paper or Craft Foam

Pencil

Scissors

Stapler

Glue

Red and Yellow Yarn

Stick


Step 1


Paint a wooden clothespin green.


Paint a wooden clothespin green.


Step 2


Draw a big circle on felt, paper or craft foam.


Draw a big circle on felt, paper or craft foam.


Step 3


Cut out the circle.


Cut out the circle.


Step 4


Draw a line thru the center.... both ways.


Draw a line thru the center…. both ways.


Step 5


Cut out one of the pizza slices.


Cut out one of the pizza slices.


Step 6


Staple closed like this.


Staple closed like this.


Step 7


Now push the head thru the hole.


Now push the head thru the hole.


Step 8


Now, your piece looks like this.


Now, your piece looks like this.


Step 9


Paint stripes on legs.


Paint stripes on legs.


Step 10


Cut out a small circle and a pizza slice shape


Cut out a small circle and a pizza slice shape… Use paper, felt or craft foam.


Step 11


Glue pizza slice into cone shape for top of hat.


Glue pizza slice into cone shape for top of hat.


Step 12


Cut slits at bottom of cone.


Cut slits at bottom of cone.


Step 13


Glue slits to top of circle.


Glue slits to top of circle.


Step 14


Fold yarn in half several times


Fold yarn in half several times…


Step 15


Glue yarn on top of head.


Glue yarn on top of head.


Step 16


Now cut looped ends of yarn to make hair.


Now cut looped ends of yarn to make hair.


It should look like this.


Like this.


Step 17


Glue the hat on top of head.


Glue the hat on top of head.


Glue the hat on top of head.


Like this.


Step 18


Find a stick.


Find a stick.


Step 19


 Cut a slit in front of dress.  Then put stick thru clothespin and slit in dress.


Cut a slit in front of dress.  Then put stick thru clothespin and slit in dress…


Step 20


It should look like this.


Like this.


Step 21


Fold some yellow yarn in half a few times


Fold some yellow yarn in half a few times… Like this…


Step 22


Take a 2nd piece of yarn and tie it around folded yarn.


Take a 2nd piece of yarn and tie it around folded yarn.


It should look like this.


Like this.

Step 23


Take loops on each side and cut the loops open.


Take loops on each side and cut the loops open.


It should look like this.


Like this.


Step 24


Tie this on to end of stick with another piece of yarn.


Tie this on to end of stick with another piece of yarn.


It should look like this.


Like this.


Step 25


Finished Clothespin Witch


And, that’s it.  You just finished making a Clothespin Witch.  Isn’t it awesome?!  This will make for a wonderful Halloween Decoration in your house.  Enjoy!!

Technorati Tags: , , , , , , , , , ,

How to Make a Homework Caddy

Did you ever feel like you were rummaging around to find your homework school supplies when it was time to do your homework?  Well, I have a craft for you today that will fix this problem.  In this post I’m going to show you How to Make a Homework Caddy.  This is a perfect way to keep all your homework school supplies in one place when you are ready to do your homework.  You can keep all your school supplies like crayons, pencils and scissors in once place and carry this caddy around where ever you want to do your homework.  So, grab the materials needed and let’s get started.

Check out our other Back to School Crafts.


How to Make Homework Caddy Cans


Materials Needed

4 Empty Cans

Glue

Yarn (4 different colors if you would like)

Cardboard Box (2 cans wide)

Scissors

Marker

Paint (optional)

Duct Tape


Step 1


Get 4 empty cans.


Get 4 empty cans.


Step 2


Take off the labels.


Take off the labels.


Step 3


 Add glue around bottom of the can.


Add glue around bottom of the can.


Step 4


Start winding yarn around can.


Start winding yarn around can.


Keep winding the yarn.


Keep winding the yarn.


Keep adding glue and winding until yarn is up to rim of can.


Keep adding glue and winding until yarn is up to rim of can.


Step 5


Find a box that is about 2 cans wide


Find a box that is about 2 cans wide… like this one.


Step 6


Cut the box in half.


Cut the box in half.


Step 7


Turn it so they are back to back.... like this.


Turn it so they are back to back…. like this.


Step 8


Draw a handle.


On the back of the box where the two boxes meet… Draw a handle.  This handle looks like a sideways letter ‘D’.


Step 9


Cut out handle and then trace handle onto back of the other box.


Cut out handle and then trace handle onto back of the other box.


Step 10


 If you want to... paint the box.


If you want to… paint the box.


Step 11


Roll up duct tape and place it on bottom of can and on one side of can.


Roll up duct tape and place it on bottom of can and on one side of can.


Step 12


Place cans in box.


Place cans in box.  Use duct tape to tape both handles together.

Now you have your homework caddy finished.  You are all ready to carry your homework caddy anywhere you want to do your homework.  Enjoy!!

Technorati Tags: , , , , , , , , , ,

How to Decorate a Notebook with Yarn or Crepe Paper

I have a super fun craft for you today!!  And, it’s totally perfect for back to school.  In this craft I will show you how to decorate a notebook with yarn or crepe paper.  Your notebook will be an original…. no one else will have a notebook like yours.  This craft is not only a lot of fun, but it is really simple.  Simply use crepe paper or yarn to make a one of a kind design on the front of your back to school notebook.  So, grab the materials needed and let’s get started.

Check out our other Back to School Crafts.


How to Decorate a Notebook with Yarn or Crepe Paper


Materials Needed

Yarn or Crepe Paper

Glue

Scissors

Notebook


Step 1


Put glue down where you are going to glue yarn or paper.


Put glue down where you are going to glue yarn or paper.


Step 2


Place yarn or crepe paper on glue.


Place yarn or crepe paper on glue.

And, that’s it!!  What kind of awesome design for your notebook did you come up with?  Let me know in the comments below.  And, don’t forget to take a picture of the notebook and share that too in the comment.

Here is our video on How to Decorate a Notebook with Yarn or Crepe Paper

Technorati Tags: , , , , , , , ,

How to Make a Coupon Organizer Case

Mother’s Day is right around the corner.  Have you thought about a gift for your mother yet?  Well, if not I got a great Mother’s Day craft for you.  I’m going to show you how to make a Coupon Organizer Case.  There is not many things more frustrating that going shopping with a pile of coupons and no way of organizing them…. well, your mom won’t have that problem anymore.  With the number of envelopes you are going to be adding to this craft she will have more than enough places to organize her coupons.  So, let’s get started.

Check out our other Mother’s Day Crafts.


How to Make a Coupon Organizer Case


Materials Needed

Cardboard

Paper

Glue or Paste

Hole Punch

10-20 Envelopes

5 Binder Rings, Ribbon or Yarn

Markers, Crayons, Glitter Glue (items to decorate case)


Step 1


Cut 2 pieces of cardboard down to a size that is a tiny bit larger than a business envelope.


Cut 2 pieces of cardboard down to a size that is a tiny bit larger than a business envelope.


Step 2


Cover with paper.  Paste in place.


Cover with paper.  Paste in place.


Step 3


Use a hole punch to poke holes on left side.


Use a hole punch to poke holes on left side.


Step 4


Punch holes in 10-20 envelopes so they will match up with covers.


Punch holes in 10-20 envelopes so they will match up with covers.


Step 5


Bind 2 covers and all the envelopes together.


Bind 2 covers and all the envelopes together.  You can use binder rings, ribbon or yarn to bind them together.


Step 6


Decorate cover.


Decorate cover.


Finished Coupon Case


And there you have it…. you just finished making your Coupon Organizer Case.  Isn’t it a wonderful way to organize coupons?  Your mom is going to surely love this!!

Here is our video on How to Make a Coupon Organizer Case

Technorati Tags: , , , , , , , , , , , ,

How to Make a Glove Bunny for Easter

Get ready for a fun and creative craft because I have just that for you today.  In this post I am going to show you how to make a Glove Bunny for Easter.  That’s right…. it’s an Easter bunny made out of a Glove.  This is a great craft to do to actually use that glove that you no longer have the pair for.  After stuffing the glove you have a nice, cuddly Easter Bunny that would be perfect as an Easter decoration or a nice cuddly friend.  The choice is yours.  So, let’s get started.

Check out our other Easter Crafts.


How to Make a Glove Bunny for Easter


Materials Needed

Glove

2 Safety Pins

Stuffing

Glue

Clothespins or Clips

Cap

yarn

Construction Paper

Ribbon or Twist Tie

Cotton Ball


Step 1


Get a glove.


Get a glove.  Then fold middle finger down and the two outside fingers can be pushed to the back.


This is what the other side looks like.


This is what the other side looks like.


Step 2


Pin middle finger down from inside of glove.


Pin middle finger down from inside of glove.


Step 3


Fill with stuffing.


Fill with stuffing.


Step 4


Fold bottom part inside glove.


Fold bottom part inside glove.


Step 5


Glue and clip shut.


Glue and clip shut.


Step 6


Get a cap.


Get a cap.


Fill cap with glue.


Fill cap with glue.  Fill with tiny, cut pieces of yarn… as well as tiny little paper eggs that you cut out.


For a tiny handle use a ribbon or twist tie.


For a tiny handle use a ribbon or twist tie.


Step 7


Put tiny basket handle over one arm and then pin both arms together.


Put tiny basket handle over one arm and then pin both arms together.  Pin from behind arms.


Step 8


Glue cotton ball to back.


Glue cotton ball to back.

And, that’s it…. you just finished making your Glove Bunny for Easter.  Isn’t he a cutie patootie?!  Let me know how your Glove Bunny turned out in the comments below.  And, take a picture of it too and post that with the comment as well…. I’d love to see it.

Technorati Tags: , , , , , , , , , ,

How to Make a Glued String Easter Basket

Today I have a fun and creative craft for you.  In this post I’m going to show you how to make a Glued String Easter Basket perfect to fill with Easter eggs and candy.  The Easter Basket turns out beautifully and it is simply made with a balloon, yarn, flour and water.  Don’t use the same boring Easter Baskets that every child uses from the store…. make your very own Glued String Easter Basket.  The Easter Bunny will love it.  So, let’s get started.

Check out our other Easter Crafts.


How to Make a Glued String Easter Basket


Materials Needed

Balloon

Flour

Water

Shallow Bowl

Yarn

String

Needle

Scissors


Step 1


Blow up balloon and tie a knot at the end.


Blow up balloon and tie a knot at the end.  Tie a string to this, and hang it from an overhead point, so that it is about eye level for the child.


Step 2


Mix flour and water.


Mix flour and water.  Do this by mixing 1/4 cup of flour into 1 cup of water. You will want the mixture to be thin-sh and a bit runny.


Step 3


Dip the yarn into the flour mixture


Cut yarn in lengths of about 4 feet lengths. Dip the yarn into the flour mixture and wet each piece of yarn thoroughly.


Step 4


Start at top and criss-cross.


Start at top and criss-cross.


Step 5


Wrap more yarn around balloon and then you should pop the balloon.


Wrap more yarn around balloon and then you should pop the balloon.


Step 6


Cut top side of string on both sides to make basket.


Cut top side of string on both sides to make basket.

And there you have it…. you just made a Glued String Easter Basket.  How did it turn out for you?  Let me know in the comments below.  And, make sure to take a picture of your Easter Basket too and share it in the comment…. I’d love to see it.

Technorati Tags: , , , , , , , , , , , , ,

How to Make Yarn Bird Cages

I have a fun and creative craft for you today.  I’m going to show you how to make Yarn Bird Cages.   These Yarn Bird Cages are colorful decorations for all sorts of occasions, and can be made by children aged six and up.  You will simply dip yarn in flour and water and wrap around a balloon…. it is so much fun.  Kids will love dipping their yarn into the flour and water mixture.  So, grab the materials needed and let’s get started.

Check out our other Balloon Crafts.


How to Make Yarn Bird Cages


Materials Needed

Balloon

Flour

Water

Yarn

String

Shallow Bowl


Step 1


Blow up a balloon and tie a knot at the end.


Blow up a balloon and tie a knot at the end.


Step 2


Mix flour and water.


Mix flour and water.


Step 3


Dip yarn into flour mixture.


Dip yarn into flour mixture.


Step 4


Start at top and criss-cross.


Start at top and criss-cross.


Step 5


Wrap more yarn around balloon and then you should pop the balloon.


Wrap more yarn around balloon and then you should pop the balloon.


Step 6


Tie string at the top to hang the bird cage.


Tie string at the top to hang the bird cage.

And there you go…. you just finished your Yarn Bird Cage.  How did your bird cage turn out?  Let me know in the comments below.  And, since every bird cage is different take a picture of your bird cage and post it with your comment below…. I’d love to see it.

Technorati Tags: , , , , , , , ,

How to Make a Paper Bag Bunny Puppet

I have a fun and creative craft for you today.  I am going to show you how to take a paper bag and make it into a bunny puppet.  Sounds like fun, right?  It really is.  And, the timing of it couldn’t be any more perfect.  After all, Easter is in just a few weeks.  Made with string or yarn the arms and legs of the puppet actually move.  When you aren’t using it as a puppet hang the Paper Bag Bunny up as an Easter decoration.  People are sure to love it when they see it.  So, let’s get started.

Check out our other Easter Crafts and Puppet Crafts.


How to Make a Paper Bag Bunny Puppet


Materials Needed

Paper Bag

Newspaper

String or Yarn

Several Sheets of Paper

Scissors

Glue

Pencil


Step 1


Wad up several sheets of newspaper and put in paper bag until 3/4 full.


Wad up several sheets of newspaper and put in paper bag until 3/4 full.


Step 2


Close the open end of bag with string or yarn.


Close the open end of bag with string or yarn.


Step 3


Cut 8 strips of paper each approximately 3/4 inch by 18 inches long.


Cut 8 strips of paper each approximately 3/4 inch by 18 inches long.


Step 4


Glue ends of 2 strips of paper together at right angle


Glue ends of 2 strips of paper together at right angle (so it looks like a letter L).


Step 5


Keep folding each strip over the other strip until entire strips are used.


I colored each strip a different color to help you visualize how to fold these.  1)  did #1 in last step.  2)  fold blue strip over and crease.  3)  fold red strip over and crease.  4)  fold blue strip down and crease.  Keep folding each strip over the other strip until entire strips are used.  Glue last fold together.


Step 6


You will need 4 all together.


Now you have a springy arm or leg.  You will need 4 all together.


Step 7


Draw and cut out bunny hands, feet, ears, eyes and mouth.


Draw and cut out bunny hands, feet, ears, eyes and mouth.


Step 8


On each side of the bag, glue on arms.


On each side of the bag, glue on arms.  Spread out extra edges of the top of the bag to form a skirt.  Under skirt, glue legs.  Glue on hands and feet to legs and arms.


Step 9


Glue string to hands and feet.


Glue string to hands and feet.

There you go….. you just finished your paper bag bunny puppet.  Isn’t it adorable?  Now move the strings and watch the the bunny dance.  What else can you make him do?

Technorati Tags: , , , , , , , , , , , , , , ,

How to Crochet a Blanket for Beginners

Today I’m going to show you how to Crochet a Blanket for Beginners.  Crocheting a blanket is a lot of fun and it can also be totally relaxing.  Once you know how to crochet your choices of things you can make are limitless.  I will be showing you how to crochet a blanket using a much smaller version…. just to give you an idea.  Your blanket with be much wider than mine.  So, grab the materials needed and let’s get making a blanket.


How to Crochet a Blanket for Beginners


Materials Needed

6 Skeins of Yarn (your choice in color)

5.5 mm Crochet Hook

Scissors


Step 1


Knot yarn on crochet hook to begin.


Knot yarn on crochet hook to begin.


Step 2


Wrap extra yarn around finger so that the yarn is pulled tight.


Wrap extra yarn around finger so that the yarn is pulled tight.


Step 3


Go under the yarn.


Go under the yarn.


Step 4


Grab a hold of that loop with the hook.


Grab a hold of that loop with the hook.


Step 5


And, pull that loop through the loop you made with the original knot.


And, pull that loop through the loop you made with the original knot.


Step 6


go under the yarn again


You just made your first stitch.  You will be making 135 of these stitches to make the width of the blanket. Now, go under the yarn again…


Step 7


grab a hold of the yarn and pull it through the loop on the crochet hook.


…. and grab a hold of the yarn and pull it through the loop on the crochet hook.


Step 8


It should look like that


It should look like that once pulled through.


Step 9


continue making these stitches until you have 135 of these stitches.


Now, continue making these stitches until you have 135 of these stitches.  This is your blanket’s width.


Step 10


Push your hook through the first stitch of your crocheted blanket.


Now, this row is the most difficult of the entire blanket.  It is because you have the least amount of crocheted blanket to work with.  Push your hook into the first stitch of your blanket.


Step 11


Go under the yarn and grab a hold of it.


Go under the yarn and grab a hold of it.


Step 12


Pull that yarn through first stitch.


Pull that yarn through first stitch….. one of the loops on your crochet hook.  Do not go through both loops yet.


Step 13


You will again have 2 loops on your crochet hook


You will again have 2 loops on your crochet hook.


Step 14


Go under yarn again with your hook.


Go under yarn again with your hook.


Step 15


pull that yarn through both stitches on the crochet hook.


And, pull that yarn through both stitches on the crochet hook.


Step 16


Push hook through 2nd stitch of crocheted blanket.


Push hook through 2nd stitch of crocheted blanket.


Step 17


Go under yarn with hook.  Pull that yarn through the first loop on the crochet hook.


Go under yarn with hook.  Pull that yarn through the first loop on the crochet hook.


Step 18


You now have 2 loops left on your crochet hook.


You now have 2 loops left on your crochet hook.


Step 19


Go under yarn again.


Go under yarn again.


Step 20


pull yarn through both loops on crochet hook.


And, pull yarn through both loops on crochet hook.


Step 21


It should look like this when you reach the end of the 2nd row.


Continue doing this through every stitch on the first row of the blanket.  It should look like this when you reach the end of the 2nd row.  Your blanket will be a lot wider.  Remember, I am using a much shorter version, so it is easier to teach you.


Step 22


Turn the crocheted blanket over.


Turn over the blanket so that the crochet hook is back on the right side.


Step 23


Add 2 chain stitches


Add 2 chain stitches like you did in step 2 through step 6.  You will do this every time you start a new row.


Step 24


go into the first stitch of the previous row of the crocheted blanket like you did in step 10.


Go under the yarn with your hook…. grab a hold of the yarn and go into the first stitch of the previous row of the crocheted blanket like you did in step 10.


Step 25


With your crochet hook through the first stitch grab a hold of the yarn with your hook.


With your crochet hook through the first stitch grab a hold of the yarn with your hook.


Step 26


Pull the hook through the first loop on the crochet hook.


Pull the hook through the first loop on the crochet hook.  You are left with three loops on your hook.


Step 27


Go under the yarn again


Go under the yarn again….


Step 28


then pull the hook through the first two loops.


…. then pull the hook through the first two loops.  You are left with 2 loops on your hook.


Step 29


Go under the yarn with your hook and pull it through the last two loops on your hook.


Go under the yarn with your hook and pull it through the last two loops on your hook.  You are now left with one loop…. you are done with the stitch and ready to go into your 2nd stitch of the previous row like you did in Step 24.


Step 30


Keep doing this entire process until you finish this row of the blanket.


Keep doing this entire process until you finish this row of the blanket.


Step 31


When you are finished with that row turn over your blanket so that the crochet hook is back on the right side.


When you are finished with that row turn over your blanket so that the crochet hook is back on the right side.  You are ready to start a new row.


Step 32


Remember when you start a new row you need to add 2 chain stitches like you did in Step 23.


Remember when you start a new row you need to add 2 chain stitches like you did in Step 23.  You need to do this every time you start a new row.


Step 33


Continue doing Step 23 thru 31 for each row of the blanket.


Continue doing Step 23 thru 31 for each row of the blanket.  It will get easier as you go along as you will get more confident.  As you move along through your blanket you will find that you will need to add more yarn.  That is super easy.  Simply knot a new piece of yarn to the old and cut off the remaining string.  It’s that simple.


Step 34


When you decide your crocheted blanket is finished you will want to end it correctly.


When you decide your crocheted blanket is finished you will want to end it correctly.  That is what I will show you now.


Step 35


Pull crochet hook to give yourself a large loop to work with.


Pull crochet hook to give yourself a large loop to work with.


Step 36


Cut the yarn to remove it from the skein of yarn.


Cut the string of yarn to remove it from the skein of yarn.  Leave enough of the string of yarn that you will be able to use it to tie a knot in the next few steps.


Step 37


Grab a hold of the string of yarn and the loop of yarn.


Grab a hold of the string of yarn and the loop of yarn.  You are ready to tie a knot.


Step 38


Tie a knot


Tie a knot with the string of yarn and the loop of yarn.


Step 39


Pull the knot tight.


Pull the knot tight.


Step 40


Once knot is made you can cut off remaining string of yarn and loop of yarn.


Once knot is made you can cut off remaining string of yarn and loop of yarn.


Step 41


It should look like this now.


It should look like this now.  Your crocheted blanket is all finished.


Finished Crocheted Blanket


And, that is it.  You have yourself a finished crocheted blanket that you made yourself.  The blanket itself is crocheted from one simple stitch and yet it comes out looking awesome!!  Please take a picture of your crocheted blanket and share it along with a comment in the comment section below…. I’d love to see a picture of your blanket.

Technorati Tags: , , , , , , , , , , , , , , , ,