How to Make Lava Lamps with a Mini Empty Jar or Bottle Craft Idea for Kids

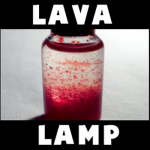
This is a fun and easy project for Summer-time and it is very inexpensive to make. This craft is to make a beautiful, homemade lava lamp. You most likely have all the crafts materials already in your house and kitchen. Laura from Dacian Moon Handmade  will show you, step by step, how to make a mini – lava lamp. You can even make it bigger so that the cool effects will be easier to see.

How to Make Lava Lamps with a Mini Empty Jar or Bottle Craft Idea for Kids


How to Make Lava Lamps with a Mini Empty Jar or Bottle Craft Idea for Kids


CRAFTS MATERIALS NEEDED:

– mini – bottle
– food coloring
– vegetable oil
– Alka Seltzer
– water


IMG_6533


Step 1.

Fill the bottle a little more than half with oil.


IMG_6534


like this.


IMG_6535


Add water until almost full…


IMG_6536


… like this.


IMG_6537


Step 2.

Add some drops of food coloring.


IMG_6539


Step 3.

Take a quarter of  an Alka Seltzer, make it small pieces and add one at a time to the bottle. (If you want to make a bigger lamp, and use a 1 liter bottle, you should add a full pill of Alka Seltzer)


IMG_6540


Wait until the first piece stops bubbling before you drop in the next.  If you add too much Alka Seltzer, the solution gets all cloudy.


IMG_6541


Let it calm down.


IMG_6547


… then watch the bubbles start going up, again and again.


IMG_6589


I think if you would add a bit of very fine glitter the effect would be even nicer.


IMG_6590bis


Technorati Tags: , , , , ,

How to make a Chalk Pastel Jars for Valentines Day or for Summer Fun

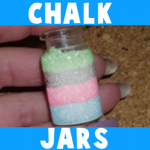
Today we will show you how to make a really cool item that you have never made before. This project is to make a jar filled with beautiful pastel chalk…it looks like sand art, but instead with chalk. Look below to find out how to make these awesome jars…great for a Valentines Day gift or for a Cool Summer Project. Laura from Dacian Moon Handmade   will show you today how to make a cute gift for your Valentine.

How to make a Chalk Pastel Jars for Valentines Day or for Summer Fun


Chalk Pastel Jars


CRAFTS MATERIALS NEEDED:

– chalk: blue, pink, green
– sugar
– small jar
– paper


IMG_3796


Step 1.

Put some sugar on a piece of paper.


IMG_3798


Spread it.


IMG_3799


Rub the blue chalk over the sugar…


IMG_3800


… and the sugar will become blue.


IMG_3801


Use the paper as a funnel to put the blue sugar into the jar.


IMG_3802


like this.


IMG_3803


Step 2.

Repeat step 1 using pink chalk. Put pink sugar over the blue one.


IMG_3805


 Step 3.

Add a layer of white sugar on the jar, then make some green sugar (repeating step 1, with green chalk).


IMG_3809


Add the green layer over the white one, like this.


IMG_3810


Seal the jar and the gift is ready.


IMG_3811


Technorati Tags: , , , , , , , , , ,

18 Cool Mummy Craft Ideas for Halloween


14 Cool Mummy Craft Ideas for Halloween


You are in for a treat today.  I have searched the internet to find what I thought was the best in Mummy crafts for Halloween.  I came up with 18 of my favorite Halloween Mummy crafts.  They are all totally creative and equally creepy.  Some of them are edible, some are meant to be used as decorations and others are actually moveable mummies.  But, I’m sure you will find them all fun and festive.  I hope you have a blast looking at all of these cool mummy craft ideas for Halloween…. I know I did.  So, without further ado…. let’s get started.

Check out our other Halloween Crafts.

18 Cool Mummy Craft Ideas for Halloween

(1)  Craft Stick Mummy


Craft Stick Mummy


I found this silly craft over at First Palette.  This Halloween Mummy Craft is made out of craft sticks and guaze.  And, the finished item is perfectly creepy for Halloween.  Make a few and put them around the house this Halloween.


(2)  Mummy Candy Holder


Mummy Candy Holder


Are you having a Halloween Party this year?  If you are I have the perfect decorations and party favors for you.  How about making this Halloween Mummy Craft.  It’s a Mummy Candy Holder…. the kids are sure to love it.  Check out Parents for all the craft details.


(3) Printable Paper Mummy Toy


Printable Paper Mummy Toy


Here is a paper toy craft from this site…for a paper mummy. This is very easy to make and a lot of fun to play with. Find out how here.

(4)  Bendable Mummy


Bendable Mummy


Here is a great Halloween craft that is made from an old shirt.  This is a great craft to recycle those old T-shirts.  Got to love recyclable crafts.  You want the craft details?  Check out Family Sponge.


(5)  Mummy Cupcakes


Mummy Cupcakes


Ok, I love the yummy crafts…. the edible ones.  Well, these Mummy Cupcakes are certainly no exception.  They are adorable…. and they look delicious.  Get the entire Mummy recipe at The Craft Patch….. make sure to check it out.


(6)  Mummy Sign


Mummy Sign


If you are looking for an outside Halloween decoration craft…. then you have found it here.  I found this Mummy craft over at Woman’s Day.  It is so terribly cute…. I just adore it.  This craft is for the more mature as there is a Saber Saw being used.   Adult Supervision is a must for this craft.

 (7) Mummy Bowling


Mummy Bowling


My daughter’s Girl Scouts troop made these for a Halloween Fair party they had. The Brownies and Daisies loves playing Mummy Bowling. Find out how to make these out of water bottles here.

(8)  Mummy Cookies


Mummy Cookies


Are you throwing a Halloween Party?  If so, you know that you cannot have a Halloween Party without some Halloween Cookies.  And, Halloween is just not Halloween without some Mummy treats.  So, make sure to check out this Mummy Cookie recipe I found over at Crystal and Comp….. the kids are sure to love them!!


(9)  Origami Mummy


Origami Mummy


Here is a simple fun Halloween Mummy craft you are sure to enjoy.  It is an Origami Mummy.  You simply need some origami paper, googly eyes and magic marker and you are good to go.  Make a few and decorate your room for Halloween.  Check out the entire craft at Activity Village.


(10)  Mummy Pumpkins


Mummy Pumpkins


Check out this awesome Halloween Mummy craft.  It combines two of the most popular items for Halloween…. a Pumpkin and Mummy.  It is just so fitting for a Halloween decoration.  You can see the Halloween craft in its entirety by going to Celeb Baby Laundry.

(11) Bead Pipe Cleaner and Bandages Mummy


Bead Pipe Cleaner and Bandages Mummy


Find out how to make these mummies with movable arms and legs. All you will need is bandages, pipe cleaners, and a bead. Learn how to make these mummies with the following instructions.

(12)  Juice Box Mummy


Juice Box Mummy


If you are anything like me…. you have tons of juice boxes at home.  I always try to come up with crafts that use empty juice boxes because I hate just throwing the empty juice boxes away.  Well, when I found this Mummy craft made from recycled juice boxes I was overjoyed.  Check it out for yourself at Kaboose.


(13)  Mummy Jars


Mummy Jars


This is one of my favorite Mummy crafts i found.  It seems to be really easy, but a ton of fun.  Plus, look at the outcome…. you have these glowing mummy jars that can be placed around the house as a Halloween Decoration.  You can take a look at the craft for yourself over at Crafts reDesigned.


(14)  Mummy Door Hanger


Mummy Door Hanger


This Mummy craft is pretty darn cute.  I found the craft over at TLC and I think it is perfect for Halloween.  It can be put on your front door for all the Trick-or-Treaters to see or simply place it on one of your many indoor doors as an inside Halloween Decoration.


(15)  Aged Mummy


Aged Mummy


I love this Mummy craft.  Do you know why?  Because Craftaholics Anonymous made it look pretty authentic by dirtying up the gauze around the mummy’s body.  I love that.    Make sure to check out her site as she will show you too how to make this Aged Mummy.


(16)  Tissue Paper Mummies


Tissue Paper Mummies


I found this great Halloween Mummy craft over at Happy Hooligans.  And, it is super cute!!  They simply used recycled empty toilet paper rolls and white tissue paper…. and these mummies turned out amazing.  They are perfect for decorating…. the kids will love telling everyone they made the mummies themselves.

 (17) Mummy Trick-or-Treat Baskets


Mummy Trick-or-Treat Baskets


Find out how to make these trick-or-treat baskets – it is a lot easier than you would think. They come out looking really unique and fun. Find the instructions here.

(18)  Egyptian Mummy


Egyptian Mummy


Now, I know this isn’t exactly the kind of Mummy you think of when you think of Halloween mummies.  But, I love this craft and had to include it once I found it.  Check it out over at 123 Peppy…. I think you will like it too.

Technorati Tags: , , , , , , ,

Coolest Earth Day Craft Ideas – Crafts Made from Recycled Materials


Coolest Earth Day Craft Ideas - Crafts Made from Recycled Materials


Earth Day will be here in just a couple of weeks.  In honor of Earth Day I thought I would scour the internet looking for cool ideas for Earth Day crafts.  All of the crafts that I found and have listed here are made from recycled materials.  Earth Day is a special day to celebrate the Earth and to increase awareness and appreciation of the Earth’s natural environment.  And, I think making crafts from recycled materials such as the ones found here is a great way to teach children about recycling and the importance of doing that to help save our Earth.  So, without further ado….

Coolest Earth Day Craft Ideas

(1)  Newspaper Roses


Newspaper Roses


Look how beautiful these Roses are?  They really are lovely & they are completely made from recycled newspapers.  Check out the craft and all its details over at Zakka Life.


(2)  Serving Tray


Serving Tray


I love, love, love this idea!!  Crafty Nest went to a Salvage Yard and noticed that there were old cupboards there.  She picked up a white one and with a little creativity and a lot of fun she was able to make this beautiful serving tray.  Check out her website so you too can make this.


(3)  Can-Do Robots


Can-Do Robots


Made from tin cans these robots are so freakin cute.  What is really cool is that their features are made of magnets, so they can be removed.  Which makes these robots like a Mr. Potato Head…. How fun is that?!  Check out the craft details over at Family Fun.


(4)  Cardboard Ottoman or Side Table


Cardboard Ottoman or Side Table


What a clever and creative idea!!  Made from recycled cardboard tubes you can choose to make either a side table or an ottoman…. or even make both.  When you look at them from above they are actually daisies.   Check out Esprit Cabane for all the crafting details.


(5)  Smashed Soda Can Animals


Smashed Soda Can Animals


Ok, this cow is really cute, isn’t he?!  But, wait till you check out Fave Crafts….. they have not only a cow, but they will show you how to make a pig and a bear too.  Make all three recycled can crafts and you will have a beginning to your very own recycled animal farm.


(6)  Milk Jug Shade


Milk Jug Shade


Now, this recycled craft turns out beautiful, doesn’t it?  Honestly, if I saw this I would have no idea it was actually made from recycled milk jugs.  But, it is.  I found this craft over at Mother Earth News.  Check out their site for all the wonderful craft details.


(7)  Recycled Picnic Basket


Recycled Picnic Basket


I found this recycled picnic basket over at bron marshall and for the main basket it is actually made from a recycled beer six-pack.  Isn’t that a clever idea?  They other container is actually made from a recycled half dozen egg carton…. they simply added a handle.  Make sure to check out their site for the full craft details.


(8)  Newspaper Basket


Newspaper Basket


This is an amazing basket!!  And, it is completely made from Newspaper.  Look how sturdy it looks too…. I love it.   How About Orange shows you step-by-step how to make this basket yourself.


(9)  Recycled Glass Chandelier


Recycled Glass Chandelier


Oh I just love this recycled craft idea…. it might just be my favorite.  I found this recycled craft over at Casa Sugar.    With a few recycled materials and some tea lights  you too can have this stunning glass chandelier.  I love the way they show this chandelier being outside…. it would be perfect for a fun outside party.


(10)  Creative Notepads


Creative Notepads


Here is a creative way to recycle those leftover notebook pages and even those left over paper scraps.  Esprit Cabane shows us how to take those leftover paper products and make them into cute little pocket size notepads.  Check out her site for the full details.


(11)  Toilet Paper Tube Albums


Toilet Paper Tube Albums


These Toilet Paper Tube Albums are just precious.  They are a beautiful way to store special keepsakes and pictures of events that you don’t want to lose.  Those Northern Skies shows you step-by-step how you too can make these albums from recycled toilet paper tubes.


(12)  Magazine Boxes


Magazine Boxes


Here is a creative and imaginative way to recycle those stacks of magazines you keep at home.  When made like the tutorial on Abstract Octopus you can actually store things in these boxes.  Check out the site for the full craft details.


(13)  Plastic Cup Earrings


Plastic Cup Earrings


Aren’t these earrings adorable?  You would never realize they were made from a plastic cup unless I told you.  I found this idea over at Punk Projects and I think it is a great way to recycle plastic cups… plus the craft is fun to do.  Make sure to check out her website for the details.

Technorati Tags: , , , , , , , , ,

How to Make an Organizer out of Old Plastic Bottles

Today I have a super easy craft that is very useful.  I’m going to show you how to make an Organizer out of Old Plastic Bottles or Jars.  This craft is a great way to recycle those old plastic bottles and jars.  And, the outcome is a beautiful organizer.  You will need a little bit of adult help as you will need to use a cutter to cut the plastic bottles all different sizes.  So, grab the materials needed and let’s get this craft started.

Check out our other Plastic Bottle Crafts.


Materials Needed

Old plastic bottles and jars

Fabric

Glue

Scissors, cutters (Adult Help)

Ribbon


Step 1

Collect a few jars and cut them in different heights as shown.


Step 2

Cover the jars with fabric and glue it in place as shown. Place the jars together and glue them on a piece of cardboard.


Step 3

Draw around the jars and cut it out so that the base looks like it is shown


Step 4

Add a ribbon and your Organizer is finished.


And, that is it…. you have a beautiful organizer made simply out of old Plastic Bottles and Jars.  Now, the question is….. what are you going to organize?  What are you waiting for… get started.

Technorati Tags: , , , , , , , , , , ,

How to Make a Sailboat candle Holder

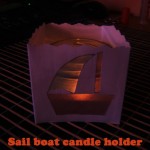
If you love candles then today’s craft is going to make you very happy.  I’m going to show you how to make a Sailboat  Candle Holder.  Made from a piece of cardboard and transparent paper this candle turns out beautifully.  The candle shimmers right through the transparent paper onto your wall.  You’ll gonna love it!!  Just keep in mind you will need some help from an adult to light the candle.  Never light it without adult supervision.  So, let’s get started.

Check out our other Candle Crafts.

Laura from Dacian Moon Handmade will show you how to make this Step-by-Step.


MATERIALS NEEDED

– cardboard
– transparent paper
– glue
– recycled jar
– pencil
– red and blue colored pencils
-ruler
– decorative edge scissors
– scissors
– tea candle


Step 1

Measure on the cardboard the height of the jar plus 1 cm …


… and cut it out.


Step 2

Using the decorative scissors, cut along one long side.


It will look like that.


Step 3

Using the jar again, measure its width …


… and mark it on the cardboard. Place the transparent paper over it and draw the new markings on it…


… to help you cut out this rectangle.


Step 4

Fold the cardboard on the marked line…


… like this.


Continue folding around it until you have this.


Step 5

Fold the last side at 0.5 cm – you will use that to close it.


Step 6

Unfold it all.


On the second side draw a boat…


… like this.


Step 7

Using the scissors, cut out the drawing.


It will look like this.


Turn it to the other side and apply a layer of glue on the rectangle with the boat.


Place the transparent paper on it.


Turn it again.


Step 8

Use the red pencil to color the boat …


… like this.

You can place a textured paper under it to have a pattern on the boat.


And blue pencil to color the sail.


Step 9

Apply a layer of glue on the last folded part (the 0.5 cm one)…


… then glue it to  the edge of the first part, like this.


Step 10

Place the jar inside…. along with the candle.


… and have an adult light it.


Notice how beautiful the candle looks shimmering through the sailboat.  Isn’t it just breathtaking.  Don’t forget…. never leave a candle lit unattended.  If you are leaving the room…. blow it out.

Technorati Tags: , , , , , , , ,

How to Make a Sweet Flowers Candle Holder

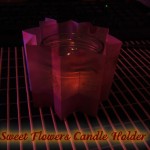
I have a really fun craft for you today.  I am going to show you how to make a Sweet Flowers Candle Holder.  This craft turns out really magnificent.  With the use of transparent paper around the outside of a candle the glow of the candle looks really lovely glowing through the transparent paper.  Keep in mind, you will need adult supervision for this craft.  Candles aren’t something to play with, so make sure to have an adult around to light the candle as well as stay in the room once the candle is lit.  With that being said…. let’s start the craft.

Check out our other Jar Crafts.

Laura from Dacian Moon Handmade will show you how to make this Step-by-Step.


Materials Needed

– transparent paper with flower print
– scissors
– recycled jar
– tea candle


Step 1

Measure 1 cm over the height of the jar on the transparent paper…


… and cut it out.


You will have a rectangle a little bit taller than the jar.


Step 2

Fan fold the short side…


… until all the rectangle is folded.


Step 3

Apply a layer of glue on the last folded side…


… and place it over the first one.


Step 4

Put the jar (with the candle) inside.


Now you can have an adult light the tea candle.


Notice how beautiful the candle looks shimmering through the transparent paper.  Doesn’t it look gorgeous?  Don’t forget to blow the candle out when you are leaving the room…. never leave a candle unattended.

Technorati Tags: , , , , , ,

How to Make a Decorated Candle Jar

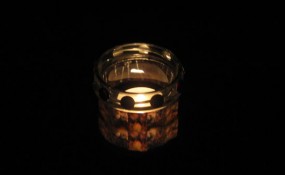
Today I’m going to show you how to make a decorated candle jar perfect to give as a gift for the Holiday Season.  Imagine how much your friends and loved ones would enjoy a gift that you made yourself.  They would totally love it.  And, this decorated candle jar turns out beautifully…. so you will be so proud to give this craft as a gift.  So, let’s get started.

Laura from  Dacian Moon Handmade will show you, step by step, how to make a decorated candle jar.


MATERIALS NEEDED

– tracing paper
– image from computer
– craft glue (that will be transparent when dry)
– scissors
– self-adhesive crystals
– paintbrush
– recycled jar – it shouldn’t be too tall, but large enough to place a tea candle inside


Step 1

Print the image on the tracing paper. You will need to print it twice because the image must go around the jar.


Cut off the images. I need 4 trees to cover my jar.


Step 2

Using the craft glue…


… cover one side of the jar…


Then place one image on it.


Repeat that until the whole jar is covered.

Let it dry.


Step 3

Over the image add glue again spreading it with the paintbrush…


… like that.

Wash your paintbrush immediately with water or else it will bind itself.


Let it dry well.

This layer of glue placed on top of the image will protect it and give you the chance to make some interesting patterns when you spread it.


Step 4

Take one self-adhesive crystal…


And place it on the upper part of the jar.


Decorate as you please…


… now you can light the candle or give as a gift.


Awesome job…. you just finished your decorated candle jar.  How did your candle turn out?  Take a picture and share it with us in the comments below.  Now, go wrap your decorated candle jar and get it ready to give as a gift.  Whoever you give it to will LOVE it!!

Technorati Tags: , , , , , , , ,

Making Snow Globes with Toy Figures & Glass Jars with Easy Crafts Instructions for Kids

Do you want to make a really cool snow globe? Find a figurine that you don’t play with any more and use that to make a really cool snow globe. This is also a great way to keep a special toy figures on display. Find out how to make this super cool snow globe with a baby food jar (or any old jar).


Making Snow Globes with Toy Figures & Glass Jars with Easy Crafts Instructions for Kids


Making Snow Globes with Toy Figures & Glass Jars with Easy Crafts Instructions for Kids

Crafts Materials Needed

– Baby Food Jar (or larger jars if you want a bigger snow globe)
– Toy Figurine
– Glitter
– Glue Gun (Parental Help Required)
– (Optional) Acrylic Paint and Paint brush to paint the outside of the jar.

Step 1


Making Snow Globes with Toy Figures & Glass Jars with Easy Crafts Instructions for Kids


Firstly, wash the jar and cap and dry them both off. Then take your toy figurine and hot glue it to the baby jar’s lid (Let Mom or Dad Do This Part).

Step 2


Making Snow Globes with Toy Figures & Glass Jars with Easy Crafts Instructions for Kids


Now fill the jar with water and sprinkle in the glitter of your choice.

Step 3


Making Snow Globes with Toy Figures & Glass Jars with Easy Crafts Instructions for Kids


(Let Mom or Dad do this part) Put glue onto the cap and then close the lid tightly on to the jar. Then Seal the jar by gluing all around the edge.

Step 4


Making Snow Globes with Toy Figures & Glass Jars with Easy Crafts Instructions for Kids


This is what your Snow Globe should look like now.


Making Snow Globes with Toy Figures & Glass Jars with Easy Crafts Instructions for Kids


You can then paint (optional) whatever you want to on this snow globe. Since my snow globe is a Super Mario Snow Globe, I put the Mario logo on the jar.


I hope that you had a great time and that your snow globe turned out fantastically.

Technorati Tags: , , , , , , ,

How to Make an Ant Farm Jar and Watch an Ant Colony Build Mazes

This is a great project for kids who are interested in nature and bugs. This is an easy project for kids of any age and you get to watch ants build an underground city…so it is pretty cool. This ant farm has no openings, so you don’t have to worry about the ants escaping. You can open the jar outside to feed the ants, and then close it back up and bring it inside to observe.


How to Make an Ant Farm Jar and Watch an Ant Colony Build Mazes Craft Activity for Kids


How to Make an Ant Farm Jar and Watch an Ant Colony Build Mazes Craft Activity for Kids

Crafts Materials Needed

– 2 Jars – One Big, One Smaller
– Loose, Sand-Like Soil
– Water
– Sugar

Step 1

Clean both jars out, and dry them out. Take the outside wrappers off so you will be able to see inside the ant jar.

Step 2


Put the smaller jar, without its lid, upside down, within the bigger jar. Try to center it.


Put the smaller jar, without its lid, upside down, within the bigger jar. Try to center it. Poke a few tiny holes in the jar lid, small enough for ants to not escape.


Step 3


Fill the outside area between both jars, with the sandy-soil.


Fill the outside area between both jars, with the sandy-soil. Make sure that the entire area is filled, but don’t pack it tightly or the ants will not be able to dig their way through it.

Step 4 : Finding and Trapping the Ants

Now you must find the ants for your ant farm jar. Go looking in your back yard or in the local park. If you still can not find any ants then you can build an ant trap. Ants love sugar, so what you should do is put some sugar, mixed with a tiny bit of water, into a jar or can. Put it on its side and keep an eye on it…when you have about 20 ants. Don’t get more than 20 ants…crowding too many ants in the jar will make them less active and less fun to watch. You can close the jar and put them in your ant farm jar (DO THIS OUTSIDE – NOT INSIDE YOUR HOUSE).  Important : Make sure that these ants are from the same colony or they will land up fighting and killing each other.


Step 5 : Close That Jar Tight

Make sure to close that jar tight. Don’t worry about the ants getting enough air because you will be opening it to put food in there. Believe it or not, that is plenty of air for your ants.


How to Make an Ant Farm Jar and Watch an Ant Colony Build Mazes


Feeding Your Ants

Do the feeding of your ants outside to keep them from escaping into your house (or I will get a lot of nasty emails from your Moms). 🙂

Once a week (no more than this) feed the ants a few drops of sugar water. You can put it directly into the soil. You can also drop in there a few grains of bird or grass seed.

FEEDING ANTS TOO MUCH CAN KILL THEM!

Keep Your Ants Safe

– Keep your ant jar away from direct blow of air conditioners, radiators, and heaters…keep them at normal room temperature.

– Keep them out of the direct glare of sunlight.

The Fun Part is Watching Your Ants Build an Underground City

Now just watch and observe your ants build their own littler underground city. They can build them most amazing, intricate mazes. I hope you enjoyed this project.

Technorati Tags: , , , , , , , , , , , , ,