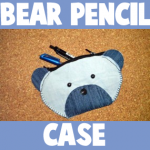
How to make and Sew a Bear Pencil Case for Back to School

Although school isn’t starting for at least a month or more, I thought I would share a project to get in the spirit of Back-to-School time. Here is a simple sewing project, that a first-time-sewer can accomplish with a little help from a parent. Laura from  Dacian Moon Handmade  will show you, step by step, how to make this cute bear pencil bag / case…a great way to organize your school pencils and pens.

How to make and Sew a Bear Pencil Case for Back to School


How to make and Sew a Bear Pencil Case for Back to School


CRAFTS MATERIALS NEEDED:

– light blue cotton cloth
– dark blue cotton cloth
– canvas – to double the bag
– pen
– scissors
– one black button, two beads
– needle and thread
– zipper


Step 1.

Take the light blue cloth and fold it in half…


… then draw an oval on it. Like this.


Cut it out.


… like this.


Now the two sides are united by the lower part.


Step 2.

Draw the muzzle and two ovals for the ears on dark blue cloth…


… then cut the out.


Step 3.

Open the light blue oval and place it on top of the canvas…


… and cut the form on it. I did the same for the ears but then I didn’t use the canvas on ears so you don’t need to.


Place the canvas on the light blue cloth…


… and fold in half to have the head of the bear.


Step 4.

Sew the two parts together, using a blanket stitch along the sides. (To make a blanket stitch, push the needle through the fabric then pull the needle through the loop.)


Like this.


Sew 2/3 of it then prepare one ear. Take an ear oval and fold it in half…


… then continue to sew over it…


… like this.


Step 5.

Place the muzzle on the lower part of the head…


… and sew it here.


Like this.


In the upper part of the muzzle sew the black button…


… as a nose.


Step 6.

Mark the places for the eyes…


And sew the beads there…


… like this.


Step 7.

Start on the lower part and sew the other part of the head and the other ear.


Step 8.

We will add a zipper from one ear to the other…


…sewing it on place.


Like this.


That’s all. Now you have a blue bear pencil bag !:)


Technorati Tags: , , , , , , , , , ,

How to Turn a CD Case into a Pencil Box

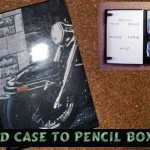
I have a great craft today that will help you keep your pens and pencils in one place.  In this post I will show you how to turn a CD Case into a Pencil Box.  This creative craft is easy and it is a lot of fun.  With this pencil box you can keep your notes or your schedule on the left hand side while you keep your pens and pencils in the right side.  Close up the pencil box and throw it in your school bag and you are good to go.  So, grab the materials needed and let’s get started.

Check out our other Back to School Crafts.

Laura from Dacian Moon Handmade will show you this craft step-by-step.


Materials Needed

– CD case
– favorite picture (A4 format)
– craft glue
– pen
– scissors
– needle and thread
– light blue cotton piece
– wide elastic band
– a sheet of white cardboard


Step 1

Open the CD case and measure the cloth on the right side.


Cut it to the right dimensions.


Step 2

Measure the elastic band on the same side and cut it a little wider.


Bend the band over the edge of the cloth…


… and sew it there…


… like this.


Bring it to the front and bend the other end over the cloth, like this.


Sew it there.


Sew a stitch at each centimeter. This will help to determine the places for pencils.


Step 3

Measure another elastic band …


… and sew it on the lower part of the fabric.


Step 4

Turn the fabric backwards…


… and apply a layer of glue on it…


… and put it in its place. Press and then let the glue dry.


Step 5

Take the white cardboard…


… and measure the left side of CD Case.


Place it under the clamps.


Now you can use it to write things.


I will write my schedule on it.


Add some pencils and the interior of your pencil box is ready.


Step 6

Let’s make the exterior now. Turn over the CD case.


Take the picture…


… and measure it on the CD case.


Cut it at the right dimension and put it between the plastic wrap and the case.


It will look like this.


Now close the case and your pencil box is ready.


How awesome is this pencil box?  It’s really great and will come in handy for school or at home for homework.  Enjoy it!!

Technorati Tags: , , , , , , , , , ,

How to Make an Elegant Pen Holder

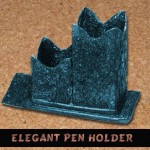
Since school is back in session I decided to show you how to make an Elegant Pen Holder.  This elegant pen holder will look wonderful on any desk and it is so useful.  No longer will you have pens and pencils floating around your desk…. you will now have a spot for all your pens and pencils.  This craft is so easy and a lot of fun.  It is made from recycled boxes so it is a great green craft too.  Add style to your desk with this elegant pen holder.  Let’s get started.

Check out our other Back to School Crafts.

Laura from Dacian Moon Handmade  will show you, step by step, how to make this craft.


Materials Needed

– recycled box
– cardboard
– pen
– craft glue
– scissors
– paint
– paintbrush
– aluminum foil


Step 1

From the recycled box we will make two holders.  Trace your shape on the box…  I made a wave shape.


Cut on the line…


… and you have the two pieces. You can adjust the edge until you are happy with the result.


Step 2

We will use aluminum foil to cover them. This way we will add a nice texture.


Cut a piece of foil (wide enough to cover the holder piece) and place one holder in the middle.


Cover it with foil.


Press well to preserve the shape of the holder.


Step 3

Apply a layer of glue on the base…


… and place it on the cardboard piece (also covered in foil).


Do the same with the other holder piece.  Flatten the foil well and let the glue dry.


Step 4

Use a wide paintbrush to cover it with paint. Apply as many layers that you need until it looks as you want.


I applied 3 layers of paint on mine and I think it looks good.


And, there you have it….. you now have an Elegant Pen Holder.  This pen holder will look great on any desk.

Technorati Tags: , , , , , , , , , , , , , ,

How to Make a Simple Desk Organizer

There is not much worse than doing your homework on a cluttered unorganized desk.  Who wants to hunt for the homework supplies you need on a messy desk?  Well, you don’t have to worry about that anymore.  Today I’m going to show you how to make a Simple Desk Organizer.  It will be perfect to hold on to some paper, pencils, erasers, and pretty much anything else you want to keep organized on your desk.  So, grab the materials needed and let’s get started.

Check out our other Back to School Crafts.


How to Make a Simple Desk Organizer


Tutorial offered by Laura from  Dacian Moon Handmade  .

Materials Needed

– recycled box
– white paint
– scissors
– pencils (one with eraser head)
– paper glue
– red paper


Step 1

Take the box…


… and draw the contour of our organizer on it, like in the picture.


Cut on the line.


It will look like this.


Step 2

Place the box on its side on the paper and draw the contour.


Turn it on the other side and continue the contour. It will look like this.


Apply a layer of glue on half of the paper…


… and place the box on it.


Then glue the other half.


Like this.


Continue covering  the sides of the box.


You can cover the inside of the sides too.


It will look like this.


Step 3

Put a little bit of paint on a piece of paper…


… and use the pencil with eraser head…


… to make white dots.


Decorate the box with white dots.


Finally, let’s add a thin band of paint on the edges.


Let it dry well.


Now you can use the organizer.


Isn’t this a great Desk Organizer?  And, it was so simple to make.  Now, you have a great way to organize your desk perfect for doing your homework.  Enjoy!!

Technorati Tags: , , , , , , , , , , , ,

How to Make a Homework Caddy

Did you ever feel like you were rummaging around to find your homework school supplies when it was time to do your homework?  Well, I have a craft for you today that will fix this problem.  In this post I’m going to show you How to Make a Homework Caddy.  This is a perfect way to keep all your homework school supplies in one place when you are ready to do your homework.  You can keep all your school supplies like crayons, pencils and scissors in once place and carry this caddy around where ever you want to do your homework.  So, grab the materials needed and let’s get started.

Check out our other Back to School Crafts.


How to Make Homework Caddy Cans


Materials Needed

4 Empty Cans

Glue

Yarn (4 different colors if you would like)

Cardboard Box (2 cans wide)

Scissors

Marker

Paint (optional)

Duct Tape


Step 1


Get 4 empty cans.


Get 4 empty cans.


Step 2


Take off the labels.


Take off the labels.


Step 3


 Add glue around bottom of the can.


Add glue around bottom of the can.


Step 4


Start winding yarn around can.


Start winding yarn around can.


Keep winding the yarn.


Keep winding the yarn.


Keep adding glue and winding until yarn is up to rim of can.


Keep adding glue and winding until yarn is up to rim of can.


Step 5


Find a box that is about 2 cans wide


Find a box that is about 2 cans wide… like this one.


Step 6


Cut the box in half.


Cut the box in half.


Step 7


Turn it so they are back to back.... like this.


Turn it so they are back to back…. like this.


Step 8


Draw a handle.


On the back of the box where the two boxes meet… Draw a handle.  This handle looks like a sideways letter ‘D’.


Step 9


Cut out handle and then trace handle onto back of the other box.


Cut out handle and then trace handle onto back of the other box.


Step 10


 If you want to... paint the box.


If you want to… paint the box.


Step 11


Roll up duct tape and place it on bottom of can and on one side of can.


Roll up duct tape and place it on bottom of can and on one side of can.


Step 12


Place cans in box.


Place cans in box.  Use duct tape to tape both handles together.

Now you have your homework caddy finished.  You are all ready to carry your homework caddy anywhere you want to do your homework.  Enjoy!!

Technorati Tags: , , , , , , , , , ,

How to Make a Cereal Box Paper Holder

I have a fun and useful back to school craft for you today.  In this post I will show you how to transform a cereal box into a Cereal Box Paper Holder.  This Cereal Box Paper Holder is perfect for holding all of your back to school materials.  It can hold your fun drawings, notebooks, homework, test results and basically anything you want to keep in a safe place.  Don’t let you school paperwork build up into unorganized piles…. keep them safe in this Cereal Box Paper Holder.  So, grab the materials needed and let’s get started.

Check out our other Back to School Crafts.


How to Make a Cereal Box Paper Holder


Materials Needed

Cereal Box

Scissors

Magazine Pics or Colorful Paper

Mod Podge or 1/2 Glue 1/2 Water Mixture

Paintbrush


Step 1


Get a cereal box


Get a cereal box…. the bigger the better.


Step 2


Cut off top flaps


Cut off top flaps…. now it looks like this.


Step 3


Cut a triangle shape from box.


Cut a triangle shape from box.


Step 4


Cut across to other side.


Cut across to other side.


Step 5


Cut on a diagonal on the other side too.


Cut on a diagonal on the other side too.


Step 6


Cut out pics from a magazine that you like.


Of course, you can cover the paper with colorful paper.  But, in this craft we use magazine pics.  Cut out pics from a magazine that you like.  My son loves Mario and Pokemon.


Step 7


You need either Mod Podge or a mixture of half glue and half water.


You need either Mod Podge or a mixture of half glue and half water.


Step 8


Put glue down in areas that you are immediately going to put a pic down.


Put glue down in areas that you are immediately going to put a pic down.


Step 9


Stick a pic down on the glue mixture


Stick a pic down on the glue mixture / mod podge…. then brush it over the pic as well.


Step 10


Keep doing this.... wrapping pics around edges.


Keep doing this…. wrapping pics around edges.  Brush Mod Podge / glue mixture over all at end.


Step 11


Let dry.


Let dry.  Place paper within.

And, there you have it…. Your Cereal Box Paper Holder is ready just in time for Back to School.  Now, you have a place to hold on to your important school paperwork.

Here is our video on How to Make a Cereal Box Paper Holder

Technorati Tags: , , , , , , , , , , , , , , ,

How to Make a Coupon Organizer Case

Mother’s Day is right around the corner.  Have you thought about a gift for your mother yet?  Well, if not I got a great Mother’s Day craft for you.  I’m going to show you how to make a Coupon Organizer Case.  There is not many things more frustrating that going shopping with a pile of coupons and no way of organizing them…. well, your mom won’t have that problem anymore.  With the number of envelopes you are going to be adding to this craft she will have more than enough places to organize her coupons.  So, let’s get started.

Check out our other Mother’s Day Crafts.


How to Make a Coupon Organizer Case


Materials Needed

Cardboard

Paper

Glue or Paste

Hole Punch

10-20 Envelopes

5 Binder Rings, Ribbon or Yarn

Markers, Crayons, Glitter Glue (items to decorate case)


Step 1


Cut 2 pieces of cardboard down to a size that is a tiny bit larger than a business envelope.


Cut 2 pieces of cardboard down to a size that is a tiny bit larger than a business envelope.


Step 2


Cover with paper.  Paste in place.


Cover with paper.  Paste in place.


Step 3


Use a hole punch to poke holes on left side.


Use a hole punch to poke holes on left side.


Step 4


Punch holes in 10-20 envelopes so they will match up with covers.


Punch holes in 10-20 envelopes so they will match up with covers.


Step 5


Bind 2 covers and all the envelopes together.


Bind 2 covers and all the envelopes together.  You can use binder rings, ribbon or yarn to bind them together.


Step 6


Decorate cover.


Decorate cover.


Finished Coupon Case


And there you have it…. you just finished making your Coupon Organizer Case.  Isn’t it a wonderful way to organize coupons?  Your mom is going to surely love this!!

Here is our video on How to Make a Coupon Organizer Case

Technorati Tags: , , , , , , , , , , , ,

How to Make a Notepad Pencil Gift Set

Today I’m going to show you how to make a Notepad Pencil Gift Set.  This Notepad Pencil Gift Set is a perfect gift for somebody that has a lot going on and needs some organizing.  It would make a great gift for anyone like this.  They could simply hang it up in plain sight and when a note is written on the notepad they are reminded of all the things they need to do.  Or, hang this next to the phone…. this item makes for a perfect place to leave messages for others.  So, let’s get started with this craft.

Check out our other Gift Crafts.


How to Make a Notepad Pencil Gift Set


Materials Needed

Cardboard

Colored Paper

Pencil

Glue

White Paper

Hole Punch

Black Marker

Stapler


Step 1


Cover a piece of cardboard with colored papers.


Cover a piece of cardboard with colored papers.


Step 2


Wrap paper around pencil to figure out where to glue.


Wrap paper around pencil to figure out where to glue.


Step 3


Fold white paper in fours ... then cut 4 pages apart.


Fold white paper in fours … then cut 4 pages apart.  Do this a few times to get a big enough bundle of paper for a pad.


Step 4


Staple paper to center of cardboard


Staple paper to center of cardboard;  Punch hold for hanging;  Glue or tape paper loop above paper pad;  Decorate the background paper with a nice design;  Write notes or something similar.


Finished Notepad Pencil Gift Set


And, there you have it…. you just finished your Notepad Pencil Gift Set.  How did it turn out for you?  Let me know in the comments below.  Also, take a picture of the Notepad and share that too in the comments…. I’d love to see it.

Here is our video on how to make a Notepad Pencil Set

Technorati Tags: , , , , , , , , ,

How to Make an Organizer out of Old Plastic Bottles

Today I have a super easy craft that is very useful.  I’m going to show you how to make an Organizer out of Old Plastic Bottles or Jars.  This craft is a great way to recycle those old plastic bottles and jars.  And, the outcome is a beautiful organizer.  You will need a little bit of adult help as you will need to use a cutter to cut the plastic bottles all different sizes.  So, grab the materials needed and let’s get this craft started.

Check out our other Plastic Bottle Crafts.


Materials Needed

Old plastic bottles and jars

Fabric

Glue

Scissors, cutters (Adult Help)

Ribbon


Step 1

Collect a few jars and cut them in different heights as shown.


Step 2

Cover the jars with fabric and glue it in place as shown. Place the jars together and glue them on a piece of cardboard.


Step 3

Draw around the jars and cut it out so that the base looks like it is shown


Step 4

Add a ribbon and your Organizer is finished.


And, that is it…. you have a beautiful organizer made simply out of old Plastic Bottles and Jars.  Now, the question is….. what are you going to organize?  What are you waiting for… get started.

Technorati Tags: , , , , , , , , , , ,

How To Make a Craft Box With a Used Gift/Shoe Box

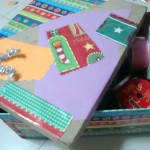
A sturdy shoe or gift box can be transformed into a pretty craft box where you can store your art and craft materials and accessories. A few easy steps to follow, but feel free to use your own creativity.  No need to follow this craft step by step.  Each craft box made will look differently than anybody else’s craft box…. that’s how it should be.  So, grab the materials you need to make your craft box and let’s get started.


Materials Needed

Used cardboard box (gift/shoe)
Wrapping Papers
Colored Scratch Papers
Scissors
Glue/Glue Gun
Ribbons


Step 1

Prepare materials needed. Choose papers and ribbons to use.


Step 2

Place wrapping paper on the bottom and gently press it against the box to create the side’s dimension. With a pair of scissors, cut the paper giving about a half inch more on one side, and the exact measurement on the other side.


Step 3

Glue paper onto the box, folding the extra side to overlap the other side. Continue the same steps until all sides are covered. If your box has a hole handle, you may leave the wrapper until just below the handle.


Step 4

Be more creative when wrapping the box cover. You can partially cover one side and have your kid glue shaped pieces of papers and wrappers. Add a ribbon or two.

And that’s it! Your box is now ready for storing your craft accessories.  Now, you have all your craft supplies in one place so you can find them easily.

Technorati Tags: , , , , , , , , , ,

Clever ways to Organize Craft Items to Get Rid of the Mess

Are you like me where you love the crafts, but hate the mess that storing crafts can make?  It can be ridiculously hard to store crafts without creating a mess in the process.  And, you know how hard it can be to find what you need for your crafts when you can’t find anything!!  Well, today I’m going to show you how you can clean up your mess and organize your crafts in super cute and clever ways.


Clever ways to Organize Crafts to Get Rid of the Mess


Let me know your thoughts or if you too have a clever way to organize your crafts.

(1) Shower Rack


Use a Shower Rack to organize your crafts


Better Homes and Gardens got it right with this awesome craft organizer.  Notice how they used this shower rack to store their scissors, pencils and paper.  And, it looks good too.


(2)Pegboard


Use a Pegboard to organize your crafts


Look how nice this craft area looks.  They simply use a Pegboard to hang all their important craft items in easy to reach spots.  Check out i Stamp to get all the details.


(3) Shoe Organizer


Use a Shoe Organizer to organize your crafts


This is a great idea to organize your kids’ crafts.  You know how cluttered your kids’ room can be with crafts.  Well, Brady Lou has the right idea…..use a shoe organizer to clean up the craft clutter.


(4) Canvas Totes


Use Canvas Totes to organize your crafts


Now how cute is this organizing method….. so cute!!  Use decorated totes to organize your craft items.  Giverslog tells us how much easier it is with the totes to take the craft items from the closet to the craft table.  Smart thinking!!


(5) Phone Book Pencil Holder


Use a Phone Book to organize your crafts


No need to rub your eyes…. you are seeing this image right!!  Chica and Jo shows us how to turn a simple phone book into the most clever pencil holder.  Or, use it for other craft items like paint brushes.


(5) Milk Jugs


Use Milk Jugs to organize your crafts


I love these milk jugs…. not only are they craft savvy, but they are also so pretty to look at.  Family Fun outdid themselves with this craft.  Make as many as you need to clean up your child’s messy craft area.


(6) Soup Cans


Use Soup Cans to organize your crafts


This is a simple craft, but a very useful one.  Notice how TheNest transforms simple soup cans into the perfect desktop craft organizers.


(7) Water Jugs


Use Water Jugs to organize your crafts


I thought this was super duper clever.  Instructables shows us how to take water jugs to store anything….. I figured this would be perfect for storing all kinds of craft items.  Keep in mind, before you can make this clever organization method you will have to drink A LOT of water.  But, imagine how much healthier you will be for it.


(8) Binders & Sheet Protectors


Use Binders & Sheet Protectors for organizing crafts


This is a simple method, but it can be oh so useful.  Take an everyday binder and add clear sheet protectors.   Good Housekeeping shows you you will then have a savvy way to store your needlepoint or quilting patterns.

And, there you have it.  I just showed you 8 clever ways to organize your crafts to get rid of the mess.  Which one are you going to give a try?  Or, do you have a clever way to organize your crafts that I didn’t talk about here?  If so, please let me know.  Make sure to leave me your methods in the comments below.

Top image by Urban Woodswalker

Technorati Tags: , , , , , , ,

Ideas for Displaying Your Kids’ Artwork So You Can See Your Fridge Again

As a parent, I love receiving beautiful artwork from my children. However, there comes a point when you feel like your entire refrigerator is covered with artwork. I have 4 kids, so not only is my fridge covered, but my fireplace’s mantle, my kitchen window, and the rest of my windows are all being taken over with artwork. This got me thinking…what else can I do with the artwork? I would love to see my refrigerator again…what color is it…I want to know….maybe soon I can find out again. 🙂


Ideas for Displaying Your Kids' Artwork So You Can See Your Fridge Again


Now for the ideas. Please comment below to add your own ideas or suggestions…everyone can contribute.

(1) Clothesline Art


Hang childs artwork with clothespins


Hang a Clothesline in your child’s room or playroom (high enough that the child can’t get hurt) and then use clothespins to hang your child’s art.

(2) Curtain Hangers for Art


drapes artwork


This is similar to the clothespin idea, but instead by a curtain hanging system. Instead of hanging curtains with the clips, hang the artwork.  This idea comes from Project Nursery … visit it to find out how she did it.

(3) Plexiglass Table Cover to Display Artwork


Plexiglass Table Cover to Display Artwork


There is a great how-to article, on the Examiner.com, about making a Plexiglass table cover in order to display artwork underneath. You can just go to Home Depot or Lowes and have them cut down a sheet of plexiglass to the same size as your table. Then just  place the plexiglass on top of your child’s art that you want to showcase.

(4) Hang Clipboards to Display Art


Hang Clipboards to Display Art


On a Blog called Clean and Scentsible, we found another way to display your child’s artwork. Hang Clipboards, and place newest artwork on the top layer that is showing. This is a really smart and sensible way to display your child’s artwork.


(5) Vertical Lines of Hanging Yarn


Vertical Lines of Hanging Yarn


I found a great example of hanging art from vertical lines of yarn or string or wire on a site called Spiral Montessori Mama. As this talented teacher / blogger suggests…just hang yarn from the ceiling with tape….then as your child brings home artwork just tape it to the yarn. I like how this teacher places a colorful piece of paper behind each piece of art to sort of frame it or mat it.

(6) Paint a Magnetic Wall – Maybe Even Chalkboard Paint


Paint a Magnetic Wall - Maybe Even Chalkboard Paint


On Zillow.com, I found a great idea. How about paint an entire wall with magnetic paint and then covering it with chalkboard paint (optional). You can then display all of your child’s artwork on a giant wall, instead of your refrigerator. Just a note…I did the same thing…I put 2 coats of magnetic paint and then a coat of chalkboard paint. It isn’t magnetic…although the chalkboard paint works great. I am just telling you this so you know that you might need to coat the wall with many coats of magnetic paint for it to work.

(7) Frame Them on a Special Wall


Frame Kids Artwork on a Special Wall


How about creating a special museum wall in your house….all with your child’s framed artwork. The above picture comes from Inside-OutDesigns.com.

(8) Using a Pocket Display


Using a Pocket Display


I found a simple pocket display case that has 9 pockets on each side of the case. You can then hang it either on a door knob or on the wall without damaging it.  If you want to make one of these one your own (so you don’t have to buy it), you can see a similar sort of creation here.

(9) Give Art as Gifts


Give Art as Gifts


This artwork was found on the blog called Quince and Quire.  This blogger sewed her child’s artwork to a moleskin sketchbook to give to somebody as a gift. This is a great idea…but for somebody who hates sewing, this sounds tedious….how about just using hot glue or even colorful duct tape as a frame. Another idea is finding a notebook that has a clear cover and attaching it underneath the clear cover.

(10) Mod Podge Your Child’s Artwork to Anything


Mod Podge Your Child's Artwork to Anything


You can Mod Podge your kids’ artwork to coasters or any other item such as your child’s bookcase or wooden bed. This will bring your child’s room alive with color…and it is quite easy to do. This was found on the site…Mod Podge Rocks!

(11) Use Artwork for Gift Wrapping Paper


Use Artwork for Gift Wrapping Paper


On Krafty Guts Blog, the blogger used her child’s artwork for wrapping paper. This is a great idea…this makes the child feel so special.

(12) Laminate the Artwork and Use as Placemats


Laminate the Artwork and Use as Placemats


On the blog, Make Create Do, there is an example of a place mat made from a child’s piece of art. This is also a great idea. How special is it to your child that you would make a permanent use for his creativity. Awesome idea.

(13) Showcase Art with Digital Frames


Showcase Art with Digital Frames


I love, love, love this idea. How about you scan all of your child’s work and put them all on permanent display in a digital frame.

(14) Use a L’il DaVinci Store and Display Art Cabinet


Use a L'il DaVinci Store and Display Art Cabinet


This is a really cool idea to have a cabinet that holds up to 50 pages of artwork. It then has a hinge that lets you open up the frame like a book to turn thru the pages. I found it here, see if you like it when you take a closer look.

(15) Make a Puzzles, Notebooks, Stickers, Magnets, Coffee Table Books and Other Items from Artwork


Make a Puzzles, Notebooks, Stickers, Magnets and Other Items from Artwork


On sites like Snapfish.com, you can create all sorts of things from your child’s artwork, such as stickers, puzzles, magnets, notebooks, coffee table books, posters, t-shirts, playing cards, etc.

Technorati Tags: , , , , , , , , , , ,

How to Make a Roll-up Bag for Pencils or Tools : Crafts Idea for Older Kids

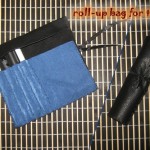
This is a tutorial well  suited for older children. It is not a hard one and is very useful. I always needed a bag like this (for pencils or different tools) and never could find one so, I decided to make one. Today I will share it with you 🙂
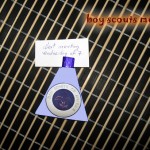


How to Make a Roll-up Bag for Pencils or Tools : Crafts Idea for Older Kids

CRAFTS MATERIALS NEEDED:

– black leather, plastic / vinyl,  (it must be soft, otherwise we can’t sew it) – or other fabric : 18 cm x 18 cm
– soft cloth for inside part (blue) : 11 cm x 25 cm
– scissors
– thread
– ribbon (black)


Step 1.

On every complex crafting project is better to make a mock-up first. So, take a paper and make a sketch of how do you want the bag to look like.


Step 2.

Place the blue cloth over the leather, exactly over the lower left corner.


Start to sew, hiding the knot of the thread between the cloth and the leather.


We will sew over the edge because this will give safety to the stitch.


Sew all side until you reach the corner.


Step 3.

Place a pencil in it’s place, between the cloth and leather, near the edge.


Now we see that we must make a little crease on the blue cloth, to make enough room for the pencil. Continue.


Place the pencil again inside the bag. You can see now that it have enough space and we start to sew up.


Is the best to sew keeping the pencil inside, not too hard pressed. When we arrive at the edge of the blue cloth, we sew down to the lowest edge of the bag. So, every pencil (tool etc.)will be separated through two lines of sewing.


We make half of the bag with places for pencils and the other will stay unbroken, because we might want to place there scissors or other bigger tool.


Step 4.

We place some pencils inside…


… and close the upper part…


… because we need to know where will be the middle to sew the ribbon.


Attach it outside, letting 1/3 of it on one side of the sewing and 2/3 on the other side.


Step 5.

The last step is to close the upper part, so the pencils will not fall away.


To do that we sew the edges.


We start on top and sew again over the edge.


Do the same for the other part.


And that’s it, a roll-up bag for pencils or tools, cute, useful and practical (perfect for camping trips) offered by Laura from Dacian Moon Handmade


Technorati Tags: , , , , , , , , , , , , , , ,

How to Make a Boy Scouts Memo Holder Crafts Activity

Laura from Dacian Moon Handmade will show you today how to make something simple and fun: a memo for Boy Scouts. Now the boys can have a special place where they can write important Scout related topics down .


How to Make a Boy Scouts Memo Holder Crafts Activity

CRAFTS MATERIALS NEEDED:

– paper (not too thin)
– scissors
– clothespin
– glue
– paints
– paintbrush
– pencil


Step 1.

First of all, we paint the clothespin blue (actually we will paint only the upper part – the one that pins). We will give it several layers of paint, until it looks good. Let it dry well.


Step 2.

Next, we cut a piece of paper with the width of 2/3 of the clothespin.


Step 3.

Draw a circle (let a little bit of space from the corner)


Then draw another circle, smaller, inside the forst one.


And draw a “fleur de lys” symbol in the center.


The last thing we need on our drawing to have the scouts logo is the name, so write: Boy Scouts of America.


Step 4.

Cut out the logo like in the next photo.


Cut another piece of paper identical with the first one. You can write your name on it or ”be prepared”


Step. 5

Take one of the paper pieces and apply a layer of glue on it’s back side …


… and place the clothespin on it, with the painted part up.


Then glue the other piece of paper on top of them.


Step 6.

Now you can play with paints and give it a friendly look 🙂


Technorati Tags: , , , , , , , , , ,

How to Make Valentine’s Day Suitcase Mailbox Craft Idea for Kids

Today we will show you how to make a cool Valentine’s day Mailbox Suitcase to hold your classmate’s Valentines Day Cards. There is a slot to place your friend’s cards…and when you want to retrieve your cards, all you have to do is unbutton the suitcase straps and get them out. You can then use this suitcase as a treasure chest or storage container.

Here are Even More Valentines Day Crafts Ideas


How to Make Valentine's Day Suitcase Mailbox Craft Idea for Kids


How to Make Valentine’s Day Suitcase Mailbox Craft Idea for Kids

Crafts Materials Needed

-Scissors

– Cereal Box

– Wrapping Paper, Decorative Paper, Craft Foam, or Felt

– Cardboard

– Ribbon

– Velcro, Magnets, or Buttons

Step 1


Step 1 : Making Valentines Day Classroom Mailbox Crafts Project


Take a cereal box, cut 3 sides off of the top panel so it is still hinged.


Step 2


Step 2 : Making Valentines Day Classroom Mailbox Crafts Project


Cut a slit on the top and 2 slits for the suitcase handle on the side that opens.

Step 3


Step 3 : Making Valentines Day Classroom Mailbox Crafts Project


Wrap the box, making sure to keep the opening lid, wrapped separately.

Step 4


Step 4 : Making Valentines Day Classroom Mailbox Crafts Project


Cut a piece of sturdy cardboard a bit longer than a handle.

Step 5


Step 5 : Making Valentines Day Classroom Mailbox Crafts Project


Wrap this cardboard strip in wrapping paper, craft foam, felt, or decorative paper.

Step 6


Step 6 : Making Valentines Day Classroom Mailbox Crafts Project


Put the handle int he 2 slits and tape or glue the handle from the inside of the box so that it stays sturdily within the box.

Step 7


Step 7 : Making Valentines Day Classroom Mailbox Crafts Project


Cut 2 pieces of ribbon long enough to be wrapped around the suitcase.

Step 8


Step 8 : Making Valentines Day Classroom Mailbox Crafts Project


Now we need a way to fasten the straps .. such as velcro, magnets, buttons, or another way that you can think of in order to be able to open and close the suitcase.

Finished Suitcase Valentines Day Box


How to Make Valentine's Day Suitcase Mailbox Craft Idea for Kids


This is how the suitcase should look. Have fun and Happy Valentines Day.

Here are Even More Valentines Day Crafts Ideas

Technorati Tags: , , , , , , , , , , , , , , , , ,

Make Totem Pole Mail & Notes Holder Gift for Dad’s Office on Father’s Day

This is a really cute idea to make a totem pole to hold letters and special notes. This would probably look really great in your Dad’s office…so why not make it for your Dad as a gift on Father’s Day? It is a tall totem pole of VIP’s handles letters, memos and notes. Find the instructions below.


Make Totem Pole Mail Holders Gift for Dad’s Office on Father’s Day

CRAFTS MATERIALS THAT YOU WILL NEED:

– Rubber Hose

– Scissor

– Paint or Glue

– Letters and Notes

HOW TO MAKE CRAFTS PROJECT : TOTEM LETTER POLE

Step #1


On a length of rubber garden hose cut downward slits every 1 & 1/2″ or so.

Step #2


Carve and paint on faces or glue on photos to identify each section.

Step #3

Arrange occupants in order of importance.


Your Dad can tack the totem pole on his bulletin board or wall and this totem pole and its’ creatures will put the bite on papers and letters according to what must be done first.

Technorati Tags: , , , , , , , , , , , , , , ,