Chinese New Year Crafts – Year of the Dragon


Chinese New Years Crafts


Chinese New Year falls on January 23rd this Year.  And, in honor of Chinese New Year I put together a list of crafts just about the Chinese New Year.  You will find that most of them are Dragon Crafts and you might wonder why….. well, I will tell you why.  This year is the Year of the Dragon.  So, to honor that fact the majority of the crafts I have listed here will be Dragon Crafts.  Not all of them…. there are plenty of fun other crafts that have nothing to do with Dragons.  So, check out the post and pick a few Chinese New Year Crafts to do with the kids….. they are sure to love them.  So, let’s get started.
Here are Even More Chinese New Years Crafts

Chinese New Year Crafts – Year of the Dragon

(1) Festive Ribbon Dragon


Festive Ribbon Dragon


Here is an adorable dragon perfect for this years Chinese New Years.  This is the mini sized version of the huge size dragon they use in parades for Chinese New Years.  Check out FamilyFun for all the crafting details.


(2) Pop-Up Greeting Card


Pop-Up Greeting Card


Isn’t this Chinese Pop-Up Greeting card gorgeous?  I think it is really beautiful.  Imagine giving this to someone to celebrate the Chinese New Year.  Go to FreePaperCraftTemplate for all the details on how to print off this free template.


(3) Origami Dragon


Origami Dragon


Since this Chinese New Year is the year of the Dragon how could I not include an Origami Dragon in this post.  And, look how awesome this Origami Dragon turns out.  You can get the full instructions for this Origami by going to Origami-Instructions.


(4) Chinese New Year Fish


Chinese New Year Fish


Fish is a very popular dish on Chinese New year.  Fish is a sign of prosperity…. so it is very common to see people eating fish on Chinese New Year.  With that being said I thought it was a good idea to include Fish in this Chinese New Year Post.  Go to Julie K in Taiwan for all the craft details.


(5) Chinese Dragon Door Hanger


Chinese Dragon Door Hanger


Here is a cute craft for the youngest of crafters.  If you go to NickJr they show you how to make a simple Chinese Dragon Door Hanger that is perfect for any kid’s room.  Plus, making this craft with them is the perfect time to explain to your kids a little bit about the Chinese New Year.


(6) Dragon Mask


Dragon Mask


Now, isn’t this Dragon Mask incredible?  What little one wouldn’t love wearing this Dragon Mask all over the house.  After all, children love dressing up.  Find all the Dragon Mask “how-to’s” over at AlphaMom.  This is such a great Chinese New Year craft!!


(7) Pull-A-Long Dragon Craft


Pull-A-Long Dragon Craft


Here is a great way to make a Dragon for Chinese New Year….. made out of paper cups.  How awesome is that?!  It turns out so cute too.  This is a great way to teach your children about the Chinese culture.  Make sure to check out the craft in its entirety over at FreeKidsCrafts.


(8) Toy Spinning Hand Drum


Toy Spinning Hand Drum


Here is a fun toy for the Chinese New Year.  Not only fun to play with…. but also fun to make.  This toy is a great way to make lots of noise during the Chinese New Year.  Make sure to check out 4CrazyKings for all the fun details.


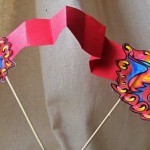
(9) Paper Dragon


Paper Dragon


This is a fun craft for the Chinese New Year.  This Paper Dragon turns out so beautiful…. I just love the colors.  I found this craft over at CraftJr and I just love it.  She explains how this craft is really so easy that a toddler can do it.  And, trust me…. the kids will love maneuvering around the dragon with the sticks.


(10) Marbled Red Vinasse Eggs


Marbled Red Vinasse Eggs


This Marbled Egg  is an extremely popular Chinese snack…. and it is extremely popular during Chinese New Year as the egg represents fertility.  To get this marbled effect you first crack the egg and then simmer the egg in colored liquid.  Get the full details at Pig Pigs Corner.


(11) Paper Chain Dragons


Paper Chain Dragons


One of the easiest crafts to teach a young child is how to make a paper chain.  So, let’s use that technique to make a Paper Dragon.  The kids will have such a fun time making this craft.  The Chinese tradition is a rich tradition….. why not show this to your kids by creating this craft.  Check out NaturallyEducational for all the craft details.


(12) Flying Dragon Puppet


Flying Dragon Puppet


Okay, I officially love this craft…. I just love how it turns out.  It turns out so colorful and festive…. just like any New year should be.  Check out JellyFishJelly for the craft details and put this Flying Dragon Puppet together.  I don’t know what your kids will love more…. putting the craft together or playing with the puppet.

Technorati Tags: , , , , , , , , ,

How to Make an Origami Dreidel for Hanukkah

Today I’m going to show you how to make an Origami Dreidel for Hanukkah.  A dreidel is a spinning top toy that is played during the Hanukkah season.  Each side of the dreidel has a different Hebrew letter on it.  The children will bet each other which letter will be on top of the dreidel when the dreidel lands.  The winner usually wins chocolate candy called gelt.  Fun stuff!!  So, let’s start today’s craft.

Check out or other Hanukkah Crafts.


How to Make an Origami Dreidel for Hanukkah


Materials Needed

Origami Paper

Glitter Glue, Marker or Paint


Step 1


Pick the color Origami paper that you want your dreidel to be.


Pick the color Origami paper that you want your dreidel to be.  Then turn it over to the white side…. like above.


Step 2


Fold in half.


Fold in half.


Step 3


Now, it should look like this.


Now, it should look like this.


Step 4


open it back up so you can now see a crease in the center.


Now, open it back up so you can now see a crease in the center.


Step 5


Fold each of the bottom corners up to the center crease.


Fold each of the bottom corners up to the center crease.


Step 6


your Origami paper should look like this


Now, your Origami paper should look like this (an upside down house).


Step 7


Fold both sides to center line over the triangles you just folded.


Fold both sides to center line over the triangles you just folded.


Step 8


Now your paper should look like this.


Now your paper should look like this.


Step 9


Bring top of paper down to bottom point.


Bring top of paper down to bottom point.


Step 10


Now it should look like this.


Now it should look like this.


Step 11


fold it part way back up, but not all the way back up.


Now, fold it part way back up, but not all the way back up.  Fold it where marked above to make a pleat.


Here is another angle of this pleat fold.


Here is another angle of this pleat fold.


Step 12


fold the top of the paper in to the center line and the corners start bending into triangles


This is really difficult to show you how to do.  Basically, fold the top of the paper in to the center line and the corners start bending into triangles.


Step 13


Notice the triangles formed.


Notice the triangles formed.


Step 14


Turn over to the other side.


Turn over to the other side.


Step 15


You can use glitter glue, marker or paint to draw a Hebrew letter on the front of the Origami.


Each side of the dreidel bears a letter of the Hebrew alphabet:  Nun, Gimel, Hei and Shin (the Hebrew letters are shown in image above).  You can use glitter glue, marker or paint to draw a Hebrew letter on the front of the Origami.

The dreidel is beautiful isn’t it?  How did your dreidel turn out?  What color did you make your dreidel?  Let me know in the comments below.  And, take a picture and share it with us as well…. we’d love to see it.

Technorati Tags: , , , , , , , , , , , , , , ,

How to Make Paper Circle Ornaments for Christmas

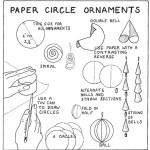
I have a fun craft for you today….I am going to show you how to make Paper Circle Ornaments for Christmas.  And, I’m not going to just show you one Paper Circle Ornament…. I’m going to show you four different ones.   They are so creative and beautiful…. you could even decorate an entire tree with these ornaments…. how fun would that be?  All of these ornaments are made of paper circles. To make drawing circles easy, you can use cups or tin cans or something like this. Draw around them, as illustrated. So, let’s get started.

Check out our other Christmas Crafts.


How to Make Paper Circle Ornaments


Materials Needed

Glue

Pencil

Scissors

Needle and Thread

Tin Cans (2 to 2 1/2 inches in diameter)

Straws

Paper


PAPER SPIRAL CIRCLES ORNAMENTS


Paper Spiral Circles Ornaments


Spiral circles can be made out of any paper, as long as it is not too stiff to spiral downward gracefully. Foil covered paper makes an attractive spiral, because any little breeze will cause the ornament to swing around and show the colors alternately. Start cutting from the edge and work towards the centers, leaving enough paper in the middle for hanging.


PAPER CHAINS OF BELLS ORNAMENTS


Paper Chains of Bells Ornaments


Chains of bells are made with four or more half circles of lightweight paper, and as many short sections of drinking straws, threaded together alternately. Glue the bells, and assemble the ornament after these are dry. Work from the bottom up, first tying the end of the thread around a straw section, then a bell, and so forth. Make a loop at the top of the thread for hanging.


PAPER DOUBLE BELLS ORNAMENTS


Paper Double Bells Ornaments


Double bells can be made of stiffer paper, and if paper with a contrasting reverse is not available, glue two sheets together and cut out the circle. Find the center point, then cut from the outer edge of the circle to center point. Then bend one end up and one end down, and glue the ends. Hold with the fingers a minute to give the glue a chance to set, otherwise the springiness of the paper will pull the ornament apart.


PAPER CIRCLE BALL ORNAMENTS


Paper Circle Ball Ornaments


Circle balls are made with at least six full circles, in two or more contrasting colors. More circles can be used, if the children want to take the time. Construction paper in bright colors is good for this ornament. Fold and crease each circle down the center. Glue together halves of two different circles, glue the next one on, and so forth. When all the circles are glued on, glue the last to the first, and include a looped thread for hanging.

There you go…. now you know how to make 5 different types of Paper Circle Ornaments for Christmas.  They are all very unique to one another that you could easily make a few of each to decorate your Christmas tree this Holiday season.

Technorati Tags: , , , , , , , , , , , ,

How to Make Paper Star Ornaments

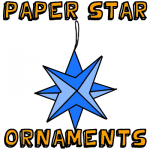
Today I’m going to show you how to make a Paper Star Ornament for Christmas.  This ornament is not any ordinary paper ornament…. the paper star ornament comes out looking crisp and beautiful.  Make a few to decorate your Christmas tree this Christmas season.  You can even use colored paper to make each ornament a different color.

Check out our other Christmas Crafts.


How to Make Paper Star Ornaments


This one looks a lot trickier than it is. This craft is for 9 years of age and up. The paper needs to be in perfect squares for this ornament, or it will turn out crooked. The paper can be any crisp paper that will fold in a sharp crease. The foil coated papers make beautiful stars, and the paper creases well. Stay away from construction paper and the like, because it folds in a crumbly fashion. For a starter, use squares 4 to 5 inches on a side, then graduate to smaller ones. Fold the paper wrong side up…meaning if you have a piece of paper with 2 different colors, then turn it to the wrong color facing up.


Materials Needed

Pencil

Glue

Scissors

Square

Paper


Step 1


Make a perfect square


You need a square piece of paper for this craft. If you don’t have square paper, then use the above trick to create a square piece of paper.


Step 2


Fold the page down on its diaganols


Fold the page down on its diaganols…in the picture above, fold B to C and A to D. You should now have an X shaped crease.


Step 3


Now fold the paper in half twice


Now fold the paper in half twice…in the picture it is A to B and C to D.


Step 4


Fold each side in to the center of the page


Fold each side in to the center of the page and then…


draw pinch marks


…draw pinch marks.


Step 5


Cut each line that you see has a dashed pinch mark on it


Cut each line that you see has a dashed pinch mark on it. Only cut it up to the pinch mark.


Step 6


fold each pair of sides in to the center line


After you cut these lines…. fold each pair of sides in to the center line as you see in the illustration.


Step 7


glue the flaps together


After folding over the spikes of the star, glue the flaps together, with the edges flush. This gives the three-dimensional effect.


Step 8


Make two of these four-pointed stars, and then glue together back to back, with the points alternating


Make two of these four-pointed stars, and then glue together back to back, with the points alternating. Run a thread through one spike for hanging on your Christmas tree or anywhere else that you want to decorate for Xmas.

How did you Paper Star Ornament turn out?  Did you use special paper like foil paper or colored paper?  Let me know in the comments below.  And, don’t forget to take a picture and post it with your comment…. I’d love to take a look at it.

Technorati Tags: , , , , , , , , , , , ,

How to Make your Own Envelopes for Christmas

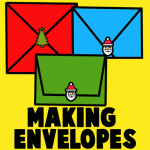
Today I’m going to show you three different ways to make your own Envelopes for the Christmas Holiday.  Everyone loves to receive homemade drawings and paper gifts for the Holidays.  But, instead of just handing them the drawings…. how about make your own envelopes to place them in.  You don’t have to stick to the ordinary white paper envelopes either… Instead make many different envelopes out of different color paper.

Check out our other Christmas Crafts.


How to Make your Own Envelopes for Christmas


Materials Needed

Paper

Stickers

Glue (optional)


All three style envelopes require starting off with a square piece of paper.  If the only paper you have is rectangular…. that’s not a problem.  This is how you can take a rectangular piece of paper and make it a square…


This is how you can take a rectangular piece of paper and make it a square.


Fold corner A over until the side AB meets up with side BC.  Cut along the bottom.  Now, your paper is square.


Envelope 1

Step 1


Fold corners into the center.


Start with the square piece of paper.  Fold corners into the center.


Step 2


Close envelope with a sticker.


Close envelope with a sticker.


Envelope 2

Step 1


fold all corners to the center.


Start with the square piece of paper.  Again, with this envelope, fold all corners to the center.  But, then cut off part of the bottom triangle.


Step 2


fold the bottom tab up


Firstly, fold the bottom tab up… then fold each side triangle inwards.


Step 3


Fold the top triangle down over both of the others


Fold the top triangle down over both of the others.  Paste or use sticker to secure.


Envelope 3

Step 1


This envelope is a bit more complicated because of the odd shape


This envelope is a bit more complicated because of the odd shape…. but it doesn’t need to be perfect.


Step 2


Fold the side tabs in over the card


Fold the side tabs in over the card.  Then fold the bottom part up.  Then glue the top flap down or use a sticker.


How to Make your Own Envelopes for Christmas


There you have it…. 3 different ways to make envelopes yourself for Christmas or any Holiday.  Which envelope style are you going to use?  Let me know in the comments below.

Technorati Tags: , , , , , , , , , , , ,

How to Make a Paper Christmas Ornament

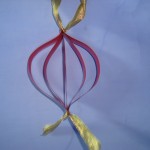
Today I’m going to show you a simple craft to make a Christmas Ornament out of paper and ribbon.  And, keep in mind…. just because the craft is a simple one does not mean that the ornament will look simple when done.  As a matter of fact, the ornament turns out to be quite beautiful.  So, let’s get started.

Check out our other Christmas Crafts.


christmas ornament


Craft materials required:

Colored Paper

Scissors

Ribbon

Hole Punch

Paper Clip

Ruler


Step 1

Cut 5 strips of paper about 4 cm wide.


Image017


Step 2

Cut 2 of them to the length of 20 cm, 2 to the length of 16 cm and 1 to the length of 12 cm.


Image018


Step 3

Place them on top of each other in this order… 20 cm – 16 cm  – 12 cm – 16 cm – 20 cm.  Bring one end of all the strips together and punch a hole in it.


Image019


Step 4

Tie a piece of ribbon as shown.  Leave it long enough to be used to hang it up somewhere.


Image020


Step 5

Bring the other end of all the strips together as shown. You can hold it in place with a paper clip.  Punch a hole in this end too.


Image022


Step 6

Tie a small piece of ribbon through the bottom end.


Image023


Step 7

Hang up the paper ornament on your Christmas tree or use it as a Christmas decoration somewhere else in your house.


christmas ornament


And, that’s it.  I told you the craft is simple.  How did your Christmas Ornament turn out?  Let me know in the comments below.  And, don’t forget to take a picture of it as well…. you can include it in your comment, so I can take a look at it.

Technorati Tags: , , , , , , , , , , ,

How to Make a Paper Bead Necklace

Today I’m going to show you how to make a Paper Bead Necklace.  Believe it or not the beads are made out of magazines and glue, but you would never know that by looking at the finished craft.  The finished Paper Bead Necklace turns out beautifully.  Beautiful enough that you could give it as a gift this Holiday season.  Or, keep it for yourself…. the choice is yours.

Check out our other Jewelry Crafts.


How to Make a Paper Bead Necklace


Materials Needed

Colorful Magazines/Catalogs

Toothpick

Glue

Needle

Thread

Scissors


Step 1


Gather some colorful magazines and catalogs.


Gather some colorful magazines and catalogs.


Step 2


Cut out long triangles from the catalogs.


Cut out long triangles from the catalogs.


Step 3


Place a toothpick on the wide side of the triangle paper strip.


Place a toothpick on the wide side of the triangle paper strip.


Step 4


Roll the paper and toothpick tightly.


Roll the paper and toothpick tightly.


Step 5


Dab glue on the end and hold closed to secure.


Dab glue on the end and hold closed to secure.


Step 6


Hold for a few seconds to securely hold shut.


Hold for a few seconds to securely hold shut.


Step 7


Take bead off of toothpick.


Take bead off of toothpick.


Step 8


Make a whole bunch of beads.


Make a whole bunch of beads.


Step 9


Thread a needle.


Thread a needle.


Step 10


Place the beads over the needle and pull down over thread.


Place the beads over the needle and pull down over thread.


Step 11


When you strung enough beads... then tie it shut like shown in the picture.


When you strung enough beads… then tie it shut like shown in the picture.


Finished Paper Bead Necklace


And, there you have it…. you have just finished making your Paper Bead Necklace.  How did it turn out?  Let me know in the comments below.  And, don’t forget to take a picture and share it in the comments as well.

Here is our video on How to Make a Paper Bead Necklace step-by-step.

Technorati Tags: , , , , , , , ,

How to Make a Cornucopia Decoration for Thanksgiving

A cornucopia is a “horn of “plenty”.  Another words, it is a horn filled with flowers, nuts, produce and other food that represents the wealth of food that we have this Thanksgiving Holiday.  The Cornucopia dates back hundreds of years and it makes for the perfect Thanksgiving decoration.  Today I’m going to show you how to make a Cornucopia Decoration for Thanksgiving.  Make a few of these Cornucopias and you will have the perfect place card to put around the Thanksgiving Table.  So, let’s get started.

Check out our other Thanksgiving Crafts.

Laura from  Dacian Moon Handmade will show you how to make this Cornucopia, step by step.


MATERIALS NEEDED:

– pattern cardboard
– white and green thick thread and needle
– scissors


Step 1

Cut a square from the cardboard, with the side about 10 cm.


Bring one corner over the opposite side…


Then the other one over it, to form a cornet.


Step 2

Take the needle with white thread …


and sew the edge of the opening…


… like this.


Step 3

Using the green thread make another stitch, smaller than the first.


Cover all the opening edge .


Now you can place acorns and pine cones or candies inside, add a name tag and it’s ready.


And, that’s it.  You have just made a Cornucopia Decoration.  Make a few more to make into Thanksgiving Place Cards.  Your guests will love them and they will have a keepsake of this wonderful Thanksgiving they shared with you.

Technorati Tags: , , , , , , , , , , , ,

Decorating Spiral Notebooks with Decorative Paper for Back to School Craft

Do you want to make your Plain Jane notebooks look awesome?! This is a great craft for teens (boys and girls – it doesn’t have to be flowers) who want to have the coolest notebooks in school. All you will need is a spiral notebook, some wrapping paper or decorative paper (or even a poster or magazine layout), and some glue…and about 30 minutes of your time. Find out how to decorate your spiral notebooks below.


Decorating Spiral Notebooks with Decorative Paper for Back to School Craft


Decorating Spiral Notebooks with Decorative Paper for Back to School Craft

Step 1


Step 1 Decorating School Notebooks


First of all, buy a cheapo spiral bound notebook…at the dollar store or at the store.

Step 2


Step 2 Decorating Notebooks


Then you will need to untwist the ends of the spiral wire. Then twist the wire so that it slowly comes out of the holes….do this until the wire is completely out.


Step 3


step-03-decorative-notebook


Now take both the front and back cover and put it out on the table (protect the table with newspaper or a garbage bag first). Put it on the table so that the sides that you need to decorate are facing up. Then spread glue on one side of both covers.

Step 4


step-04-decorative-notebook


Now turn the covers over so that the decorative paper is at the bottom. You can now see where you can cut the excess paper off of the covers.

Step 5


step-05-decorative-notebook


You can now use the holes that are in the spiral notebook’s covers to guide you to where you need to poke holes in the decorative paper. You can use an awl (a tool that has a point at the end)…or you can use a needle, hole puncher, or a ball point pen if you have no other options. Poke holes all the way down each cover.

Step 6


Decorating Spiral Notebooks with Decorative Paper for Back to School Craft


Now you just need to thread the spiral wire through the covers again and bend the ends so that it doesn’t come out again. Doesn’t this look beautiful? You can further personalize and decorate your notebook to make it more your own…but this is definitely enough if you don’t feel like customizing it further.

Here is our video on How to Decorate a Spiral Notebook with Decorative Paper.

Technorati Tags: , , , , , , ,