Open Hands Father’s Day Card for Dad

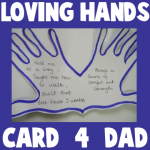
Impress your Dad this Father’s day with this personalized, creative Father’s day card. All you need is some thick white paper, markers, scissors, and your hands. The illustrated steps for this make-yourself-card are given below.


fathers-day-open-hands-cards


Open Hands Father’s Day Card for Dad


Craft Materials Required:

Thick paper

Markers

Scissors

Step 1


Cut out a piece of paper and fold it into half like a card. One half must be larger than the size of your hand.

Step 2:


Trace one hand on the paper as shown. make sure the base of your hand is at the folded edge of the paper.


Step 3:


Cut out along the lines. Outline the shape with markers, on the outsides as well as the inside of the card.

Step 4:


Write these words in the front of the card : ” Dad I love your hands,”

Step 5:


Write these words on the inside of the cards: ” held me as a baby, taught me how to walk, built that tree house that I wanted, Always a source of courage and strength”

Step 6:


Write these words on the back: “Thanks for being a wonderful Dad and so much more”

Technorati Tags: , , , , , ,

Turn a Deck of Cards into a 52 Reasons I Love You Book for a Valentines Day Gift

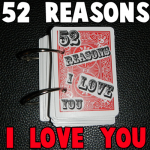
I am sure that you can think of way more than 52 reasons that you love someone. However, it will only take those 52 reasons to make your loved-one break down into tears of happiness. Take the time to tell your Mom / Dad / Sister / Brother / Grandparents etc how much you love them with this special project.
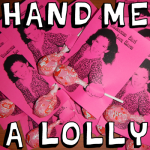
 Versions of this craft are all over the Internet…each a little different from the other, and I am not sure who was the first craftster to come up with this idea…but it is super cool. So know that I didn’t come up with this idea, however, it isn’t exactly the same as others.


Turn a Deck of Cards into a 52 Reasons I Love You Book for a Valentines Day Gift


Crafts Materials Needed:

A Deck of Cards

Glue or Paste

Jump Rings

Paper / Printer (or you can write out by hand)

Hole Puncher

Templates


template 3 - 52 ways i love you template 1


Click on Pic and Save Pic That Opens Up


template 1 - 52 ways i love you template 1


Click on Pic and Save Pic That Opens Up


template 2 - 52 ways i love you template 1


Click on Pic and Save Pic That Opens Up


template 4 - 52 ways i love you template 1


Click on Pic and Save Pic That Opens Up

Step 1


step1


Download and then print out the 4 pages of templates. Then write something for each number. Each thing should be something you love about the person you are writing the book for.

Step 2


step2 : 52 reasons why I love you


Cut each number rectangle out.


Step 3


step 3 : 52 reasons why I love you


Paste each number rectangle on a playing card.

Step 4


step4a


Now take a hole puncher and punch 2 holes in each card. Line cards up so holes are in about the same place on each card.


step4b


Here is what the holes look like on the other side of the cards.

Step 5


step 5 : 52 reasons why I love you


Open jump rings and thread it through all the cards…2 this for both holes.

Now Your Loved One Can Flip Thru Pages


step6d


step6c


step6b


step6a


This might be the most special gift you ever give any one. Your loved one will cherish this book forever.

Technorati Tags: , , , , , , , , , ,

How to Make Valentines Day Cards with Fist Holding Lollipops

I saw somewhere a handmade Valentine’s Day card with a little girl or boy holding a lollipop and I thought it was so cool. It stuck in my mind and I decided to try it out for my daughter’s Valentine’s Day card that goes out to her classmates. This is a great way to personalize your child’s Valentine’s Day card … as it display’s your child within the card. Now in a perfect situation, I would have printed this card out with colors, but of course I ran out of ink. And, I also would have printed this out on white card stock, however Walmart only had card stock in bright colors. So, decided for yourself which elements you want your card to have. Have fun.

Also, this is a craft that has to be mostly done by and adult…as a craft knife is needed. Also, you need to prepare the image on the computer…so if you have an older child and they know how to do this, then by all means, let them help.


How to Make Valentines Day Cards with Fist Holding Lollipops


Crafts Materials Needed:

Computer, Printer, Card Stock, Lollipops, Scissors, Craft Knife (for Only Mom or Dad to Use)

Step 1


step1 : Take a Picture of Your Child


Ask your child to hold out their hand in a fist. Do a better job than I did. I am an awful photographer. Oh well.

Step 2


step2 : Print Out Pictures of Child


I too k my picture into Adobe Photoshop. I then cut her cute little arm off and made it bigger so the hand looked closer / larger. This is NOT a necessary step if you are a better photographer. 🙂

Then make 4 of them so they are the right size for a Valentine’s day card.


Step 3


step3 Cut Cards Into Separate Cards


Cut into 4 separate cards.

Step 4


step4 Cut Slits in Card and Put Lollipops Thru


(For Parents / Adults Only). Take a craft knife. and cut on the left AND right side of the fist. Then put the lollipop thru like this.

Step 5


step5 : Hand Out Your Cards


Once you get the hang of it, they are really easy to make. Make sure to make enough for all of your child’s classmates.

Technorati Tags: , , , , , , , , ,

Cool Candy Valentine’s Day Card Ideas for Kids


Cool Candy Valentine’s Day Card Ideas for Kids


Valentine’s Day will be here before we know it.  Kids love handing out Valentine’s Day Cards…. they just love it.  Plus, they love receiving them as well.  I don’t know about you, but every year I try to help my kids come up with different Valentine Card ideas than the year before.   It gets difficult after a while to keep coming up with unique ideas.  Well, I thought I would help you with that by showing you some really cool Candy Valentine’s Day Card Ideas for Kids.  I found them all while scrounging the internet for you.  Each are unique and a ton of fun to make.  I’m sure you and your kids will find something here that they will enjoy making and giving to their friends and family.  So, let’s get started.

Check out our other Valentine’s Day Crafts.


Cool Candy Valentine’s Day Card Ideas for Kids

 (1) Now or Later Valentines Cards


Now or Later Valentines Cards


Better Homes and Gardens shows you how to combine these tasty treats with a clever written label to make a wonderful Valentine’s Day Card.  “Will You Be Mine Now or Later?”  How clever is that?!  The receivers will love it.


(2)  Dynamic Duo Valentine Cards


Dynamic Duo Valentine Cards


We’re two of a kind.   That is the saying you can use when you are putting together this tasty Valentine Card.  I found this cool candy Valentine’s Day card over at Spoonful.  They also offer some other clever sayings to use on other Valentine Cards so you don’t say the same thing to everybody.


(3)  Candy Doggy Card


Candy Doggy Card


Made with Tootsie Rolls this Candy Dog Valentine Card is sure to be a big hit in the classroom this year.  This is one of our fun crafts.  It is an easy craft and is inexpensive too…. gotta love that.  Check it out to find out how to make this Candy Doggy Card.


(4)  Candy Rings


Candy Rings


Here is a fun Candy Valentines craft that the children will love…. both the receiver and the giver.  These are Candy Rings…. perfect for Valentine’s Day.  I found this over at Kaboose.  Here they use a chenille stem per ring plus a wrapped candy.  These are so cute!!


(5)  Cupcake Goodies


Cupcake Goodies


These are simply brilliant…. and I’m sure absolutely delicious.  Made with cupcake liners and your favorite candy these are sure to be a big hit with your family and friends.  Add a special Valentine’s note to add a loving touch.  Check out this craft at Martha Stewart.


(6)  You Rock Valentines


You Rock Valentines


Show somebody how much you love them with this unique Valentines idea.  Made with Pop Rocks candy this Valentines sends out an awesome message…. that the receiver “Rocks”.  I found this Candy Valentines Card at Fiskars.  Check it out for yourself.


(7)  You Make Me Snicker


You Make Me Snicker


This Candy Valentine’s Day card is just simply adorable.  I found this craft over at Craft-O-Maniac.  Here she uses pictures of her daughter with the words, “I Like You, You Make Me Snicker!” on it.  Add a snicker candy and you have yourself a Valentine’s Card.


(8)  Valentines Critter


Valentines Critter


Here is another one of our very own Candy Valentine’s Day Cards.  It is an adorable little critter holding a yummy lollipop and a heart that reads, “Happy Valentine’s Day”.   That pretty much says it all, right?  Check out our How to Make a Valentines Critter for yourself.


(9)  Butterfly Valentines


Butterfly Valentines


This butterfly is so super cute!!  And, it is really a fun and easy Candy Valentine’s Day Card to make.  You can find the craft details at Skip To My Lou.  At that site they offer a printable template that you can print off on card stock.  Do a bit of cutting and add a lollipop.  You will be good to go.


(10)  I’ve Got a Crush on You


I've Got a Crush on You


I just love this Valentine’s Day Card idea…. I just couldn’t pass up adding it to this post.  It is not quite a Valentine Card, but it is definitely an adorable Valentine message to give to a special someone.  Use Crush soda along with a special message…. “I’ve Got a Crush on You”  They will surely love it.  Check out all the details at Design Aglow.


(11)  M&M Tic Tac Toe


M&M Tic Tac Toe


This Candy Valentine’s Day Card is really awesome.  And, it is sure to be so much fun for anyone who receives it.  I found this great Valentine idea at Shim & Sons.  Here they used 2 different color M&M’s and placed plenty in resealable bags.  They also used card stock to create the Tic Tac Toe Valentine Cards.  These are sure to be a ton of fun.


(12)  Lip & Mustache Lollipops


Lip & Mustache Lollipops


This is an awesomely clever idea.  Here Blonde Designs shows you how to use craft foam to trace some mustaches and lips.  Add them to a lollipop with a Valentine note and you have a fun Candy Valentine’s Day Card.  Watch how silly everybody looks sucking on the lollipop… they will look like they have mustaches and funny looking lips.  It is sure to get a lot of laughs.


(13)  Valentine Mice


Valentine Mice


I know what you are thinking…. when you think of Valentine’s Day you don’t think of mice.  I understand that.  But, take a look at these delicious mice made from Hershey Kisses and think again.  The receiver of this special Valentines gift will surely love it.  So much so that they probably will not want to eat it.  Check out Floral Showers for all the details.


(14)  Valentine’s Fuzzy Cake Balls


Valentine's Fuzzy Cake Balls


I found this yummy Valentine’s Day treat at Hungry Happenings and just had to share it with you.  Here they use shaved coconut to make these adorable creatures.  But, as they share with you if you do not like coconut feel free to use shaved chocolate instead.  Add a cute and loving message to your fuzzy cake ball and you have yourself the perfect Valentines.

Top photo by StuartWebster

Technorati Tags: , , , , , , , , , ,

How to draw a Valentine Dragoness Valentine’s Card

Today I will show you how to draw a fantasy style Valentine’s Day Card…. specifically a Valentine Dragoness Valentine’s Day card.  You can use regular paper for this craft or if you would like something more durable feel free to use Card Stock.  Whatever you have in your house is fine.  I will show you how to make every detail of this Valentine Dragoness perfect for your someone special.  So grab a paper and pencil and let’s get started.

Check out our other Valentine’s Day Crafts.

Laura from Dacian Moon Handmade will show you step-by-step how to make this.


Materials Needed

Paper or Card Stock

Pencil

Black Pen or Thin Marker


Step 1

Let’s start with one simple circle (is not necessary to be perfect). Now draw the X’s below.


Step 2

We’ll draw the basic parts of her face: eyebrow, jaw and snout.


Step 3

Now outline the head, over the new added parts, and then add the neck.


Step 4

Now we will sketch the nose…


And the mouth.
The mouth should be from the edge of the snout to the jaw.


Step 5

Let’s give her life: add the eye.
It should be drawn keeping the shape of the eyebrow.
Add definition to the nose, the jaw and the mouth.


Step 6

The basics are done so we can start adding details. Let’s give her horns and a little crest.


Step 7

Her head is ready but feel free to add as many details as you want – this will make your dragoness one of a kind.
It’s time to sketch the heart she is holding…


… and the hands.


Step 8

Let’s complete her with some wings. We draw it the same way we drew the crest, just bigger.


Step 9

Of course, she has claws. So, we draw them.  Also, draw her crest to go down over her back (between the wings), and add the last details.

Now our sketch is ready.


Step 10

Clean the unneeded lines. If you want you can copy it on a new paper (by placing it up against a window and tracing it).


Step 11

You’ll see that after cleaning… the lines are too thin… so outline and emphasize the important features, especially the eye.


Step 12

Apply shadows with thin and light lines.


Step 13

Now, with a little piece of paper, smudge the shadows.


Step 14

Add “Be my Valentine” on the heart and our dragoness is ready.


Give this handmade Valentine Dragoness to someone special this Valentine’s Day.  They will love it.

Technorati Tags: , , , , , , , , , , ,

How to Make a Pop-up Christmas Card

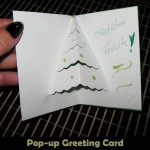
Today I’m going to show you how to make a very special greeting card for the Christmas Holiday.  In particular I’m going to show you how to make a Pop-up Christmas card.  Anyone receiving this Christmas card will love it… not only because it came from you, but also because of the 3-D effect of the card.  In this post I will show you how to make a Pop-up Christmas tree that actually sticks out of the card when opened.  Add a special note to your card and it is ready to send out for Christmas to a friend or family member.

Check out our other Christmas crafts.

Laura from  Dacian Moon Handmade will show you how to make this, step by step.


Materials Needed

– cardboard
– green paper
– green pen
– glue
– scissors
– green glitter glue


Step 1

Fold the cardboard in half.


Fold the upper corners outward at about 2/3 of their height…


… like this.


Step 2

At 2/3 of height, cut in waves until you reach the crease…


… it will look like this.


Make another 2 – 3 waved cuts…


… like this.


Step 3

Press the lower part (under the first cut) behind…


… like this. It will look like the tree stem.


Step 4

Fold the green paper in half.


Apply a layer of glue on the cardboard until you reach the creases…


… and place it over the green paper, like this.


Do the same on the other part.


Step 5

Take the green pen …


and write “Seasons Greetings” beside the tree.


Add some glitter glue globes on the tree and your greeting card is ready .


And, there you have it.  You just made a beautiful and festive Pop-up Greeting card for Christmas.  The receiver will love it!!

Technorati Tags: , , , , , , , , , , , ,

Fun Kwanzaa Crafts for Kids


Fun Kwanzaa Crafts for Kids


Top Image by TheBlackHour.com

Oh boy…. do I have a treat for you today.  In this post I have compiled 14 Kwanzaa crafts from around the internet.  They are all perfect for your children to make.  Whether you celebrate Kwanzaa or not these crafts are great to help teach your children about Kwanzaa and the African culture.  Many of them not only incorporate the three colors of Kwanzaa (red, green & black), but they also help teach you about the 7 Principles of Kwanzaa…. Unity, Self Determination, Collective Work & Responsibility, Collective Economics, Purpose, Creativity and Faith.   These are wonderful principles to have and to teach your children.  So, check out these Kwanzaa crafts…. you are sure to find a few to do with your children.

Fun Kwanzaa Crafts for Kids

(1)  Kwanzaa Flag Garland


Kwanzaa Flag Garland


Here is a festive Kwanzaa craft perfect to help teach your children about Kwanzaa.  Here Kaboose shows you how to make this Kwanzaa Flag Garland in great detail.  It uses the symbolic colors of the holiday… red, green and black.


(2)  Kwanzaa Greeting Card


Kwanzaa Greeting Card


Here is one of our very own Kwanzaa crafts.  In this Kwanzaa Greeting Card craft we will show you how to make a greeting card for the Holiday Kwanzaa.  It is a very easy craft, so even young children will enjoy this craft.  You simply need some paper , scissors and glue.


(3)  Kwanzaa Mobile


Kwanzaa Mobile


I found this Kwanzaa craft over at Spoonful.  Here they use the 3 colors of Kwanzaa as well as the 7 principles of Kwanzaa to make this adorable mobile.  This will make an awesome Kwanzaa decoration as well as teach your children about Kwanzaa.


(4)  Handprint Kinara


Handprint Kinara


Here is a fun craft that children of all ages will love to make.  Activity Village shows us how to take your handprint and make it into a very cute Kinara.  It’s a quick, fun and messy Kwanzaa craft for kids!  They will love it.


(5)  Doll Pin Kinara


Doll Pin Kinara


I have another fun Kinara craft for you.  This one came from Kaboose and it promises to be tons of fun.  Here they use doll pins, spools, paint and some other materials to make this festive Kinara.  Kaboose even has tons of information to teach you more about the Holiday of Kwanzaa.


(6)  Kwanzaa Placemat


Kwanzaa Placemat


Here is another entertaining Kwanzaa craft.  In this craft Making Friends shows you how to incorporate the 3 colors of Kwanzaa into this colorful placemat.  Your kids will have fun weaving strips of red, green and black craft foam into this festive Kwanzaa placemat.


(7)  Kwanzaa Bracelet


Kwanzaa Bracelet


Here is a great Kwanzaa craft that both boys and girls will love making.  I found this craft at Yahoo! Voices and it’s a good one.  Make these Kwanzaa bracelets with the colors of Kwanzaa and give them to your family and friends as gifts.  They will love it.


(8)  Bubble Wrap Corn


Bubble Wrap Corn


Kwanzaa is about the festival of the first harvest of the crops.  So, this Bubble Wrap Corn just makes sense as a craft for Kwanzaa.  Give your child all the details about Kwanzaa as you make this fun bubble wrap craft with them.  Check out No Time for Flashcards for all the details.


(9)  Kwanzaa Bead Candles


Kwanzaa Bead Candles


Here Spoonful shows us another wonderful Kwanzaa craft.  This time they make these cute Kwanzaa bead candles.  Here they use craft cubes, oval beads as well as other materials to make these festive candles.  This is a great way to introduce the seven principles of Kwanzaa.


(10)  Kwanzaa Flag Decoration


Kwanzaa Flag Decoration


Family Education shows us a great way to teach your children a little bit about Kwanzaa and the African culture.  Here they use different flags of Africa to make a great decoration for Kwanzaa.  As you are making these flags of Africa with your children it is a great time to teach them about Kwanzaa.


(11)  Corn Necklace


Corn Necklace


Remember Kwanzaa is the festival of the first harvest of the crops.  Corn was a very important crop.  So, this Corn Necklace craft is perfect for Kwanzaa.  Here Better Homes & Gardens explains how each ear of corn represents a child in the family.  Check out the craft for all the details.


(12)  Papier Mache Bowl


Papier Mache Bowl


Check out this gorgeous and super festive Papier Mache Bowl perfect for Kwanzaa.  I found this at Crafts Holidays site and thought it was beautiful.  Here they use Papier Mache to make this bowl…. so it is sure to be a lot of fun for the kids.  Use this bowl to hold the Mazao (or fresh fruits and vegetables) at your Kwanzaa table.


(13)  Kid-Friendly Kinara


Kid Friendly Kinara


Nick Jr. has the right idea with this Kinara Kwanzaa craft.  It is just adorable and the children will love making it.   Here they use craft sticks as well as clothespins to put this Kinara together.  They also don’t forget the colors of Kwanzaa with this Kinara.


(14)  Cardboard & Tissue Paper Kinara


Cardboard & Tissue Paper Kinara


Kids love to do crafts with tissue paper and cardboard rolls.  And, this Kwanzaa craft will be no exception.  I found this craft over at PBS and thought it was a great one to include.  Make sure to check this Kinara craft out.  Plus, they also go into great detail of the 7 Principles of  Kwanzaa…. great to teach your children.

Technorati Tags: , , , , , , , ,

How to Make a Pop-Up Hanukkah Dreidel Greeting Card

Now is the time to start to get your Holiday greeting cards ready to be given out.  Well, today I’m going to show you how to make a Pop-Up Hanukkah Dreidel Greeting Card.  Anyone who receives this Hanukkah greeting card will love the 3D look of this card.  With some simple paper, scissors and some markers for decorating you too can make this Hanukkah Dreidel Greeting Card.  Your kids will love making this pop-up card.  Plus, they will be preparing a special card for someone they love…. they will truly get a kick out of that.

Check out our other Hanukkah Crafts.


How to Make a Pop-Up Hanukkah Dreidel Greeting Card


Materials Needed

Piece of Paper

Colorful Piece of Paper

Scissors

Markers, Crayons or Colored Pencils to Decorate Card


Step 1


Get a piece of paper.


Get a piece of paper.


Step 2


Fold in half.


Fold in half.


Step 3


Cut slits on fold.


Cut slits on fold.


Step 4


Open up page.


Open up page.


Step 5


Fold this part in.... the other direction.


Fold this part in…. the other direction.


Step 6


Now turn card in this direction.


Now turn card in this direction.


Cut down in a V shape, but don't cut all the way!


Cut down in a V shape, but don’t cut all the way!!!


Step 7


Fold right here upwards to make a crease.


Fold right here upwards to make a crease.


Step 8


Bring top part of card down on this square


Bring top part of card down on this square (not bottom of card).


Cut 2 slits.  As you can see... You are NOT cutting bottom of card as seen here.


Cut 2 slits.  As you can see… You are NOT cutting bottom of card as seen here.


 Step 9


Fold this part in opposite direction.


Fold this part in opposite direction.


Step 10


Make a crease here.


Make a crease here.


Step 11


Glue down the outer edges of white paper onto colorful paper


Glue down the outer edges of white paper onto colorful paper (the side that doesn’t pop out).


It should look like this.


Like this.


Step 12


Decorate the card.


Decorate the card.

Anyone who receives this Hanukkah card will love it!!  I love the 3D look of this greeting card…. as will the receiver.

Technorati Tags: , , , , , , , , , , , , ,

How to Make Haunted House Pop-Up Cards for Halloween

I have a super duper fun Halloween craft for you today.  In this post I’m going to show you how to make a Haunted House Pop-up Card.  People love receiving cards from their loved ones.  But, what they especially love are the homemade cards.  And, this homemade card will be no exception.  Do you know what makes this Haunted House card so special?  It’s the 3-D look of the card.  I will show you how to easily make a 3-D Haunted House Pop-up Card.  Once the Halloween Card is opened it can be displayed nicely with all the other Halloween decorations.  So, let’s get started.

Check out our other Halloween Crafts.


How to Make Haunted House Pop-Up Cards for Halloween


Materials Needed

Piece of White Paper

Colorful Piece of Paper

Scissors

Black Marker

Colorful Crayons, Markers or Colored Pencils


Step 1


Get a piece of paper.


Get a piece of paper.


Step 2


Fold in half.


Fold in half.


It should look like this.


Like this.


Step 3


Cut on the fold on the red lines.


Cut on the fold on the red lines.


It should look like this.


Like this.


Step 4


Unfold.


Unfold.  Then put your fingers into slits and fold the inside part in opposite direction.


It should look like this.


Like this.


Step 5


Fold in the spot on the above image.


Fold in the spot on the above image.


Fold here too.


Fold here too…


Step 6


Pinch the top fold and cut on the red lines.


Pinch the top fold and cut on the red lines.


It should look like this.


Like this.


Step 7


Fold here like in above picture.


Fold here like in above picture.


If you fold it down again it will look like this.


If you fold it down again it will look like this…


Open.


And, open…. like this….


Step 8


Outline edges in black.


Outline edges in black.


Step 9


Draw windows, doors and other details.


Draw windows, doors and other details.


Step 10


Color it too.


Color it too.


Step 11


Draw other details.


Draw other details.


Step 12


Add background and a sidewalk.


Add background and a sidewalk.


Step 13


Paste just the outside edges to a colorful piece of paper.


Paste just the outside edges to a colorful piece of paper.


Step 14


You can decorate the outside of the card too.


You can decorate the outside of the card too.


Step 15


Finished Haunted House Pop-up Card


Didn’t this Halloween pop-up card turn out amazing?  Anyone receiving it will love it!!  To make the Trick-or-Treat figures seen here simply print them off at How to Make a Trick-or-Treat Paper Toy.  The Trick-or-Treat figures go perfectly with today’s Halloween craft.

Technorati Tags: , , , , , , , , , , , , , , , , , , ,

13 Cool Bubble Wrap Crafts for Kids


13 Cool Bubble Wrap Crafts for Kids


Bubble Wrap can have many uses.  You can use bubble wrap to package items so they deliver safely…. you can use bubble wrap as a stress reliever…. you can even use bubble wrap as a noise maker.  But, did you know that bubble wrap is an awesome material to use in crafts?  It really is.  This week I was scouring the internet looking for some cool bubble wrap crafts for kids…. and I found 13 of them.  I couldn’t help but show these bubble wrap crafts to you as they are as much fun as they are creative.  So, scroll through these 13 bubble wrap crafts… you are sure to find quite a few that you will enjoy making.

13 Cool Bubble Wrap Crafts for Kids

(1)  Bubble Wrap Hopscotch

Bubble Wrap Hopscotch

This is a fabulously cool idea…. I just love it!!  I found this awesome bubble wrap craft over at Givers Log.   Here she uses bubble wrap to create this fun activity that kids have been doing for years…. hopscotch.  What child doesn’t love jumping on bubble wrap… now there is plenty of chances to do just that.


(2)  Bubble Wrap Fish


Bubble Wrap Fish


Bubble Wrap is a great medium to paint with.  Bubble wrap has tons of cuts and grooves giving this fish a bunch of texture.  Make sure to check out Free Kids Crafts to get all this crafts details.


(3)  Bubble Wrap Greeting Cards


Bubble Wrap Greeting Cards


Check out these beautiful Greeting Cards…. and for each of them bubble wrap was used.  I found this bubble wrap craft over at Creative Jewish Mom… and as she says, she is very creative.  In this post she shows you how to make Rosh HaShana Cards with bubble wrap.  Keep in mind with this technique you can make any greeting card you wish.


(4)   Tactile Letters using Bubble Wrap


Tactile Letters using Bubble Wrap


I found this really cool site that in order to help teach children the letters and the sounds they make they integrate the letter of the week with a sensory experience…. in this case they used bubble wrap and glued it to a letter B to help teach the children the Letter B and its sound.  Check out Teach Preschool for all the details.


(5)  I Don’t Want to Stay Down Doll


Bubble Wrap Doll


Here is one of our posts that we made a few months back.  Here we used bubble wrap to make a “I Don’t Want to Stay Down” Doll.   This doll is a traditional Romanian Toy.  It is called a “Hopa Mitica” Doll and it won’t stay down no matter how hard you try…. it keeps popping back up.  Check it out to make one for yourself.


(6)  Bubble Wrap Travel Game


Bubble Wrap Travel Game


Here is a creative way to use bubble wrap….. Create Bubble Wrap Bingo.  Using the large bubble wrap Apartment Therapy shows you how to make this awesome Bubble Wrap Travel Game.  Make this craft and carry it in the car for long trips…. the kiddos can pop the bubbles every time they see one of the items.  Check out the site for all the crafting fun.


(7)  Roller Pin & Bubble Wrap Painting


Roller Pin and Bubble Wrap Painting


This is a great way to have children paint…. after all look at the great texture bubble wrap and the rolling pin create.  This is such a great idea.  I found this bubble wrap craft over at Teach Preschool and it looks super fun to me.  Imagine all the great paintings your kids could make.  Check out the site for yourself.


(8)  Bubble Wrap Butterflies


Bubble Wrap Butterflies


Aren’t these butterflies just simply magnificent?  And, they are made from bubble wrap…. which of course makes them perfect for this post.  Teaching the Little People came up with this idea and it is such a great one…. she points out how making Bubble Wrap Butterflies are a perfect way to teach your little ones the letter B.  Check out her site for all the details.


(9)  Bubble Wrap Snakes


Bubble Wrap Snakes


These bubble wrap snakes are sssssssssoooo…. cute!!  They are fun, colorful and they even spring to life.  I found this bubble wrap craft over at Fun Art 4 Kids and I love it.   She used bubble wrap, paint and a popsicle stick to create this springy snake.  Make sure to check out her site to get all the details.


(10)  Bubble Wrap Advent Calendar


Bubble Wrap Advent Calendar


Here is another bubble wrap craft that is from our site.  We showed you this craft last year just in time for the Christmas Holidays.  In this particular post we showed you how to make an Advent Calendar out of Bubble Wrap.  What better way to count down to the Holidays than to do it with a advent calendar you made yourself.  Make sure to check it out.


(11)  Bubble Wrap Crocs


Bubble Wrap Crocs


This bubble wrap craft has got to be one of my favorite bubble wrap crafts I found.  Just look how adorable these crocs are!!  I found this super creative bubble wrap craft at Positively Splendid and it is pretty incredible.   Amy at Positively Splendid shows you step-by-step how to create these bubble wrap crocs so check it out for yourself.


(12)  Bubble Wrap Corn


Bubble Wrap Corn


Look how amazing this bubble wrap corn looks…. it really looks like Indian Corn.  I found this bubble wrap craft at Parents and it looks like a lot of fun.  This bubble wrap Indian Corn makes the perfect decoration for the Thanksgiving Holiday.  Make sure to check out the website for the step-by-step tutorial.


(13)  Bubble Wrap Egg Dyeing


Bubble Wrap Egg Dyeing


Here is a super duper creative way to use Bubble Wrap.  Use Bubble Wrap to dye an egg.  I would have never thought to do this…. but Family Fun did.  They will show you how you too can make your Easter Eggs using Bubble Wrap.  Cool idea!!

Technorati Tags: , , , , , , , , ,

How to Make a 3D Carnation Mother’s Day Card

Mother’s Day is coming up next month.  That will be here before you know it.  So, in honor of the upcoming Mother’s Day Holiday today I will show you how to make a 3D Carnation Mother’s Day Card.   Any mom would love receiving a homemade card from their child.  And, this card is no exception.  Not only is this card made by you, but it is also 3D which makes it really cool.  You will use crepe paper to give this card a 3D effect.  So, grab the materials needed and let’s get started.

Check out our other Mother’s Day Crafts.


How to Make a 3D Carnation Mother's Day Card


Materials Needed

Red and Pink Crepe Paper

Construction Paper or Card Stock

Paste or Tape

Markers

Scissors


Step 1


Cut out a circle on red and pink crepe paper.


Cut out a circle on red and pink crepe paper.


Step 2


Fold in halves and then quarters.


Fold in halves and then quarters.  Snip edges irregularly to resemble a carnation.


It should look like this.


It should look like this.


Step 3


Take a piece of construction paper or card stock and draw 2 stems.


Take a piece of construction paper or card stock and draw 2 stems.  You will be pasting the carnations to the top of these stems.


Step 4


Paste or tape on carnations


Cut top of stem as shown and tuck in flower.  Paste or tape on carnations.  Write “Mom” or “Mommy” or “Mother”.


Finished Mothers Day Carnation Card


There you go….. you just finished making a 3D Carnation Mother’s Day Card.  Your mom is going to absolutely love it.  Do you know why?  Because you made it yourself.

Technorati Tags: , , , , , , , , , , , , , , , , , , , ,

How to Make Easter Egg Cards

Easter is just around the corner.  So, to get ready for the upcoming Easter Holiday I thought we would do a craft in honor of Easter.  Today I will show you how to make beautiful Easter Egg Cards.  These cards turn out really lovely.  They will be perfect to hand out to your loved ones and friends…. so make quite a few.   Each card can be written with a unique saying inside.  So, grab the materials needed and let’s get started with this craft.

Check out our other Easter Crafts.


How to Make Easter Egg Cards


Materials Needed

Printer & Paper

White Paper

2 Pieces of Colorful Paper

Crepe Paper, Sequins, Glitter (Items to Decorate Eggs)

Marker

Hole Punch

Scissors

Ribbon


Click on template image below to make larger and to print.


Easter Egg Card Template


Step 1


Print out template.


Print out template.


Step 2


Use egg template to trace 2 eggs on colorful paper and 1 egg on white paper.


Use egg template to trace 2 eggs on colorful paper and 1 egg on white paper.


Step 3


Decorate the Easter egg with crepe paper, sequins, glitter


Decorate the Easter egg with crepe paper, sequins, glitter or however you wish to.


Step 4


Write a message on the white egg.


Write a message on the white egg.


Step 5


Punch 2 holes on wide part of eggs.


Punch 2 holes on wide part of eggs.


Step 6


Now push ribbon thru both holes (in all 3 eggs) and tie a bow above the top egg


Now push ribbon thru both holes (in all 3 eggs) and tie a bow above the top egg… as seen above.

And, there you have it….. you just finished making an Easter Egg Card.  Now, make a few more and hand them out to loved ones or friends this Easter.  The receiver will be sure to love them.

Technorati Tags: , , , , , , , , , , ,

How to Make a Shamrock Greeting Card for St. Patrick’s Day

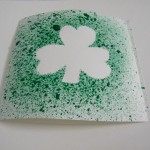
In this post I’m going to show you how to make a Shamrock Greeting Card Craft for St. Patrick’s Day. You can make it to wish your friend, teacher or mother (or whoever you would like) a wonderful St. Patrick’s Day.  All you need is some paint, paper and an old toothbrush.   The craft is an easy one, but it is sooooo…. much fun.  So, grab those materials needed and your St. Patrick’s spirit and let’s get started.  Have fun!!

Check out our other St. Patrick’s Day Crafts.


Materials Needed

Thick white paper

Paint

Toothbrush

Scissors

Marker


Step 1

Fold a piece of thick white paper to make a card of the size you want.


Step 2

Draw out a shamrock smaller than the card and cut it out.


Step 3

Take an old toothbrush and dip it in some tempera paint.


Step 4

Place the shamrock in the center of the card.  Use the toothbrush to spray paint on it.  Make sure you spray plenty of paint around the edges of the shamrock.


Step 5

When you are done lift the shamrock off carefully… and surprise!!… you have a beautiful shamrock card underneath.


Step 6

Allow it to dry, write a special message inside, and spread a little love this St. Patrick’s Day.  The receiver of this card will absolutely love it!!

Technorati Tags: , , , , , , , , , , , ,

How to Make Hearts and Arrows for Valentines Day

I have a fun and easy craft for you today.  I’m going to show you how to make Hearts and Arrows for Valentines Day.  This Hearts and Arrows craft makes for the perfect card to give your special someone.  Or, use this craft as a decoration for Valentines Day.  Either way you are sure to get lots of compliments from anyone who sees this item.  And, the cool part is you probably already have all the materials needed in your house.  So, grab those materials and let’s get started.

Check out our other Valentines Day Crafts.


How to Make Hearts and Arrows for Valentines Day


Materials Needed

Printer and Paper

Scissors

Glue or Paste


Click on template images below to make larger and to print.  You can choose to print off a color or black and white version.

Heart & Arrow Template – Color Version


Heart & Arrow Template


Hearts & Arrow Template – B & W Version


Heart & Arrow Template - Black & White Version


Squiggly Background – Color Version


Squiggly Background


Squiggly Background – B & W Version


Squiggly Background - Black & White Version


Step 1


Print out templates.


Print out templates.


Step 2


Cut out items from templates.


Cut out items from templates.  Also, cut slits in heart.


Step 3


Now put arrow thru the heart


Now put arrow thru the heart to look like above picture.


Step 4


Paste the heart on the squiggly heart shape.


Paste the heart on the squiggly heart shape.


Finished Hearts and Arrows Craft


And, there you go…. you just finished your Hearts and Arrows for Valentines Day.  Now make sure to give it to someone special this Valentines Day.

Technorati Tags: , , , , , , , , , , , , , ,

How to Make a Fantasy Style Valentine’s Day Card : Dragon Valentine

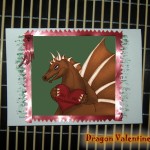
Do you have someone special that you would love to give a Valentine’s Day Card too, but they aren’t crazy about the traditional Valentine’s Day Cards.  Well, if so…. I have the perfect Valentine’s Day Card Craft for you.  Today I’m going to show you how to make a Fantasy Style Valentine’s Day Card…. A Dragon Valentine to be specific.  The craft is an easy one, but don’t worry… it’s fun too.  So, grab the materials needed and let’s get started.

Check out our other Valentine’s Day Crafts.

Tutorial offered by Laura from Dacian Moon Handmade.


Materials Needed

– paper (not too thin)
– scissors
– design template (dragon)
– glue
– plastic ribbon (about 40 cm)
– glitter glue


Step 1

Save the dragon image from here and print it (you can also draw this dragon yourself).


Cut out the image.


Step 2

Fold the paper in half.


Apply a layer of glue on the image …


… and place it on the middle of paper.


Step 3

Make some lines with green glitter glue around the image.


It should look like this.


Step 4

Cut 4 pieces of ribbon (just long enough to frame the image). With the scissor cut little triangles on one side of the ribbon (like in the next picture).


Repeat that for all the 4 pieces of ribbon.


Step 5

Apply a layer of glue on one side of the ribbon…


… and place it on the edge of the image.


Do the same with the other 3 pieces.


Step 6

Cut another piece of ribbon (about 3 cm).


With the scissor make cuts on its length…


… like this:


Then pull sudden on the cut end and the small pieces will curl themselves.


Step 7

Glue that piece of ribbon on the left upper corner of the image and make a little heart on it with glitter glue (I used mauve to match the eyes of the dragon).


This is the finished card.


See, the craft was fun, wasn’t it?  And, look at the great Valentine’s Day Card you have to give to your Someone Special!!  The real question is…. who are you going to give it to?

Technorati Tags: , , , , , , , , , , ,

Chinese New Year Crafts – Year of the Dragon


Chinese New Years Crafts


Chinese New Year falls on January 23rd this Year.  And, in honor of Chinese New Year I put together a list of crafts just about the Chinese New Year.  You will find that most of them are Dragon Crafts and you might wonder why….. well, I will tell you why.  This year is the Year of the Dragon.  So, to honor that fact the majority of the crafts I have listed here will be Dragon Crafts.  Not all of them…. there are plenty of fun other crafts that have nothing to do with Dragons.  So, check out the post and pick a few Chinese New Year Crafts to do with the kids….. they are sure to love them.  So, let’s get started.

Here are Even More Chinese New Years Crafts

Chinese New Year Crafts – Year of the Dragon

(1) Festive Ribbon Dragon


Festive Ribbon Dragon


Here is an adorable dragon perfect for this years Chinese New Years.  This is the mini sized version of the huge size dragon they use in parades for Chinese New Years.  Check out FamilyFun for all the crafting details.


(2) Pop-Up Greeting Card


Pop-Up Greeting Card


Isn’t this Chinese Pop-Up Greeting card gorgeous?  I think it is really beautiful.  Imagine giving this to someone to celebrate the Chinese New Year.  Go to FreePaperCraftTemplate for all the details on how to print off this free template.


(3) Origami Dragon


Origami Dragon


Since this Chinese New Year is the year of the Dragon how could I not include an Origami Dragon in this post.  And, look how awesome this Origami Dragon turns out.  You can get the full instructions for this Origami by going to Origami-Instructions.


(4) Chinese New Year Fish


Chinese New Year Fish


Fish is a very popular dish on Chinese New year.  Fish is a sign of prosperity…. so it is very common to see people eating fish on Chinese New Year.  With that being said I thought it was a good idea to include Fish in this Chinese New Year Post.  Go to Julie K in Taiwan for all the craft details.


(5) Chinese Dragon Door Hanger


Chinese Dragon Door Hanger


Here is a cute craft for the youngest of crafters.  If you go to NickJr they show you how to make a simple Chinese Dragon Door Hanger that is perfect for any kid’s room.  Plus, making this craft with them is the perfect time to explain to your kids a little bit about the Chinese New Year.


(6) Dragon Mask


Dragon Mask


Now, isn’t this Dragon Mask incredible?  What little one wouldn’t love wearing this Dragon Mask all over the house.  After all, children love dressing up.  Find all the Dragon Mask “how-to’s” over at AlphaMom.  This is such a great Chinese New Year craft!!


(7) Pull-A-Long Dragon Craft


Pull-A-Long Dragon Craft


Here is a great way to make a Dragon for Chinese New Year….. made out of paper cups.  How awesome is that?!  It turns out so cute too.  This is a great way to teach your children about the Chinese culture.  Make sure to check out the craft in its entirety over at FreeKidsCrafts.


(8) Toy Spinning Hand Drum


Toy Spinning Hand Drum


Here is a fun toy for the Chinese New Year.  Not only fun to play with…. but also fun to make.  This toy is a great way to make lots of noise during the Chinese New Year.  Make sure to check out 4CrazyKings for all the fun details.


(9) Paper Dragon


Paper Dragon


This is a fun craft for the Chinese New Year.  This Paper Dragon turns out so beautiful…. I just love the colors.  I found this craft over at CraftJr and I just love it.  She explains how this craft is really so easy that a toddler can do it.  And, trust me…. the kids will love maneuvering around the dragon with the sticks.


(10) Marbled Red Vinasse Eggs


Marbled Red Vinasse Eggs


This Marbled Egg  is an extremely popular Chinese snack…. and it is extremely popular during Chinese New Year as the egg represents fertility.  To get this marbled effect you first crack the egg and then simmer the egg in colored liquid.  Get the full details at Pig Pigs Corner.


(11) Paper Chain Dragons


Paper Chain Dragons


One of the easiest crafts to teach a young child is how to make a paper chain.  So, let’s use that technique to make a Paper Dragon.  The kids will have such a fun time making this craft.  The Chinese tradition is a rich tradition….. why not show this to your kids by creating this craft.  Check out NaturallyEducational for all the craft details.


(12) Flying Dragon Puppet


Flying Dragon Puppet


Okay, I officially love this craft…. I just love how it turns out.  It turns out so colorful and festive…. just like any New year should be.  Check out JellyFishJelly for the craft details and put this Flying Dragon Puppet together.  I don’t know what your kids will love more…. putting the craft together or playing with the puppet.

Technorati Tags: , , , , , , , , ,