How to make a Phone and Cards Pouch for Your Dad on Fathers Day

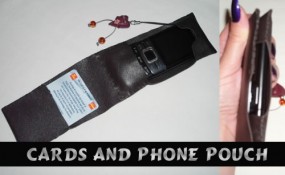
Learn how to make a great leather / vinyl wallet for your dad’s gift for Father’s Day. This wallet makes a perfect gift for Father’s Day: it is great to hold his phone and business cards. This step by step tutorial is by by Laura from Dacian Moon Handmade


phone cards cover


How to make a Phone and Cards Pouch for Your Dad on Fathers Day

CRAFTS MATERIALS NEEDED:

– leather or vinyl
– needle and thread
– scissors
– pen
– phone to be sure it fits


IMG_5357


Step 1.

Measure and cut the piece of skin to be 1 cm wider than the phone and 3 times longer.  Should be so long because we must cover one end of the phone, like this…


IMG_5358


… make another fold on the other end for the cards, like this…


IMG_5359


… and the two parts must fit one over the other, like this.


IMG_5360


Step 2.

To easily remove the phone will cut a little the cover. First draw the desired shape…


IMG_5362


… then we cut it out.


IMG_5363


It will look like this.


IMG_5364


Step 3.

Starting at the fold…


IMG_5365


sew the two sides, like this…


IMG_5366


… and the phone fits perfectly.


IMG_5367


Step 4.

We will use a piece of leather to make the bottom of the phone holder. Place it under the phone, like this…


IMG_5369


… and sew the bottom, to fix it in place.


IMG_5370


Also continue to sew the edges.


IMG_5372


Now the phone holder is ready.


IMG_5373


Step 5.

Measure the available part to make the card holder…


IMG_5375


… and sew the edges.


IMG_5376


The card holder is also ready 🙂


IMG_5377


Close it and it will look like this : cute and practical.


IMG_5379


I hope that your wallet / case turned out well and that your dad likes it!

Technorati Tags: , , , , ,

How to Make Leather Wallets with Stitching Craft for Kids & Teens

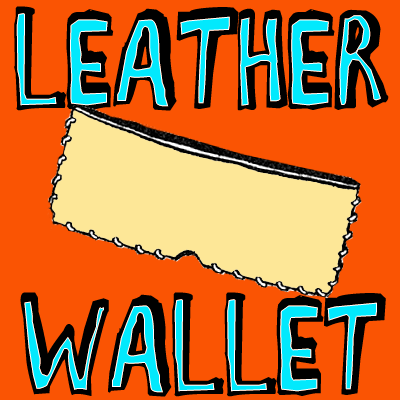
Here is a great project for groups of kids…for Summer Camps, After-school programs, as well as in school settings. This craft is for making a leather wallet that is laced together. This is a very basic leather wallet craft and I think you will be able to follow it with some adult supervision. This craft requires adult supervision and assistance! Please refer to our article about Working with Leather!

You Might Enjoy Our Leather Crafts

How to Make Leather Wallets with Stitching Craft for Kids & Teens


How to Make Leather Wallets with Stitching Craft for Kids & Teens


CRAFTS MATERIALS NEEDED:

Leather

Cutting knife and board (For Adult to Use)

Steel angle (With Adult Supervision)

#0 Punch

3/32″ goatskin (or whatever leather you have on hand)

Rubber cement

How to Make These Leather Laced Wallets

Step 1


leather-wallets-01


(Adult Should Do This Part) Using steel angle and knife, cut two pieces of leather 9″ x 31/2″, as in Figure 1.


 Step 2


leather-wallets-02


Fold one piece of leather in half, and punch a small hole in the center to allow for folding. Open leather up, as in Figure 2.

 Step 3


leather-wallets-03


Run spacing wheel on three sides of both pieces of leather, 1/8 ” from the edge, as in Figure 3.

 Step 4


leather-wallets-04


Skive wrong side of leather on three sides where the pieces are to be joined, as in heavy line in Figure 4. (Here is How You Skive)

 Step 5


leather-wallets-05


Cement skived areas and make holes for lacing using fib and mallet or #0 punch, as in Figure 5.

 Step 6


leather-wallets-06


Lace pieces of wallet together using whip stitch, as in Figure 6.  (Here is How You Use the Whip Stitch)


You Might Enjoy Our Leather Crafts

Technorati Tags: , , , , , , ,

Open Hands Father’s Day Card for Dad

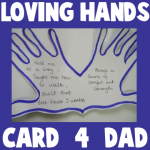
Impress your Dad this Father’s day with this personalized, creative Father’s day card. All you need is some thick white paper, markers, scissors, and your hands. The illustrated steps for this make-yourself-card are given below.


fathers-day-open-hands-cards


Open Hands Father’s Day Card for Dad


Craft Materials Required:

Thick paper

Markers

Scissors

Step 1


Cut out a piece of paper and fold it into half like a card. One half must be larger than the size of your hand.

Step 2:


Trace one hand on the paper as shown. make sure the base of your hand is at the folded edge of the paper.


Step 3:


Cut out along the lines. Outline the shape with markers, on the outsides as well as the inside of the card.

Step 4:


Write these words in the front of the card : ” Dad I love your hands,”

Step 5:


Write these words on the inside of the cards: ” held me as a baby, taught me how to walk, built that tree house that I wanted, Always a source of courage and strength”

Step 6:


Write these words on the back: “Thanks for being a wonderful Dad and so much more”

Technorati Tags: , , , , , ,

Number One Dad Badge Fathers Day or Mothers Day Gift Craft

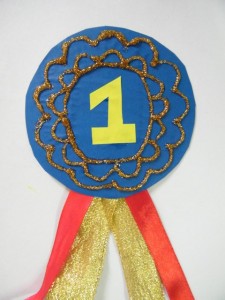
Is your dad the best in the world? Here’s a father’s day gift that will help him remember that. The simple instructions to make this Number 1 Dad badge are given below:

Number One Dad Badge Fathers Day Gift Craft


Craft materials required:

Thick card stock ( cereal box etc.)

ribbon

glue

scissors

glitter glue

colored paper


Step 1:


Cut out a circle on thick card paper as shown.

Step 2:


Glue colored paper on it as shown.


Step 3:


Cut out the number 1 and glue it in the center as shown.

Step 4:


Cut out 2 pieces of ribbon and fold them as shown below

Step 5:


Tape them to the back of the card as shown.

Step 6:


Decorate with glitter glue as shown.

Technorati Tags: , , , , , , , , , ,

Puppets for Thumb wrestling: Father’s Day Gift

Here’s a Father’s day gift that guarantees hours of fun. Make a set of thumb puppets for your dad and yourself, and play thumb wrestling. The simple illustrated instructions to make the thumb puppets follow:


Craft materials required:

-White fabric

-black yarn

-ribbon

-scissors

-needle and thread

-fabric glue

-Permanent marker


Step 1:

Cut out a piece of cloth double the length of your thumb and about an inch wider than the width of your thumb.


Step 2:

Fold it into half and stitch along the two sides as shown.


Step 3:

Fold it inside out as shown:


Step 4:

Glue small pieces of yarn to make hair


Step 5:

Glue a strip of ribbon along the bottom as shown


Step 6:

Add facial features with a marker.


Make another one for your dad in the same way. Make sure its big enough for your dad’s thumb. Your dad is sure to enjoy this Father’s day gift.

Technorati Tags: , , , , , , , , , ,

How to Make a Pen Holder by Weaving Magazines Together

Each of us have at home a lot of magazines that we do not need anymore, how about you recycle them by making something useful out of them. This is called upcycling. Here’s a useful way to use them…this would make a great gift for Mom or Dad on Mother’s Day or Father’s Day. It would also be good for your desk when you are doing your homework

Tutorial offered by Laura from  Dacian Moon Handmade  .


CRAFTS MATERIALS NEEDED:

– Magazines
– Transparent tape

Step 1


Open the magazine on the middle and take one (double) page.


Start folding it at 1.5 cm …


… until you have this band.


Repeat until you have about 11 – 12 bands.


Step 2.

Place some of them on the table, like this. Initially I started with 6 but I took one out because my support would be too wide. So you can start directly with 5.


Bring another band and place it perpendicular to the others, putting it over a band, then under the next … and so on… like in the picture.


Add another two, in negative. Where the first band is over, the second band will be under.

It will look like this.


Step 3.

Bend up the remaining part of the bands…


… and put another band through them…


… form the corners…


… and where the band is ending, place a little piece of tape to keep it in place.


Continue adding bands until you reach the top.


Step 4.

Add tape on the upper edge to keep it in place…


… and you have a new pen holder 😀


Technorati Tags: , , , , , , , , , , , , , ,


How to Make Valentines Day Pop Up Card of Girl Hugging Heart Crafts Idea for Kids

Today, we will show you how to make this really cool Valentine’s Day Pop Up Card craft for kids. Learn how to fold and cut paper to make a pop-up card with a girl hugging a Valentine’s Day heart. People will love receiving this card…so learn how to make it.

Here are Even More Valentines Day Crafts Ideas


I love you Pop Up Cards


How to Make Valentines Day Pop Up Card of Girl Hugging Heart Crafts Idea for Kids

Crafts Materials Needed

– Paper
– Scissors
– Glue
– Coloring Stuff … Colored Pencils or Watercolors or Markers or Crayons, etc

Step 1


Step 1 : Making Valentines Day Pop Up Cards Instructions


Take 2 normal sized pieces of paper and fold them in half length-wise, as you see above.

Step 2


Step 2 : Making Valentines Day Pop Up Cards Instructions


Draw 2 curved lines … this will be the girl’s face.


Step 3


Step 3 : Making Valentines Day Pop Up Cards Instructions


Draw 2 more upwards curved lines along the fold. Don’t draw them beyond the half-way mark (seen above).

Step 4


Step 4 : Making Valentines Day Pop Up Cards Instructions


Cut on the lines that you just drew and then fold them back, as pictured above.

Step 5


Step 5 : Making Valentines Day Pop Up Cards Instructions


Now just put them back in the original position as if you didn’t even cut them. And you are done…just kidding.

Step 6


Step 6 : Making Valentines Day Pop Up Cards Instructions


Now open the paper as if it is a tent and push the cut segments through to the other side of the paper, as pictured above.

Step 7


Step 7 : Making Valentines Day Pop Up Cards Instructions


Now close paper together and press.

Step 8


Step 8 : Making Valentines Day Pop Up Cards Instructions


Now open up the card to see the pop-up head and arms …. it should look like the picture above.

Step 9


Step 9 : Making Valentines Day Pop Up Cards Instructions


Draw a face and hair on the head. You don’t have to draw a girl…you can draw a boy, if you want to.

Step 10


Step 10 : Making Valentines Day Pop Up Cards Instructions


Now draw arms and hands on the curved-‘u’ looking section. Just draw 2 curvy letter ‘m’ shapes for fingers.


How to Make Valentines Day Pop Up Card of Girl Hugging Heart Crafts Idea for Kids


Here is what it should look like so far.

Step 11


Step 11 : Making Valentines Day Pop Up Cards Instructions


Now we have to make a heart for the girl to hold in her arms. So get a piece of paper and fold it in half. Then draw half of a heart on the fold and cut it out.

Write a message on the heart…such as ‘Happy Valentine’s Day’ or ‘I Love You’ or ‘Be Mine’.

Step 12


Step 12 : Making Valentines Day Pop Up Cards Instructions


Now glue the heart inside of the hands.

Step 13


How to Make Valentines Day Pop Up Card of Girl Hugging Heart Crafts Idea for Kids


This is what the card looks like closed. After the glue dries…it should look like the pictures below.

Step 16


How to Make Valentines Day Pop Up Card of Girl Hugging Heart Crafts Idea for Kids


Here is what it should look like with the heart in the girl’s arms.


How to Make Valentines Day Pop Up Card of Girl Hugging Heart Crafts Idea for Kids


And another picture. I hope that yours turned out great too!

Here are Even More Valentines Day Crafts Ideas

Technorati Tags: , , , , , , , , , , , , ,

How to Make a Roll-up Bag for Pencils or Tools : Crafts Idea for Older Kids

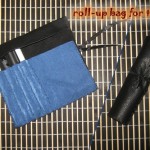
This is a tutorial well  suited for older children. It is not a hard one and is very useful. I always needed a bag like this (for pencils or different tools) and never could find one so, I decided to make one. Today I will share it with you 🙂


How to Make a Roll-up Bag for Pencils or Tools : Crafts Idea for Older Kids

CRAFTS MATERIALS NEEDED:

– black leather, plastic / vinyl,  (it must be soft, otherwise we can’t sew it) – or other fabric : 18 cm x 18 cm
– soft cloth for inside part (blue) : 11 cm x 25 cm
– scissors
– thread
– ribbon (black)


Step 1.

On every complex crafting project is better to make a mock-up first. So, take a paper and make a sketch of how do you want the bag to look like.


Step 2.

Place the blue cloth over the leather, exactly over the lower left corner.


Start to sew, hiding the knot of the thread between the cloth and the leather.


We will sew over the edge because this will give safety to the stitch.


Sew all side until you reach the corner.


Step 3.

Place a pencil in it’s place, between the cloth and leather, near the edge.


Now we see that we must make a little crease on the blue cloth, to make enough room for the pencil. Continue.


Place the pencil again inside the bag. You can see now that it have enough space and we start to sew up.


Is the best to sew keeping the pencil inside, not too hard pressed. When we arrive at the edge of the blue cloth, we sew down to the lowest edge of the bag. So, every pencil (tool etc.)will be separated through two lines of sewing.


We make half of the bag with places for pencils and the other will stay unbroken, because we might want to place there scissors or other bigger tool.


Step 4.

We place some pencils inside…


… and close the upper part…


… because we need to know where will be the middle to sew the ribbon.


Attach it outside, letting 1/3 of it on one side of the sewing and 2/3 on the other side.


Step 5.

The last step is to close the upper part, so the pencils will not fall away.


To do that we sew the edges.


We start on top and sew again over the edge.


Do the same for the other part.


And that’s it, a roll-up bag for pencils or tools, cute, useful and practical (perfect for camping trips) offered by Laura from Dacian Moon Handmade


Technorati Tags: , , , , , , , , , , , , , , ,

Make Totem Pole Mail & Notes Holder Gift for Dad’s Office on Father’s Day

This is a really cute idea to make a totem pole to hold letters and special notes. This would probably look really great in your Dad’s office…so why not make it for your Dad as a gift on Father’s Day? It is a tall totem pole of VIP’s handles letters, memos and notes. Find the instructions below.


Make Totem Pole Mail Holders Gift for Dad’s Office on Father’s Day

CRAFTS MATERIALS THAT YOU WILL NEED:

– Rubber Hose

– Scissor

– Paint or Glue

– Letters and Notes

HOW TO MAKE CRAFTS PROJECT : TOTEM LETTER POLE

Step #1


On a length of rubber garden hose cut downward slits every 1 & 1/2″ or so.

Step #2


Carve and paint on faces or glue on photos to identify each section.

Step #3

Arrange occupants in order of importance.


Your Dad can tack the totem pole on his bulletin board or wall and this totem pole and its’ creatures will put the bite on papers and letters according to what must be done first.

Technorati Tags: , , , , , , , , , , , , , , ,

Make Fish Pen and Pencil Holder for Dad’s Desk on Father’s Day

Father’s Day is coming up in the middle of June already. Show Dad that he is the Big Fish in your world by making him this fish pencil holder as a gift. He can hold both pens and pencils in this fish. Of course, this can be made as a present for anyone, not just your dad…such as Mom for Mother’s Day or for a birthday. Be sure of a big catch when you’re fishing for a pencil with this big fish of the deep sea. Directions are below.

Make Fish Pen and Pencil Holder for Dad’s Desk on Father’s Day for a Great Gift


CRAFTS MATERIALS THAT YOU WILL NEED:

– Pencils & Pens

– Old Sponge Ball (Nerf Ball)

– Scissors

– Glue

– Paint and Paint Brush

– Sturdy Cardboard

HOW TO MAKE THIS CRAFT TO MAKE DESK HOLDER FOR PENS AND PENCILS

Step 1


Cut a flat edge on one side of an old sponge ball.

Step 2


In a circle around the top cut several holes large enough to hold pencils.

Step 3

Paint on a fish face and glue on a sturdy cardboard tail to serve as a rudder.

Sit him on your desk and fill to the gills with pencils and pens for your Dad, Grandpa, Grandma, Mom, or who ever you want to give this great gift to.

Technorati Tags: , , , , , , , , , , , , , , , , , ,

How to Make Tri-Fold Picture Frame Present for Dad on Father’s Day

Do you want to learn how to make a unique picture frame? Most picture frame crafts are for one photograph, but this one holds 3 photos. This would be perfect to make as a gift for Dad or Mom for family photos…and it would look great on their office desk. If you want to learn how to make a tri-fold picture frame, then look at the directions below.

FYI…this craft is for older children – 9 and up….younger children can do it with help from an adult / parent / teacher.


How to Make Tri-Fold Picture Frame Gift That Holds 3 Photos for Dad’s Desk on Father’s Day

CRAFTS MATERIALS THAT YOU  WILL NEED:

– Cardboard, 15 by 5 inches
– 2 Pieces of felt, each 16 by 5′ inches
– 3 Snapshots (family photos)
–  Wool thread in contrasting color
–  Needle with large eye
–  Scissors
– Tape measure
– Glue Stick, Rubber Cement, or other Adhesive
– Chalk

HOW TO MAKE THIS CRAFT : TRI-FOLD FAMILY PICTURE FRAME

Step 1

Cut the cardboard into three pieces, each 5 by 5 inches. Paste one photography on each piece. Try to choose pictures that you father will look at and feel all mushy and sentimental.


Step 2


Arrange the three pieces side by side and lay one piece of felt over them. Leave 1/2 inch between the pieces of cardboard,since the felt is 1 inch wider than the three pieces of cardboard.


Step 3

Mark with chalk either an oval or square shape where the felt is to be cut out to show the underlying family photographs. Cut out these pieces of felt.


Step 4

Sew a long-and-short blanket-stitch border around each hole (see instructions on blanket stitching below) using the pretty wool thread.

Tip: How to Sew a Blanket Stitch


To blanket stitch, make a knot at the end of your piece of thread. Put your needle in 1/4 inch from the edge of the fabric, put the thread under the point of the needle and then pull the needle with the rest of the thread through. Repeat until finished.

Step 5

Glue the felt with the holes over the cardboard so the snapshots show through. Glue the other piece of felt to the back of the three pieces of cardboard.


Step 6

Sew a running stitch (see instructions for sewing the running stitch right below.) in places marked A and B in the illustration and then the frame is ready.


Tip : How to Make the Running Stitch


Begin sewing this stitch with three or four little stitches sewn one over the other, instead of making a knot in the thread. The running stitch itself is a small, even stitch, running on a straight line. Try to make each stitch about 1/8  inch long, though if it is closer to 1/4 of an inch no thunder or lightning are going to strike you. You can run up to six of these little stitches on the needle and then pull the needle through the fabric. Finish your seam with three or four little stitches sewn one on top of the other.

Below you can see what the finished picture frame will look like.


Technorati Tags: , , , , , , , , , , , , , , ,

Make Newspaper or Magazine Holder Rack for Dad on Father’s Day

Father’s Day is coming up in the middle of June…which isn’t too far away from now. Do you want to start planning a great gift for your Dad? This is an arts and crafts project that uses a cork and a wire coat hanger to make a great rack to hold magazines and newspapers. If your Dad reads a lot of periodicals (newspapers and magazines), then this might be the perfect craft to make for your Dad.
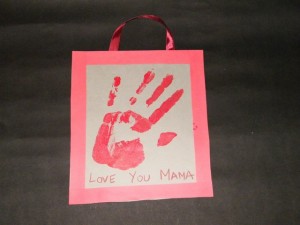
 Instructions are below…enjoy.


Make Newspaper or Magazine Holder Rack for Dad on Father’s Day

CRAFTS MATERIALS THAT YOU WILL NEED:

– Wire hanger

– Gummed tape or felt / fabric or ribbon

– Bottle cork, optional

HOW TO MAKE THIS CRAFT TO MAKE RACK HOLDER FOR MAGAZINES AND NEWSPAPERS

Bend the wire hanger as indicated in the illustrations below.

Step 1


Straighten hook on wire hanger as pictured above.

Step 2


Now bend hook on wire hanger down as pictured above.

Step 3


Now bend arms on wire hanger down as seen above. Letter ‘C’ is where the cork will be placed.

Step 4


Now pull apart hanger about 6 inches at the top. Remember, the cork can also be seen as letter ‘c’.

Step 5

Cover the hanger entirely with gummed tape. If you don’t have gummed tape, then wrap your hanger in ribbon, fabric or felt…but you will need to use glue to secure to the hanger.

Step 6

Insert the end (C) into the center of the cork, if you have one. The cork will keep the holder from scratching table, desk, or floor when it stands with magazines held neatly in it.


This holder is the perfect size for magazines and newspapers of most sizes. Your Dad or Grandpa would love this for Father’s Day…however Moms and Grandmas would love this as well for Mother’s Day or a birthday as well.

Technorati Tags: , , , , , , , , , , , , , , , , ,

Make Keepsake Hand Print Poster Gift for Mom on Mother’s day Craft

Moms and Dads always love hand print crafts AND they are very easy to make. Here is a cute arts and crafts project for kids to make for Mom on Mother’s Day or Dad on Father’s Day. This is also great for toddlers and preschoolers. Make this beautiful hand print poster for your Mom this Mother’s day. She’ll treasure it forever.

Make Keepsake Hand Print Poster Gift for Mom on Mother’s day Craft


Craft materials required:

Red acrylic paint

Brush

Thick paper

Ribbon

Red colored paper

Scissors

Glue

Tape

Crayon


Step 1

Cut out a piece of paper larger than the size of your hand. Use the paintbrush to apply paint on your palm and stamp your hand on the paper.


Step 2

Write a message for your mom below the print.


Step 3

Cut out strips of red paper and glue it on the sides to make a border.


Step 4

Cut a piece of ribbon and tape it to the back as shown.


Step 5

Your poster is ready! Gift it to your mom on mother’s day and she can hang it up on the wall.


Technorati Tags: , , , , , , , , , , , , ,

How to Weave Purses / Handbags for Mom’s Gift on Mothers Day

Here is a great Mother’s Day crafts project for kids to make for Mom or Grandma. Below, you can find out how to make a cardboard loom to weave beautiful handbags / purses to give as gifts or to keep for yourself. Either way, it is a lot of fun and the results are beautiful. This is a great crafts project for older kids and girls, as well as teens.

How to Weave Purses / Handbags for Mom’s Gift on Mothers Day


Crafts Materials Needed:

– Stiff Piece of Cardboard
– Scissors
– Heavy String
– Zipper
– Thread

(1) Notch both top and bottom of a thin stiff piece of cardboard.


(2) Loop heavy string around top notches (A) and between bottom notches (B) around the cardboard. See Picture Below.


Click on the Image Above to See it Bigger.

(3) Weave yarn over and under strings (C).

(4) Skip a string at one end to keep the weave in proper sequence around the cardboard.

(5) Overlap new yarn (B).

(6) When weaving is finished, remove cardboard. Turn the purse inside out and sew in zipper.

Technorati Tags: , , , , , , , , , , ,

Make Silhouette Self-Portraits for Mom or Dad Gift Craft

Silhouette portraits make a wonderful gift for Mom and Dad for Birthdays or for Mother’s Day or for Father’s Day … and better yet,  they are very easy to make. This will make a wonderful keepsake craft for Mom and Dad as they watch you grow up and get to see how small your head used to be in comparison to how you look now (when they look back on it years later). Have fun with the easy instructions below.

Make Silhouette Portraits for Mom or Dad Gift Arts &  Crafts Project for Kids


Crafts Materials Needed

-Large sheet of wrapping paper (or large piece of other type of paper if you don’t have wrapping paper)
-Thumb tacks or Masking Tape
-Black crayons
-Lamp

Step 1

Find a friend or family member to help you make your self portrait.

Step 2


Tack or Tape a large piece of wrapping paper to the wall (with permission from an adult).

Step 3

– Seat yourself sideways on a chair, close to the wall, directly in front of the paper.

Step 4

Now have your friend place a lighted lamp close behind you with the light shining on you, in such a way that his shadow is cast on the tacked-up paper.

Step 5

With your crayon, have your friend follow the outline of the shadow.

Step 6

Then take the paper off the wall and fill in the shape you have drawn with black crayon, as shown in the picture below.


Technorati Tags: , , , , , , , , , , , , ,

Make a Family Newspaper to Talk About Family News

Every family has news—lots of news—so why not make a family newspaper! This would be a great gift to make for Mom on Mother’s Day or Dad on Father’s Day or for birthdays. For gifts, you can put clever titles like ‘The Best Mom in the World Has Been Found’ … or The Sweetest Mother in the World Has Been Found to Be Timmy’s Mom (if your name is Timmy). This is a great crafts idea that will produce a keepsake to cherish in years to come. Find out how to make a Family Magazine or Newspaper below.

How to Make a Family Newspaper to Talk About Family News – Great Gift Idea for Kids to Make


Crafts Materials Needed

-Paper
-Pencil
-A ruler

Directions for Making This Arts and Crafts Project:

Step 1

Print the name across the top of a large sheet of paper.

Step 2


Insert a dateline by drawing two parallel lines under the title and printing the date in this space.

Step 3

Divide the rest of the sheet into four columns.

More Instructions

The main news should be put under a two-column headline. Print headlines in pencil or ink. You can write the news itself in longhand.
What’s the main piece of news? Well, it might be a visit from a relative, someone’s graduation from school, a new business venture by some member of the family, a furlough visit of your older brother, a party, or any other event that makes that particular week memorable.

A joke column is always good. You can print the home schedules for washing dishes or doing other chores around the house.
Ask other members of the family to contribute. Father will be glad to offer a parental bit—perhaps some special announcement about a picnic that is being planned.

Maybe one of the other boys or girls will contribute a poem or a funny cartoon.

If the newspaper consists of two or more sheets, they can be bound together by running scotch tape down the edges of the left-hand side of the sheets. The newspaper will then open like a book.

Technorati Tags: , , , , , , , , , , ,