How to Make Fairy Lights with Bubbles and Paint

This is a cool and fun project for summer. What can be more pleasant than playing with water on a hot Summer day? How about painting with colorful bubbles, just the way a fairy would.
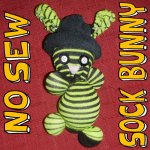
 Laura from  Dacian Moon Handmade will show you, step by step, how to make this.

How to Make Fairy Lights by Blowing Bubbles


How to Make Fairy Lights with Bubbles and Paint


CRAFTS MATERIALS NEEDED:

– plastic bottle
– 1 sock
– paints
– tape
– scissors
– liquid soap / shower gel… mixed with water


IMG_6670


Step 1.

Cut off the lower part of the bottle.


IMG_6672


Like this.


IMG_6673


Step 2.

Put the sock on the cut.


IMG_6674


Like this. You can use tape to fix it in place.


IMG_6676


Step 3.

Add some paint on the sock.


IMG_6677


Dip the sock in the soap / water mixture …


IMG_6678


Then gently blow through the mouth of the bottle. Take care not to suck in air through the bottle, because of the soap and paint.


IMG_6681


It is a fun project and you can make very beautiful fairy lights 😉


IMG_6679


Technorati Tags: , , , , , , , , , , , , ,

How to Make a Simple No-Sew Sock Bunny Rabbit for Easter or for Fun

Today, we will show you how to make a sock doll bunny rabbit…the best part is that there is NO sewing involved in this craft. Anybody can make these sock bunnies and they can make it pretty quickly. I think you can probably make one of these is 20 or 30 minutes. And these sock bunnies turn out so adorable that you are going to make a few of them so your bunnies can keep each other company. This shouldn’t be played with by young kids who might eat the rubber bands if they come off!


How to Make a Simple No-Sew Sock Bunny Rabbit for Easter or for Fun


Crafts Materials Needed

– 1 Stretchy Sock  – I used Knee High Girls Socks
– 1 Normal Sock for the Hat
– Small Rubber Bands or Yarn
– Buttons or Sharpie Marker or Fabric Markers or Needle and Thread
– Stuffing
-Scissors

Step 1 Thru 9


Step 1 Thru 9 How to Make a Simple No-Sew Sock Bunny Rabbit for Easter or for Fun


We have a crafts tutorial for making a no-sew sock doll. Steps 1-9 are the same for this tutorial…so first go to the sock doll tutorial, and do steps 1-9 and then come back to this tutorial for step 10. Your doll should look like the above picture when you are done with step 9.

Step 10


Step 10


Now cut the top part in half…as seen in picture above.


Step 11


Step 11


Now, in this picture above, we have already done one of the 2 sides. The left side has been braided already…we did this by cutting the left side into three strips and then braiding that side and rubber banding the end as if it was hair. Now the right side needs to be done…we cut the right side into 3 strips…now we just need to braid it. If you don’t know how to braid, please see this tutorial.


real-pic-06


Now both sides should be braided and look like this.

Step 12


Step 12


Now both the right side and left side is looped into a letter ‘U’ shape. Then hold both loops together in the center and rubber band both sides together. I used more than one rubber band to make sure both sides stayed together.

Step 13


Step 13


Cut a second sock in half.

Step 14


Step 14


Now put the bottom of the sock (toe part) on top of the bunny.

Step 15


Step 15


Now fold up the bottom of the sock…so it is rolled up like a normal winter hat is.

Step 16


Step 17


Now cut a small slit on both sides of the hat.

Step 17


Step 18


Now pull an ear thru


real-pic14


And another ear thru.

Step 18


Step 19


Cut a nose out of fabric or felt (a triangle shape). Use a button(s) for eyes.

Step 19


Step 19


Ask mom or dad to help you hot glue the eyes and nose on. That is it…you have a stuffed bunny rabbit to play with. Wasn’t that easy?!

This shouldn’t be played with by young kids who might eat the rubber bands if they come off!

How to Make a Snowman from Socks

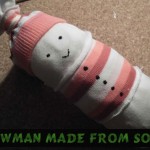
When you think of winter time what do you think of?  Snow, of course.  Well, what is the one thing that children love to make in the snow?  A snowman.   Today I’m going to show you how to make a snowman from socks.  This is an adorable snowman stuffed toy that any child will love to snuggle with.  And, if the child helped your make it…. they will enjoy it even more.  This is a great winter time craft that can be enjoyed by children young and old.

Check out our other Winter Crafts and Sock Crafts.

Step by step tutorial offered by Laura from Dacian Moon Handmade


Materials Needed

– striped sock
– white fabric
– filling material (I used some cotton pads broken into pieces)
– scissors
– ribbon
– black paint
– needle and thread


Step 1

Measure the width of the socks on the fabric folded in two…


… and cut it out.


Sew the two sides together, letting an opening on the upper part.


Like this.


Turn it to the other side.


Step 2

Shred the cotton pads into small pieces…


… and fill the sewed white fabric with it.


Like this.


Tie the open end with the ribbon.


Step 3

Use a thread to separate the 3 snowballs of the snowman.


Like this.


Step 4

Cut off the upper part of the sock …


… then cut that part in half.


Dress the snowman with one, as a shirt.


Put the other one on its head, as a cap.


Use the ribbon to tie the cap to keep it in place.


Draw eyes, mouth and buttons on your snowman using black paint.


Check out this adorable sock snowman.  You can give this to a friend or family member…. or enjoy it for yourself.

Technorati Tags: , , , , , , , , , , , ,

How to Make a Sock Baby Doll

I have a fun craft for you today.  In this post I’m going to show you how to make a Sock Baby Doll.  That’s right…. it’s a baby doll made out of a sock.  This craft is a great way to put to use those socks that no longer have a match.  Plus, you probably have all the materials needed for this craft in your house… so no need to buy any more materials.  Give this sock baby doll to your best friend…. or better yet keep it for yourself.  The choice is yours.  So, let’s get started.

Check out our other Sock Crafts or Doll Making Crafts.


How to Make a Sock Baby Doll


Materials Needed

Sock

Scissors

Needle & Strong Thread

Stuffing

Black Marker (optional)


Step 1


Cut a sock where you see dashed lines


Cut a sock where you see dashed lines… to look like this…


After cutting, the above pieces are what you should see.


After cutting, the above pieces are what you should see.


Step 2


Turn sock so top hole is in the front as in image B.


Turn sock so top hole is in the front as in image B.


Sew front and back of each leg together as shown.


Sew front and back of each leg together as shown.


Step 3


Stuff the legs and sew hole closed.


Stuff the legs and sew hole closed.


Step 4


Turn doll around so that sewn up hole is in the back.


Turn doll around so that sewn up hole is in the back.  Gather and draw in with strong thread the section shown in the image above.


Step 5


Draw or sew a face on.


Draw or sew a face on.


Step 6


Fold each square in half.


Fold each square in half.


Sew sides with dashed lines.


Sew sides with dashed lines.


Fill with stuffing.


Fill with stuffing.


Sew shut.


Sew shut.


Step 7


Sew on arms.


Sew on arms.

Awesome job…. you just finished making your Sock Baby Doll.   How did your baby doll turn out?  Let me know in the comments below.  Also, take a picture of your sock baby doll and add that to your comment as well… I’d love to see it.

Technorati Tags: , , , , , , , , ,

How to Make Pilgrim Girl Puppets

Pilgrims are an important part of Thanksgiving.  After all, if it wasn’t for the Pilgrims we would have no Thanksgiving at all.  Today I will show you how to make a Pilgrim Girl Puppet perfect for the Thanksgiving Holiday.  It is a fun craft that you can make out of things that you probably already have in your home…. such as a shirt sleeve, sock and glove.  So, let’s get started.

Check out our other Thanksgiving Crafts and Puppet Crafts.


How to Make Pilgrim Girl Puppets


Materials Needed

Shirt Sleeve

Sock

Cotton, Filling or Laundry Lint

Rubber Band, String or Yarn

Yarn

Permanent Marker

Glove

White Fabric or Felt

Ribbon

scissors

Glue


Step 1


Cut shirtl sleeve.


Measure 12 – 15 inches from the end of a shirt sleeve…. cut the sleeve.


Step 2


Cut part of sock off.


Cut part of sock off.


Step 3


Fill sock with cotton, filling or laundry lint.


Fill sock with cotton, filling or laundry lint.  Then close with rubber band or tie closed with yarn or string.


Step 4


Glue yarn on top of head for the hair.


Glue yarn on top of head for the hair.  Use permanent marker to draw eyes, nose and mouth.


Step 5


Glue head to top of sleeve.


Glue head to top of sleeve.  Cut a slit on both sides of the sleeve.


Step 6


Push thumb and pinky of glove into slits you made in the sleeve.


Push thumb and pinky of glove into slits you made in the sleeve.


Step 7


Cut a 6 inch by 6 inch piece of white fabric or felt.


Cut a 6 inch by 6 inch piece of white fabric or felt.  Then cut an X shaped slit in the center of this square.


Step 8


Pull square over girl's head


Pull square over girl’s head (that is why we cut the letter X slit).  Glue square to sleeve.


Step 9


Glue white rectangle of felt or fabric to long ribbon for girl's apron.


Glue white rectangle of felt or fabric to long ribbon for girl’s apron.


Step 10


Cut white rectangle of felt.


Cut white rectangle of felt.


Step 11


Curl the ends of the felt.


Curl the ends of the felt.  Now place the white rectangle to top of head as the bonnet and glue into place.  Glue or tie apron to sleeve.


Finished Pilgrim Girl Puppet.


Place hand in puppet.  Use center finger to tip the head.  Use pinky and thumb to move the puppet’s hands.

Now you have your finished Pilgrim Girl Puppet.  Isn’t she a cutie?!  How did you puppet turn out?  Make sure to let me know in the comments below.  You can even take a picture of your puppet and share it with me in the comment.  I’d love to see it.

Technorati Tags: , , , , , , , , , , , ,

How to Make a No-Sew Water Bottle Holder

I have a very useful craft for you today.  I’m going to show you how to make a No-Sew Water Bottle Holder.  No more holding on to a wet and cold water bottle with your bare hands.  The water bottle cover-up will keep your hands nice and warm while keeping your water bottle cold.  Let’s do it.

Check out our other No-Sew Crafts.


How to Make a No-Sew Water Bottle Holder


Materials Needed

2 Different Color Socks

Water Bottle

More than 48″ of String

Beads

Scissors


Step 1


Cut cuffs off 2 socks in different colors.


Cut cuffs off 2 socks in different colors.


Step 2


Place one cuff over bottle up to the very top.


Place one cuff over bottle up to the very top.  Tie closed with 48 inch long string.


Step 3


Cut slits at the top of the socks like in image above.


Cut slits at the top of the socks like in image above.  Pull string through slits.


Step 4


Place beads on string and then tie strings closed.


Place beads on string and then tie strings closed.


Step 5


Turn second sock inside out.


Turn second sock inside out.


Step 6


Tie cut end closed with string.


Tie cut end closed with string.  Turn right side out.


Step 7


Now your item looks like this.


Now your item looks like this.


Step 8


Pull second sock over first sock.


Pull second sock over first sock.


Finished water bottle holder


There you have it.  You just finished your No-Sew Water Bottle Holder out of socks.  Now grab your water bottle with holder and go off and have some fun.

Technorati Tags: , , , , , , , ,

How to Make No-Sew Stuffed Puppy Dog Animal Toy with Socks & Rubber Bands

Today we will show you how to make stuffed puppy dogs out of socks and rubber bands. This craft will probably take less than 10 minutes for you…it is that easy. These are no-sew stuffed animals…that is right…no sewing necessary at all. If you like sock monkeys, but you were too lazy to make them, then this arts and crafts project is for you. Have fun.

You Might Like Our No-Sew Baby Doll Craft

You Might Like Our Other No-Sew Crafts


How to Make No-Sew Stuffed Puppy Dog Animal Toy


How to Make No-Sew Stuffed Puppy Dog Animal Toy with Socks & Rubber Bands

Crafts Materials Needed

– Stretchy Socks – I used Knee High Girls Socks
– Small Rubber Bands or Yarn
– Buttons or Sharpie Marker or Fabric Markers or Needle and Thread
– Stuffing
-Scissors

Step 1


Step 1 : Start Sock Doggy with a Sock


Take out your sock….preferably socks that are stretchy and ones that have an interesting pattern or color.

Step 2


Step 2 : Put Stuffing in the Sock


Put your stuffing in to your sock…put it all the way down to the tip of the sock.

Step 3


Step 3


Now on the side ‘A’ (pictured above), form a ball by making sure that some of the stuffing is at that corner and then just pushing down with your thumbs to form a ball.

Step 4


If this stuffed dog is being made for a younger child (under 3 or 4 of age) you should use yarn instead of a rubber band, just in case it comes off…you never know what a child will put in his or her mouth and chock on. If you use a rubber band just put the rubber band around the ball until it is tight. If you are using yarn, wrap it around that ball-shape and tie knots and wrap it around more and tie more knots…then cut it off.

Step 5


Now you should do the same thing for the other dog paw, side B.

Step 6


Now put stuffing above the paws for the puppy dog’s belly area.

Step 7


Now make 2 arms the same way that you made the paws.

Step 8


Tie the yarn or rubber band next for the neck.

Step 9


This is what the real thing looks like so far.

Step 10


Add stuffing to the sock for the puppy dog’s head and then again, tie off with rubber band or yarn.

Step 11


This is what the real puppy dog looks like so far.

Step 12


Now cut the remaining sock (the part above the head and rubber band) in the center….like you see above.

Step 13


Now on each side – there are 2 sides – cut in 3 slits. So basically you have 6 slits in all then.

Step 14


Now braid each side. If you don’t know how to braid…then visit the Wikipedia page on braiding.

Step 15


Now rubber band each side in a loop.

Step 16


Now rubber band both loops together in the center.

Step 17


How to Make No-Sew Stuffed Puppy Dog Animal Toy


Cut off the excess that was on the top of the 2 loops (you will be cutting off the rubber bands too from step #15)

Step 18


Now this is what your doggy will look like.

Step 19


How to Make No-Sew Stuffed Puppy Dog Animal Toy


If you want to…glue on button eyes and nose. If your parents are around, ask them to hot glue them on, otherwise use fabric glue. If you have a sharpie or paint, make the dog’s mouth too.

I hope that you had a lot of fun.

You Might Like Our No-Sew Baby Doll Craft

You Might Like Our Other No-Sew Crafts

Technorati Tags: , , , , , , , , , , , , , , , , , , , ,

How to Make Easy No-Sew Sock Dolls Crafts Idea for Kids

Today we will show you how to make dolls out of socks. This craft will probably take less than 10 minutes for you…it is that easy. These are no-sew dolls…that is right…no sewing necessary at all. If you like sock monkeys, but you were too lazy to make them, then this arts and crafts project is for you. Have fun.

You Might Like Our No-Sew Puppy Dog Craft

You Might Like Our Other No-Sew Crafts


How to Make Easy No-Sew Sock Dolls Crafts Idea for Kids


How to Make Easy No-Sew Sock Dolls Crafts Idea for Kids

Crafts Materials Needed

– Stretchy Socks  – I used Knee High Girls Socks
– Small Rubber Bands or Yarn
– Buttons or Sharpie Marker or Fabric Markers or Needle and Thread
– Stuffing
-Scissors

Step 1


Step 1 : Making No-Sew Sock Monkey Dolls Crafts Project


Take out your sock.

Step 2


Step 2 : Making No-Sew Sock Monkey Dolls Crafts Project


Put stuffing in your sock…all the way down to the tip of the sock.


Step 3


Step 3 : Making No-Sew Sock Monkey Dolls Crafts Project


Now on side ‘A’, form a ball by making sure that some of the stuffing is at that corner and then just pushing down with your thumbs to form a ball.

Step 4


Step 4 : Making No-Sew Sock Monkey Dolls Crafts Project


If this doll is being made for a young child (under 3 or 4 of age) you should use yarn instead of a rubber band, just in case it comes off….it could be a choking hazard. If you use a rubber band just put the rubber band around the ball until it is tight. If you are using yarn, wrap it around that ball-shape and tie knots and wrap it around more and tie more knots…then cut it off.

Step 5


Step 5 : Making No-Sew Sock Monkey Dolls Crafts Project


Do the same thing for the other foot, side B.

Step 6


Step 6 : Making No-Sew Sock Monkey Dolls Crafts Project


Now put stuffing above the feet for the baby doll’s belly.

Step 7


Step 7 : Making No-Sew Sock Monkey Dolls Crafts Project


Now make 2 arms the same way that you made the feet.

Step 8


Step 8 : Making No-Sew Sock Monkey Dolls Crafts Project


Tie the yarn or rubber band next for the neck.

Step 9


Step 9 : Making No-Sew Sock Monkey Dolls Crafts Project


Add stuffing to the sock for the doll’s head and then again, tie off with rubber band or yarn.

Step 10


Step 10 : Making No-Sew Sock Monkey Dolls Crafts Project


Now there is extra sock above the head….fold it down over the head to form a hat for the doll.

Step 11


Step 11 : Making No-Sew Sock Monkey Dolls Crafts Project


This is what is should look like…another pic is below.


Step 11 : Making No-Sew Sock Monkey Dolls Crafts Project


This is what the doll looks like so far.

Step 12

Now we have to choose a way to put the eyes on…thinking about the safety of the child we are making it for. If this is for a child that doesn’t put little items in his mouth anymore…then I would say use buttons  – they look super cute. You can either sew the eyes on or you can use either strong fabric glue or hot glue ( in that case, please ask a parent for help so you don’t get hurt.)


Step 12 : Making No-Sew Sock Monkey Dolls Crafts Project


Otherwise, you can sew dolls eyes, use fabric paint or sharpie, permanent markers. If you have any other ideas for eyes, please let me know.


How to Make Easy No-Sew Sock Dolls Crafts Idea for Kids


This is what your doll will look like. He is super cute. And my 4 year old loves this baby doll. She was playing with him for quite a long time and talking to him and feeding him, etc. So I think this craft was a hit.

You Might Like Our No-Sew Puppy Dog Craft

You Might Like Our Other No-Sew Crafts

Technorati Tags: , , , , , , , , , , , , , ,