How To Make a Craft Box With a Used Gift/Shoe Box

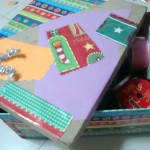
A sturdy shoe or gift box can be transformed into a pretty craft box where you can store your art and craft materials and accessories. A few easy steps to follow, but feel free to use your own creativity.  No need to follow this craft step by step.  Each craft box made will look differently than anybody else’s craft box…. that’s how it should be.  So, grab the materials you need to make your craft box and let’s get started.


Materials Needed

Used cardboard box (gift/shoe)
Wrapping Papers
Colored Scratch Papers
Scissors
Glue/Glue Gun
Ribbons


Step 1

Prepare materials needed. Choose papers and ribbons to use.


Step 2

Place wrapping paper on the bottom and gently press it against the box to create the side’s dimension. With a pair of scissors, cut the paper giving about a half inch more on one side, and the exact measurement on the other side.


Step 3

Glue paper onto the box, folding the extra side to overlap the other side. Continue the same steps until all sides are covered. If your box has a hole handle, you may leave the wrapper until just below the handle.


Step 4

Be more creative when wrapping the box cover. You can partially cover one side and have your kid glue shaped pieces of papers and wrappers. Add a ribbon or two.

And that’s it! Your box is now ready for storing your craft accessories.  Now, you have all your craft supplies in one place so you can find them easily.

Technorati Tags: , , , , , , , , , ,

How To Make a Fresh Flower Bracelet

Spring is so close you could almost taste it.  And, with that being said I thought we would celebrate Spring with doing a craft that is totally about flowers.  Today I’m going to show you how to make a Fresh Flower Bracelet.  If you would prefer you could make this into a garland by making the Fresh Flower bracelet even longer.  The choice is yours.  I used the Temple Flower for this craft.  Fresh flowers look best.  So, let’s get started.

Check out our other Spring Crafts.


Materials Needed

8-10 pieces of fresh flowers (per bracelet, more for garland)
string
needle (medium hole)
scissors


Step 1

Clean flowers, make sure bugs or insects are not present. You do not necessarily need to wash them.


Step 2

Place string inside the needle hole and poke it inside the flower, with its petals facing towards you.


Step 3

With the needle point slightly out on the back, gently pull it out and do the same procedure until the desired length.


Step 4

Check length if it is enough to cover the wrist. With a scissors, cut the string.


Step 5

Make a knot to securely tie both ends. Adjust accordingly.

And, your gorgeous Fresh Flower Bracelet is complete.  Doesn’t it look absolutely beautiful…. and if you used fresh flowers like I did it should smell equally lovely.  Enjoy!!

Technorati Tags: , , , , , , , , , ,

How To Make A Two-Tone Paper Bracelet

Today I’m going to show you how to make a Two-Tone Paper Bracelet.  This craft is a whole lot of fun…. it is even more fun if you grab some of your friends and have them make bracelets with you.  You simply need some colored papers of your choosing, a pair of scissors and glue… that’s it.  This bracelet craft is super simple, but trust me you will enjoy making it.  So, grab those craft materials and let’s get started.

Check out our other Jewelry Crafts.


Materials Needed

colored papers, 2 colors
scissors
glue


Step 1

Using the two colored papers you have chosen, cut 4 inch-wide strips each.


Step 2

Glue ends to form 1 long strip for each color.


Step 3

In a 90 degree form, place strips on top of the other and glue.


Step 4

Fold the one strip on top of the other and alternate folding with the other strip. Continue doing so until the whole strip is used. You should come up with somewhat like a springy form.


Step 5

Put on bracelet and let somebody glue ends to lock the bracelet.

And, there you have it…. you just finished your Two-tone Paper Bracelet.  How did it turn out for you?  Let me know in the comments below.  And, take a picture of the bracelet and post that too…. I’d love to see it.

Technorati Tags: , , , , , , , , , , , ,

How To Make Paper Carnations

Today I’m going to show you how to make Paper Carnations.  Paper Carnations can be used for many things…. Valentine’s Day, for example.  Valentine’s Day is coming up in just a couple of weeks.  These carnations would be beautiful in a bouquet as a gift for your someone special.  Or, for Mother’s Day…. what mother wouldn’t love receiving a bouquet of hand made paper carnations from their child?   They would certainly love it.  Or, just make these Paper Carnations any day of the week to give to someone special as a surprise.  No one could resist them!  So, let’s get started.

Check out our other Valentine’s Day Crafts.


Materials Needed

tissue papers (the one used for wrapping presents)

pipe cleaners/fuzzy wires

scissors


Step 1

Fold tissue paper into portions, enough to make 3 to 4-inch circles.


Step 2

Stack 7-10 pieces of circles and by folding it, make two small slits in the middle. This is where you slip in the tip of the pipe cleaner, then fold it to lock it in place.


Step 3

Starting in the middle, gently fold the paper up, until all the side are pulled upwards.  Continue doing the same for the other papers underneath.


Step 4

When all the papers are up, gently arrange it to form blooming petals of your carnation flowers.


Step 5

Make a bunch of these flowers and you can place it a flower vase for a more attractive look.

Or better yet, make a bouquet of carnation flowers and give it to somebody for Valentine’s Day.  They are sure to love it.  How did your carnation flowers turn out?  Let me know in the comments below.

Technorati Tags: , , , , , , , , , , , ,

A Bowl of Oranges Collage – Craft for Chinese New Year

Chinese New Year is just a few days away…. It falls on January 23, 2012.  Chinese New Year is the most important of the traditional Chinese Holidays.  In honor of Chinese New Year today we are going to make a Bowl of Oranges Collage.  Oranges are passed out freely on Chinese New Year because they represent luck and wealth.  So, I thought this craft would be a perfect craft for Chinese New Year.  You only need a few materials for this craft, so grab them and let’s get started.

Check out our other Chinese New Year Crafts.


Materials Needed

colored papers in different shades of orange

2 construction papers, any color prefered (of different colors)

toy cup

scissors

glue


Step 1

Choose a darker construction paper as your base. Using a toy cup, draw circles on the orange papers.  Using the scissors, cut out the circles. These will be your oranges.


Step 2

Using the other construction paper, cut a shape of a bowl.


Step 3

Arrange oranges on the bowl and glue.

You can add any  embellishments and designs to your bowl that you wish.  In my collage I added extra pieces of the orange papers to decorate the sides of the bowl.  How are you going to decorate your bowl?  Let me know in the comments below.  And, feel free to take a picture of your collage as well and add that to the comments…. I’d love to see it.

Technorati Tags: , , , , , , , ,

How to Make a Pressed Flower Card

Today I’m going to show you how to make a Pressed Flower Card.  This card can be used for any occasion that comes around.  Imagine the excitement of anyone who receives this greeting card.  They are sure to love it.  Made from flowers and construction paper your kids are sure to have a lot fun making this card.  So grab the materials needed and let’s get started.

Check out our other Greeting Card crafts.


Materials Needed

fresh flowers of your choice (can include a little stem and leaves)

Construction Paper (any preferred color and size)

book

glue

scissors

colored pen


Step 1

Make sure flowers are free from insects. Arrange flowers and gently press it against the pages of the book. Leave it there for 2 hours or more.


Step 2

Fold paper crosswise so it resembles a greeting card.


Step 3

When the flowers are ready, gently take them out and place them in the front side of the card… this is to roughly measure if there is enough space. Trimming stems and leaves may be necessary to fit in the card. Be careful when holding the flowers as they are fragile.


Step 4

With a glue, slowly start tracing the stems first. Let glue sit there for about a minute before placing flowers back. Then continue with the leaves, finishing with the flowers.


Step 5

With all parts glued to the paper, press it again with the book and leave it for 30 minutes or so.


Step 6

Check if all flower parts are properly glued. Then using a colored pen, write your message inside the card.


And your card is ready!   How beautiful is this card?!  And, it is unique from any other card…. that makes this greeting card even cooler.  You will find no other card like this.  Now, who are you going to send your first Pressed Flower Card to?

Technorati Tags: , , , , , , , ,

How to Make a Colored Hands Wreath for Martin Luther King Day

Martin Luther King Day is just around the corner.  Martin Luther King Day is always the 3rd Monday in January and it marks Martin Luther King’s Birthday.  Well, today’s craft is in honor of Martin Luther King’s Birthday.  I’m going to show you how to make a colored hands wreath for Martin Luther King Day.  This craft is just perfect for the occasion, in celebration of Martin Luther King’s birthday. The colored hands represents children of different races joining hands in peace and unity.  A few colored papers, a pair of scissors and a glue is what you need.  So, let’s get started.


MATERIALS NEEDED

colored papers, assorted
scissors
glue


Step 1

With the back portion of the colored papers, let your child trace his/her hand with a marker. Do the same to the other paper colors until you have around 7-8 pieces.


Step 2

With a pair of scissors, cut the drawings and set aside.


Step 3

When all hand shapes are cut, arrange it in a circle as if the hands are reaching outwards. Make sure the colors are alternately placed. Glue the outer side so it touches the side of the other hand. Continue doing this until you create a circle that resembles a wreath.

There you have it….. you just finished making your colored hands wreath for Martin Luther King Day.  Doesn’t it look awesome when finished?  Now go hang it proudly for all to see.

Technorati Tags: , , , , , , , , , , , ,

How To Make A Chinese Paper Lantern

Today I’m going to show you how to make a Chinese Paper Lantern.  This craft is ideally for Chinese New Year. But, you can also have your kids do this if you have a Chinese-themed party, or maybe a Chinese activity in school…. or perhaps you would just like to teach your children about the Chinese tradition.  What ever the reason may be your kids are sure to love making this craft.  So, grab the materials needed and let’s get started.

You can go with all red or mix it with other playful colors to have rainbow inspired lanterns. If you want bigger lanterns, you can just adjust paper size accordingly.

Check out our other Chinese New Year crafts.


Materials Needed

colored papers

scissors

glue


Step 1

Fold colored paper in half, lengthwise… then another half, crosswise.  Now you have 4 equal sides. Cut rectangles.


Step 2

Using one rectangle, fold it lengthwise.  On the folded side, cut strips of about 1/4 inch… be careful not to cut it all the way.  Leave about half an inch on the end.


Step 3

Open fold and using glue, attach both ends, with the strips vertically positioned.  You can cut a short strip of the same color paper and attach it on top of the standing lanterns, as its holder.


Step 4

Do the same steps to do some more lanterns, varying colors if preferred.

You can leave it on a table as a decoration  or you can get some string and hang them from the ceiling.  Whatever way you decide to present these lanterns they are sure to be a big hit.  How did your lanterns turn out?  Let me know in the comments below.

Technorati Tags: , , , , , , , , , , ,

How To Make a Paper Doll Chain

Have you ever wanted to know how to make a paper doll chain?  Well, if so…. I am going to be showing you how to make that today.  You can use old paper items like newspapers, paper bags or scrap paper.  I used 8×11 used bond paper, with printed items on one side.  But, feel free to use any kind of paper.  This is a fun craft, so let’s get started.

Check out our other Paper Folding activities.


MATERIALS NEEDED:

Sheet/s of Paper
Scissors
Crayons or Markers
Glue


Step 1

Cut a long wide strip of paper, with the dimensions depending on how big you want the paper dolls to be.  Fold the paper accordion-style, crosswise in about 1-2 inches. You should come up with neat rectangles with identical folded triangles underneath it.


Step 2


Trace a boy or girl on the front fold


Use template to trace a boy or girl on the front fold… Make sure both arms and feet are along edges.


Step 3

With a scissors, cut in the half-shape of the doll. You can make variations, like cutting one for boys, and another one for girls. Make sure the hands are on the same vertical side so it will be easier to connect the dolls.


Step 4

Pull the paper dolls apart and you should get a chain of paper dolls.   Using your crayons and markers, draw faces and design the dolls’ clothing. You can also cut colored paper shapes to use as a design on the dresses.


Step 5

Connect one paper doll hand to others, to have a longer chain.


And, there you have it.  You have just made a Paper Doll Chain.  Don’t forget to let me know how they turned out.  Share your picture in the comments below.

Here is a video we made on how to make a paper doll chain.

Technorati Tags: , , , , , , , ,

How to Make Pencil Toppers Using Pipe Cleaners

A very simply craft that your kids can do. As easy as 1-2-3. You can do this to add a little fun to your kid’s pens or pencils. Or this can also make a pretty present.

How to Make Pencil and Pen Toppers to Decorate Them for Back to School

Crafts Materials Needed:

pencils, pens

pipe cleaners/fuzzy wires

craft foam shapes

glue

How to Make This Craft:

Step 1

1. Holding the pipe cleaner on your right hand and the pencil on the other. With your left hand, holf the tip of the wire and gently push it against the pencil and swirl it around until you reach the other end.

Step 2


2. With the wire secure in place,  get any foam shape of your liking. Glue it to the upper tip of the wire.

Step 3

3. Gently slide the wire up the pencil, with only half of the wire hugging the pencil now. And you have a cool pencil topper!

Here is our video on how to Make Pencil Toppers.

Technorati Tags: , , , , , , , ,