How to Make a Bow Tie for New Year Eve Party

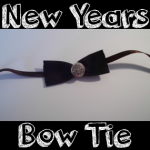
Are you allowed to stay up until midnight on New Years Eve and want to look all dressed up and spiffy? Here is a cute craft for kids to make a bow tie to wear an outfit with a classic style, perfect for any New Year party. Here is the step by step tutorial offered by Laura from Dacian Moon Handmade

You Might Also Like Our Other New Years Crafts


How to Make a Bow Tie for New Year Eve Party


How to Make a Bow Tie for New Year Eve Party

CRAFTS MATERIALS NEEDED:

– material or canvas (a rectangle of  about 8 cm x 5 cm)
– metallic button
– scissors
– ribbon
– needle and thread


IMG_3019


Step 1.

Fold the canvas in two lengthwise.


IMG_3020


Sew the two sides together…


IMG_3021


Like this.


IMG_3022


Step 2.

Bend so that the cloth will be sewn on center.


IMG_3023


Sew the new edge…


IMG_3025


… like this.


IMG_3027


Sew the other edge too.


IMG_3028


Step 3.

Turn it back in front.


IMG_3029


Make a seam in the middle, parallel to the edges.


IMG_3034


Pull the thread…


IMG_3035


… like this.


IMG_3036


Step 4.

Put the button on the needle…


IMG_3037


… and sew it over the middle seam.


IMG_3039


Step 5.

Cut the ribbon in half…


IMG_3041


… and sew it on the back of your bow…


IMG_3042


… like this.


IMG_3043


Your chic bow tie is ready.


IMG_3044


And there you have it, a cute little bow tie to wean on New Years Eve to celebrate the New Year in style! I hope that you had fun!

You Might Also Like Our Other New Years Crafts

Technorati Tags: , , , ,

How to Make a New Years Cube Dice Time Capsule to Celebrate the New Year

Bored and don’t know what to do on New Years Eve or New Years Day? 
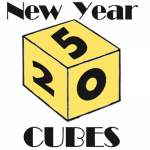
How about making a cube with the numbers 2015 (or whatever year it happens to be when you see this tutorial). A fun thing to do is to write a letter about what you hope for the following year. Put it inside the cube. Don’t look at it until the following year. See how things have changed or if things turned out the way you hoped they would. Or you can just roll it around, toss it around, or just put it up on a shelf.

You Might Also Like Our Other New Years Crafts

How to Make a New Years Cube Dice to Celebrate the New Year


How to Make a New Years Cube Dice to Celebrate the New Year


Step 1

Print out the correct template. This year, you would print out 2015 (but I also included up to 2020) for future New Years. You can either choose, aqua, pink, yellow, or black and white.

2015 Templates


2015-new-years-dice-aqua


2015-new-years-dice-bw


2015-new-years-dice-pink


2015-new-years-dice-yellow


2016 Templates


2016-new-years-dice-aqua


2016-new-years-dice-bw


2016-new-years-dice-pink


2016-new-years-dice-yellow


2017 Templates


2017-new-years-dice-aqua


2017-new-years-dice-bw


2017-new-years-dice-pink


2017-new-years-dice-yellow


2018 Templates


2018-new-years-dice-aqua


2018-new-years-dice-bw


2018-new-years-dice-pink


2018-new-years-dice-yellow


2019 Templates


2019-new-years-dice-aqua


2019-new-years-dice-bw


2019-new-years-dice-pink


2019-new-years-dice-yellow


2020 Templates


2020-new-years-dice-aqua


2020-new-years-dice-bw


2020-new-years-dice-pink


2020-new-years-dice-yellow


How to Put These New Year Cubes Together

After you print out the cube template with the right color and year, then you are going to want to cut it out and then fold on the dotted lines and on the tabs. And then glue the cube together. We already made cubes in another New Years tutorial, why don’t you check out the pictures on that folding tutorial, it is exactly the same. BEFORE YOU CLOSE THE CUBE: Write a note and place it inside the cube. Don’t peek until the following year. See how things have changed since you wrote the note.

There really isn’t much that you can do with this cube, other than put it up somewhere or toss it around with your friends. It is just a cute craft that gives you time to think about the year gone past and the year yet to come. I hope that you enjoy it.

You Might Also Like Our Other New Years Crafts

Technorati Tags: , , , , , , , , , , , ,

How to Make a New Year Countdown to 12 Clock Craft for Preschoolers and Kids

Here is a fun craft for younger kids who can’t stay up to 12:00 yet. You can make a countdown to 12  and have a pre-party with your young children, counting down to 12. This way your children don’t feel like they missed out on any of the New Year celebrations. Step by step tutorial offered by Laura from Dacian Moon Handmade

Check out our other New Years Crafts


NYclock


How to Make a New Year Countdown to 12 Clock Craft for Preschoolers and Kids

CRAFTS MATERIALS NEEDED:

– 2 sheets of blue paper
– paper glue
– white paper
– scissors
– pencil
– eye pin (or a brass fastener)
– crystal (optional)
– 1 auto-adhesive star
– 2 pieces of chenille stem (pipe cleaners)


IMG_3109


Step 1.

Cut the sheets of blue paper in half, lengthwise. You will have 4 rectangles.


IMG_3111


Step 2.

Accordion fold them.


IMG_3112


Like this.


IMG_3113


Step 3.

Apply a layer of glue on the last fold and stick it to the first on the next paper accordion.


IMG_3114


Repeat until you complete the circle.


IMG_3123


Like this.

NOTE: if the space in the middle is too big, put a small piece of tape on the back. It will keep it in place.


IMG_3124


Step 4.

Remove the protective foil of the star and place it on the middle. Like this.


IMG_3125


Cut 4 small rectangles of white paper and write on them „12”, „9”, „6”, „3”.


IMG_3127


Apply a layer of glue on one of them (on the back, of course) …


IMG_3128


… and place it on the clock, in its place.


IMG_3129


Do the same for the other ones.


IMG_3130


Step 5.

If you want to put a crystal or a bead on the eye pin, you can do that now. (Don’t use small beads or crystals with very young children). Put the crystal on the eye pin…


IMG_3132


… then wrap a piece of chenille around the pin, like this.


IMG_3134


Add the second piece of chenille. It will look like this.


IMG_3135


Put the pin through star, fix the chenille steams to point almost at 12, and the clock is ready !


IMG_3136


And there you have it. Use this cool clock to have an early countdown to 12:00 New Year Party! Have Fun!

Check out our other New Years Crafts

Technorati Tags: , , , ,

How to Make a Pair of Party Earrings for New Years

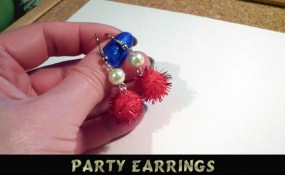
New Years is just around the corner and before New Years  the New Years Eve Parties begin.  Why not wear an amazing pair of earrings to this years New Years Eve Parties.  Today I’m going to show you how to do just that…. I’m going to show you how to make a pair of party earrings for New Years.  These New Years earrings have a lot of flash…. perfect for New Years Eve.  And, these earrings don’t have to be just worn on New Years Eve…. they are so beautiful you will want to wear them year round.

Check out our other New Years Crafts and Jewelry Crafts.

Step by step tutorial offered by Laura from Dacian Moon Handmade


party earrings


Materials Needed

– 2 sparkle pom-poms
– 2 glass pearls
– 2 head pins
– 2 eye pins
– 2 earring findings
– 1 flat nose pliers


IMG_3062


Step 1

Take a head pin…


IMG_3063


… and put it through a pom-pom.


IMG_3064


Use the pliers to make a loop…


IMG_3065


… like this.


IMG_3066


Step 2

Take the eye pin…


IMG_3067


… and put a glass pearl on it.


IMG_3068


Cut the extra pin (with your pliers if it has a cutting side. If not, you’ll need a cutting pliers too), then make an open loop.


IMG_3069


Put the earring finding through the loop…


IMG_3070


… and close it. Like this.


IMG_3071


Step 3

Open the eye of the pin…


IMG_3072


… and put it through the loop of the pom-pom.


IMG_3073


Close the pin’s eye and you have an earring.


IMG_3074


Repeat to make the second one. Now is time to shine at the party.


IMG_3077


Aren’t these New Years Earrings beautiful?  I am sure you will get tons of compliments about these earrings…. even well after New Years Eve has passed.

Technorati Tags: , , , , , , , , , , ,

Some Really Cool Perpetual Calendar Crafts for the New Year


Some Really Cool Perpetual Calendar Crafts for the New Year


Today I am going to show you a bunch of some really cool perpetual calendar crafts perfect for the upcoming New Year.  What is great about perpetual calendars is that they can be changed to show any combination of day, month, and year….. which means that the same calendar can be used year after year after year.  Sure, you can purchase a perpetual calendar at a store or online, but I am pretty sure you would spend way too much money and they wouldn’t be as awesome as the perpetual calendars I have listed here.  I have scoured the internet to find you some really cool perpetual calendar crafts.  You will surely find one here that will fit your needs.

Check out our other New Years Crafts and Calendar Crafts.

Some Really Cool Perpetual Calendar Crafts for the New Year

(1)  Nut Can Perpetual Calendar Craft


Nut-Can-Perpetual-Calendar


This is a super cool Perpetual Calendar.  Made from a nut can this perpetual calendar is quite unique.  If you look closely at the image above this perpetual calendar even has a choice for mood.  In this case they chose nutty.  Check this craft out at Design Sponge.


(2)  Perpetual Button Calendar


Perpetual-Button-Calendar


This perpetual calendar is super duper cute.  Make it once, and you can use it forever – just move the numbers to their correct location each month, and change the nameplate!  How fun is that?!  I found this craft over at MakeZine.  Check it out for yourself.


(3)  Paper Box Perpetual Calendar


Paper Box Perpetual Calendar


This is one of our very own perpetual calendar crafts.  Here we use some colorful templates that you glue together to make boxes.  Add some popsicle sticks and you have yourself a perpetual calendar.  Check out our Paper Box Perpetual Calendar for all the details.


(4)  Corkboard Perpetual Calendar


Corkboard Perpetual Calendar


I love the idea of this corkboard perpetual calendar.  Here they use a corkboard and foam to give this perpetual calendar a colorful look.  The corkboard is a wonderful material to use as you can easily thumbtack your notes and errands to the corkboard perpetual calendar to remind you what you need to get done.  Check out Michaels for all the craft details.


(5)  Scrapbooking Paper Perpetual Calendar 


Scrapbooking Paper Perpetual Calendar


I found this perpetual calendar craft at Our Big Earth and it is a wonderful idea.  Here they use coordinating scrapbooking paper to give this a unique look.  This is a flip chart type of calendar…. so it would be great for any desktop.  Check out the site for all the details.


(6)  Magnetic Perpetual Calendar


Magnetic Perpetual Calendar


This is actually a cookie sheet perpetual calendar.  For this craft she spray painted the cookie sheet, duct tape the edges and used playing card numbers for the days.  She also attached a dry erase board for notes and special events.  Being that everything is on magnets things can be easily moved.  Check out A Creative Princess for the info.


(7)  Colorful Perpetual Calendar


Colorful Perpetual Calendar


Look how beautiful and colorful this perpetual calendar is.   Here she uses 31 pictures to represent the days of the month…. you can cut out these pictures from scrapbooking paper or just use stickers.  I found this perpetual craft at Sandy’s Space.  Check it out for yourself.


(8)  Thrifty Box Perpetual Calendar


Thrifty Box Perpetual Calendar


Aren’t these perpetual calendars just absolutely beautiful?  No one would believe that you not only made them yourself, but also they are extremely thrifty.  I found this craft at Amazing Paper Grace.  Here she uses $1.00 boxes that she found at Michael’s.  Check out all the details on how she puts these perpetual calendars together.


(9)  Perpetual Calendar / Memo Board


Perpetual Calendar Memo Board


This is such a clever idea!!  I found this craft over at Curbly and I love it.  Here they use six steel bars painted with punchy colors, numbered magnets, plus seven days of the week and twelve months combine to make a perpetual calendar, which also serves as a memo board.  This would look amazing above anyone’s desk.


(10)  Perpetual Family Photo Calendar


Perpetual Family Photo Calendar


This is just absolutely brilliant…. and you will surely get so many compliments on this perpetual calendar.  What you might not be able to tell from the above picture is that there are 31 pictures on the twine.  You will simply flip each day/photo as the days pass.  Check out Shaken Together to see it for yourself.


(11)  Flipping Perpetual Calendar


Flipping Perpetual Calendar


I found this perpetual calendar craft at MomClick.    This is a really neat perpetual calendar because it uses the flip-chart idea.  Easily flip between day of the week, months and number days.  This perpetual calendar will look terrific on any desk.


(12)  Perpetual Chalkboard Calendar


Perpetual Chalkboard Calendar


This perpetual calendar is so awesome…. not just because it is obviously a wonderful perpetual calendar.  But, the materials to make this perpetual calendar is really thrifty.  Gotta love that!!  I found this perpetual calendar craft at I Will Craft.   Here she shows you how she made a perpetual calendar with metal flashing, game pieces and some scrabble tiles all in a framed vintage chalkboard.

Technorati Tags: , , , , , , , , , , ,

How to Make a Charm Bracelet with Wishes

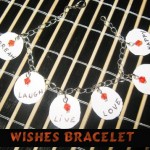
Here is a jewelry craft perfect for the New Year.  I am going to show you how to make a Charm Bracelet…. but not just any charm bracelet.  This charm bracelet is made up solely of wishes…. your wishes.  How beautiful would that be to wear?  So beautiful!!  We all have wishes for the New Year…. and you can proudly wear your wishes around your wrist.  So, come up with your wishes, grab the craft materials… and let’s get started.

Check out our other New Years Crafts and Jewelry Crafts.

Laura from Dacian Moon Handmade will show you how to make it, step by step.


MATERIALS NEEDED

– white cardboard
– crystals
– pins
– jump rings
– chain
– round nose pliers
– pen
– 1 lobster clasp
– optional: varnish – can be even nail polish


Step 1

Draw 6 circles on the cardboard (diameter ~2cm).


Cut them out.


Step 2

Write on them, on the lower part, wishes for the new year.  Some examples: love, hope, laugh, live, happy, dream.


Like this.


Step 3 – optional

Apply a layer of varnish on them – first on one side, let them dry, then on the other. This will extend the life of the bracelet and will protect it from water.

Let them dry well.


Step 4

Using a pin make holes on top of the circles. You can make the holes before varnishing them (it’s easier).


Step 5

Use the pliers to open a jump ring and put it through one circle. Like this.


Do the same for all circles.


Step 6

Place the chain in front of you – it should be of the right size to fit your wrist. (You could use a cord in place of the chain, but then you should make a knot around every jump ring and circle…you will then tie the bracelet to your arm.)


Arrange all the pieces (circle with jump ring) along the chain, to see where all of them will be.


When you know their places, put the jump rings through the chain eyes… like this.


This is the bracelet with all the pieces linked.


Step 7

Take a pin…


… and put a crystal on it.


Make a loop (using the pliers) on the pin end, like this.


Now, put it on one jump ring, in front of the circle.


Close the loop.


Add crystals to all the pieces.


Step 8

Now the only thing you have to do is to add the closure part. Open a new jump ring…


… and link the clasp…


… to the chain. Like this.


The bracelet is ready!


I told you this bracelet turns out beautifully.  Don’t you agree?  How proud would you be to wear this Charm Bracelet around town?  I imagine so proud…. as you made this Charm Bracelet with Wishes yourself.  Enjoy wearing it!!

Technorati Tags: , , , , , , , , , , , , ,

How to Make a New Years Noisemaker

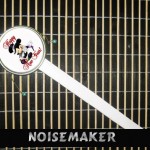
What does every child love to do when the ball drops and we hit the New Year???  Make lots of noise.  And, what’s the best way to make lots of noise on New Years Eve?!  With noisemakers, of course.  Well, instead of buying the store bought Noisemakers…. why not make your own.  The craft is a fun one and the Noisemaker turns out so much better than the store bought ones.  Plus, you get to tell everyone at the New Years Party that you made them yourself.  How cool is that?!  So, let’s get started.

Check out our other New Years Crafts.

Laura from Dacian Moon Handmade  will show you how to make a noisemaker, step by step.


MATERIALS NEEDED:

– a piece of cardboard (a rectangle of about 20 cm x 7 cm)
– 2 tin lids
– craft glue
– scissors
– 1 piece of thick thread (about 15 cm)
– 2 beads
– 2 pins
– round nose pliers (to make the loops on the pins)


Step 1

Place a bead on one pin…


… then make a loop at the end of the pin.


Do the same with the second bead.


Tie them on the ends of the thread.


Like this.


Step 2

Place the thread over one lid, on the middle, like in the picture.


Fold the cardboard until you have a bar.


On the last fold add glue to keep it in place.


Step 3

Apply glue on the middle of the lower part of the lid. Here we will put the handle.


Place the cardboard bar over this glue…


… then put glue on the edge of the lid, over the thread and cardboard, like in the picture.


Place the other lid on top of this and keep it pressed for a couple of minutes, until it is dry.


It will look like this. Let it dry well.


Now you can paint the lids or, like me, glue a cute image over them… and the noisemaker is ready.


Now you are all set to make some noise this New Years Eve.  Why not make a few more and hand them out at your New Years Party.  Your party goers are sure to love them.  Happy New Years!!

Technorati Tags: , , , , , , , , , ,

How to Make a Paper Box Perpetual Calendar

January is almost here.  And, with January comes the need for a new calendar.  But, what if you had a Perpetual Calendar…. or another words a “Forever Calendar”?  If you did you wouldn’t need to change your calendar every year.   You would simply change the date everyday by rotating the numbers and the month.  Well, with that being said…. today I’m going to show you how to make a Paper Box Perpetual Calendar.  The craft is an easy one, but oh so useful.  So, let’s get started.

Check out our other New Years Crafts and Calendar Crafts.


How to Make a Paper Box Perpetual Calendar


Materials Needed

Paper

Printer

Scissors

Glue

Popsicle Sticks

Paint (optional)

Laminating or Cereal Box Cardboard (optional)


Click on the following templates to make larger and print.

Template 1


Perpetual Calendar Template 1


Template 2


Perpetual Calendar Template 2


Template 3


Perpetual Calendar Template 3


Step 1


Print out templates.


Print out templates.  I laminated them…. but no need to do this.  This is optional.  You can alternatively paste them to cereal box cardboard if you want to make them sturdier.


Step 2


Cut all of templates out.


Cut all of templates out.


Step 3


Fold on dotted lines.


Fold on dotted lines.


Step 4


Glue tabs together.


Glue tabs together…. box will come together.


From a different view


From a different view… you can see how box is going to fold together.


See how it is coming together.


See how it is coming together.


you have a cube.


After you fold and paste final side in… you have a cube.


Step 5


The month templates work the same way


The month templates work the same way… cut out… fold on dotted lines.


Glue tabs together.


Glue tabs together.


Fold and paste sides in


Fold and paste sides in and you have a rectangle shape.


Step 6


See how many Popsicle sticks you will need to use so that 2 blocks will fit on it.


To make the stand… I used Popsicle sticks… Mine are bigger than normal so you might need to use more than me.  See how many Popsicle sticks you will need to use so that 2 blocks will fit on it.  Then line them side to side.


Step 7


Glue pieces vertically


Glue pieces vertically (up and down direction) to keep them in place.


Step 8


Glue 3 or 4 sticks at the top.


Glue 3 or 4 sticks at the top.


Step 9


Glue about 10 Popsicle sticks on opposite side of the sticks you added in the last step.


Turn over.  Glue about 10 Popsicle sticks on opposite side of the sticks you added in the last step.


Step 10


Repeat steps 6 and 7 to make a back for stand.


Repeat steps 6 and 7 to make a back for stand.


Step 11


Glue backing to the stack of Popsicle sticks.


Glue backing to the stack of Popsicle sticks.


Step 12


Glue enough Popsicle sticks so that the month block can be pushed out to the front


Glue enough Popsicle sticks so that the month block can be pushed out to the front… like this.


Step 13


It looks nice when you paint it.


It looks nice when you paint it.


Step 14


The blocks can be placed like this


The blocks can be placed like this to display the date.


a calendar you never have to get rid of.


Change the date everyday… a calendar you never have to get rid of.  How did your perpetual calendar turn out?  Where are you going to display your calendar?  Let me know in the comments below.  I’d love to hear about it.

Technorati Tags: , , , , , , , , , , ,

How to Make New Years Resolution Reminders

Today I’m going to show you how to make New Years Resolution Reminders.  A New Years Resolution is something you want to change or do better in the new year.  Such as conserve more water or save electricity, for example.  You probably have different ones.  Well, with today’s craft you will have an easier time remembering your New Years Resolutions throughout the new year, so you can keep working on your New Years Resolutions.  Do you know what your New Years Resolutions will be?  Come up with a few and then let’s get started on the craft.

Check out our other New Years Crafts.

Laura from Dacian Moon Handmade  will show you how to make these resolution reminders, step by step.


MATERIALS NEEDED:

– two pieces of cloth of different colors (I chose blue and white)
– black and white textile paint
– needle and thread
– scissors
– cotton pads
– 6 beads (4 white and 2 blue)
– 9 paper clips


Step 1

Cut one rectangle from the blue cloth ( ~12 cm x 5 cm)


Fold it in half, like this…


… and start sewing the fold.


Near the edge, place a paper clip over the cloth…


… and sew it in place.


Continue to sew the lower part and add the second paper clip near the other edge.


Sew the sides too.


When you finish it will look like this.


Step 2

Take one cotton pad …


… and part it in small pieces.


Put all those pieces inside the blue cloth…


… and sew the upper part too. We made a pillow.


Step 3

On the right upper part, sew 2 white beads…


… like this. Those will be the eyes.


On the middle sew a paper clip – this will be needed to hang the reminders somewhere.


Now we have a blank reminder.


Step 4

Using white paint, write the first resolution. My example, “keep my room clean”.


With black paint, complete the eyes.


Like this.


Step 5

Take a piece of white cloth and follow all the steps above…


… to make a white cute pillow with blue eyes and a new message, “study harder”. Take care that you must have two paper clips on the upper part, to link to the first reminder, and two paper clips on the lower part to link to the next.


Step 6

Make the third cute pillow, blue. You can add as many reminders as you like. Just take care that the last of them should have paper clips only on the upper part.


Link them together and place it somewhere you will easily see. It will help you remember your New Years Resolutions.


And, there you have it…. you just finished your New Years Resolution Reminders.  Isn’t it cute?  What were your New Years Resolutions?  Let me know in the comments below.  Also, take a picture of your craft and share it with your comments…. we’d love to see it.

Technorati Tags: , , , , , , , , ,

How to Make a New Years Party Hat

It just isn’t a New Years Party if you don’t have a New Years Party Hat.  Well, if you don’t have one yet….. don’t worry.  Today I’m going to show you how to make a New Years Party Hat.  And, this hat turns out awesome.  It actually turns out a lot better than any store bought New Years Party Hat you will find.  Made with glitter glue and crystals this party hat is like no other you will find.  So, let’s get started.

Check out our other New Years Crafts.

Laura from Dacian Moon Handmade  will show you how to make it, step by step.


MATERIALS NEEDED:

– white cardboard
– blue paper
– scissors
– pencil
– glue
– blue and silver glitter glue
– auto-adhesive crystals (blue)
– double adhesive band
– 2 candy wrappers


Step 1

Place the cardboard in front of you.


Make a cone from it…


… like this.


Apply a layer of glue on the last corner you roll to keep the cone in place.


Let it dry.


Step 2

Cut the extra part to let the cone stand.


Now we have a blank cone. The next step is to decorate it.


Step 3

Draw three stars on blue paper…


… then cut them out.


Step 4

Take one wrapper …


… and cut it criss-cross, like in the picture.


Now we have a band with one side criss-crossed.


Cut another two (or as many you need to cover the base of the cone.)


Apply a layer of glue on the back of one…


… and place it on the cone baseline.


Step 5

Make some small bands of wrapper…


… like this.


Apply a layer of glue on the upper part of the cone…


… and place the small bands over it…


… like this.


Step 6

Now is time to add the stars on the cone. Take the double-adhesive band…


…cut a small piece and place it on the cone, where you want one star to be.


Take the protection cover off and place the star over it.


Do the same to add the other two stars.


This is the Party Hat ready for the New Years Party.


See, I told you the hat turns out awesome.  Imagine all the compliments you will get on this hat at the New Years Party.  Plus, no one will have a hat like yours.  How did your hat turn out?  Let me know in the comments below…. add a picture too.  I’d love to see it.

Technorati Tags: , , , , , , , , ,

How to Make a Pair of New Years Earrings

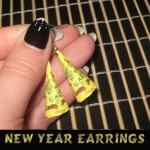
I have a super fun craft for the girls today.  I am going to show you how to make a pair of New Years Earrings.  This craft isn’t as complicated as it sounds…. the earrings are actually made out of paper that is decorated by you.  You can use your imagination to decorate the earrings however you see fit.  Or, if you rather…. you can copy how I decorated my New Years earrings.  Whatever you would like.  So, grab the craft materials and let’s get started.

Check out our other New Years Crafts.

Laura from Dacian Moon Handmade  will show you, step by step, how to make them.


MATERIALS NEEDED:

– yellow paper (or any other color you want your earrings to be)
– colored pen (I used green)
– scissors
– pin
– earring hooks
– 2 jump rings
– glitter glue (I used green, silver and purple)


Step 1

Draw an arc on one corner, like this.


Cut it out.


Use your colored pen to write in the middle “Happy New Year” or “Happy 2012”.


Step 2

Make a cone from it.


Step 3

You will see that the writing is on one side, so we’ll use this side as the front part.


Take the pin and make a hole in the upper part of the cone, like this.


Put a jump ring through it.


Add the earring hook, then close the jump ring.

If the writing does not stay in front (as the earring stays in your ear) you can:

– Open the jump ring and put the hook in reverse (if the writing is to the back side)

– Add another jump ring between the first one and the hook (if the writing is on one side)


It will look like this.


Step 4

Use glitter glue to decorate the cone and let it dry well.


Repeat step 1, 2, 3, 4 to make the second earring.


Now you have cute glittering earrings to wear at a New Years Party.  Did you make your earrings like mine or did you use your imagination to make them differently?  Either way…. I’d love to see them.  Take a picture of them and post it in the comments below.

Technorati Tags: , , , , , , , , , , ,

How to Make a New Years Mask

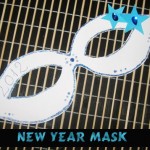
If you are going to a New Years Party I have the perfect craft for you today.  I am going to show you how to make a beautiful and elegant New Years Mask.  Made from cardboard, crystals and glitter glue this mask turns out beautifully.  You are sure to get many compliments on this mask from all who see it.  And, the cool part….. you get to tell them that you made it yourself.  So, let’s get started.

Check out our other New Years Crafts.

Laura from Dacian Moon Handmade  will show you how to make this mask step-by-step.


MATERIALS NEEDED:

– white cardboard
– blue paper
– colored pen (I used blue)
– scissors
– needle and thick thread
– pencil
– glue
– blue glitter glue
– auto-adhesive crystals (blue)


Step 1

Place the cardboard in front of you.  Use a piece of thread to measure how big the mask should be…


… and make the markings on the cardboard, according to your measurements.


Measure again and make the markings for the eyes.


Step 2

Draw the lower part of the mask.


Make an arch in the middle, where the nose will be, like this.


Step 3

Continue with the upper part of the mask – you can make any shape you like. Make an inverted arch in the middle.


Cut out the mask.


Step 4

Draw the eyes…


… and cut them out.


It will look like this.


Step 5

Take the needle with thread and put it through one corner, like this.


On the end of the thread make a knot, then pull the thread.


The knot will stay in the front of the mask. Do the same for the other corner, and now you can use the threads to tie the mask.


Step 6

Right now we have a blank mask. Let’s decorate it!  Use glitter glue to highlight all the edges of the mask…


… like this.


Draw two stars on the blue paper…


… and cut them out.


Add glue on the back of one…


… and place it on one side, over the eye.


Like this.


Add the second one beside it.


On the other side of the mask write 2012 using your colored pen.


Like this.


Now, take two auto-adhesive crystals and place them over the stars.


You can make a more complicated design, if you want. I am adding just some more points with glitter glue.


Now the mask is ready!  Wear it proudly for all to see on New Years Eve.  How did your mask turn out?  Let me know in the comments below.  Don’t forget to take a picture of the mask… you can add it to your comment so I can check it out.  Now, you are ready to celebrate the New Year.

Technorati Tags: , , , , , , , , ,

Crafty Ways to Make New Years Noisemakers


Crafty Ways to Make New Years Noisemakers


New Years is just days away.  And, with New Years comes the celebrating when the ball drops and it is officially the next year.  What is the one thing that it seems everyone does when the ball drops?…. Makes noise and screams, “Happy New Year!!!”   So, today is all about the noise making.  I’m going to show you 10 crafty ways to make New Years noisemakers.  Each of the items have step-by-step tutorials on how to make the noisemakers.  With 10 choices you are sure to find the noisemaker perfect for you.  So, without further ado….

Crafty Ways to Make New Years Noisemakers

(1) Sparkly Firecracker Noisemaker


Sparkly Firecracker Noisemaker


Made from a toilet paper tube and some glitter glue this beautiful noisemaker is quite easy to make…. but sure to be a lot of fun.  Kaboose shows you how to make this firecracker noisemaker for yourself.


(2) Noisemaker Shakers


Noisemaker Shakers


Believe it or not….. these adorable noisemakers are made from empty ribbon spools.  Simply fill the ribbon spools with dried beans or something noisy and you are good to go.  Get the specifics of this noisemaker craft over at Family Fun.


(3) Paper Bowl Noisemaker


Paper Plate Noisemaker


Here is a noisemaker craft that promises to be a lot of fun.  Made from paper bowls, beads and some other fun stuff…. it will surely be a fun noisemaker.  You can find the step-by-step tutorial over at Education.com.


(4) Vintage Noisemaker


Vintage Noisemaker


This noisemaker craft is for the older children and the adults.  The step-by-step tutorial is a little more complicated than the other noisemaker crafts, but this one is sure to turn out beautifully…. and make lots of noise.  You can get the how-to over at Vintage Image Craft.


(5) Paper Plate Noisemaker


Paper Plate Noisemaker


Here is an awesome looking Noisemaker…. and it is sure to be a lot of fun to make.  I love the jewels on top of the paper plate.  I think the decorating will be almost as much fun as the actual noise making will be.  Find out how to make this noisemaker at Kaboose.


(6) Paper Roll Noisemaker


Paper Roll Noisemaker


Here is a noisemaker craft for the youngest of crafters.  You simply need some paper towel rolls, wax paper and items to decorate.  What’s nice is you probably have all the materials you need for this craft at home.  Find out exactly how to make these at MakeAndTakes.


(7) Paper Plate Tambourine


Paper Plate Tambourine


Look how beautiful this noisemaker is when finished.  I love the little jingle bells.  You can decorate your paper plates any way you want to.  I imagine a lot of glitter glue on mine.  You can find the tutorial over at First Palette.


(8) Water Bottle Noisemakers


Water Bottle Noisemaker


Here is a great way to reuse those water bottles you used.  Fill them with beans, rice or something noisy…. decorate the bottles and you are all ready for New Years Eve.  Find out the exact how-to over at Lucky Me.


(9) Raisin Box Noisemakers


Raisin Box Noisemakers


Look how festive these New Years Noisemakers are!!  I love the colorful stickers along with the jingle bell.  You simply fill the raisin boxes with something noisy, cover the boxes, add a stick and decorate.  Do you know how you would decorate yours?  Check out Alpha Mom for the full directions.


(10) Paper Towel Roll Noisemaker


Paper Towel Roll Noisemaker


Here is a simple craft, but promises to be a lot of fun.  Made simply from a paper towel roll and cardstock.  You are probably wondering where the noise comes from since you don’t fill it with any noisy items….. the noise comes from shaking the paper towel roll back and forth.  The paper makes noise by banging into one another.  Get the full directions over at Love To Know Crafts.

And, there you have it…. 10 different crafty ways to make New Years Noisemakers.  Do you know which one you are going to make?  Or, do you have a noisemaker craft of your own?  Let me know in the comments below.

Technorati Tags: , , , , , , , , ,

How to Make a Confetti Blowing Pipe to Celebrate Festivities and Parties for New Years Eve

Tomorrow is New Years Eve so it is time to party (partaaaaaaaaaaaay). So how about making a toy confetti pipe to make cool little fireworks to celebrate the upcoming New Year. We will show you how to do this with the easy illustrated steps below. Have fun.


How to Make a Confetti Blowing Pipe to Celebrate Festivities and Parties for New Years Eve


How to Make a Confetti Blowing Pipe to Celebrate Festivities and Parties for New Years Eve

Crafts Materials Needed

..Pins

..Stiff Paper or Card Stock Paper

..Colorful Paper

..Scissors

..Glue or Paste

Step 1


Step 1 : Making Sparkling Confetti Blowing Pipe to Celebrate New Years Day


Take a strip of stiff paper 3 and 1/2 inches wide and 11 inches long. Cut a hole in one end. Fig 1.

Step 2A


Step 2 : Making Sparkling Confetti Blowing Pipe to Celebrate New Years Day


Paste the 2 lengthwise edges together to form a hollow tube as seen above in fig. 2A

Step 2B


Step 3 : Making Sparkling Confetti Blowing Pipe to Celebrate New Years Day


Pin up the open end nearest to the hole. Figure 2B.

Step 3


Step 4 : Making Sparkling Confetti Blowing Pipe to Celebrate New Years Day


Cut the bowl of pipe in the form of Figure 3, making it about 4 inches across the widest part. Slash the lower edge.

Step 4


Step 5 : Making Sparkling Confetti Blowing Pipe to Celebrate New Years Day


Now paste the pipe-bowl into a funnel shape by bringing the 2 sides together in figure 4.

Step 5


Step 6 : Making Sparkling Confetti Blowing Pipe to Celebrate New Years Day


Fasten the bowl over the hole in the tube. Glue in place as seen in figure 5.

Step 6

cut a bunch of gold, silver, red, blue, yellow, green, and all different types of colorful paper into VERY small pieces. The brighter the colors, the more sparkling and intense the colorful celebratory fireworks will be.

To Play With This Toy Confetti Maker:

To play with this toy, place the open end of the pipe stem to your lips and blow. Grab more paper confetti or take it off the floor and place it back into the pipe bowl. Re-blow the toy confetti pipe.

Technorati Tags: , , , , , , , , , , , ,

Making a New Years Memory Accordion Pocket Book to Hold Precious Memories

It is almost New Years Eve and Day so I thought that I would make a special craft for this special time. It is nice to put aside special treasures, mementos, pictures, certificates, love letters, or whatever else you find important to you. You can use this special fold-up, accordion pocketed book to hold all the memories of this year or next year … and then you can put it away as if it were a time capsule. Then you can try not to look at it for 10 years. You will be surprised at how much you have changed in that amount of time. Have fun.

Making a New Years Memory Accordion Pocket Book to Hold Precious Memories


Making a New Years Memory Accordian Pocket Book to Hold Precious Memories


Crafts Materials That You Need:

..Ribbons
..Decorative Paper (Any Size That You Want…my paper was 11 x 14…but this will also work with 8×11 or any other paper)
..Scissors
..Glue
..Ruler

Step 1


Step 01 : How to Make Accordion Fan Out Memory Scrapbook to Hold Pictures


Take one of your decorative pieces of paper and cut it lengthwise (in half) as you see above.

Step 2


Step 02 : How to Make Accordion Fan Out Memory Scrapbook to Hold Pictures


No bend one of these pieces of paper in half lengthwise.


Step 3


Step 03 : Kids Craft to Make New Years Scrapbook Project for Photos


Now bend it again inwards.

Step 4


Step 04 : Kids Craft to Make New Years Scrapbook Project for Photos


Unfold it…turn it onto its opposite side. It probably will stand up like mind does above. Now fold it inwards again (now it will be in the opposite direction of the original crease).

Step 5


Step 05 : How to Make Accordion Fan Out Memory Scrapbook to Hold Pictures


Like I said above, you are re-creasing the folds in the opposite direction.

Step 6


Step 06 : How to Make Accordion Folding Pocketed Memory Book for New Years Craft for Kids


Now do the same exact thing with the second piece of paper.

Step 7


Step 07 : Kids Craft to Make New Years Scrapbook Project for Photos


Overlap both of these folded pages so that they look like mountains (look at the above picture). Now glue them together.

ALSO CUT OFF THE FIRST OR LAST RECTANGLE.

Step 8


Step 08 : Kids Craft to Make New Years Scrapbook Project for Photos


If you want pockets in your accordion memory book…then follow this step. You will be doing step 1-7 over again….but in half the height. This is for the accordion pockets. Just figure out how high your original accordion fold was and then make 2 accordions half the height.

Step 9


Step 09 : How to Make Accordion Fan Out Memory Scrapbook to Hold Pictures


It is a little hard to see but I have glued the pockets down to the first accordion folds that we made. You should glue it to the bottom and to the creases. Don’t glue the entire thing down or you won’t be able to use them as pockets.

Step 10


Step 10 : How to Make Accordion Folding Pocketed Memory Book for New Years Craft for Kids


This part is a bit complicated and you might need a parent to help you. Don’t over-think it. Basically just put your folded up accordion paper in the middle of a piece of decorative paper….Lightly draw a line around this paper book. Now just take a ruler and draw lines vertically and horizontally across the paper. Now you should have a grid. On the farthest left line draw a triangle at the top and at the bottom of the paper (as seen above). These 2 triangles should be cut out so they are removed from the piece of paper. On the right side of the paper, cut the top and bottom square so that they are removed from the paper. It would be better if you could make these cuts larger than the line (as you see above). Fold on the dashed lines that you see above.

Step 11


After you cut out everything...this is what it should look like.


After you cut out everything…this is what it should look like.

Step 12


Step 12 : Kids Craft to Make New Years Scrapbook Project for Photos


Now fold the middle and left tabs inwards (as seen in the diagram above). Basically fold top left down…bottom left up. Fold middle top down and middle bottom up. Then it will look like the picture above.

Step 13


Step 13 : How to Make Accordion Fan Out Memory Scrapbook to Hold Pictures


Now fold the left over the middle.

Step 14


Step 14 : How to Make Accordion Folding Pocketed Memory Book for New Years Craft for Kids


Now fold the right rectangle into the pocket that you created in the previous step.

This will be one of the covers.

Get another piece of decorative paper and do the same thing that you did in steps 10 – 14.

Step 15


Step 15 : Kids Craft to Make New Years Scrapbook Project for Photos


Yes…I know…all of a sudden my covers turned orange. I messed up the green ones. Anyways. This is what you should have in front of you right now. 2 covers and your accordion paper with pockets (unless you decided not to).

Step 16


Glue Covers to Accordion


Glue the front cover to one side of the accordion and the back cover to the other side of the accordion.

Step 17


Step 16 : Kids Craft to Make New Years Scrapbook Project for Photos


Cut 2 slits in the back of  the back cover because you will be putting ribbon through it and then tying the ribbon in the front of the book.

Step 18 – Finishing up Your Memory Scrapbook


Step 17 : How to Make Accordion Fan Out Memory Scrapbook to Hold Pictures


Draw whatever you want on the front of the cover. You can even draw a picture if you want to. Stick pictures, ticket stubs, invitations, memos, special notes, and other special mementos from this year (or next year) so you can remember your special memories from that year. You can use it as a time capsule. Look at this in ten years if you want to.

Technorati Tags: , , , , , , , , , , , , , , , , ,