How to Make Abe Lincoln Finger Puppets for Presidents Day

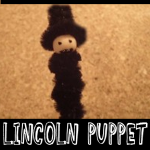
It is February which means that it is time for Presidents Day again. How about celebrating this great holiday with an Abe Lincoln Finger Puppet? Laura from Dacian Moon Handmade  will show you today how to make a Lincoln puppet out of pipe cleaners.

How to Make Abe Lincoln Finger Puppets for Presidents Day


How to Make Abe Lincoln Finger Puppets for Presidents Day


CRAFTS MATERIALS NEEDED:

– black pipe cleaner
– wooden bead (~1 cm diameter)
– instant glue
– scissors
– 2 toothpicks
– black and red paints


IMG_4060


Step 1.

Glue the wooden bead on top of one toothpick – this will be the head.

Start wrapping the pipe cleaner around the toothpick.


IMG_4061


You stop when you go over the middle. Cut the extra pipe cleaner.


IMG_4062


Like this.


IMG_4063


Step 2.

Make a spiral of pipe cleaner…


IMG_4064


Like this.


IMG_4065


Expand bottom to form the hat.


IMG_4066


Step 3. 

Apply glue on the head…


IMG_4067


… and quickly fix the hat there. (Quickly because we use instant glue)


IMG_4068


Step 4.

Use paints to add a beard…


IMG_4069


… eyes …


IMG_4070


… nose and hair.

Your puppet is ready 😀


IMG_4072


I hope that you enjoyed making this finger puppet for Presidents Day. Come back for more crafts.

Technorati Tags: , , , , , ,

How to Make a Patriotic Fan

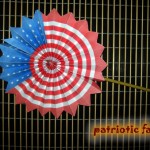
Today I’m going to show you how to make a Patriotic Fan.  Made from a printed-off template, some glue and a flexible straw…. it makes for an excellent decoration to be used on any Patriotic day.  Rather make a fan that is not patriotic?  Not a problem.  Simply print of a template of your choosing and follow the rest of the directions to complete the fan.  Sound good?  Awesome!!  So, grab the materials you need to make the craft and let’s get started.

Check out our other Drinking Straw Crafts.


Materials Needed

– template (found here)
– scissors
– glue
– 1 flexible straw (it is not important that it’s flexible)
– pencil
– stapler


Step 1

Print the template from here.   Cut off the white margins.


Step 2

With your pencil, make markings on the long sides at 1 cm of one another.


Step 3

Accordion fold on the markings…


… like this.


Fold the whole paper.


Step 4

Cut off one corner…


… like this.


Do the same with the other corner.


Step 5

Bring together the two corners of one side…


… and staple them.


Do the same on the other side.


Step 6

Apply a layer of glue on the straw…


… and place it on one crease (on the back side, of course)


And, that’s it. A cute patriotic fan that can be used as a decoration for any Patriotic Day.


Isn’t that an awesome Patriotic Fan?  It’s make for an excellent decoration for any day that you are feeling especially Patriotic.

Technorati Tags: , , , , , , , , ,

How to make a Tricorn Hat Badge

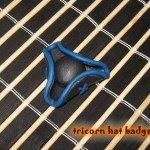
Today I’m going to be showing you how to make a Tricorn Hat Badge.   The Tricorn Hat was a very popular hat in the 18th Century.  The turned-up portions of the brim formed gutters that directed rainwater away from the wearer’s face, depositing most of it over his shoulders.  Well, in this post I’m going to show you had to make this style Hat into a brooch that you can wear.  Because we’ll use oven-hardening polymer clay you’ll need a little help from an adult.

Check out our other Jewelry Pin Crafts.

Laura from Dacian Moon Handmade will show you, step by step how to make this tricorn hat badge.


Materials Needed

– toothpick
– black and blue polymer clay
– roll (you can use anything tubular – I used a vitamins container)
– baking paper
– baking tray
– cutter
– brooch base
– craft glue


Step 1

Cut a piece of black clay.


Condition it by hand, simply mix it and squish it with your fingers. You may want to roll it into a log between your palms, fold it in half, and then roll again.
Finally, make a ball with it.


Step 2

Cut another piece (about the same size as the first).


Condition it too and make another ball.


Place it on a piece of baking paper and flatten it.


Use the roll to flatten it well, until is thin enough.


Like this.


Step 3

Place the ball on the flatten one, in the center.


Step 4

Lift the margins around the ball to form three corners.


Step 5

Take the blue polymer clay…


… and condition it.


Make a roll from it, moving your fingers forward and backward, as in the picture.


Do that until your roll is as thin as the toothpick.


Step 6

Gently, place the blue roll on the edge of the hat, pressing a little bit.


It will look like that.


Cut the extra blue clay…


… and with it make another roll, thinner than the first.


Step 7

Cut the new roll in 6 pieces.


Step 8

Place them two by two into “x’s” on the hat’s sides.


It will look like that.


Step 9

Now you’ll need the help of an adult.
Place the hat (with it’s piece of baking paper) on the baking tray, and bake it according to the instructions on the polymer clay package (they depend on the brand you use: fimo, cernit, sculpey…, but usually it is one half of hour at 230 F or 110 C)


Step 10

Let it cool down.


Step 11

Apply a layer of craft glue on the brooch base…


… place it on the back side of the hat. Let it dry well, and…


… the badge is ready !


And, there you have it…. you just finished making your Tricorn Hat Badge.  How did your badge turn out?  Let me know in the comments below.  And, make sure to take a picture of it too and add it to the comment…. I’d love to see it.  Now, go wear your Tricorn Hat Badge proudly.

Technorati Tags: , , , , , , , , , ,

How to Make a George Washington Wig for President’s Day

Lately I have been showing you some crafts to do for President’s Day.  Well, I’m going to continue with the President’s Day crafting fun by showing you how to make a George Washington Wig.  Made from cotton balls and a large paper shopping bag…. this craft turns out awesome.  Plus, the craft is a lot of fun…. almost as much fun as the child will have running around wearing the George Washington Wig he/she just made.  So, grab the materials needed and let’s get started with this crafting fun.

Check out our other President’s Day Crafts.


How to Make a George Washington Wig


Materials Needed

Large Paper Bag

Pen or Marker

Scissors

Cotton Balls

Glue

Blue Ribbon


Step 1


Draw a number 5 like shape on large bag.


Draw a number 5 like shape on large bag.


Step 2


Now, cut out the shape you drew in last step


Close the bag so it is not open.  Now, cut out the shape you drew in last step so you cut thru both sides.


Step 3


This is the part that will go over your head.


This is the part that will go over your head.


Step 4


Glue cotton balls over the outside of bag.


Glue cotton balls over the outside of bag.


Step 5


Tie ribbon around back for ponytail.


Tie ribbon around back for ponytail.


Finished George Washington Wig


Awesome job… you just finished making your George Washington Wig for President’s Day.  Wasn’t it fun to make?!  Now, put on your wig and act like George Washington.  Fun stuff!!

Technorati Tags: , , , , , , , , ,

How to Make an Abe Lincoln Top Hat for President’s Day

Yesterday I showed you how to make a an Easy George Washington Hat for President’s Day.  Well, it wouldn’t be right to make a hat and celebrate George Washington’s special day if we don’t do the same thing for Abraham Lincoln.  So, today I will show you how to make an Abe Lincoln Top Hat for President’s Day.  After all, President’s Day is about honoring both George Washington and Abraham Lincoln.  And, what better way to honor Abraham Lincoln than to make his top hat.  So, grab the materials needed and let’s get started.

Check out our other President’s Day Crafts.


How to Make an Abe Lincoln Top Hat for President's Day


Materials Needed

Oatmeal Container

Black Felt, Paper or Foam

Paper Plate

Black Paint

Pen or Pencil

Scissors

Glue


Step 1


Grab an Oatmeal Container.


Grab an Oatmeal Container.


Step 2


Take the cap of the rolled oats container and cover with black felt


Take the cap of the rolled oats container and cover with black felt, paper or foam.


Step 3


Put the cap on the box and then wrap black paper, felt or craft foam around the box


Put the cap on the box and then wrap black paper, felt or craft foam around the box.  Leave opening unwrapped.


Step 4


Paint a plate black.


Paint a plate black.


Step 5


Trace the oatmeal box on the center of plate.


Trace the oatmeal box on the center of plate.


Step 6


Draw tabs into circles and then cut out.


Draw tabs into circles and then cut out.


Step 7


Cut out and it will look like this.  Fold tabs inwards.


Cut out and it will look like this.  Fold tabs inwards.


Step 8


Put glue on tabs and glue to inside of box.


Put glue on tabs and glue to inside of box.


Step 9


Let glue dry.


Let glue dry.

And, there you have it…. you just finished your Abe Lincoln Top Hat for President’s Day.  How did it turn out for you?  Let me know in the comments below.  Now, go wear it proudly.

Technorati Tags: , , , , , , , , ,

How to Make an Easy George Washington Hat for President’s Day

President’s Day is coming up later this month…. specifically on February 20th.  On President’s Day we celebrate George Washington’s Birthday.  So, in honor of our first President’s birthday I’m going to show you how to make an easy George Washington Hat.  Your youngest of crafters will love making this George Washington Hat…. almost as much as they love wearing it.  You don’t need many materials for this craft.  As a matter of fact, you probably have most of the materials at home already.  So, grab the materials needed and let’s get started.

Check out our other President’s Day Crafts.


How to Make an Easy George Washington Hat


Materials Needed

Paper

Pen or Marker

Scissors


Step 1


Fold paper in half like picture.


Fold paper in half like picture.


Step 2


Draw a letter 'S' like shape on the paper.


Draw a letter ‘S’ like shape on the paper.


Step 3


Cut out the letter 'S' shape.


Cut out the letter ‘S’ shape.


Step 4


Cut a slit partially thru fold.


Cut a slit partially thru fold.


Step 5


Unfold.


Unfold.

And, there you have it…. you just finished making an Easy George Washington Hat.  How did your George Washington Hat turn out?  Let me know in the comments below.  And, don’t forget to take a picture too…. you can also post a picture with your comment.  I’d love to see it.

Technorati Tags: , , , , , , ,

How to Make Cardboard Tubes Log Cabin for Abe Lincoln on Presidents Day

Well it is going to be February in 2 hours, so I figured that I would put up a Toy Log Cabin Craft Building craft to celebrate Abraham Lincoln’s birthday. Why? Because it is Presisents Day soon. Just use paper and cardboard tubes / rolls and then just connect them together easily.


How to Make Cardboard Tubes Log Cabin for Abe Lincoln on Presidents Day


How to Make Cardboard Tubes Log Cabin for Abe Lincoln on Presidents Day

Crafts Materials Needed

– Paper Towel Rolls
– Toilet Paper Rolls
– Construction Paper or Card Stock
– Scissors

Step 1


Step 1 : Making Paper Towel Roll Log Cabin Craft for Kids


First off, take a piece of construction paper and cut 3 or so long strips out. These will be used to connect the tubes (logs) together.

Step 2


Step 2 : Making Paper Towel Roll Log Cabin Craft for Kids


Fold the pieces of construction paper, these will be the corners of the log cabin to hold the tubes together.


Step 3


Step 2.5 : Making Paper Towel Roll Log Cabin Craft for Kids


For all of the cardboard tubes….make slits parallel to each other…as you see in the picture above.

Step 4


Step 3 : Making Toilet Paper Roll Log Cabin Craft for Kids


Here is a picture illustrating how to put the log cabin together…take the piece of folded paper…and stick the cardboard tube onto the piece of paper by inserting the paper into the slits that are on the tubes.

Step 5


Step 4 : Making Toilet Paper Roll Log Cabin Craft for Kids


Here is one of the folded pieces of paper (corner pieces) with 6 tubes on it. This shows you how we will build the log cabin. You don’t have to follow my directions…lay out the cabin the way that you want to.

Step 6


Step 5 : Making Toilet Paper Roll Log Cabin Craft for Kids


This is how you make windows and doors….you can use toilet paper rolls for the parts around the doors and windows…and use long, paper towel rolls for logs that have to go all the way across the structure.

Step 7


Step 6 : Making Toilet Paper Roll Log Cabin Craft for Kids


Use an entire piece of paper for the roof and then just place it within the four corners of your log cabin house.

Step 8


How to Make Cardboard Tubes Log Cabin for Abe Lincoln on Presidents Day


I hope that you enjoyed this building arts and crafts project to help celebrate Abraham Lincoln’s birthday for Presidents’ Day.

Technorati Tags: , , , , , , , , , , , , , , ,

George Washington’s Camp Paper Folding Crafts Model Craft for Kids to Make for President’s Day


George Washington’s Camp Paper Folding Crafts Model for Kids to Make for President’s Day


Presidents Day is coming up on February 15th this year (2010) and I am posting a great project for teachers to do with their classrooms full of students. This is a great group project to celebrate George Washington’s birthday. This project includes paper folding and cutting and the use of clay. See below for the instructions to make George Washington’s camp. Use this to teach the kids about the Revolutionary War and General George Washington who later became America’s first president.

Make the Soldier’s Tents from Washington’s Camp


Below is the paper folding instructions to make the tent. Get a 4 inch square piece of paper (or cut 4 inches by 4 inches out of a larger piece of paper)


(1) Fold into 16 squares

(2) Fold diagonals of the corner squares.

(3) Cut on these diagonal lines.

(4) Now cut on the solid lines.

(5) Paste square A to square B.

(6) Paste square C to square D.

(7) A slit may be cut in one end and the edges folded out to represent the opening of the tent.

Fold several tents …at least 5 of 6.

Make a Canon for Washington’s Camp


(1) Make the cannon by forming 2 thin circular pieces of clay.

(2) Join these 2 circular pieces of clay with a toothpick.

(3) Make the cannon’s stock with clay and place it between the 2 wheels that you just made.

(4) Make cannon with clay and place on top of the stock that you formed in step #3.

(5) Let clay dry.

Make a Drum and Drum Sticks for Washington’s Camp


Below is the paper folding instructions to make the drum. 


(1) Cut out a rectangle that is about 8 inches x 2 inches long

(2) Make a crease that is about 1/2 inch from the bottom (as seen above).

(3) Make vertical cuts (up and down) from edge to edge along this crease (see the image above).

(4) Paste ends together so that it forms a cylinder-like shape.

(5) Remember when you made all of those cuts along the bottom of this paper…now fold them in.

(6) Cut a circle that fits the cylinder shape that you just made.

(7) Paste this circle onto the slits of paper you just cut and folded in.

To Make the Drum Sticks, you can either use toothpicks or make them from clay.

Print Rifles & US Colonial Flag

Print out these military rifles by (1) right clicking on them to open them in a new window (2) Click on File > Print.


Print out this Colonial US Flag by (1) right clicking on them to open them in a new window (2) Click on File > Print.


Find a chopstick, a stick from outside or other sturdy stick-like object. Fold this Colonial US flag in half and past it around the stick.


Now let the groups of children place their tents and cannons on to the poster board (or cardboard) to represent George Washington’s camp. Attach the flag to the cardboard or poster board by punching it through the board and then placing the Cannons Around it. You can also cut out trees and place them around the camp and if you want, you can place rifles in formation (as seen in the picture above).

Good luck and Happy Presidents Day.

Here are More President’s Day Crafts for Kids

Technorati Tags: , , , , , , , , , ,