How to Make Removable Nail Art for 4th of July : Fun Craft Idea for Independence Day

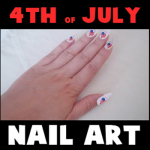
This is an adorable craft idea for little girls and teenage girls on the Fourth of July. By using mailing labels, you can make very patriotic nail art that can be taken off easily after the celebrations have finished. Laura from Dacian Moon Handmade  will show you, step by step, how to have a beautiful 4th July themed manicure.

How to Make Removable Nail Art for 4th of July  : Fun Craft Idea for Independence Day


How to Make Removable Nail Art for 4th of July  : Fun Craft Idea for Independence Day


CRAFTS MATERIALS NEEDED:

– white labels
– pencil
– red marker
– blue marker
– scissors


IMG_5989


Step 1.

Place a finger over one label…


IMG_5990


And draws approximately the contour of the nail.


IMG_5991


Do the same for all the fingers.


1


 Step 2.

Now is time to decorate them. Draw a little heart on each of them.


IMG_5993


Like this.


2


Delineates the left corner of the heart , like this.


IMG_5995


Step 3.

Let’s add some colors. Make the upper left corner of the heart blue (using the blue marker).


IMG_5996


Like this.


IMG_5997


Then, using the red marker, draw the lines on the rest of the heart.


IMG_5998


Like this.


IMG_5999


Repeat for all fingers.


IMG_6000


Step 4.

If you have space, you can write on top of the heart “4 July”.


IMG_6001


Like this.


IMG_6002


Step 5.

Cut them out.


IMG_6003


Now our nail art looks like this.


IMG_6004


Remove the protection foil of the label…


IMG_6005


And place it on your nail.


IMG_6006


This is your cute 4th July themed manicure. It can be easily removed by detaching it from your nails.


IMG_6009


Now you will look amazing at the Fourth of July Parade and cookouts and parties. I hope that you have an amazing Independence Day!

Technorati Tags: , , , , , , ,

How to make Vampire Teeth and Fangs for Halloween

If you want to be a spooky vampire for Halloween, you are going to need a set of fangs for your costume. Here is the easiest way to complete your Halloween costume with vampire fangs / teeth. You will need a disposable fork and little less to complete this craft.  Laura from  Dacian Moon Handmade  will show you, step by step, how to make them.

WARNING: This is only for older kids … and make sure they know to be careful to not swallow the fangs/teeth.


How to make Vampire Teeth and Fangs for Halloween


CRAFTS MATERIALS NEEDED:

– plastic fork
– scissors
– nail file
– straight pliers


Step 1.

Break fork tail.


Like this.


Step 2.

Straighten the edges with scissors so that it remains a convenient length.


Like this.


Step 3.

Use pliers to shorten the teeth in the middle of the fork.


Like this.


Round all edges and corners (using nail file) that will not hurt when you wear them.


Your perfect vampire fangs are ready ! 😀


WARNING: This is only for older kids … and make sure they know to be careful to not swallow the fangs/teeth.

Technorati Tags: , , , , ,

How to Make a Woven Leprechaun Beard with a Cardboard Loom for St. Patricks Day

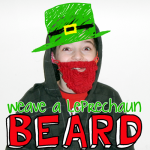
Today we are making a woven yarn Leprechaun beard and we are doing it with a simple cardboard loom. I have seen some crafts online for making crocheted or knitted bears and I figured I would show you a way that you, as a child, can make a fabric beard. This is something you can do, just by  making a cardboard loom. This will be a great homemade Saint Patrick’s Day craft that I know you will have fun making.


How to Weave a Leprechaun Beard


Crafts Materials Needed:

Yarn

Scissors

Cardboard

(Optionally) Packaging Tape

Sewing Needle

Rubber Bands or Hair Rubber Bands

Step 1


step1


Cut a sturdy piece of cardboard that is about 9 inches wide. The height depends on how long you want the beard to be.

 Step 2


step2


If your cardboard isn’t very sturdy and bends easily then you will want to strengthen it by wrapping it in packaging tape. Otherwise, skip this step.

 Step 3


step3


Cut slits, 1/2 inches apart, along the top of the cardboard. Then cut diagonally downwards to make a beard shape. See the picture above.

 Step 4


step4


Now cut a slit across from the slits that you made in the previous step.

 Step 5


step5


I used red yarn, but if you have orange yarn this would probably be better for a Leprechaun. Tape yarn in the first slit as seen in the picture above.

Step 6


step6


I wrapped the yarn in a slightly different way then illustrated here. I then decided this way would be easier so that is why I had to draw the yarn in the picture above. Anyways, this is easy so don’t make it harder than it is. You are simply just wrapping the yarn around the cardboard, and each time inserting the yarn in the slits.

 Step 7


step7


Thread yarn thru a needle.

 Step 8


step8


If you haven’t ever woven anything, you will need to know that you are just putting the yarn under the first thread, then over the next one, under the next one, and so on. Do this now.

 Step 9


step9


Pull yarn thru until there is just a tiny tail of yarn hanging out, as seen in the picture above. To push yarn up, you can use a fork.

 Step 10


step10


When you get to the end of the row, you just turn around and go the other way. If you ended by going over the yarn, then on the next row you will go under the yarn. If you ended the row going under the yarn, in the next row you will go over though.

 Step 11


step11


When your yarn runs out, you will want to push the needled up thru some loops and then cut the yarn loose.

 Step 12


step12


Now you can start a new piece of yarn, just weave it exactly the way you did previously.

 Step 13


step13


Remember we will need a hole in our beard so we can talk thru it and show our mouth. To do this, you just weave back and forth along a few of the outside lines like I did in the picture. After you do a few rows (maybe about 5-6 rows), then you can start weaving along the entire width of the cardboard loom again.

 Step 14


step14


This is what your beard should look like when you finish the entire length of the loom.

 Step 15


step15


I want you to know sew around the border of the mouth. Nothing fancy, just loop around the outside border of the mouth. This will ensure that the yarn won’t come loose. After this cut the inside lines of yarn that you see inside the mouth.

 Step 16


step16


Next cut in half all of the yarn lines in the back of the cardboard loom.

 Step 17


step17


Now you will see that there will be free threads of yarn. Tie them together into knots so your woven beard doesn’t come apart.

 Step 18


step18


Now your beard will look like this.

 Step 19


step19


Now you will need rubber bands. I couldn’t find any normal rubber bands so I used hair bands. However, I believe that normal rubberbands would work better.

Push a rubber band thru the top corner of the beard.

 Step 20


step20


Now push one end of rubber band thru the loop of the other end and pull.

 Step 21


step21


It should now look like this. Do the same exact thing on the other top corner of the beard. If your beard doesn’t fit, you might need two rubber bands looped together on both sides. You basically just put a second rubber band thru the first rubber band…then you loop one side thru the other side (like you did in the last step) and pull.  This is called a rubber band chain…find out how to make one here.


step22


Like in the above picture…

Wear Your Leprechaun Beard


How to Weave a Leprechaun Beard


Now just loop the rubber bands over your ears. Perhaps you would like to put a Leprechaun hat on your head and really play the part. Perhaps make a goofy face like my son did. 🙂 Have a Very Happy Saint Patrick’s Day!!!

How to Make a Fairy Crown for Halloween

Girls love pretending to be Fairys.  They can pretend to be Fairys on any day of the year, but they especially love dressing up as a Fairy on Halloween.  Well, a fairy just can’t truly be a fairy without their Fairy Crown.  In this post I will show you how to make a Fairy Crown for Halloween.  Add this to your Fairy Skirt and Fairy Mask to have the most perfect Fairy Costume this Halloween.  Or, use the Fairy Costume to play dress-up all year long.  Let’s get started with the craft.  NOTE: you will need a little bit of help from an adult for this tutorial.

Check out our other Halloween Crafts.

Laura from  Dacian Moon Handmade  will show you, step by step, how to make this.


fairy-crowns-necklaces


Materials Needed

– 2 pieces of tulle: green and cream colored
– ribbon
– red beads
– needle and thread
– pen
– scissors
– a piece of brown cord
– lighter and pliers or tweezers (with Adult help)


Step 1

Draw 5 circles on cream tulle.


Cut them out.


Do the same with green tulle but make those circles smaller.


Step 2

This is the step where you need help. Fold a circle in quarter


… hold it with pliers and burn it a very little on the edges…. enough to wrinkle a bit.  (Must Have Adult Help.)  It is a very quick move with the lighter.


Do the same for all the circles. If you skip this step, the circles will remain flat.


Step 3

Set the pattern and make a mark where you should have the first circle (flower).


Using needle and thread sew the end of the ribbon…


… twist the ribbon…


… and sew it loose.


It will look like this.


Step 4

When you reach the marker, put a white circle on the needle…


… then a red bead …


and sew it to the spot.


Continue twisting the ribbon and sewing it loose, then add a green circle with a red bead… and so on.


Like this.


Step 5

Take the brown cord and put it through the tube of ribbon, under the first stitch.


Let enough cord free and make a knot.


This will keep the cord in place.

Begin to wrap loosely around the necklace…


… along with flowers, like this.


When you reach the other end pass the cord through the ribbon tube again.


The crown will be tied at the back…


… and it is ready to complete your Fairy costume.


Isn’t this Fairy Crown adorable?  Any Fairy would love to wear this crown.  Make sure to make the Fairy Skirt and Fairy Mask to accompany this Fairy Crown.

Technorati Tags: , , , , , , , , , , , ,

How to Make a Fairy Skirt Costume for Halloween

Earlier today I showed you How to Make a Fairy Mask for Halloween.  But your Fairy Costume wouldn’t be complete if you didn’t have a Fairy Skirt to wear along with it.  I have an easy craft to show you how to make a Fairy Skirt using some green and cream tulle.  Tulle is a wonderfully light material perfect for Fairys.  After all, how else could a Fairy fly around like she does if she wasn’t wearing something light like Tulle.  Your little girl will love this fairy skirt…. she will surely use it well after Halloween is over for dress-up fun.   So, let’s get started.

Check out our other Halloween Crafts.

Laura from Dacian Moon Handmade   will show you, step by step, how to make it.


How to make Fairy Skirts for Costumes on Halloween


Materials Needed

– tulle : green and cream colored
– elastic cord
– scissors


Step 1

Cut strips of tulle with a width of 2 cm. The strips must be twice the length of the skirt.


Green and cream tulle…. When you think you have enough you can begin to assemble the skirt.


Step 2

Take the cord…


… and place it behind  one strip folded in half.


Bring the ends through the loop, over the cord…


… and pull to get a knot.


Add another one…


… and another one… and so on.


Take care to alternate the green and cream strips and all the knots to be oriented in one direction, for the strips to sit well.


Step 3

When you added enough strips, just tie the ends of the cord …


… and the skirt is ready.


 NOTE: I am using a doll as example, but the skirt is actually meant for girls.

What a beautiful fairy skirt to wear over leggings this Halloween.  Make sure to Make the Fairy Mask to wear with this Fairy Skirt…. it will complete your Fairy Costume this Halloween.

Technorati Tags: , , , , , , , , , ,

How to Make a Fairy Mask for Halloween

Little girls love to be Fairys.  They just do.  But, sometimes those store bought Fairy Masks can be a real nuisance to wear during Trick-or-Treating.  Well, I have a treat for you today.  I’m going to show you how to Make a Fairy Mask for Halloween.  This Fairy Mask is made with Tulle so it is wonderfully light.  Not like those plastic or vinyl store bought Fairy Masks…. this mask is simply beautiful.  Plus, your little girl will have a blast making her mask too…. almost as much as wearing it.  Keep an eye out as I will show you How to Make a Fairy Skirt Costume later today.

Check out our other Halloween Crafts.

Laura from  Dacian Moon Handmade  will show you, step by step, how to make this.


fairy-masks


Materials Needed

– mask template (you can download it from here)
– transparent foil
– scissors
– a piece of tulle
– silver textile paint
– silver ribbon
– tape


Step 1

Print the template and fix it on the table with tape.


Place on top of it the transparent foil and fix it with tape.


Over the foil place the tulle and fix it with tape also.


Now the setting is ready.


Step 2

Take the silver textile paint (multi-surface paint will work fine too)…


… and trace the pattern with it.


Take care to follow every swirl and every line and don’t touch the lines you already painted.


When you finish it will look like this. Let it dry overnight.


Step 3

Gently peel tulle away from the transparent foil.


It will look like this.


Cut out around the mask, including eye holes.


Like this.


Cut the ribbon in two and fix them with paint (or with craft glue) to the mask…


… like this.


Let it dry well and your mask is ready.


Didn’t this Fairy Mask come out amazing?!  Any Fairy would love to wear this Fairy Mask for Halloween.  Keep an eye out as I will be showing you How to Make a Fairy Skirt Costume next.

Technorati Tags: , , , , , , , , , ,

How to Make Leather or Vinyl Eyebrows for Halloween

Did you ever notice how by just moving your eyebrows it changes your entire expression on your face?  It’s true.  Eyebrows can make you look happy, sad, mean, angry or mystified.  Well, today I’m going to show you how to make Leather or Vinyl Eyebrows for Halloween.  These eyebrows can change any Halloween Costume to give it that extra special “Wow” factor.  If you want to look mystifying…. it can do that.  If you want to look mean…. eyebrows can do that.  I think you get the idea.  So, grab the materials needed and let’s get started.

Check out our other Halloween Crafts.

Laura from  Dacian Moon Handmade  will show you, step by step, how to make these.


How to make Leather or Vinyl Eyebrows for Halloween


Materials Needed

– a piece of light brown leather or vinyl
– pen
– scissors
– paint markers (green, gold, red)
– spirit gum


Step 1

Using the pen, draw the shape of a brow on leather.


Step 2

We will decorate it with leaves.


Mine looks like this.


Step 3

Cut it out…


… like this.


Turn it over and place it on leather to trace the contour of the other eyebrow.


Step 4

Is time to add some colors.


Use green marker to add an overall color.


With the red one make leaf veins…


… like this.


And with gold add some highlights.


Like this.


Repeat for the other one. Let them dry well.

You can attach them using water – soluble spirit gum… and you can remove them by washing with soap and water.


Imagine how these Eyebrows can change your look for Halloween.   If you are planning on being a Nature Goddess, elf, nymph or fairy these eyebrows can help you pull it off.

Technorati Tags: , , , , , ,

How to Make Devil Horns for your Halloween Costume

Do you have the Halloween costume and the only thing you need are the horns?  Not a problem…. in this post I’m going to show you how to Make Horns for your Halloween Costume.  These horns will add the extra bit of creepiness you are looking for to your costume.  You could have a scary costume all ready, but you add some horns and you just took your Halloween costume to the next level.  Isn’t that what Halloween is all about…. adding a little bit of creepy and scary?  So, grab the materials needed and let’s get started.

Check out our other Halloween Crafts.

Laura from  Dacian Moon Handmade will show you, step by step, how to make this.


How to Make Devil Horns for your Halloween Costume


Materials Needed

– tinfoil
– simple headband
– black multi-surface paint
– red paint marker
– paintbrush
– scissors


Step 1

Cut some strips of tinfoil (4 -5)…


…and begin to wrap the headband with them.


Step 2

Stop when you reach the point where the horns should be.


Take a bigger piece of tinfoil…


… and crumple it…


… to finally have a horn shape.


Make another one.


Step 3

Wrap a strip of tinfoil around one horn…


…fixing it to the headband….


… like this.


Do the same with the other horn and and continue to wrap all the way.


Step 4

Put some black paint on a cardboard…


… and paint the headband using the paintbrush.


Like this.


You have one small thing to do yet: paint the top of the horns with red.


Like this.  Let it dry well.


And, there you have it…. you have just made Horns for your Halloween Costume.  Now, have fun getting dressed up this Halloween!!

Technorati Tags: , , , , , , , ,

How to Make Gloves with Claws for Halloween

Are you still trying to figure out how to add an extra scary effect to your Halloween costume this year?  Well, I just might have the perfect idea for you.  Why not make these Gloves with Claws for Halloween?  They are sure to make any costume you are planning to wear even more scary.  Even if you are planning to be a cat this year…. you can’t do it without claws or your costume is just not finished.  Add these scary Gloves with Claws for a truly scary effect this Halloween.  Let’s get started.

Check out our other Halloween Crafts.

Laura from Dacian Moon Handmade  will show you, step by step, how to make this craft.


How to make a Glove with claws for Halloween


Materials Needed

– gloves
– a piece of black canvas
– scissors
– needle and thread


Step 1

Cut 5 rounded triangles from the canvas.


Like this.


Step 2

Using the needle and thread, sew the lower part of one triangle to one glove finger (where the nails should be)…


… like this.


Do the same for all the triangles / fingers. Repeat for the other glove…


… and they are ready to be worn.


There is something about adding claws to any costume that makes it scary.  Add these scary gloves with claws to your costume and give it an extra creepy effect.

Technorati Tags: , , , , , , , , , ,

How to Make a Toy Sword for Halloween or for Play

With Halloween right around the corner, you might be looking to buy or make a toy sword for your costume. Well don’t go out and buy one, today we will tell you how to make a pretty cool toy sword. Laura from  Dacian Moon Handmade  will show you, step by step, how to make a sword fit for every knight 😉


How to Make Toy Swords


CRAFTS MATERIALS NEEDED:

– ruler
– tinfoil
– tape
– auto-adhesive crystal
– permanent markers : black
– scissors


Step 1.

Place ruler over foil…


… and begins to wrap.


Fold the upper corner like this to make the sword pointy.


It will look like this.


Step 2.

Take another piece of foil…


… and crumples it until you get a bar.


Place it over the sword to form the hilt.


Cut some stripes of foil…


… and wrap the hilt in „x” around the sword.


When you reach the lower part again…


continue to wrap the ruler…


until you feel it comfortable in hand.


Step 3.

Wrap the hilt in tape. Cover a little bit over the horizontal bar to keep it in place.


Like this.


Step 4.

Color the hilt in black…


… like this.


Add the self-adhesive crystal…


And your sword is ready.


Have fun trick or treating.

Technorati Tags: , , , , , ,


15 Spooky Halloween Crafts using Milk Jugs


14 Spooky Halloween Crafts using Milk Jugs


I had no idea how many super cool crafts are out there for Halloween using Milk Jugs.  There are just so many…. and they all are just so cool.   I was searching the internet for some awesomely creepy Halloween crafts and I found some doozies for you.  In this post I have listed 15 spooky Halloween crafts using Milk Jugs.  What’s so wonderful about these Halloween crafts is that they all use milk jugs…. an item that most of us use every day.  So, you are sure to at least have the most important material for these crafts.  Scroll through all 15 of these Halloween milk jug crafts to find some to do with your kids at home.  They will love it.

15 Spooky Halloween Crafts using Milk Jugs

(1)  Spooky Spider


Spooky Spider


Check out this spider.  It’s super awesome and super big…. I love it!!  It will be a wonderful Halloween Decoration this Season.  It is sure to creep out all who see it.  Check out Family Fun to get all the details on this great Halloween Milk Jug Craft.


(2)  Halloween Table Centerpiece


Halloween Table Centerpiece


I don’t know about you, but I’m always looking for a unique way to show off my Halloween spirit with a great centerpiece.  Well, folks I think I found it.  Check out this awesome Halloween Table Centerpiece.  I found it over at The Ramblings of a Crazy Woman and I absolutely dig it!!


(3)  Spirit Jugs


Spirit Jugs


I have a great Halloween Craft for you to use up those extra Milk Jugs you have along with some old Christmas Lights.  Eighteen25 shows us in great detail how to make this amazing looking outside decoration.  By simply decorating a bunch of milk jugs into ghosts you can have a cheap and fun way to decorate the house this Halloween Season.


(4)  Trick-or-Treat Basket


Trick-or-Treat Basket


Every Halloween I look for original ways for the kids to carry their candy.  How about making a unique Trick-or-Treat Basket using a Milk Jug.  I found this great Milk Jug Halloween Craft over at TLC Family.  What is great about using a Milk Jug for this craft is that the Trick-or-Treat Basket will not only be sturdy, but it will be rain proof too.


(5)  Recycled Halloween Windsock


Recycled Halloween Windsock


Here is another fantastic way to use a Milk Jug to make an outside Halloween Decoration.  Here Thrifty Fun shows you how to take a milk jug along with some plastic garbage bags and make a terrific windsock.  The ghost will actually look like he is flying through the night.


(6)  Milk Jug Storm Trooper Helmet


Milk Jug Storm Trooper Helmet


This has got to be one of the most creative ways to use a milk jug for Halloween.  Filth Wizardry shows us step-by-step how to take an everyday milk jug and make it into a storm trooper helmet perfect for dressing up this Halloween.  Any child will not only love making the craft, but using it to dress up too.


(7)  Halloween Monster Yard Lights


Halloween Monster Yard Lights


Here is a wonderfully colorful way to decorate the outside for Halloween.  Take milk jugs and transform them into Monster Yard Lights.  This is a fun way to decorate your yard or walkway and the kids will absolutely love it.  Do you know what they will love even more?  Making them with you.  Check out Crafts by Amanda for all the craft details.


(8)  Milk Jug Pumpkin


Milk Jug Pumpkins


If you are tired of decorating your usual pumpkins…. why not try something a little bit different this year.  Kiwi shows us how to take a milk jug and decorate it into a pumpkin.  Let the kids decorate whatever way they want to come up with unusual and unique pumpkins.  They will become great Halloween decorations and you will create loving memories of the time you made these together.


(9)  Milk Jug Pinata


Milk Jug Pinata


If you are having a Halloween Party this year this is an excellent Halloween craft for you.  You can make this creepy looking Halloween Pinata with the help of Cathie Filian.  Here she describes in great detail how you too can make this one of a kind scary pinata for your next Halloween party.


(10)  Halloween Masks


Halloween Masks


Why not take those extra milk jugs you have and make them into Halloween Masks.  Your kids can be as creative as they would like to.   These Halloween masks are as much fun to make as they are to wear.  Check out TLC Family for all the how-to’s to make this craft.


(11)  Milk Jug Ghost


Milk Jug Ghost


Here is a great Halloween Decoration….. perfect for inside your house.  Because this craft is made with Christmas lights the ghost actually lights up.  Turn off the lights and check out how your Ghost will actually glow.  Spooky, right?  Sure is.  Get all the craft details at She Knows.


(12)  Monster Light Jug


Monster Light Jug


This friendly little monster is not only cute during the day, but also lights up the night!  Not everything about Halloween has to be scary or spooky.  Some little ones just can’t handle too much scary.  For these little ones this Halloween Milk Jug craft is perfect.  Check out Kaboose for all the details on this craft.


(13)  Milk Jug Skeleton


Milk Jug Skeleton


This Halloween Milk Jug Craft is so creative!!  And, it looks like an incredibly fun craft for the kids as well as the adults.  I found this craft over at The Party Animal and I just love it!!  You will need plenty of Milk Jugs for this craft…. 7 to be exact.  But, if your kids drink a lot of milk like my kids… you will have the 7 milk jugs in no time.


(14)  Halloween Milk Jug Lanterns


Halloween Milk Jug Lanterns


I found this creative Halloween craft over at Ladies Home Journal.    In this post they show you how to take Milk Jugs and make them into Skeletons, Frankensteins and Cats.  Line a bunch of these down your driveway or a path to make a spooky lit area for the trick-or-treaters to walk.


(15)  Milk Jug Vampire Candy Holder


Milk Jug Vampire Candy Holder


We just put up our very own Halloween Milk Jug Craft.  We made a Milk Jug Vampire Candy Holder and it’s perfect for Trick-or-Treat night.  You can actually put tons of candy in the mouth and let the Trick-or-Treaters reach in the Vampire’s mouth and take the candy.  They are sure to get a big kick out of this.

Technorati Tags: , , , , , , , , , ,

How to Make Costume Hats

Costume hats are so much fun to make.  There are so many different hats you can make.  You can make a Medieval Hat or a Nurses Hat…. or maybe even a Pirates Hat.  If you are looking for different costume hats to make then you are going to love today’s post.  Today I have a printable diagram of many, many different Costume Hats you can make.  No matter what mood you are in you are sure to find a hat to fit your taste.  So, print of the printable diagram and get started making your hat today.

Check out our other Costume & Dressing Up Crafts.


How to Make Costume Hats


Click on the image below to make the diagram larger and to print off.


Make costume hat ideas


Leave a comment below and let us know what hats you decided to make.  Better yet, take a picture too and leave that with your comment…. we’d love to see them.

Technorati Tags: , , , , , , , ,

How to Make a Leprechaun Hat for St. Patrick’s Day

I don’t know about you, but when I think of a Leprechaun I think of the big, green hat he wears.  Today I’m going to show you how to make your very own Leprechaun Hat for St. Patrick’s Day.  After all, St. Patrick’s Day is only a little over a week away.  Now is the time to get started making and displaying your St. Patrick’s Day crafts.  So, grab the materials needed and let’s get started with this fun St. Patrick’s Day craft.

Check out our other St. Patrick’s Day crafts.


How to Make a Leprechaun Hat


Materials Needed

Large Ice Cream Carton or Bucket

Green Craft Foam or Wrapping Paper

Paper Plate

Green Paint

Pencil

Scissors

Glue

Tape

Belt or Black Foam/Paper & Yellow Paper


Step 1


You need a large ice cream carton or bucket.


You need a large ice cream carton or bucket.


Step 2


Wrap with green craft foam or with green wrapping paper.


Wrap with green craft foam or with green wrapping paper.  Leave hole at bottom.


Step 3


Paint a paper plate green.


Paint a paper plate green.


Step 4


Trace carton in center of plate.


Trace carton in center of plate.


Step 5


Now draw tabs.


Now draw tabs.


Step 6


Cut out.... fold tabs inwards.


Cut out…. fold tabs inwards.


Step 7


Glue and tape tabs inside of container.


Glue and tape tabs inside of container.


Step 8


The easy way to add a belt is to borrow your Dad's belt and strap it on hat.


The easy way to add a belt is to borrow your Dad’s belt and strap it on hat.


Or..... just add black strip of foam or paper.  And, yellow square with center cut out.


Or….. just add black strip of foam or paper.  And, yellow square with center cut out.


Step 9


Wear the hat.


Wear the hat.

Isn’t this Leprechaun Hat adorable?  What child wouldn’t enjoy running around the house wearing this Leprechaun Hat for St. Patrick’s Day?  Enjoy.

Technorati Tags: , , , , , , , , , , , , ,

How to Make an Elegant Mask for Purim

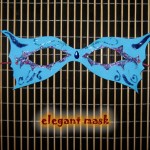
Purim is coming up quickly….. it will be here this year on the evening of March 7th.  So, since Purim is all about hiding ones identity I thought we should make a mask perfect for celebrating Purim.  So, today I will be showing you how to make an Elegant Mask for Purim.  Made from paper and whatever you would like to use to decorate the mask…. the outcome is a Mask that you would be proud to wear.  So, grab the materials you will need and let’s get started.

Check out our other Dressing Up Crafts.

Step by step tutorial offered by Laura from Dacian Moon Handmade


Materials Needed

– colored paper
– leather cord (or any other cord)
– glitter glue (or paint markers / colored pens)
– scissors
– pencil
– synthetic self adhesive crystal


Step 1

Use the cord to measure how big should be the mask…


… and make the markings on the paper, according to your measurements.


Step 2

Draw the lower part of the mask.


Step 3

Make an arch in the middle, where the nose will be.


Step 4

Continue with the upper part of the mask – you can make any shape you like. I made it in the shape of spread wings.


Step 5

Make an inverted arch on the middle.


Step 6

Cut out the mask.


Like this.


Step 7

Measure again and make the markings for the eyes.


Step 8

Draw the eyes…


… and cut them out.


It will look like that.


Step 9

Use the pencil and decorate the mask. I like curved lines and swirls so I used them. I marked the paper near the eyes holes and the corners.


In the middle make space for the crystal.


Step 10

Using glitter glue (or paint markers / colored pens) highlight the decorations. Because my paper is light blue, I use blue glitter glue on the upper part…


… like that,


pink near the eyes…


… like this,


and mauve on the corners.


Step 11

With the scissor make two little holes on the outer edge of the eye holes, like this:


Cut the cord in half.


Make a knot on one side of every half…


… place it through the little holes…
… and the mask is ready to be worn.


Isn’t this mask just simply gorgeous?  Anyone would be proud to wear this elegant mask for Purim.  Did you use your creativity to make your mask differently from mine?  Let me know in the comments below.  And, take a picture of your mask and add that too to the comments…. I’d love to see it.

Technorati Tags: , , , , , , , , , ,

How to Make a George Washington Wig for President’s Day

Lately I have been showing you some crafts to do for President’s Day.  Well, I’m going to continue with the President’s Day crafting fun by showing you how to make a George Washington Wig.  Made from cotton balls and a large paper shopping bag…. this craft turns out awesome.  Plus, the craft is a lot of fun…. almost as much fun as the child will have running around wearing the George Washington Wig he/she just made.  So, grab the materials needed and let’s get started with this crafting fun.

Check out our other President’s Day Crafts.


How to Make a George Washington Wig


Materials Needed

Large Paper Bag

Pen or Marker

Scissors

Cotton Balls

Glue

Blue Ribbon


Step 1


Draw a number 5 like shape on large bag.


Draw a number 5 like shape on large bag.


Step 2


Now, cut out the shape you drew in last step


Close the bag so it is not open.  Now, cut out the shape you drew in last step so you cut thru both sides.


Step 3


This is the part that will go over your head.


This is the part that will go over your head.


Step 4


Glue cotton balls over the outside of bag.


Glue cotton balls over the outside of bag.


Step 5


Tie ribbon around back for ponytail.


Tie ribbon around back for ponytail.


Finished George Washington Wig


Awesome job… you just finished making your George Washington Wig for President’s Day.  Wasn’t it fun to make?!  Now, put on your wig and act like George Washington.  Fun stuff!!

Technorati Tags: , , , , , , , , ,

How to Make an Abe Lincoln Top Hat for President’s Day

Yesterday I showed you how to make a an Easy George Washington Hat for President’s Day.  Well, it wouldn’t be right to make a hat and celebrate George Washington’s special day if we don’t do the same thing for Abraham Lincoln.  So, today I will show you how to make an Abe Lincoln Top Hat for President’s Day.  After all, President’s Day is about honoring both George Washington and Abraham Lincoln.  And, what better way to honor Abraham Lincoln than to make his top hat.  So, grab the materials needed and let’s get started.

Check out our other President’s Day Crafts.


How to Make an Abe Lincoln Top Hat for President's Day


Materials Needed

Oatmeal Container

Black Felt, Paper or Foam

Paper Plate

Black Paint

Pen or Pencil

Scissors

Glue


Step 1


Grab an Oatmeal Container.


Grab an Oatmeal Container.


Step 2


Take the cap of the rolled oats container and cover with black felt


Take the cap of the rolled oats container and cover with black felt, paper or foam.


Step 3


Put the cap on the box and then wrap black paper, felt or craft foam around the box


Put the cap on the box and then wrap black paper, felt or craft foam around the box.  Leave opening unwrapped.


Step 4


Paint a plate black.


Paint a plate black.


Step 5


Trace the oatmeal box on the center of plate.


Trace the oatmeal box on the center of plate.


Step 6


Draw tabs into circles and then cut out.


Draw tabs into circles and then cut out.


Step 7


Cut out and it will look like this.  Fold tabs inwards.


Cut out and it will look like this.  Fold tabs inwards.


Step 8


Put glue on tabs and glue to inside of box.


Put glue on tabs and glue to inside of box.


Step 9


Let glue dry.


Let glue dry.

And, there you have it…. you just finished your Abe Lincoln Top Hat for President’s Day.  How did it turn out for you?  Let me know in the comments below.  Now, go wear it proudly.

Technorati Tags: , , , , , , , , ,