How to Sew a “Lucky Cat” for Saint Patrick’s Day

This is a cute and funny toy made especially for St. Patrick’s Day! 
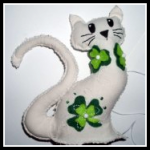
Do you want to learn how to make and sew a stuffed animal named “Lucky Cat” for Saint Patrick’s Day? This stuffed cat is covered in shamrocks and isn’t too tough to make. Learn how to make this kitty cat in the following craft tutorial.

Laura from Dacian Moon Handmade  will show you how to make it, step by step.


How to Sew a Shamrock Lucky Cat


CRAFTS MATERIALS NEEDED:

– white or cream-colored fabric
– light green and dark green felt
– filling material (I use some cotton pads broken into pieces)
– scissors
– needle and threads (white and black)
– black paint marker
– pen
– 3 small white beads
– pencil
– green beads (optional)


IMG_4668


Step 1.

Fold the fabric in half.


IMG_4669


Draw a cat outline, like this…


IMG_4673


… and the tail.


IMG_4674


Cut them out, without unfolding the fabric. This way you will have two cats and two tails.


IMG_4675


Step 2.

Place one cat over the other and start sewing them together. Start on the lower part.


IMG_4676


Go up until you reach the ear.


IMG_4678


Step 3.

Draw one big clover and some smaller on dark green felt. Also, draw them a little bit smaller on light green felt.


IMG_4679


Cut them out.


IMG_4680


Group one big dark clover with one big light clover, and the smaller ones in the same way.


IMG_4681


Step 4.

Choose one place for the big clover…


IMG_4683


… and sew it in place, using white thread.


IMG_4685


Add one white bead in the middle. Be careful not to sew both cats when you sew decorations.


IMG_4687


You can let it like this or you can make some decorative stitches with white thread and green beads


IMG_4689


Like this.


IMG_4691


Choose a place for the small clovers also.


IMG_4693


I put two of them around the cat’s neck, just like a necklace. Don’t forget to add white beads in the middle and to sew only one cat.


IMG_4696


Step 5.

Is time to decorate the head. Place a folded paper or a piece of cardboard between the two cats…


IMG_4698


… and color the eyes and nose with black paint marker.


IMG_4699


Like this.


IMG_4700


Change the thread, and using the black one…


IMG_4701


Sew the whiskers.


IMG_4702


Like this.


IMG_4703


Step 6.

Change the thread back to white and continue to sew the two cats together.


IMG_4705


When you reach the neck is time to fill the head.


IMG_4706


Tamp the filling to fill all the head and the ears. Like this.


IMG_4707


Continue to sew until you almost get down. Here will be the tail, so we must prepare it.


IMG_4709


Step 7.

Place the two tails one over the other…


IMG_4710


.. and start sewing them together from the lower part.


IMG_4711


Go until you reach the tip of the tail and start to sew the other part.


IMG_4712


Stop when you make about 10 cm. Take a piece of filling and roll it between your hands.


IMG_4713


Press it on the stitched part of the tail.


IMG_4714


Continue to fill the tail while sewing the two sides together. It will look like this.


IMG_4715


Step 8.

Place the tail between the two cats, like this.


IMG_4716


Sew it in place.


IMG_4717


Step 9.

Fill the cat’s body.


IMG_4718


sew the two parts together…


IMG_4720


And the cat is ready 😀


IMG_4721


Isn’t this cat adorable!!! I hope you enjoyed the tutorial!

Technorati Tags: , , , , , , , , , , , , ,

How to Make Gloves with Claws for Halloween

Are you still trying to figure out how to add an extra scary effect to your Halloween costume this year?  Well, I just might have the perfect idea for you.  Why not make these Gloves with Claws for Halloween?  They are sure to make any costume you are planning to wear even more scary.  Even if you are planning to be a cat this year…. you can’t do it without claws or your costume is just not finished.  Add these scary Gloves with Claws for a truly scary effect this Halloween.  Let’s get started.

Check out our other Halloween Crafts.

Laura from Dacian Moon Handmade  will show you, step by step, how to make this craft.


How to make a Glove with claws for Halloween


Materials Needed

– gloves
– a piece of black canvas
– scissors
– needle and thread


Step 1

Cut 5 rounded triangles from the canvas.


Like this.


Step 2

Using the needle and thread, sew the lower part of one triangle to one glove finger (where the nails should be)…


… like this.


Do the same for all the triangles / fingers. Repeat for the other glove…


… and they are ready to be worn.


There is something about adding claws to any costume that makes it scary.  Add these scary gloves with claws to your costume and give it an extra creepy effect.

Technorati Tags: , , , , , , , , , ,

Black Cat Foldable Paper Toy Craft for Halloween

Halloween is just around the corner so I put together a bunch of Halloween characters that you can fold out of paper. These are Halloween figurines that are very easy to print out, fold, and paste together. This specific character is a black cat, however I decided to make the cat cute instead of scary. Find out how to make this cute kitty cat below.

More Halloween Crafts.

Here are the Other Halloween Paper Toys in This Collection


black-cat-paper-foldable-toy-first-pic


Materials Needed

Paper or Card Stock

Scissors

Glue


The Template to Print Out:


black-cat-paper-foldable-toy-template


CLICK ON THIS PICTURE TO OPEN TEMPLATE. Then Save the Template to Your Computer and Print.

How To: Step 1


Cut Out Cat Template


Cut Out the Template.

Step 2


Fold Paper Cat Toy on the Lines


Fold on the lines.

Step 3


Fold Paper Cat Toy on the Tabs


Fold the Tabs too.

Step 4


Now Glue Together


Glue the cat together on the tabs.


Foldable Paper Cat Figurine Pasted Together


To look like the above picture.

Step 5


Glue the Tail and Ears on


Glue the ears on the top of the cat. Glue the tail onto the back of the cat.

Now enjoy your black cat for Halloween. Print out the other foldable paper Halloween toys in this collection too.

More Halloween Crafts.

Here are the Other Halloween Paper Toys in This Collection

Technorati Tags: , , , , , , , ,

How to Make a Kitty Cat out of a Heart Valentines Day Box

I have a fun craft for you today….. and the coolest part is you will get to use your old Valentines Day Heart Box that you had been given as a gift on Valentines Day.  Today I’m going to show you how to make a Kitty Cat out of a Heart Valentines Day Box.  This cat is made from tissue paper and paper plates….. it is so much fun to make.   Once you are done with this craft not only will you have a cute kitty cat, but you will also have a super cool box to store whatever you would like.  So, let’s get started.


How to Make a Kitty Cat out of a Heart Valentines Day Box


Materials Needed

Valentines Day Box

Paper Plates (a few)

Tissue Paper Squares (Orange & White)

Pencil

Glue

Brown Felt

Marker

Lids (One larger than the other for tracing circles)

Paper (White, Blue & Black)

Craft Foam or String

Scissors

Tape


Step 1


Start with a Valentines Day Box.


Start with a Valentines Day Box.


Step 2


Add glue to a paper plate.


Add glue to a paper plate.


Buy or cut tissue paper squares.


Buy or cut tissue paper squares.


Grab a pencil and wrap square around eraser of pencil.


Grab a pencil and wrap square around eraser of pencil.


Dip pencil into glue.


Dip pencil into glue.


Now dab pencil onto heart


Now dab pencil onto heart… pick back up.


Now leave tissue paper behind


Now leave tissue paper behind like this.


Step 3


Keep doing this.... Orange at the top and white at the bottom.


Keep doing this…. Orange at the top and white at the bottom.


It should look like this.


Like this.


Step 4


Cut a rounded triangle from brown felt.


Cut a rounded triangle from brown felt.


cut three thin rectangles.


Also, cut three thin rectangles.


Glue them as the nose and the mouth.


Glue them as the nose and the mouth.


Step 5


Trace 2 big white circles with lids.


Trace 2 big white circles with lids.


Trace 2 slightly smaller blue circles.


Trace 2 slightly smaller blue circles.


Trace slightly smaller black circles.


Trace slightly smaller black circles.


Draw 4 small white circles.


Draw 4 small white circles.


Glue them together to look like this.


Glue them together to look like this.


Step 6


Draw an ear shape with a rectangle shape at the bottom and cut out.


Draw an ear shape with a rectangle shape at the bottom on a paper plate and cut out.


Cut out two ears... then fold rectangle inwards.


Cut out two ears… then fold rectangle inwards.


Glue and tape ears on sides.


Glue and tape ears on sides.


The ears should look like this now.


The ears should look like this now.


Step 7


Now dab / glue orange tissue paper squares around outside of ears.


Now dab / glue orange tissue paper squares around outside of ears.


Step 8


Either cut a few of these pieces from craft foam or use string.


Either cut a few of these pieces from craft foam or use string.  Tape together at one end.


Stick the ends of whiskers underneath nose.


Stick the ends of whiskers underneath nose.


Finished kitty cat craft


Look how cute this craft turns out?!  It turns out so cute!!  Plus, wasn’t it a lot of fun to make?  How did your Kitty Cat turn out?  Let me know in the comments below.  And, make sure to take a picture of your craft and post that in the comments as well…. I’d love to see it.

Technorati Tags: , , , , , , , , , , ,

How to make a Cat Mask out of leather

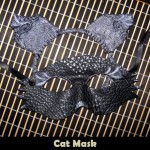
Are you planning on being a cat for Halloween?  Did you want something original that no other person will be wearing?  Why not make it yourself?  I have an awesome Cast Mask craft to show you that turns out outstanding.  In this post I will show you how to make a cat mask out of leather.

Check out our other Halloween Crafts.

Laura from Dacian Moon Handmade will show you how to make a Cat Mask out of leather, step-by-step.


CRAFT MATERIALS NEEDED:

– lace
– pen
– leather (for the best results it must be vegetable tanned leather)
– ribbon
– card stock (or you can use a recycled paper folded in two, to be thicker)
– scissors
– silver paint for textiles
– glue for textiles
– double adhesive tape


Also, you will need a Leather Hole Punch – you can use a thick needle, though, but is easier with this tool.


Step 1 – The Template

Take the sheet of card stock (or, in my case the folded paper)…


And fold it in half.


Use a mirror and hold the folded card stock up to your face. Position the fold of the paper on the middle of the nose.


Using your pen… draw a scribble circle in the area of your eye. Also make a mark where the bottom of your nose is…


…like this.


Using the eye area and the nose mark as a guide, draw half of the mask. The eye is important… you must be sure it is big enough.

It’s time for the first check… Go back to the mirror and hold it up to your face again. Look at the eye hole vs. your real eye. The hole must be a bit bigger. Also, if you want to make some changes… now is time to do them.


Cut out the template.


To cut the eye, poke a hole and then use the scissors.


Unfold the template.

Now you must do the second check… If it doesn’t fit well, it’s time to start over. If you are satisfied… let’s make it permanent.


Step 2 – Cutting the leather

Take your tape…


And put some small pieces on key spots on the back of the template, to prevent it from shifting around.


Find a good spot on the leather and lay out the template.


Using your pen, trace the contour of your template…


… like that.


Now, cut out the mask. The outside is easy enough to do with scissors alone.


It will look like that.


To cut the eye holes you will use the leather hole punch.


Make a hole on the edge of the eye mark…


… then continue with your scissors.


This is the mask.


Step 3 – Forming the mask

This step must be made without any interruption, because otherwise it will ruin your mask.

First, you must soak the mask through. You will see it changing its color a bit (on other colors it is more visible). Make sure you get the back wet as well. Once it is soaked… take it out of the water and pat it dry with a towel.


Put the leather to your face, pressing down on the sides of your nose and the sides of your face (the red marked spots on the image.)

That way the mask will take the form of your face.


Keep the mask like this until it is holding its shape.

It will take some time to do that.


When it is holding its shape you can start adding some personality to it.

Where the mask makes points… pinch into rounded tips.


Also, you can exaggerate the nose fold. This area tends to be the focus of the mask.

Keep placing it onto your face and pushing it into shape.

When you are finished… you can let it somewhere – keeping its form – to completely dry.


Step 4 – Decorating the mask

Since it is in the proper shape now, you can use the hole punch… punch a hole in a good spot for the ribbon to go.  To find out where the holes should be placed…  grab the edges of the mask in your hands and hold it up to your face. Ask yourself… where is the most weight being pulled? That is the place where you must make the holes.


Take the lace and observe it carefully. Are there any parts on it that will enhance the mask? I chose to use the spirals to decorate the eyes…


… so I cut out two.


Apply a layer of glue on one piece of lace…


… and place it on its place. Don’t mind the thick part, we will glue it later. Also, don’t mind the glue – it will be transparent when its dry.


Do the same for the other eye.


Until the glue is dry… you can decorate with the paint.


I made some points on the brow.


Now that the glue is dry enough… apply a new layer on the upper edge of the eye and force the thinner part of lace there. If you hold it a little, it will stay.


Let’s apply a bit of glue on the lower edge of the eyes too.


We don’t put anything there, but when it is dry it will look wet.

Also, you can add some silver paint on the top of the nose and draw some whiskers.  And, you could also add a bit on the edges of the mask.


Step 5 – Finishing the mask

Take the ribbon and cut it in two.


Put one half through one of the holes made with the hole punch…


… and make a knot on it, so it does not slip away.


Do the same on the other side… the mask is ready to go.


Now, THAT is one Rock’n Cat Mask.  You can almost guarantee that your Cat Mask with be different than any other you are sure to see this Halloween.  And, be sure to wear it along with the Cat Ears craft we made earlier today.  Worn together….. you will be a HUGE hit this Halloween.

Technorati Tags: , , , , , , , ,

How to make Cat Ears out of lace

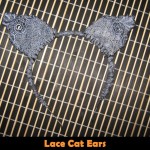
Kitty cats can be cute and cuddly….. but on Halloween they can also be pretty spooky.  Either way…. cute and cuddly or spooky…. I have a great costume for you.  Today I will be showing you how to make Cat ears out of lace perfect for Halloween…. or to play dress-up any time of year.  Keep an eye out… later today I will show you how to make a Cat mask to go with your ears.

Check out our other Halloween Crafts.

Laura from Dacian Moon Handmade will show you how to make Cat Ears, step-by-step.


CRAFT MATERIALS NEEDED:

– lace
– pen
– riband
– wire (not too soft)
– needle and thread
– scissors
– round nose pliers (optional)


Step 1 – The Armature

Cut the wire in two.


Take one piece of wire and bend it in half. Take care that the two sides should be curved, not straight, to look like cat ears.


Make loops on both ends of the wire – that will help us to fix it on the riband.


Repeat to make the armature for the second ear.


They will stay on the riband like this. Now, is time to verify if the size is OK… and correct it if it is not.


Step 2. – Lace the ears

Take the lace and look at it carefully. See how you can use it for best results. I chose to use the swirls to highlight the ears.


Draw the contour of the wire on the lace…


… and cut it out, like this.


You will need 2 lace pieces for every ear so 4 in total.


Step 3 – Completing the ears

Start sewing the margins of 2 lace pieces together…


… like this. The lower side will stay un-sewed.

Sew one side and half of the other…


…then put the wire inside. Like this.


Now, finish sewing the second side too.

Do the same for the other ear.


Step 4 – Link the ears to the riband

Start to cover the riband with lace, by turning around it…


… like this.


Using the needle and thread… sew and wrap the lace over the riband.


When you arrive at the place where the ear should be, place it like this (with the two sides of the lace around the riband)…


…  and sew through it. Take care at the edges of the ears to sew through the wire loops, for stability.


Do the same with the other ear… that’s  all.


Now, you have funky and awesome lace cat ears.  Any child will look so cute dressed up as a cat with these ears.  Or, for that matter…. any adult.  No reason that an adult can’t dress-up too.  Go for it!!   It will be purrrr-fect.   🙂

Also, check out our Cat Mask craft which will go perfect with these Cat Ears.

Technorati Tags: , , , , , , , ,

How to make Halloween Glasses

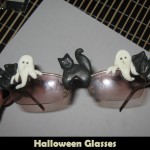
I love making a big deal about Halloween…. dressing up in festive Halloween clothing and wearing funky Halloween jewelry.  But, have you ever thought of doing more?  Something that will undoubtedly get everyone’s attention?  How about wearing blinged out Halloween Glasses?  In this post I will show you how to transform everyday glasses into a fun pair of Halloween Glasses.

Check out our other Halloween Crafts.

Tutorial (a long one but easy to do) offered by Laura from Dacian Moon Handmade . You will need help from an adult for this tutorial.


CRAFT MATERIALS NEEDED:

– night glow polymer clay
– black polymer clay
– cutter
– toothpick
– glasses (they must be made of glass because we will bake them)
– baking tray
– baking paper


Step 1 – The Ghosts

Take a piece of night glow polymer clay.


Condition it .

(Condition polymer clay by hand, simply mix it and squish it with your fingers. You may want to roll it into a log between your palms, fold it in half, and then roll again)

Take the night glow clay and make a ball of it and flatten it… then squish an end between two fingers to form a ghost, like that.


Place it on the glasses frame, as if it is staying on the edge. You can see that it is not very firm, so we better add its hands.


Add a small night glow piece on one side…


… and split it in two on the lower part… like in the picture. These are her fingers.


Do the same on the other part. Now, the ghost is firm on her position.


Repeat making another ghost…


… and place it on the other side of the frame…


… like this


Using the toothpick …


Make them some mouths.


Step 2 – the Bats

Take the black polymer clay.


Split it in 3 parts. Two smaller and one bigger.


Take one smaller piece and condition it.


Lay a small piece aside… from the remainder make a ball.


Flatten it.


Using your nails mark the middle of it…


… then squish the new formed part like this…


… to form two corners.


Do the same on the lower part and on the side, until it looks like that.


Using your toothpick …


… define the center part.


This will be the body of the bat.


Use your nails to separate the body from the wings a little… in the lower part, like this.


Now, let’s make his wings. Press the toothpick on the sides to form the wing bones.


Like this.


Do the same on the other wing. Now it looks almost like a bat… he’s just missing his head.


Take the small part you left aside and make a little ball of it. Flatten it a little…


… and place it on the upper part.


Almost done. With two even smaller pieces of clay make its ears…


… and put them on their places.


You can make a mouth too.


Let’s put the bat on the frame corner, to mask it.


Repeat this step to make another bat for the other side.


Step 3 – The Cat

Take the bigger part of black polymer clay and condition it.


Make it in the form of a bread stick…


… then bend its ends.


Flatten it a little…


… and place it on the middle of the frame, between the ghosts.


Take a smaller part of black clay and make a ball with it.


Squish between two fingers to form a cat ear…


… then the other.


With your toothpick make her mouth and nose.


Make two small balls of white (or night glow) clay…


… to make her eyes.


And two even smaller black ones …


… to complete the eyes.


What do we still need? A tail!

So, let’s make another “bread stick” – a little thinner than the first one.


Curl it to look like a tail and put it on its place.


Then add the head… the black cat is ready.


Step 4 – the Baking

Place the glasses on the baking tray, and bake them according to the instructions on the polymer clay package (they depend on the brand you use: fimo, cernit, sculpey…, but usually it is one half hour at 230 F or 110 C).  *Must have adult supervision*


Let them cool down.


Now, the last thing is to make eyes for the ghosts, so use a paint marker to do that.


There you go…. you have finished your Halloween Glasses.


Now, those are some cool and unique Halloween Glasses.  You are going to look so festive this Halloween with your homemade Halloween Glasses.  Put them on and wear them proudly.

Technorati Tags: , , , , ,