How to Make Cellophane Dancers

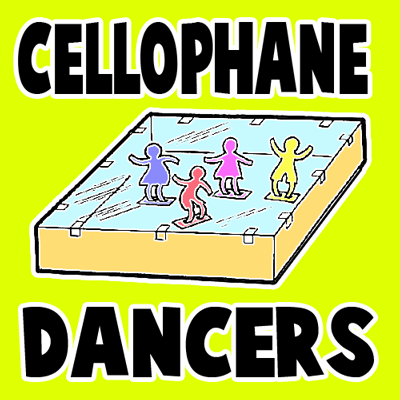
You can make a whole dance studio filled with boys and girls who will jump and dance about as if they were really alive. The trick is causing enough static electricity to make these little guys jump and dance.
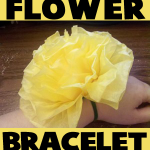
 Find out how to make cellophane dancers below.

How to Make Cellophane Dancers


How to Make Cellophane Dancers


Crafts Materials Needed:

Large deep cardboard box

Light cardboard

Cellophane

Scotch tape

Silk handkerchief

Glue or paste

Scissors

Tissue paper

Pencil

How to Make Them:

Step 1


Fold the strips back and forth


To make the dancers, cut 2 strips of tissue paper, 5 inches long and 3/4 of an inch wide. Fold the strips back and forth, as in illustration A.

Step 2


You will have 2 square tissue paper packets


You will have 2 square tissue paper packets, as in illustration B.


Step 3


Draw Half Figures


Fold each packet down the center. On the fold of one packet, draw and then cut out, the half figure of a girl, and on the other packet, the half figure of a boy, as in illustration C.

Step 4

Open up the strips, you will have one continuous row of girls, and one of boys.

Step 5


you will have one continuous row of girls


Cut 2 strips of light cardboard 1/8 of an inch wide. Glue a standing row of dancers to each cardboard strip, bending back the feet of the dancers about 1/8 of an inch to make them stand firmly, as in illustration D.

Step 6


Glue a standing row of dancers to each cardboard strip


Cut the hands of the dancers apart, and cut the cardboard between them. Each dancer will be standing on a separate cardboard platform, as in illustration E.

Step 7


Cut a piece of celluloid to fit the top of the box, and fasten with pieces of Scotch tape


Stand the dancers in the cardboard box ballroom. Cut a piece of cellophane to fit the top of the box, and fasten with pieces of Scotch tape, as in illustration F.

To make the dancers jump and dance, rub a silk handkerchief over the celluloid top. This will generate enough static electricity to make the dancers come “alive.”

Technorati Tags: , , , , , , , ,

How to Make Tissue Paper Flower Bracelets for Mom on Mothers Day or Easter

This versatile, large and beautiful flower can be used as a basket topper, bracelet or hair decoration. They are simple to make and you’ll be amazed to see your own flower bloom right in front of you. Since Mother’s Day is coming up, and we didn’t post this craft for Easter, I thought it might also be good to make as a gift for your Mom.


Flower Bracelets to Make for Mom on Mothers Day or For Easter


How to Make Tissue Paper Flower Bracelets for Mom on Mothers Day or Easter


Crafts Materials list:
  • 1 large sheet of tissue paper (2’6″ X 20″)


  • Pipe Cleaner (Green for the stem, but could be any color)


  • Scissors


  • Ruler


Step 1: Cut sheet into eight equal pieces. Then stack the pieces, putting any smaller ones on top.


Step 2: Fold the stack like an accordion, length-ways


Step 3: Wrap the pipe cleaner around the middle of your folded stack, twisting it tightly.


Step 4: Separate the sheets, pulling up to the center, one piece at a time. This is the fun part and you shouldn’t worry about making it perfect.


Step 5: Marvel at your new flower. Try to hold yourself back from making an entire garden.

Technorati Tags: , , , , , , , , , , , , ,

18 Cool Mummy Craft Ideas for Halloween


14 Cool Mummy Craft Ideas for Halloween


You are in for a treat today.  I have searched the internet to find what I thought was the best in Mummy crafts for Halloween.  I came up with 18 of my favorite Halloween Mummy crafts.  They are all totally creative and equally creepy.  Some of them are edible, some are meant to be used as decorations and others are actually moveable mummies.  But, I’m sure you will find them all fun and festive.  I hope you have a blast looking at all of these cool mummy craft ideas for Halloween…. I know I did.  So, without further ado…. let’s get started.

Check out our other Halloween Crafts.

18 Cool Mummy Craft Ideas for Halloween

(1)  Craft Stick Mummy


Craft Stick Mummy


I found this silly craft over at First Palette.  This Halloween Mummy Craft is made out of craft sticks and guaze.  And, the finished item is perfectly creepy for Halloween.  Make a few and put them around the house this Halloween.


(2)  Mummy Candy Holder


Mummy Candy Holder


Are you having a Halloween Party this year?  If you are I have the perfect decorations and party favors for you.  How about making this Halloween Mummy Craft.  It’s a Mummy Candy Holder…. the kids are sure to love it.  Check out Parents for all the craft details.


(3) Printable Paper Mummy Toy


Printable Paper Mummy Toy


Here is a paper toy craft from this site…for a paper mummy. This is very easy to make and a lot of fun to play with. Find out how here.

(4)  Bendable Mummy


Bendable Mummy


Here is a great Halloween craft that is made from an old shirt.  This is a great craft to recycle those old T-shirts.  Got to love recyclable crafts.  You want the craft details?  Check out Family Sponge.


(5)  Mummy Cupcakes


Mummy Cupcakes


Ok, I love the yummy crafts…. the edible ones.  Well, these Mummy Cupcakes are certainly no exception.  They are adorable…. and they look delicious.  Get the entire Mummy recipe at The Craft Patch….. make sure to check it out.


(6)  Mummy Sign


Mummy Sign


If you are looking for an outside Halloween decoration craft…. then you have found it here.  I found this Mummy craft over at Woman’s Day.  It is so terribly cute…. I just adore it.  This craft is for the more mature as there is a Saber Saw being used.   Adult Supervision is a must for this craft.

 (7) Mummy Bowling


Mummy Bowling


My daughter’s Girl Scouts troop made these for a Halloween Fair party they had. The Brownies and Daisies loves playing Mummy Bowling. Find out how to make these out of water bottles here.

(8)  Mummy Cookies


Mummy Cookies


Are you throwing a Halloween Party?  If so, you know that you cannot have a Halloween Party without some Halloween Cookies.  And, Halloween is just not Halloween without some Mummy treats.  So, make sure to check out this Mummy Cookie recipe I found over at Crystal and Comp….. the kids are sure to love them!!


(9)  Origami Mummy


Origami Mummy


Here is a simple fun Halloween Mummy craft you are sure to enjoy.  It is an Origami Mummy.  You simply need some origami paper, googly eyes and magic marker and you are good to go.  Make a few and decorate your room for Halloween.  Check out the entire craft at Activity Village.


(10)  Mummy Pumpkins


Mummy Pumpkins


Check out this awesome Halloween Mummy craft.  It combines two of the most popular items for Halloween…. a Pumpkin and Mummy.  It is just so fitting for a Halloween decoration.  You can see the Halloween craft in its entirety by going to Celeb Baby Laundry.

(11) Bead Pipe Cleaner and Bandages Mummy


Bead Pipe Cleaner and Bandages Mummy


Find out how to make these mummies with movable arms and legs. All you will need is bandages, pipe cleaners, and a bead. Learn how to make these mummies with the following instructions.

(12)  Juice Box Mummy


Juice Box Mummy


If you are anything like me…. you have tons of juice boxes at home.  I always try to come up with crafts that use empty juice boxes because I hate just throwing the empty juice boxes away.  Well, when I found this Mummy craft made from recycled juice boxes I was overjoyed.  Check it out for yourself at Kaboose.


(13)  Mummy Jars


Mummy Jars


This is one of my favorite Mummy crafts i found.  It seems to be really easy, but a ton of fun.  Plus, look at the outcome…. you have these glowing mummy jars that can be placed around the house as a Halloween Decoration.  You can take a look at the craft for yourself over at Crafts reDesigned.


(14)  Mummy Door Hanger


Mummy Door Hanger


This Mummy craft is pretty darn cute.  I found the craft over at TLC and I think it is perfect for Halloween.  It can be put on your front door for all the Trick-or-Treaters to see or simply place it on one of your many indoor doors as an inside Halloween Decoration.


(15)  Aged Mummy


Aged Mummy


I love this Mummy craft.  Do you know why?  Because Craftaholics Anonymous made it look pretty authentic by dirtying up the gauze around the mummy’s body.  I love that.    Make sure to check out her site as she will show you too how to make this Aged Mummy.


(16)  Tissue Paper Mummies


Tissue Paper Mummies


I found this great Halloween Mummy craft over at Happy Hooligans.  And, it is super cute!!  They simply used recycled empty toilet paper rolls and white tissue paper…. and these mummies turned out amazing.  They are perfect for decorating…. the kids will love telling everyone they made the mummies themselves.

 (17) Mummy Trick-or-Treat Baskets


Mummy Trick-or-Treat Baskets


Find out how to make these trick-or-treat baskets – it is a lot easier than you would think. They come out looking really unique and fun. Find the instructions here.

(18)  Egyptian Mummy


Egyptian Mummy


Now, I know this isn’t exactly the kind of Mummy you think of when you think of Halloween mummies.  But, I love this craft and had to include it once I found it.  Check it out over at 123 Peppy…. I think you will like it too.

Technorati Tags: , , , , , , ,

How to Decorate a Notebook with Yarn or Crepe Paper

I have a super fun craft for you today!!  And, it’s totally perfect for back to school.  In this craft I will show you how to decorate a notebook with yarn or crepe paper.  Your notebook will be an original…. no one else will have a notebook like yours.  This craft is not only a lot of fun, but it is really simple.  Simply use crepe paper or yarn to make a one of a kind design on the front of your back to school notebook.  So, grab the materials needed and let’s get started.

Check out our other Back to School Crafts.


How to Decorate a Notebook with Yarn or Crepe Paper


Materials Needed

Yarn or Crepe Paper

Glue

Scissors

Notebook


Step 1


Put glue down where you are going to glue yarn or paper.


Put glue down where you are going to glue yarn or paper.


Step 2


Place yarn or crepe paper on glue.


Place yarn or crepe paper on glue.

And, that’s it!!  What kind of awesome design for your notebook did you come up with?  Let me know in the comments below.  And, don’t forget to take a picture of the notebook and share that too in the comment.

Here is our video on How to Decorate a Notebook with Yarn or Crepe Paper

Technorati Tags: , , , , , , , ,

How to Make a 3D Carnation Mother’s Day Card

Mother’s Day is coming up next month.  That will be here before you know it.  So, in honor of the upcoming Mother’s Day Holiday today I will show you how to make a 3D Carnation Mother’s Day Card.   Any mom would love receiving a homemade card from their child.  And, this card is no exception.  Not only is this card made by you, but it is also 3D which makes it really cool.  You will use crepe paper to give this card a 3D effect.  So, grab the materials needed and let’s get started.

Check out our other Mother’s Day Crafts.


How to Make a 3D Carnation Mother's Day Card


Materials Needed

Red and Pink Crepe Paper

Construction Paper or Card Stock

Paste or Tape

Markers

Scissors


Step 1


Cut out a circle on red and pink crepe paper.


Cut out a circle on red and pink crepe paper.


Step 2


Fold in halves and then quarters.


Fold in halves and then quarters.  Snip edges irregularly to resemble a carnation.


It should look like this.


It should look like this.


Step 3


Take a piece of construction paper or card stock and draw 2 stems.


Take a piece of construction paper or card stock and draw 2 stems.  You will be pasting the carnations to the top of these stems.


Step 4


Paste or tape on carnations


Cut top of stem as shown and tuck in flower.  Paste or tape on carnations.  Write “Mom” or “Mommy” or “Mother”.


Finished Mothers Day Carnation Card


There you go….. you just finished making a 3D Carnation Mother’s Day Card.  Your mom is going to absolutely love it.  Do you know why?  Because you made it yourself.

Technorati Tags: , , , , , , , , , , , , , , , , , , , ,

How to Make Egg Carton Tulips for Spring

I have a fun and creative Spring craft for you today.  I’m going to show you how to make Egg Carton Tulips for Spring.  This craft is a great way to use up all those egg cartons you have laying around after Easter.  Nothing like recycling items and using them to create something beautiful.  And these tulips are no exception….. they come out looking so colorful.  Just the perfect craft to make and give to you Mom or Grandma to help them celebrate Spring.  They will surely love this item….. so let’s get started.

Check out our other Spring Crafts.


How to Make Egg Carton Tulips for Spring


Materials Needed

Egg Carton

Scissors

Different Color Paints

Pipe Cleaners

Tissue Paper same Color as Paint

Green Construction Paper

Pot full of Dirt


Step 1


Cut out egg carton cups so they look a bit like this.


Cut out egg carton cups so they look a bit like this.  Cut the 4 corners like above.


Step 2


Paint egg cups beautiful colors.


Paint egg cups beautiful colors.


Step 3


Poke hole in bottom of egg cups.


Poke hole in bottom of egg cups.  Stick pipe cleaner up this hole.


Step 4


Put a small square of tissue paper into the egg cup and let pipe cleaner push thru tissue paper.


Put a small square of tissue paper into the egg cup and let pipe cleaner push thru tissue paper.  Bend pipe cleaner to keep it on.


Step 5


Cut out a green leaf and stick it on bottom of pipe cleaner.


Cut out a green leaf … poke a hole in it… stick it on bottom of pipe cleaner.


Step 6


Stick pipe cleaners in vase full of dirt


Stick pipe cleaners in vase full of dirt … and leaves will stay on and flowers will stand up tall.  Give to Mom or Grandma.

Technorati Tags: , , , , , , , , , ,

How to Make a Fish out of a Heart Valentines Day Box

Today I have a fun craft to do with your left over Valentines Day Heart Shaped Box.  I’m going to show you how to make a Fish out of a Heart Valentines Day Box.   This craft is not only a lot of fun, but it is a great way to recycle those used Valentines Day Boxes…. so you don’t have to just throw them away.   And, the fish not only turns out totally cute, it also gives you a secret storage box to store your small secret things in.  Now, that is fun!!  So, grab the materials needed and let’s get started.

Check out How to Make a Kitty Cat out of a Heart Valentines Day Box.


How to Make a Fish out of a Heart Valentines Day Box


Materials Needed

Valentines Heart Box

Black Marker

Red Craft Foam, Felt or Paint

White & Black Craft Foam

Colorful Tissue Paper (2 different colors)

Pencil

Scissors

Glue Stick

Lid or Bowl (for tracing)

Paper Plate

Paper

Glue


Step 1


Get your chocolate hearts box.


Get your chocolate hearts box.


Step 2


Draw lips with backwards E shape.


Draw lips with backwards E shape.


Step 3


I used sticky craft foam square tiles and filled in space in the lips.


I used sticky craft foam square tiles and filled in space in the lips.  Use anything that you want to use though…. even paint or felt.


Step 4


Draw an outline around the lips


Draw an outline around the lips.  Draw curved rectangles for white highlights.


Step 5


Fill curved rectangles with white craft foam.


Fill curved rectangles with white craft foam.


Step 6


Use colorful tissue paper for next part.


Use colorful tissue paper for next part.


Draw circle on a stack of square tissue paper.


Draw circle on a stack of square tissue paper.


Cut out circles.


Cut out circles.


Step 7


Dot glue all over the rest of heart.


Dot glue all over the rest of heart.


Layer circles on top of box and on top of each other.


Layer circles on top of box and on top of each other.


Until it looks like this.


Until it looks like this.


Step 8


Use a lid or bowl to trace a big circle on white foam.


Use a lid or bowl to trace a big circle on white foam.


Trace a smaller circle on black craft foam.


Trace a smaller circle on black craft foam.


Cut out 2 small white circles and glue together like this.


Cut out 2 small white circles and glue together like this.


Step 9


Glue eye on fish face.


Glue eye on fish face.


Step 10


Draw a heart with a rectangle on lef


Draw a heart with a rectangle on left….. do this on a paper plate.


Bend and glue rectangle on to side of heart box furthest from lips.


Bend and glue rectangle on to side of heart box furthest from lips.


Now fish should look like this.


Now fish should look like this.


Step 11


Draw half of a heart on folded paper.


Draw half of a heart on folded paper.


Cut out heart.


Cut out heart.


Cover with tissue paper circles too.


Cover with tissue paper circles too.  Make two of these.


Step 12


Glue fin to fish face.


Glue fin to fish face.

And, your fish is now done. Wasn’t that fun?  Now, you have a secret storage box that is decorated as a fish.  The real question is now ….. what are you going to fill your secret box with?  Enjoy.

Technorati Tags: , , , , , , , , , ,

How to Make a Kitty Cat out of a Heart Valentines Day Box

I have a fun craft for you today….. and the coolest part is you will get to use your old Valentines Day Heart Box that you had been given as a gift on Valentines Day.  Today I’m going to show you how to make a Kitty Cat out of a Heart Valentines Day Box.  This cat is made from tissue paper and paper plates….. it is so much fun to make.   Once you are done with this craft not only will you have a cute kitty cat, but you will also have a super cool box to store whatever you would like.  So, let’s get started.


How to Make a Kitty Cat out of a Heart Valentines Day Box


Materials Needed

Valentines Day Box

Paper Plates (a few)

Tissue Paper Squares (Orange & White)

Pencil

Glue

Brown Felt

Marker

Lids (One larger than the other for tracing circles)

Paper (White, Blue & Black)

Craft Foam or String

Scissors

Tape


Step 1


Start with a Valentines Day Box.


Start with a Valentines Day Box.


Step 2


Add glue to a paper plate.


Add glue to a paper plate.


Buy or cut tissue paper squares.


Buy or cut tissue paper squares.


Grab a pencil and wrap square around eraser of pencil.


Grab a pencil and wrap square around eraser of pencil.


Dip pencil into glue.


Dip pencil into glue.


Now dab pencil onto heart


Now dab pencil onto heart… pick back up.


Now leave tissue paper behind


Now leave tissue paper behind like this.


Step 3


Keep doing this.... Orange at the top and white at the bottom.


Keep doing this…. Orange at the top and white at the bottom.


It should look like this.


Like this.


Step 4


Cut a rounded triangle from brown felt.


Cut a rounded triangle from brown felt.


cut three thin rectangles.


Also, cut three thin rectangles.


Glue them as the nose and the mouth.


Glue them as the nose and the mouth.


Step 5


Trace 2 big white circles with lids.


Trace 2 big white circles with lids.


Trace 2 slightly smaller blue circles.


Trace 2 slightly smaller blue circles.


Trace slightly smaller black circles.


Trace slightly smaller black circles.


Draw 4 small white circles.


Draw 4 small white circles.


Glue them together to look like this.


Glue them together to look like this.


Step 6


Draw an ear shape with a rectangle shape at the bottom and cut out.


Draw an ear shape with a rectangle shape at the bottom on a paper plate and cut out.


Cut out two ears... then fold rectangle inwards.


Cut out two ears… then fold rectangle inwards.


Glue and tape ears on sides.


Glue and tape ears on sides.


The ears should look like this now.


The ears should look like this now.


Step 7


Now dab / glue orange tissue paper squares around outside of ears.


Now dab / glue orange tissue paper squares around outside of ears.


Step 8


Either cut a few of these pieces from craft foam or use string.


Either cut a few of these pieces from craft foam or use string.  Tape together at one end.


Stick the ends of whiskers underneath nose.


Stick the ends of whiskers underneath nose.


Finished kitty cat craft


Look how cute this craft turns out?!  It turns out so cute!!  Plus, wasn’t it a lot of fun to make?  How did your Kitty Cat turn out?  Let me know in the comments below.  And, make sure to take a picture of your craft and post that in the comments as well…. I’d love to see it.

Technorati Tags: , , , , , , , , , , ,

How To Make Paper Carnations

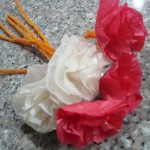
Today I’m going to show you how to make Paper Carnations.  Paper Carnations can be used for many things…. Valentine’s Day, for example.  Valentine’s Day is coming up in just a couple of weeks.  These carnations would be beautiful in a bouquet as a gift for your someone special.  Or, for Mother’s Day…. what mother wouldn’t love receiving a bouquet of hand made paper carnations from their child?   They would certainly love it.  Or, just make these Paper Carnations any day of the week to give to someone special as a surprise.  No one could resist them!  So, let’s get started.

Check out our other Valentine’s Day Crafts.


Materials Needed

tissue papers (the one used for wrapping presents)

pipe cleaners/fuzzy wires

scissors


Step 1

Fold tissue paper into portions, enough to make 3 to 4-inch circles.


Step 2

Stack 7-10 pieces of circles and by folding it, make two small slits in the middle. This is where you slip in the tip of the pipe cleaner, then fold it to lock it in place.


Step 3

Starting in the middle, gently fold the paper up, until all the side are pulled upwards.  Continue doing the same for the other papers underneath.


Step 4

When all the papers are up, gently arrange it to form blooming petals of your carnation flowers.


Step 5

Make a bunch of these flowers and you can place it a flower vase for a more attractive look.

Or better yet, make a bouquet of carnation flowers and give it to somebody for Valentine’s Day.  They are sure to love it.  How did your carnation flowers turn out?  Let me know in the comments below.

Technorati Tags: , , , , , , , , , , , ,

How to Make a Decorated Candle Jar

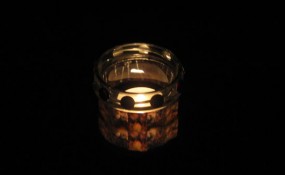
Today I’m going to show you how to make a decorated candle jar perfect to give as a gift for the Holiday Season.  Imagine how much your friends and loved ones would enjoy a gift that you made yourself.  They would totally love it.  And, this decorated candle jar turns out beautifully…. so you will be so proud to give this craft as a gift.  So, let’s get started.

Laura from  Dacian Moon Handmade will show you, step by step, how to make a decorated candle jar.


MATERIALS NEEDED

– tracing paper
– image from computer
– craft glue (that will be transparent when dry)
– scissors
– self-adhesive crystals
– paintbrush
– recycled jar – it shouldn’t be too tall, but large enough to place a tea candle inside


Step 1

Print the image on the tracing paper. You will need to print it twice because the image must go around the jar.


Cut off the images. I need 4 trees to cover my jar.


Step 2

Using the craft glue…


… cover one side of the jar…


Then place one image on it.


Repeat that until the whole jar is covered.

Let it dry.


Step 3

Over the image add glue again spreading it with the paintbrush…


… like that.

Wash your paintbrush immediately with water or else it will bind itself.


Let it dry well.

This layer of glue placed on top of the image will protect it and give you the chance to make some interesting patterns when you spread it.


Step 4

Take one self-adhesive crystal…


And place it on the upper part of the jar.


Decorate as you please…


… now you can light the candle or give as a gift.


Awesome job…. you just finished your decorated candle jar.  How did your candle turn out?  Take a picture and share it with us in the comments below.  Now, go wrap your decorated candle jar and get it ready to give as a gift.  Whoever you give it to will LOVE it!!

Technorati Tags: , , , , , , , ,

How to Make a Christmas Candle Arrangement

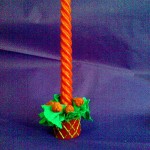
Today I’m going to show you how to make a Christmas Candle Arrangement.  This Christmas Candle Arrangement makes for a beautiful tabletop decoration this Holiday Season.  Make more than one candle arrangement and put them around the house as decorations.  Or, better yet….. make a few of these Christmas Candle Arrangements and give them as a gift this Christmas.  Whatever you decide to do with this craft it is sure to be a big hit this Christmas Season.

Check out our other Christmas Crafts.


Image027


Materials required:

Old toilet paper roll

Crepe paper – red, green

Glitter glue – gold

Glue

Paint – Red

Paintbrush

Scissors

A candle


Step 1

Cut through the toilet paper roll as shown below.


Image008


Step 2

Cut out a small ring of toilet paper roll about 6 cm wide.


Image009


Step 3

Overlap the ends to make a smaller roll. Tape the ends in place as shown.


Image010


Step 4

Place the candle inside the ring and stuff it with bits of torn green crepe paper. Tear the paper long enough that it comes out of the ring as shown below.


Image018


Step 5

Paint the toilet paper roll with red acrylic paint.


Image019


Step 6

Make a design on it with gold glitter glue as shown.


Image023


Step 7

Make small balls out of torn red crepe paper as shown.


Image025


Step 8

Glue the balls near the base of the candle as shown


Image026


Step 9

Place the candle on your table and you’re ready for Chistmas dinner!!


Image027


There you go…. you just finished making a Christmas Candle Arrangement.  Now, make a few more to decorate your house with this Holiday Season.  Or, have you decided to give them away as gifts?  Good for you…. either way they are sure to be enjoyed.

Technorati Tags: , , , , , , , , , , ,

How to Make Standing Ghosts for Halloween

I have a craft that kids will love to make.  It’s a Standing Ghosts craft and it is perfect for Halloween.  The craft is easy enough that in no time you could have several of these ghosts made….. ideal for decorating the House for Halloween.

Check out our other Halloween Crafts.


How to Make Standing Ghosts for Halloween


Materials Needed

Cardboard

Scissors

Clothespin

Tissues

Rubber Band or String


Step 1


Cut an oval from cardboard


Cut an oval from cardboard.


Step 2


Close the clothespin onto the bottom of the cardboard oval


Close the clothespin onto the bottom of the cardboard oval.


Step 3


Place some tissues on top of the clothespin and cardboard you made


Place some tissues on top of the clothespin and cardboard you made.


Step 4


Use a rubber band or string to form the head


Use a rubber band or string to form the head.


Finished Standing Ghosts


Wasn’t that fun to make?  I told you your kids would love making a standing ghost.  Now, make a few more and use them to decorate your house for Halloween.

Technorati Tags: , , , , , , , ,

How to Make Stained Glass Valentines Day Heart Window Hanging

Today we will show you how to make a faux (fake) stained glass window heart. It is so easy that I bet if you try one, you won’t want to stop. When you tape these on your window, the beautiful sun shines through them and they look so beautiful.  This is a wonderful decoration to celebrate the ones you love for Valentine’s Day.

Here are Even More Valentines Day Crafts Ideas


How to Make Stained Glass Valentines Day Heart Window Hanging : Kids Craft


How to Make Stained Glass Valentines Day Heart Window Hanging : Kids Craft

Crafts Materials Needed

– Scissors
– Black Paper
– Colorful Tissue Paper or Cellophane Sheets

Step 1


Step 1 : Stained glass valentines day hearts window craft


Take a piece of black construction paper (or other type of black paper) and fold it in half.

Step 2


Step 2 : Stained glass valentines day hearts window craft


Draw a half of a heart on the folded piece of paper, along the edge. Then cut out the heart.


Step 3


Step 3 : Stained glass valentines day hearts window craft


Now draw shapes on the half of the heart…and while it is folded, cut them out.


Step 4 : Stained glass valentines day hearts window craft


This is what the heart might look like when you open it up, however, it would have your design on it.

Step 5


Step 5 : Stained glass valentines day hearts window craft


Now take pieces of colored cellophane or tissue paper and paste it behind the black paper.

Step 6


How to Make Stained Glass Valentines Day Heart Window Hanging : Kids Craft


Now when you tape it on the window, the sun will shine through it and it will look like a beautiful stained glass window. This is a wonderful decoration to celebrate the ones you love for Valentine’s Day.

Here are Even More Valentines Day Crafts Ideas

Technorati Tags: , , , , , , , , , , , , ,