How To Make Paper Carnations

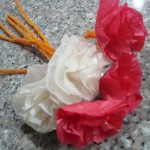
Today I’m going to show you how to make Paper Carnations.  Paper Carnations can be used for many things…. Valentine’s Day, for example.  Valentine’s Day is coming up in just a couple of weeks.  These carnations would be beautiful in a bouquet as a gift for your someone special.  Or, for Mother’s Day…. what mother wouldn’t love receiving a bouquet of hand made paper carnations from their child?   They would certainly love it.  Or, just make these Paper Carnations any day of the week to give to someone special as a surprise.  No one could resist them!  So, let’s get started.

Check out our other Valentine’s Day Crafts.


Materials Needed

tissue papers (the one used for wrapping presents)

pipe cleaners/fuzzy wires

scissors


Step 1

Fold tissue paper into portions, enough to make 3 to 4-inch circles.


Step 2

Stack 7-10 pieces of circles and by folding it, make two small slits in the middle. This is where you slip in the tip of the pipe cleaner, then fold it to lock it in place.


Step 3

Starting in the middle, gently fold the paper up, until all the side are pulled upwards.  Continue doing the same for the other papers underneath.


Step 4

When all the papers are up, gently arrange it to form blooming petals of your carnation flowers.


Step 5

Make a bunch of these flowers and you can place it a flower vase for a more attractive look.

Or better yet, make a bouquet of carnation flowers and give it to somebody for Valentine’s Day.  They are sure to love it.  How did your carnation flowers turn out?  Let me know in the comments below.

Technorati Tags: , , , , , , , , , , , ,

11 Cool Outer Space Crafts for Kids


11 Cool Outer Space Crafts for Kids


Today I have some awesome craft ideas for you.  Not just any craft ideas…… today I have cool outer space crafts for you.  I was making my way through the internet looking for some really creative outer space crafts and I think I found them.  I found some that are made from food and others that are made from recycled materials.  I found crafts that are perfect for the youngest of crafters and others that are meant for older children.  But, bottom line…. there is an outer space craft here for you.  So, enough with the chit-chat….. let’s get started.

11 Cool Outer Space Crafts for Kids

(1)  Orbiting Planets


Orbiting Planets


Here is a great craft to help teach your kids about space and all the orbiting planets.  Plus, the craft is a lot of fun.  I found this craft over at BusyBeeKidsCrafts and they have the right idea….. use a fun craft to help teach your children about space.


(2) Recycled Robot Craft

Recycled Robot Craft

Look how cute this robot is….. so cute!!  And, it is made from many recycled materials which makes this robot even cooler.  FreeKidsCrafts shows you how you can take tin foil, an empty container and soda bottle lids and make it into a robot like above.  How fun!!


(3) Alien Pipe Cleaner Craft


Alien Pipe Cleaner Craft


I love this craft…. I just love how these little aliens turn out.  I found this Outer Space craft over at Craft Jr. She shows you step-by-step how to make the aliens as pictured above.  But, she also explains how if you have mismatched colors or pipe cleaners of different sizes it doesn’t matter…. they are aliens after all.


(4) Spiral Galaxy


Spiral Galaxy


What a pretty craft….. I love all the colors in this Spiral Galaxy Craft.  And, believe it or not this Outer Space craft is made with a paper plate and some glow in the dark paint.  TheCraftyClassroom shows you in detail how you too can make this craft.


(5) Out of this World Centerpiece


Out of this World Centerpiece


Here is a cool craft that will be a lot of fun to put together.  Plus, this Out of this World Centerpiece is perfect if you are having an Outer Space birthday party.  Imagine this being the centerpiece at the Birthday table.  Find out how to make this over at MakingFriends.


(6) Grass Head Monster


Grass Head Monster


This is an awesome Outer Space craft because your child is going to have to care for it everyday.  It is actually made with real grass seed so your child will have to care for it everyday for the grass to grow.  Check out FreeKidsCrafts for all the details.


(7) Googly Eyed Green Blobs


Googly Eyed Green Blobs


These are pretty creepy looking…. aren’t they?  I found this craft over at MakeAndTakes and she had it posted as a Halloween craft, but I thought this craft would also fit for an Alien…. so I am including it in this Outer Space crafts list.  Check out her site for all the “how-to” details.


(8)  Rocket Craft


Rocket Craft


Isn’t this Rocket craft just adorable?  I love it!!  And, it is made out of a cardboard box.  What a creative idea.  You will need help from an adult for this craft as they do use a craft knife.  But, it would be so much fun making this with your parents.  Check out Se7en for the step-by-step details.


(9) Space Cake


Space Cake


I just had to add this cake to this post.  I know it really isn’t a craft Per Se, but I think cooking can be quite crafty…. and it is also a ton of fun to do with an adult.  So, check out this Outer Space cake over at FamilyFun and get the recipe to cook with your parents.  This would be great for an Outer Space birthday party.


(10) Puffy Paint Moon Craft


Puffy Paint Moon Craft


AllKidsNetwork shows us how if you mix shaving cream and glue together it makes a lumpy and bumpy surface….. just like the moon.  Actually, what they explain is that while the glue dries it makes a smooth-textured material that puffs while it’s drying and then flattens out.  Isn’t that cool?  Go to AllKidsNetwork to check out the full details.


(11) Space Shuttle Craft


Space Shuttle Craft


Wow, isn’t this space shuttle amazing?!  It’s just so creative.  And, the best part…. It’s made out of mostly all recycled materials.  How cool is that?!  Kids of all ages will love making this space shuttle…. the younger kids will need help from an adult.  Check out LooLeDo for the entire craft tutorial.

Technorati Tags: , , , , , , , , , , ,

How to Make a Button Santa Claus Ornament

Today I’m going to show you how to make a Button Santa Claus Ornament.  This Santa ornament is like no other….this Santa ornament is made up of buttons of different sizes and colors.  Use your creativity to make your ornament look like Santa.  This craft is a lot of fun…. so grab your buttons and a pipe cleaner and let’s get started.

Check out our other Christmas Crafts.


How to Make a Button Santa Claus Ornament


Materials Needed

Pipe Cleaner

Buttons – White, Black, Red & Skin Color Assorted Buttons

Scissors

Black Marker (optional)


Step 1


Take a pipe cleaner and string buttons on the pipe cleaner.


Take a pipe cleaner and string buttons on the pipe cleaner.  You won’t have the same ones as me, so you will have to be creative.


Step 2


Now make a loop at the top and then push the pipe cleaner into the 2nd hold on each button until you hit bottom.


Now make a loop at the top and then push the pipe cleaner into the 2nd hold on each button until you hit bottom.


Step 3


Twist it to lock in place


When you have pushed the pipe cleaner thru to the bottom… Twist it to lock in place.


Step 4


It should look like this.


Like this.


Step 5


Cut off extra.


Cut off extra.


Step 6


You can draw a face on Santa


You can draw a face on Santa if you want to.

Isn’t that Santa ornament original?  I can guarantee that no one else will have a Santa ornament like this one.  How did your Santa ornament turn out?  Make sure to let me know by taking a picture of your ornament and adding it to the comments below…. I’d love to see it.

Technorati Tags: , , , , , , , , , , ,

How to Make a Halloween Skull Mummy Figure

Today I’m going to show you how to make a Halloween Skull Mummy Figure with movable arms and legs.  This Skull Mummy is super creepy and totally perfect for Halloween.  Made with pipe cleaners and bandage tape your child is going to love putting together this creative Halloween Skull Mummy Figure.

Check out our other Halloween Crafts.


How to Make a Halloween Skull Mummy Figure


Materials Needed:

White or Orange Bead

Permanent Marker

2 White Pipe Cleaners

Self Stick Bandage Tape


Step 1


Draw ovals for eyes on a white or orange bead


Draw ovals for eyes on a white or orange bead.


Step 2


Draw a triangle nose and lines underneath


Draw a triangle nose and lines underneath.


Step 3


Draw question mark cheek bones


Draw question mark cheek bones.


Step 4


Fold two pipe cleaners in half


Fold two pipe cleaners in half.


Step 5


Now twist one of the pipe cleaners... from last step... and wrap it around the 1st pipe cleaners a few times


Now twist one of the pipe cleaners… from last step… and wrap it around the 1st pipe cleaners a few times.


Step 6


Use self stick bandage tape and wrap around legs and arms like a mummy


Use self stick bandage tape and wrap around legs and arms like a mummy.


Step 7


It should look like this


It should look like this.


Step 8


Place bead over top of pipe cleaner and then push back in bead's hole to keep on


Place bead over top of pipe cleaner and then push back in bead’s hole to keep on.


Step 9


Wrap around the chest and neck and even the head if you want


Wrap around the chest and neck and even the head if you want.


Finished Skull Mummy


Totally creepy, huh?!  I did warn you.  Don’t let the creepiness fool you though….. this Halloween craft is still a ton of fun to make.  Trust me… give it a whirl.

Technorati Tags: , , , , , , , , ,

How to Make a Halloween Spider on His Web

I don’t know about you, but when I think of Halloween there are a few spooky characters I think of.  I think of witches, ghosts, skulls and of course the spider.  I just find spiders very scary.  In this post you will learn how to make a Halloween spider on his web perfect for decorating and displaying with your other Halloween paraphernalia.  On lookers will love it!!

Also check out our other Halloween Crafts OR Learn How to Draw a Cartoon Spider Web.


Halloween Spider and his Web Craft.


Materials Needed:

Chopsticks (or other type of sticks)

Glue

Yarn

Black Pom Poms (one big and one small)

Googly Eyes

4 Pipe Cleaners


Step 1


Place chopsticks on top of each other like above


Place chopsticks on top of each other like above (an x shape with a line through it).


Step 2


Glue all the sticks together and then take some yarn and wrap it around the middle


Glue all the sticks together and then take some yarn and wrap it around the middle.  Glue all together in the middle again.


Step 3


Start wrapping the string around the chopsticks


Start wrapping the string around the chopsticks.  Make a loop around each stick as you create the web.

Step 4


Keep wrapping yarn or string all around the sticks


Keep wrapping yarn or string all around the sticks like you see above.  Wrap the yarn around each stick as you continue the web pattern.  At the end tie a knot and glue to the end.


Step 5


Glue 2 black pom poms together


Glue 2 black pom poms together… one big and one small.  Glue googly eyes on smaller pom pom.


Step 6


Cut 4 pipe cleaners in half


Cut 4 pipe cleaners in half.  Each half is a leg.  Bend each half into a letter Z shape and glue onto big pom pom.


Step 7


 Glue the spider on the web or tie a piece of yarn


Glue the spider on the web or tie a piece of yarn to it and attach to web.


Halloween Spider and his Web Craft.


Isn’t this craft perfect for Halloween?  The kids will love doing this craft, but they will also love the finished product even more.  They will certainly enjoy displaying it proudly this Halloween season.  And, make sure to check out our other Halloween Crafts so you can decorate your entire house this Halloween.

Technorati Tags: , , , , , , , ,

How to Make Pencil Toppers Using Pipe Cleaners

A very simply craft that your kids can do. As easy as 1-2-3. You can do this to add a little fun to your kid’s pens or pencils. Or this can also make a pretty present.

How to Make Pencil and Pen Toppers to Decorate Them for Back to School

Crafts Materials Needed:

pencils, pens

pipe cleaners/fuzzy wires

craft foam shapes

glue

How to Make This Craft:

Step 1

1. Holding the pipe cleaner on your right hand and the pencil on the other. With your left hand, holf the tip of the wire and gently push it against the pencil and swirl it around until you reach the other end.

Step 2


2. With the wire secure in place,  get any foam shape of your liking. Glue it to the upper tip of the wire.

Step 3

3. Gently slide the wire up the pencil, with only half of the wire hugging the pencil now. And you have a cool pencil topper!

Here is our video on how to Make Pencil Toppers.

Technorati Tags: , , , , , , , ,

Making Valentine’s Day Hearts Candy Doggy Card Project for Kids

If you want to make a special Valentine’s Day Card Treat to give out to your friends and classmates this year at school, then here is a tasty and inexpensive project to make. It is a Tootsie Roll, Standing Hearts Doggy Card. The easy to follow, illustrated steps can be found below. Have fun.

Here are Even More Valentines Day Crafts Ideas


Making Valentine's Day Hearts Candy Doggy Card Project for Kids


Making Valentine’s Day Hearts Candy Doggy Card Project for Kids

Crafts Materials Needed

– Tootsie Rolls

– Paper

– Pipe Cleaners / Chenille Stems

–  Scissors

– Glue

–  Googley Eyes

Step 1


Step 1 : Making a Valentines Day Heart Doggy Toosie Roll Card


Take a piece of red paper and fold it in half lengthwise.

Step 2


Step 2 : Making a Valentines Day Heart Doggy Toosie Roll Card


Cut a half heart along the fold to make a perfect heart.


Step 3


Step 3 : Making a Valentines Day Heart Doggy Toosie Roll Card


Cut out 3 hearts.

Step 4


Step 4 : Making a Valentines Day Heart Doggy Toosie Roll Card


Take a red piece of paper that is 3 inches x 3 inches. Put a tootsie roll in the center.

Step 5


Step 5 : Making a Valentines Day Heart Doggy Toosie Roll Card


Then grasp 3 chenille stems and make sure that all of the ends are even….place that on or under the Tootsie Roll. Then wrap the paper around it.

Step 6


Step 6 : Making a Valentines Day Heart Doggy Toosie Roll Card


Glue the paper shut. Then the top pipe cleaner would bend up for the neck in the front. The back of this same pipe cleaner should curl like a dog’s tail. The other 4 ends should be legs…look below at the bottom picture to see how it should look.

Step 7


Step 7 : Making a Valentines Day Heart Doggy Toosie Roll Card


The above picture shows how to make the dog’s head. Take a heart for the face…and 2 hearts for the ears. Make a ‘w’ for the mouth. Googly eyes for the eyes, and a heart for the nose (drawn in).

Step 8


Step 8 : Making a Valentines Day Heart Doggy Toosie Roll Card


Glue the ears on.  Then glue it on the dog’s neck (pipe cleaner. You can also glue on a ‘u’ shaped piece of paper for the dog’s tongue if you want to.

Step 9


Making Valentine's Day Hearts Candy Doggy Card Project for Kids


You can give this doggy treat to your friends at school for Valentine’s Day cards if you want…just write the person’s name on the outside on one side and write from: (your name) on the other side. I hope that you enjoyed this craft. Happy Valentine’s Day.

Here are Even More Valentines Day Crafts Ideas

Technorati Tags: , , , , , , , , , , , , , , ,