How to Make a Matchstick Picture

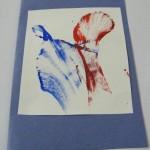
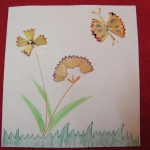
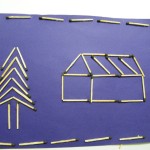
Here is a craft that is easiest enough that even the youngest of crafters are sure to enjoy.  I am going to show you how to make a beautiful matchstick picture that your child will love to have hung on the wall.  I am showing you just one idea….  Feel free to use your own creativity and create your own designs.  Now, keep it mind that we are using matchsticks…. always supervise your child during this craft.


Materials Needed

Craft paper

Matchsticks

Scissors

Glue


Step 1

Take a plain sheet of thick paper


Step 2

Apply glue on one side of a matchstick


Step 3

Place the matchsticks to make a house as shown below.


Step 4

Make a tree as shown below.


Step 5

Make a border with matchsticks as shown below. Put up the picture on your wall and enjoy it!!


Easy, peasy, lemon squeezy!!  How did your Matchstick Picture turn out?  Did you make the design I made or did you use your own creativity to make your own?  Let me know in the comments below.

Technorati Tags: , , , ,

How to Make a Thread Painting Greeting Card

I am going to show you how to make a greeting card that is so unique from any other you have seen or made before.  It uses a new technique called thread painting and it is so much fun.  This greeting card is perfect for anytime of year and for any family or friend.  They are sure to love it.  So, let’s get started on this thread painting craft.  Not only will you enjoy doing it…. the result of this craft is always a surprise.

Check out our other Greeting Card crafts.


Materials Needed

Thread

Paint

Card Paper / Card Stock

Scissors

Paintbrush


Step 1

Take white card paper and fold it into two.


Step 2

Take a piece of twine/ thread and paint it in any color you like. You can also use more than one color as done below. Make sure that the paint does not dry completely.


Step 3

Place the wet thread/ twine between the folded card in any design you like. Leave one end of the thread coming out of the folded paper.


Step 4

Fold the paper on it, put a book or weight on the paper to keep the 2 papers close together and pull the loose end of the thread. When you completely pull the thread out, take off the book, and open the folded paper. You will see a design like this.


Step 5

Cut off one half of the paper and glue it on a different colored folded card paper to make a greeting card.


Write a special message inside and give it to someone you love.  I’d love to see how neat your Thread Painting Greeting Card turned out.  Take a picture of it and post it in the comments below…. I’d love to see it.

Here is our video on How to Make a Thread Painting Greeting Card .

Technorati Tags: , , , , , , , ,

How to Make a Rose Hairband

I have a fun craft for the girls today…. I am going to show you how to transform an old, ordinary looking hairband to a beautiful rose hairband that you can wear with your favorite dress.  Simply use your favorite piece of satin ribbon and grab an old hairband.  In this tutorial I am going to use green ribbon, but feel free to use your favorite satin ribbon.  So, let’s get started.


Materials Needed

An old hairband

Satin ribbon –  one inch thick

Scissors

Tape


Step 1

Take a piece of satin ribbon about 10 inches long and fold it in the center to make a 90 degree angle as shown.


Step 2

Take the ribbon end on the right side and cross it over to the left side as shown.


Step 3

Take the ribbon on the bottom and cross it over to the top as shown.  You can hold the center between your fingers to keep it all in place.


Step 4

Again take the ribbon on the left and bring it to the right.


Step 5

Alternatively repeat the process a few times till you get folds in the center line like this.


Step 6

Hold one ribbon end in your finger and gently tug on the other end. The folded ribbon will crunch together to form a rose shape like below.


Step 7

Tie the two ends twice to make 2 knots.


Step 8

The top of the rose will look like this.


Step 9

Place the rose as desired on the hairband. Roll the loose ends of ribbon around the hairband and tape the ends to the hairband.


Step 10

Make a second rose and place it as shown.


Step 11

Make a third rose as shown.


Step 12

Use ribbon to cover the leftover bits. Your satin rose hairband is now ready.


Doesn’t this satin rose hairband turn out gorgeous?  How did your hairband turn out?  Let me know in the comments below.  Make sure to take a picture and share that too in the comments…. I would love to see it.

Technorati Tags: , , , , , ,

How to Make a Popsicle Stick Ornament

Today I have a fun Christmas craft for the youngest of crafters.  I’m going to show you how to make a Popsicle Stick Ornament.  This craft is super easy, but it is also super duper fun.  This Popsicle Stick Ornament comes out looking pretty and will look great on any Christmas tree this Holiday Season.  So, grab a popsicle stick and the rest of the craft materials needed and let’s get started.

Check out our other Christmas Crafts.


Image034


Materials Needed

Popsicle stick

Ribbon

Gold twine/ cord

Glitter glue

Green acrylic paint

Paintbrush

Tape


Step 1

Paint the popsicle stick green as shown.


Image029


Step 2

Make a design on the stick with glitter glue. You can make any design you like.


Image030


Step 3

Make a small bow with red ribbon.


Image031


Step 4

Use craft glue to glue the ribbon to the top of the popsicle stick.


Image032


Step 5

Take a piece of gold twine and tape the ends together.


Image033


Step 6

Tape the gold loop to the back of the popsicle stick.  Hang your Christmas ornament on your tree.


Image034


Isn’t this Christmas ornament beautiful?  I told you it would be.  Imagine how proud your little one will be to see that something they made is hanging on the tree.  Let me know how your ornament turned out in the comments below.  And, don’t forget to take a picture of it…. you can share that too in the comments.

Technorati Tags: , , , , , , , , , , , ,

How to Make a Christmas Gift Bowl

Today I’m going to show you how to make a bowl perfect for a Christmas gift.  This bowl would make a special gift for your Mom, Grandma or Aunt this Christmas.  It will mean so much to them and they will surely treasure it for years to come.  You will simply take a plain glass or plastic bowl and use acrylic paint to paint a Christmas design on the front of the bowl.  This craft will be a lot of fun…. almost as fun as it will be to give it as a gift this Christmas.  So, let’s get started.

Check out our other Christmas Crafts.


Image089


Materials Needed

White plastic (or glass) bowl

acrylic glitter glue – gold and green

acrylic paint – red

paintbrush

pencil


Image060


Step 1

Draw a line near the edge of the bowl, around it as shown.


Image061


Step 2

Paint the space between the edge and the line as shown.


Image062


Step 3

Draw holly leaves with a pencil in a few places around the bowl.


Image063


Step 4

Go over the lines with acrylic glitter glue. Allow to dry.


Image089


Step 5

You are done… The bowls can be washed as the acrylic design will stay.

Now, you are ready to wrap your bowl to give as a gift.  You know what you can do….. make a set of 2, 4 or 6 and give them an entire set as a Christmas gift.  They can use them to decorate the table next year for Christmas.  Now, the real question is…. who is the lucky person who is going to receive this Christmas bowl as a gift?  Hmmmmm……

Technorati Tags: , , , , , , , , , , , , ,

How to Make a Christmas Candle Arrangement

Today I’m going to show you how to make a Christmas Candle Arrangement.  This Christmas Candle Arrangement makes for a beautiful tabletop decoration this Holiday Season.  Make more than one candle arrangement and put them around the house as decorations.  Or, better yet….. make a few of these Christmas Candle Arrangements and give them as a gift this Christmas.  Whatever you decide to do with this craft it is sure to be a big hit this Christmas Season.

Check out our other Christmas Crafts.


Image027


Materials required:

Old toilet paper roll

Crepe paper – red, green

Glitter glue – gold

Glue

Paint – Red

Paintbrush

Scissors

A candle


Step 1

Cut through the toilet paper roll as shown below.


Image008


Step 2

Cut out a small ring of toilet paper roll about 6 cm wide.


Image009


Step 3

Overlap the ends to make a smaller roll. Tape the ends in place as shown.


Image010


Step 4

Place the candle inside the ring and stuff it with bits of torn green crepe paper. Tear the paper long enough that it comes out of the ring as shown below.


Image018


Step 5

Paint the toilet paper roll with red acrylic paint.


Image019


Step 6

Make a design on it with gold glitter glue as shown.


Image023


Step 7

Make small balls out of torn red crepe paper as shown.


Image025


Step 8

Glue the balls near the base of the candle as shown


Image026


Step 9

Place the candle on your table and you’re ready for Chistmas dinner!!


Image027


There you go…. you just finished making a Christmas Candle Arrangement.  Now, make a few more to decorate your house with this Holiday Season.  Or, have you decided to give them away as gifts?  Good for you…. either way they are sure to be enjoyed.

Technorati Tags: , , , , , , , , , , ,

How to Make a Set of Christmas Napkins

I have an easy craft for you today since the last two crafts I posted were a bit more complicated.  Today I’m going to show you how to Make a Set of Christmas Napkins perfect for the Holiday Season.  You can choose to use them to decorate your Holiday table or give them as a gift.  The choice is yours.  So, let’s get started.

Check out our other Christmas Crafts.


Image095


Materials Needed

Acrylic Glitter Glue – gold, green

Plain Red Napkins

Crayon


Image070


Step 1

Wash, dry and iron the red napkin (you don’t want it to shrink after you write on it).


Image064


Step 2

Write or draw the design you want with crayon. Be as creative as you like.


Image068


Step 3

Go over the crayon writing with acrylic glitter glue.  Do it slowly and make sure you do not spread it over any other part of the napkin.


Image069


Step 4

Allow it to dry overnight. Iron on the back of the napkin. Your napkin can now be packed and gifted or used by you for the Holiday Season.

Feel free to eat wildly from now thru the entire Christmas Season because washing it gently with water and soap will not ruin the design.  So, did you decide to give these Christmas Napkins as a gift or did you keep them for yourself?  Let me know in the comments below.  Also, let me know how your Christmas Napkins turned out by taking a picture of them and posting them with your comment.

Technorati Tags: , , , , , , , , , , ,

How to Make Egg Head Christmas People

I have a fun craft for you today.  I’m going to show you how to make Egg Head Christmas People out of eggshells.  You can even make an entire series of egg people…Use your creativity to make angels, shepherds, Mary and Joseph. These make great tabletop Christmas decorations…. so make a few.  Let’s get started.

Check out our other Christmas Crafts.


Image005


Craft materials required:

Thick purple paper

Thick brown colored paper (or any skin color shade)

Egg Shell

Glitter Glue

Gold Paper

Permanent Marker

Glue

Scissors


Image006


Step 1

Take a square piece of purple paper.


Image105


Step 2

Roll it to make a cone and glue the end to hold it in place. Cut the edge to form a perfect cone that will stand as shown.


Image106


Step 3

Wash and dry an egg which has been broken from one end and emptied as shown.


Image100


Step 4

Cut a strip of gold paper and snip the edges to make a zigzag design as shown.


Image104


Step 5

Roll the strip and glue. Glue the crown to the top of the head as shown.


Image107


Step 6

Take a small strip of brown card paper and fold in the center as shown.


Image001


Step 7

Glue the ends of the paper strip to the cone as shown to form folded hands.


Image002


Step 8

Draw a face using a permanent marker.


Image003


Step 9

Decorate the clothes with glitter glue as shown


Image005


Isn’t it beautiful?  Who would have thought that this could have been started from an eggshell.  But, of course it was.  Please let me know in the comments below how your Egg Head Christmas People turned out.  And, don’t forget to share a picture in your comment…. I’d love to see them.

Technorati Tags: , , , , , , , , , ,

How to Make a 3-D Christmas Tree Card

Christmas is just a few weeks away….. now is the time to send out Christmas cards so that your friends and family receive them well before Christmas.  Well, today I’m going to show you how to make your very own 3-D Christmas cards.  These are perfect for big families because there is plenty of room to write everyone’s names.  Not to mention, everyone will love receiving these cards ….. especially since you made them yourself.

Check out our other Christmas Crafts.


Image040


Materials required:

Green Paper

Green Paint

Paintbrush

Scissors

Glue

Markers


Step 1

Cut out a Christmas tree shape as shown below.  You can do this by folding a paper, drawing half a shape and cutting it out. Make sure that both sides are symmetrical.


Image028


Step 2

Cut out 3 more trees  of the exact size and shape.


Image034


Step 3

Fold all the trees. Glue one side of one tree to the side of another tree as shown.


Image030


Step 4

Glue a side of the second tree to the third tree as shown. Similarly, glue the end of the third tree to the first tree.


Image031


Step 5

The tree will look like this…


Image032


Step 6

Write a note on each side. Paint the borders green.


Image039


Your friends and family will love to receive this Christmas card.


Image040


How did your 3-D Christmas Tree Card turn out?  It’s really unique isn’t it?  Now, make a few more and send out to your family and friends this Christmas season.

Technorati Tags: , , , , , , , , , ,

How to Make a Joy Christmas Decoration

Believe it or not it is December already.  Now is the time to get in the Christmas spirit.  This craft will get you in the Christmas spirit for sure.  Today I’m going to show you how to make a Joy Christmas Decoration.  This Christmas decoration is perfect to hang on a door knob or even your Christmas tree.  You can even make other words like, Peace, Hope and Love too.  So, let’s get started.

Check out our other Christmas Crafts.


DSC04091


Craft materials required:

Ribbon

Thick Colored Paper

Hole Punch

Glue

Tape

Scissors


Step 1

Cut out 3  squares of about 5 cm wide each side, in different colors.


joy ornament


Step 2

Cut out letters J, O and Y (you can also use stickers instead).


JOY


Step 3

Stick the letters on the squares on contrasting colors.


JOY ornament2


Step 4

Punch one hole near every corner as shown.


Image115


Step 5

Take a piece of ribbon through the Y letter bottom hole as shown. (from back to front)


Image116


Step 6

Through the second hole on Y , take the ribbon back. Arrange all the other letters as shown and cut the ribbon length as required.


Image117


Step 7

Repeat the process of weaving the ribbon through O and J


Image119


Step 8

Complete the weaving as shown.  Turn to the back of the ornament and tape all the ribbons in place.  Your ornament is ready.


joy ornament3


What a beautiful Christmas decoration, huh?!  As I said above, you can use this tutorial to make more of these Christmas decorations with other words like Peace, Hope and Love…. wouldn’t that look festive hanging on all your door knobs?  It sure would.

Technorati Tags: , , , , , , , , , , , ,

How to Make a Paper Christmas Ornament

Today I’m going to show you a simple craft to make a Christmas Ornament out of paper and ribbon.  And, keep in mind…. just because the craft is a simple one does not mean that the ornament will look simple when done.  As a matter of fact, the ornament turns out to be quite beautiful.  So, let’s get started.

Check out our other Christmas Crafts.


christmas ornament


Craft materials required:

Colored Paper

Scissors

Ribbon

Hole Punch

Paper Clip

Ruler


Step 1

Cut 5 strips of paper about 4 cm wide.


Image017


Step 2

Cut 2 of them to the length of 20 cm, 2 to the length of 16 cm and 1 to the length of 12 cm.


Image018


Step 3

Place them on top of each other in this order… 20 cm – 16 cm  – 12 cm – 16 cm – 20 cm.  Bring one end of all the strips together and punch a hole in it.


Image019


Step 4

Tie a piece of ribbon as shown.  Leave it long enough to be used to hang it up somewhere.


Image020


Step 5

Bring the other end of all the strips together as shown. You can hold it in place with a paper clip.  Punch a hole in this end too.


Image022


Step 6

Tie a small piece of ribbon through the bottom end.


Image023


Step 7

Hang up the paper ornament on your Christmas tree or use it as a Christmas decoration somewhere else in your house.


christmas ornament


And, that’s it.  I told you the craft is simple.  How did your Christmas Ornament turn out?  Let me know in the comments below.  And, don’t forget to take a picture of it as well…. you can include it in your comment, so I can take a look at it.

Technorati Tags: , , , , , , , , , , ,

How to Make a Woven Coaster

I have a super fun and easy craft for you today.  I’m going to show you how to make a Woven Coaster.  This coaster is one of the simplest ways to learn weaving.  With some paper and some pretty ribbon you will have the Woven Coaster finished in no time.  Why not make 3 more….. make a set of 4 Coasters.  It will make for a wonderful Holiday Gift.  Let’s get started.


Craft materials required:

Thick paper

Satin ribbon- 1 inch thick

Tape

Ruler

Scissors


Step 1

Cut a square piece of thick paper about 8 in x 8 in.


Step 2

Draw 4 lines to make a border 1 inch thick on each side.


Step 3

From the top draw horizontal lines one inch away from the top line as shown.


Step 4

Cut along the lines.


Step 5

Take a ribbon about 6.5 in long and place it as shown.


Step 6

Tape one end close to the first line as shown.


Step 7

Take the ribbon through to the other side, through the slit.


Step 8

The back will look like this.


Step 9

Take the ribbon back again through the next slit. Repeat the process to get a woven design as shown below. Tape the end in place.


Step 10

Take another piece of ribbon 4.5 in long.


Step 11

Repeat the process, but this time insert through the alternate slits as shown below.


Step 12

In this way, weave 6 ribbon pieces into place. The coaster will look like this.


For a neat finish, cover the back with a piece of paper the same size.

And there you have it…. a Woven Coaster.  How did your coaster turn out?  Let me know in the comments below.  Make sure to add a picture of your woven coaster to the comment, so I can check it out.

Technorati Tags: , , , , , ,

How to Make Pencil Shavings Art

Today I have a fun and creative craft for you.  I’m going to teach you how to make beautiful pictures out of pencil shavings. Its a great way to recycle waste. These pictures are amazing enough to frame and hang up on your wall. The simple steps to make it are given below, but be careful while you do this activity… pencil shavings are delicate and need to be handled gently.  So, let’s get started.


Craft materials required:

Pencils – Different Colors

Pencil Sharpener

Scissors

Glue

Card Stock


Step 1

Collect pencil shavings after sharpening your pencils.


Step 2

You can arrange 4 small bits like this and glue them in place to make one type of flower.


Step 3

You can glue two larger pieces together to make a butterfly.


Step 4

Decorate the butterfly as shown.


Step 5

Glue all the pencil shavings and decorate the rest of the picture with color pencils.


That’s it.  The craft is an easy one, but the results are big.  Every Pencil Shavings Artwork is an original, so don’t stop after one…. keep making them.  They make great gifts for the Holiday season.

Technorati Tags: , , , , , , ,

How to Make a “Thank You” Bookmark for Thanksgiving

Thanksgiving is just around the corner.  Thanksgiving is a day to give thanks for all that you have… for all the love and support you have around you.  What better way to show your loved ones you are thankful for them than to give them a gift you made yourself.  Today I’m going to show you how to make a “Thank You” Bookmark perfect for giving as a gift for Thanksgiving.

Check out our other Thanksgiving Crafts and Bookmark Crafts.


Image172


Materials Needed

Thick White Paper

Colored Paper to Make Letters (you could also use stickers)

Glue

Scissors

Thread – Different Colors ( I used 6 stranded embroidery thread)

Hole Punch

Pencil


Image173


Step 1

Cut out letters in different colors (or use stickers, or print out letters and cut them out)


Image151


Step 2

Arrange them in a row and glue to the white paper as shown


Image152


Step 3

Draw a line around the letters according to the shape of the letters as shown


Image153


Step 4

On the top, make a semi circle and draw as shown


Image154


Step 5

Cut along the line and punch a hole in the top.


Image156


Step 6

Take threads of different colors


Image162


Step 7

Cut them out into pieces 6 inches long, and fold them in the middle as shown


Image165


Step 8

Push the folded end through the punched hole on top of the bookmark as shown


Image166


Step 9

Pull the loose ends of the threads up and put them into the loop that is formed as shown.


Image169


Step 10

Pull tightly, till it looks like this.


Image172


And, that’s it.  It is a simple craft, but it will go over big as a gift.  So, whose the lucky person who is going to get this gift from you?

Technorati Tags: , , , , , , , , , , ,

How to Make a Thanksgiving Mobile

Thanksgiving is a time to remember how blessed we are to have such great family and friends.  Well, with that being said…. I have a creative way for you to remind yourself how thankful you are…. a Thanksgiving Mobile.  With pictures and your thankful thoughts you are sure to show everyone how blessed you truly are.  So, let’s get started.

Check out our other Thanksgiving Crafts.


Image141


Materials Needed

Thick Colored Paper

Markers

Thread

Ribbon

Scissors

Glue

Pictures of Family and Friends (you can use old photos or print outs)


Image131


Step 1

Cut out pieces of paper in different colored and sized diamonds as shown.


Image130


Step 2

Stick pictures on one side. I’m also really thankful for the great times of celebrations I had this year with my family and friends, so I made a special diamond that says ” celebrations”.  You can also add some like these.


Image133


Step 3

On the other side of the diamond, write the name of the person and decorate as shown.


Image134


Step 4

Using a pencil in the center, roll some colored paper into 2 tight rolls as shown. Glue the ends and then, remove the pencil.


Image132


Step 5

Cross the two rolls at the center and tie them together as shown.


Image149


Step 6

Punch a hole on the top end of the diamond and tie a piece of thread. Attach the thread to the paper rolls as shown.


Image135


Step 7

Tie a piece of ribbon to the top of the paper rolls as shown right in the middle.


Image136


Step 8

Now, hang up your mobile.


Image141


What a unique craft, huh?!  No one will have a Thanksgiving craft like yours.  Your family and friends are sure to love it.  Where did you hang your Thanksgiving Mobile?  Let me know in the comments below.

Technorati Tags: , , , , , , , , , ,

Kwanzaa Greeting Card Making Crafts for Kids

Make an African Styled Art Kwanzaa Greeting Card to celebrate Kwanzaa this year. This card is very simple to make and just requires some paper , scissors and glue. The simple instructions for making this colorful Kwanzaa greeting card are as follows.


kwanzaa greeting card


Kwanzaa Greeting Card Making Crafts for Kids

Craft materials required:

colored paper- choose two bright, vibrant colors

Thick card paper- white

Scissors

Glue


Step 1

Take a piece of thick card, the size you want, And fold it in half as shown.


Step 2

Cut out srtips of paper in both colors as shown.


Step 3

Cut out a strip of paper with jagged edges as shown. Do this in both colors.


Step 4

Arrange the paper strips in any arrangement you like to make a colorful Kwanzaa card.


kwanzaa greeting card


Technorati Tags: , , , , , , , , ,