
Learn how to make these adorable polymer clay stud hearts (aka heart earrings). You can give these stud hearts to your Mom, Grandma, friends, etc to show them how much you care about them…especially for Valentine’s Day, Mother’s day, or a birthday.
How to Make Cool Stuff
Learn how to make these adorable polymer clay stud hearts (aka heart earrings). You can give these stud hearts to your Mom, Grandma, friends, etc to show them how much you care about them…especially for Valentine’s Day, Mother’s day, or a birthday.

We will show you how to make this cool polymer clay heart keychain…a perfect gift to give to somebody you love or a good friend on Valentine’s day or to Mom on Mother’s Day or for a birthday. This polymer clay key chain is a cute heart adorned with flowers … perfect to decorate your phone, backpack, purse, etc.

This is a cute and easy to do, Valentine’s Day gift that kids can make for their parents, grandparents, or close friends. This arts and crafts lesson is in 2 parts. In this arts and crafts tutorial, we will show you how to make a Teddy Bear Heart Brooch Pin.

Father’s Day is coming up in the middle of June already. Show Dad that he is the Big Fish in your world by making him this fish pencil holder as a gift. He can hold both pens and pencils in this fish. Of course, this can be made as a present for anyone, not just your dad…such as Mom for Mother’s Day or for a birthday.

Do you want to learn how to make a unique picture frame? Most picture frame crafts are for one photograph, but this one holds 3 photos. This would be perfect to make as a gift for Dad or Mom for family photos…and it would look great on their office desk. If you want to learn how to make a tri-fold picture frame, then look at the directions in this arts and crafts activity for children.

This is an arts and crafts project that uses a cork and a wire coat hanger to make a great rack to hold magazines and newspapers. If your Dad reads a lot of periodicals (newspapers and magazines), then this might be the perfect craft to make for your Dad.

Did you know that you can make beads out of paper and / or fabric material? Well, you can. This is a great idea for kids to make jewelry, such as bracelets and necklaces for Mom, Grandma or an Aunt on Mother’s Day or a birthday. Girls especially seem to love this arts and crafts project because many girls love to sew with needle and thread and they love making and wearing jewelry.

This is a cute idea for kids to make jewelry, such as bracelets and necklaces for Mom, Grandma or an Aunt on Mother’s Day or a birthday. Girls especially seem to love this arts and crafts project because many girls love to sew with needle and thread and they love making and wearing jewelry. Either way, this is a lot of fun.
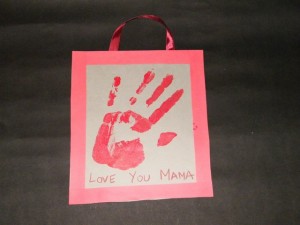
Moms always love hand print crafts AND they are very easy to make. Here is a cute arts and crafts project for kids to make for Mom on Mother’s Day. This is also great for toddlers and preschoolers. Make this beautiful hand print poster for your Mom this Mother’s day. She’ll treasure it forever.
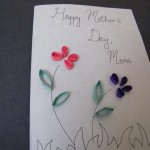
Mother’s Day is a special day for Moms and all Moms want to be treated special on that day (and all days actually). Make this beautiful card for mother’s day with the following easy directions for the following arts and crafts activity for kids. Its something new, unique and different and I’m sure mom will love it!!
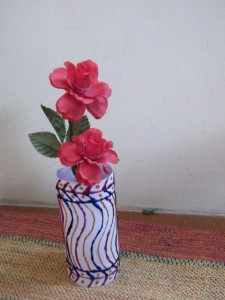
This is a recycling and a Mother’s Day Present Arts and Crafts Activity for Kids to Make. Recycling can be your way of taking care of the environment. Here’s a great craft activity that makes it really fun to recycle. Make a flower vase out of an old plastic bottle and then put fresh flowers in it for Your Mom.
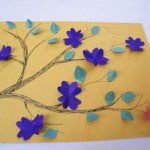
Make this beautiful branch full of flowers picture for your Mom, Aunt, or Grandma this Mother’s Day. This picture of a bunch of flowers looks much harder to make than it actually is. All you will need to make this beautiful piece of art is some colored paper, scissors and glue….oh, and lots of Love.

Mother’s Day is coming up soon and it is time to think of a very special gift to make for your Mom. Here is an idea to make a designer notepad / or designer stationary present for your Mom. Moms have a lot of tasks and to-do lists to make, as well as notes to write. It seems that a designer notepad is the perfect gift to give to your special Mom.
Does your mom love jewelry? Well, Mother’s Day is coming up and today we will teach you to how to make a very special jewelry box for your Mom. Make this nice keepsake box for her to store her favorite jewelry. It will be a great gift for mother’s day. So find an old box and follow the instructions to make this gift.

Here is a great Mother’s Day crafts project for kids to make for Mom or Grandma. Below, you can find out how to make a cardboard loom to weave beautiful handbags / purses to give as gifts or to keep for yourself. Either way, it is a lot of fun and the results are beautiful. This is a great crafts project for older kids and girls, as well as teens.

Silhouette portraits make a wonderful gift for Mom and Dad for Birthdays or for Mother’s Day or for Father’s Day … and better yet, they are very easy to make. This will make a wonderful keepsake craft for Mom and Dad as they watch you grow up and get to see how small your head used to be in comparison to how you look now (when they look back on it years later).