How to Make a Leaf Print Picture

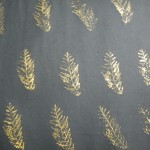
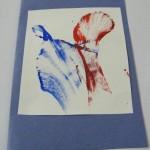
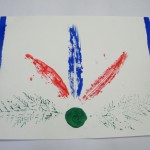
Spring will be here before you know it.  And this activity is a great excuse to spend some time outdoors.   With this activity you will need to go outdoors and collect leaves of different shapes and sizes.  You will paint them and use them as a stamp to create a picture of your choosing.  This craft is a lot of fun and the cool part is that no Leaf Print Picture will ever be the same.  Use your creativity to paint a bunch of different pictures.  So, grab some leaves and let’s get started.

Check out our other Garden & Plant Crafts.


Materials Needed

Leaves

Tempera paints

Paintbrush

Paper


Step 1

Collect leaves of different shapes and sizes.  Arrange them to form a design that you like.


Step 2

Apply paint on the underside of a leaf.


Step 3

Press it on the paper to form a print.


Step 4

Print more leaves similarly to form a design.


Step 5

Add a border and other details.


And, there you have it….. now, put it up on your wall and celebrate the coming of Spring!!  How did your Leaf Print Picture turn out?  Let me know in the comments below.  And, make sure to take a picture of it and add that to the comments as well…. I’d love to see it.

Technorati Tags: , , , , , , , , , ,

How to Make Leaf Print Gift Wrap Paper

Celebrate spring by making this pretty wrapping paper with leaves from the garden. All you need is some paper, paint and a leaf.  It’s lots of fun to do, and it will be great to wrap your next birthday gift in.  I don’t know about you, but I never seem to have enough wrapping paper in the house.  Or, I have wrapping paper, but it is the same wrapping paper I use for everyone’s gift.  You can be rest assured that no one else will have this Leaf Print Gift Wrap.  So, let’s get started.


Materials Needed

Gold paint

Leaf

Black chart paper

Paintbrush


Step 1

Take a leaf with a pretty design and paint gold paint on the underside.


Step 2

Press the painted side on the black paper. You can use a piece of newspaper to press it on to the black paper.


Step 3

Repeat this process many times to make a beautiful pattern.


Step 4

Your gift paper is ready. Let it dry and store it for later use.  Imagine how impressed the receiver of this gift wrap will be?!  So impressed!!  The paper really turns out beautiful.

Technorati Tags: , , , , , , , ,

How to Make a Trinket Box out of Popsicle Sticks

I have a fun and easy craft for you today.  I’m going to show you how to make a Trinket Box out of Popsicle Sticks.  A trinket box is great for holding little things like rings, earrings, candy, coins…. those type of little things.  These type of things are called trinkets and a trinket box is kept to store these small things as to not lose them.  This trinket box makes for a great gift for someone special or keep it for yourself.  The choice is yours.  Now let’s get started.

Check out our other Popsicle Stick Crafts.


Materials Needed

Popsicle sticks

Thick colored paper

Glue

Gold acrylic paint

Brush

Scissors


Step 1

Glue four sticks together to form a square. Make about 20 squares like this.


Step 2

On top of the first square, glue a second square as shown.


Step 3

Keep gluing the squares on top of each other in the same manner to form a design.


Step 4

Cut out a piece of paper in the size of the square and glue it to the bottom most square.


Step 5

Turn it over, paint the top two squares with gold acrylic paint. Your box is ready.


And, there you have it…. easy peasy lemon squeazy.  How did your Trinket Box turn out?  Now, the real question is this….. are you going to keep it for yourself or give it to someone else as a gift?   Hmmmmm…..

Technorati Tags: , , , , , , , , , ,

How to Make a Shamrock Greeting Card for St. Patrick’s Day

In this post I’m going to show you how to make a Shamrock Greeting Card Craft for St. Patrick’s Day. You can make it to wish your friend, teacher or mother (or whoever you would like) a wonderful St. Patrick’s Day.  All you need is some paint, paper and an old toothbrush.   The craft is an easy one, but it is sooooo…. much fun.  So, grab those materials needed and your St. Patrick’s spirit and let’s get started.  Have fun!!

Check out our other St. Patrick’s Day Crafts.


Materials Needed

Thick white paper

Paint

Toothbrush

Scissors

Marker


Step 1

Fold a piece of thick white paper to make a card of the size you want.


Step 2

Draw out a shamrock smaller than the card and cut it out.


Step 3

Take an old toothbrush and dip it in some tempera paint.


Step 4

Place the shamrock in the center of the card.  Use the toothbrush to spray paint on it.  Make sure you spray plenty of paint around the edges of the shamrock.


Step 5

When you are done lift the shamrock off carefully… and surprise!!… you have a beautiful shamrock card underneath.


Step 6

Allow it to dry, write a special message inside, and spread a little love this St. Patrick’s Day.  The receiver of this card will absolutely love it!!

Technorati Tags: , , , , , , , , , , , ,

How to Make a Wooden Beads Bracelet with an African Mask Charm

Black History Month will be coming to a close in the next couple of days.  With that being said…. I thought we could use this opportunity to make a craft for Black History Month.  Today I’m going to show you how to make a Wooden Beads Bracelet with an African Mask Charm.  The bracelet turns out just absolutely beautiful…. it truly does.  And, when using the ochre paint it ages the charm to give it an authentic look.   Because we’ll use oven-hardening polymer clay for the mask, you’ll need a little help from an adult.  So, grab the materials needed and let’s get started.

Check out our other Jewelry Crafts

Laura from Dacian Moon Handmade will show you how to make this craft.


Materials Needed

– toothpick
– brown polymer clay (I placed the toothpick beside it to show you how much polymer clay you’ll need)
– thread and needle
– scissor
– wooden beads
– paints (ochre, red and green)
– paintbrush
– baking paper
– baking tray


Step 1

Condition polymer clay by hand, simply mix it and squish it with your fingers. You may want to roll it into a log between your palms, fold it in half, and then roll again. Part it in two:  a small part and a bigger part.


Step 2

Take the bigger part and make a roll with it.


Gently squish one part, to have a pointy end.


Do the same with the other part.


Step 3

Place it on a piece of baking paper and flatten it.


Step 4

Using the toothpick, start to sculpt the eyes…


… like this.


Add eyebrows.


Make an outline of a nose.


Step 5

Take a small part of polymer clay and make it as a shape of a tear.


Place it inside the nose markings. Press gently to “glue” it.


Step 6

Sculpt the mouth.


Step 7

With the toothpick make a hole in the upper part of the mask.


Take care that the toothpick goes through the mask and gets out on the other side.


Step 8

Place the mask on the baking paper again and take another small part of polymer clay.


Roll it and place it under the hole.


Flatten it and make an “x” on the lower part of it.


Step 9

Sculpt the markings on the forehead, like in the picture.


Step 10

Now you’ll need the help from an adult.  Place the mask (with it’s piece of baking paper) on the baking tray, and bake it according to the instructions on the polymer clay package (they depend on the brand you use: fimo, cernit, sculpey…, but usually it is one half of hour at 230 F or 110 C).


Step 11

Let it cool down.


Step 12

With the ochre paint… coat the markings on the sides.


Make points around the bar on the forehead…


… and on the face, like this:


Step 13

With red paint coat the upper part …


… and add a line on the middle of the lower lip.


Step 14

With green paint mark the lines between the red and ochre. Let it dry.


Step 15

Now we’ll need the beads, needle and thread and the mask.


Make a knot near the end of the thread…


… and start adding beads on it (using the needle, of course).


Step 16

Measure on your hand to know when you are at the middle of the bracelet.


Put a jump ring on the mask and put it on the thread too (or just knot it on the thread).


Step 17

Continue to add wooden beads to complete the other half of the bracelet, then make a knot.


Now, you can wear your bracelet.


Isn’t this bracelet just absolutely gorgeous?  The ochre paint makes this African Mask Charm look very old, doesn’t it?  Just like it should.  I hope you had fun making it…. now enjoy wearing it.

Technorati Tags: , , , , , , , , , , , , , , ,

How to Make a Popcorn Bracelet

I have a super fun and easy craft for you today.  I’m going to show you how to make a Popcorn Bracelet.  This just might be the only jewelry you can make that while you make it you can eat it as well.  Just keep it mind that once you have painted the popcorn you CAN NOT eat it.  But, until the popcorn has been painted it is a tasty treat.  So, grab your friends, a good movie to watch and some popcorn and let’s make this fun craft.

Check out our other Jewelry Crafts.

Tutorial offered by Laura from Dacian Moon Handmade


Materials Needed

– popcorn
– thread and needle
– paints
– paintbrush


Step 1

Paint the popcorn in your favorite colors.


Step 2

Let them dry.


Step 3

Make a knot on one side of the thread, leaving enough extra thread to tie the bracelet.


Step 4

Start placing the popcorn on the thread, using the needle.


It will look like that.


Step 5

After the last popcorn is on the thread, make another knot near it…. and cut the thread (letting again enough extra thread to tie the bracelet).


Now, you have a cute bracelet.


Isn’t that adorable?  And, it was so much fun to make, wasn’t it?    How did your Popcorn Bracelet turn out?  Let me know in the comments below.  And, take a picture of the Popcorn Bracelet and add that to the comment as well… I’d love to see it.

Technorati Tags: , , , , , , , , , , , , ,

How to Make a Handprints T-Shirt

I have a fun keepsake memory craft for you today.  I’m going to show you how to make a Handprints T-shirt.  This Handprint T-shirt craft is perfect for the end of school, birthday party, summer camp or anything that you want to remember your friends from.  All you need are a bunch of friends, a fresh T-shirt and some paint and you are good to go.  So, grab a bunch of your best of friends and the rest of the materials needed and let’s get this craft started.

Check out our other Keepsake Crafts.

(tutorial offered by Laura from Dacian Moon Handmade)


Materials Needed

– white T-Shirt
– paints
– marker (permanent or paint marker)
– paintbrush
– friends


Step 1

Prepare your T-Shirt.


Step 2

You and your friends paint your hands – you can use the paintbrush for that.


Step 3

Place your hand over the T-Shirt and… go!


That is my handprint…


… and the handprints of my 5 friends.


Step 4

You can write a remembering quote on your handprints and, of course, you must sign them.

Let the T-Shirt dry then you can wear it.


Doesn’t this Handprints T-shirt craft turn out amazing?  Imagine how wonderful it will be to wear the T-shirt that you and your friends help make together.  It is a wonderful way to remember your time with your friends.

Technorati Tags: , , , , , , , , ,

How to Make a Potato Heart Stamp

I have a very unique craft for you today.  I’m going to show you how to make a Potato Heart Stamp for Valentine’s Day.  Yep, you read that right…. a stamp made from a potato.  It is such a clever idea, isn’t it?  And yet…. so simple.  You can make Valentines pictures and Valentines Cards with your Potato Stamp.  You will need a little help from an adult for this craft as it does call for a sharp knife.  An adult will use the knife to cut the top of the potato off.  So, make sure not to start this craft without an adult present.  So, with that being said grab an adult and the materials needed and let’s get started.

Check out our other Valentines Day Crafts.


How to Make a Potato Heart Stamp


Materials Needed

Potato

Sharp Knife (for an adult)

Butter Knife

Toothpick

Red Paint

Paintbrush

Paper


Step 1


Get a potato.


Get a potato.


Step 2


Ask an adult to cut the end off of potato.


Ask an adult to cut the end off of potato.


Step 3


Cut heart into the potato


Cut heart into the potato with butter knife and a toothpick.


Step 4


Brush paint onto the raised heart.


Brush paint onto the raised heart.


Step 5


Now push the heart against the paper


Now push the heart against the paper… repaint the potato between each print to get the best printed hearts.

Isn’t that a unique way to make hearts on a piece of paper?  I think it is…. plus it is a ton of fun.  Now, why don’t you use your Potato Heart Stamps to make some great Valentines pictures or cards to hand out to your friends and family.  I am sure they will absolutely love them!!

Here is our video on How to Make a Potato Heart Stamp.

Technorati Tags: , , , , , , , , , , ,

How to make Decorated Pencils

In the last post I was talking about how 100 days of school will be arriving soon, and that got me thinking…. if you are almost at 100 days of school your pencils must be getting old and it is time for some new ones.  Well, instead of just using the same old standard pencils for school… why not take it up a notch.  Let’s make our pencils fancy and fun with some decorations.  Today I’m going to show you how to make decorated pencils.  The craft will be so much fun…. almost as much fun as these pencils will be to use.  So, let’s get started.

Check out some Pencil Topper Crafts.

Laura from Dacian Moon Handmade  will show this tutorial step-by-step.


Materials Needed

– pencils
– fluffy feathers
– craft glue
– paint
– metallic powder
– beads


Step 1

Let’s place some beads on a piece of paper.


Apply a layer of glue on the upper part of a pencil…


… like this. Spread it well.


Step 2

To begin, press the pencil over the beads…


… then pour more beads over the pencil.  Do that until it is well covered all around.

Let it dry well.


Meanwhile let’s make the second pencil.


Step 1

Take the eraser out.


Fill its place with glue…


… like this.


Step 2

Place the feather where the glue is.  While it dries you can paint the pencil.


We will paint it all black.


Step 3

Take metallic powder on the paintbrush and spread it over the paint… do this before it is dried.


Like this:


Let it dry completely.


Now, both your pencils are finished.  Don’t they look fun?!  They are so much better than using just plain, ordinary pencils.  It almost makes you excited to do some homework, doesn’t it?   hmmmmmm…..

Here is our video on How to Make Decorated Pencils

Technorati Tags: , , , , ,

How to Make a Thread Painting Greeting Card

I am going to show you how to make a greeting card that is so unique from any other you have seen or made before.  It uses a new technique called thread painting and it is so much fun.  This greeting card is perfect for anytime of year and for any family or friend.  They are sure to love it.  So, let’s get started on this thread painting craft.  Not only will you enjoy doing it…. the result of this craft is always a surprise.

Check out our other Greeting Card crafts.


Materials Needed

Thread

Paint

Card Paper / Card Stock

Scissors

Paintbrush


Step 1

Take white card paper and fold it into two.


Step 2

Take a piece of twine/ thread and paint it in any color you like. You can also use more than one color as done below. Make sure that the paint does not dry completely.


Step 3

Place the wet thread/ twine between the folded card in any design you like. Leave one end of the thread coming out of the folded paper.


Step 4

Fold the paper on it, put a book or weight on the paper to keep the 2 papers close together and pull the loose end of the thread. When you completely pull the thread out, take off the book, and open the folded paper. You will see a design like this.


Step 5

Cut off one half of the paper and glue it on a different colored folded card paper to make a greeting card.


Write a special message inside and give it to someone you love.  I’d love to see how neat your Thread Painting Greeting Card turned out.  Take a picture of it and post it in the comments below…. I’d love to see it.

Here is our video on How to Make a Thread Painting Greeting Card .

Technorati Tags: , , , , , , , ,

How to Make a Christmas Gift Bowl

Today I’m going to show you how to make a bowl perfect for a Christmas gift.  This bowl would make a special gift for your Mom, Grandma or Aunt this Christmas.  It will mean so much to them and they will surely treasure it for years to come.  You will simply take a plain glass or plastic bowl and use acrylic paint to paint a Christmas design on the front of the bowl.  This craft will be a lot of fun…. almost as fun as it will be to give it as a gift this Christmas.  So, let’s get started.

Check out our other Christmas Crafts.


Image089


Materials Needed

White plastic (or glass) bowl

acrylic glitter glue – gold and green

acrylic paint – red

paintbrush

pencil


Image060


Step 1

Draw a line near the edge of the bowl, around it as shown.


Image061


Step 2

Paint the space between the edge and the line as shown.


Image062


Step 3

Draw holly leaves with a pencil in a few places around the bowl.


Image063


Step 4

Go over the lines with acrylic glitter glue. Allow to dry.


Image089


Step 5

You are done… The bowls can be washed as the acrylic design will stay.

Now, you are ready to wrap your bowl to give as a gift.  You know what you can do….. make a set of 2, 4 or 6 and give them an entire set as a Christmas gift.  They can use them to decorate the table next year for Christmas.  Now, the real question is…. who is the lucky person who is going to receive this Christmas bowl as a gift?  Hmmmmm……

Technorati Tags: , , , , , , , , , , , , ,

How to Make a Handprint Hanukkah Menorah

I have a great Hanukkah craft for the youngest of craft fans.  Today I’m going to show you how to make a Handprint Hanukkah Menorah.  This is a great craft to do with your young children.  It’s an easy craft made from a little bit of paint and some paper.  And, keep in the mind…. just because it is an easy craft shouldn’t take away from the fact that this craft is a ton of fun.  So, grab your young kids and some paint and make this craft with me.

Check out our other Hanukkah Crafts.


How to Make a Handprint Hanukkah Menorah


Materials Needed

Paints – Blue and Orange

Paper


Step 1


Paint both your child's hands.


Paint both your child’s hands.  I don’t know about your child…. but my child didn’t like this.


Step 2


Put your child's hands, palms down, on paper with thumbs touching.


Put your child’s hands, palms down, on paper with thumbs touching.


Step 3


You can do better than this.


You can do sooooo…. much better than this.


Step 4


Put orange paint on your finger and put a fingerprint over each candle.


My other daughter helped me.  Put orange paint on your finger and put a fingerprint over each candle.  Both the thumbs in the center are to be only one candle.


Step 5


Completed Hanukkah Menorah


Completed Handprint Hanukkah Menorah.

There you go…. you have your completed Hanukkah Menorah.  What is really cool is that every Hanukkah Menorah will be different as every child’s handprint is different.  So, make sure to let me know how your handprint Hanukkah Menorah turned out…. share a picture in the comments below.  Now, go hang up your Handprint Hanukkah Menorah for all to see.

Technorati Tags: , , , , , , , , , , , , ,

How to make a Pet Rock

Pet Rocks became popular in the 1970’s.  It would be our equivalent of the virtual pet.  It really doesn’t do much.  It sits and keeps you company.  But, one thing is for sure…. they are always super cute.  Today I’m going to show you how to make your very own Pet Rock.  You don’t have to follow the craft word-for-word if you don’t want to…. feel free to use your own imagination to make your Pet Rock however you see fit.

Laura from Dacian Moon Handmade will show you how to make your Pet Rock.


CRAFT MATERIALS NEEDED:

– stone
– acrylic paints
– paintbrush
– a button
– two plastic antennas (or anything you want to use – you can make ears, horns, hair …)
– craft glue


Step 1

Wash the stone and wait for it to dry… That way the paint will adhere better.

Then add glue where you want to place decorations.

Place button in the middle for the snout.


Take the antennas…


… and place them on their place.


Step 2

Let the glue dry.


Step 3

Choose the color you want your pet to be. I went with blue.


Carefully cover all with paint – including the antennas and snout…


… like that.


Step 4

Next, paint its eyes and make him blush.

I use night glow paint for the eyes so I can see him in the dark  too.


There you have it.  Easy Peasy Lemon Squeezy.  How did you decide to make your Pet Rock?  Let me know in the comments below.  Don’t forget to add your picture in the comment, so I can see how your Pet Rock turned out.

Technorati Tags: , , , , , , , , ,

How to Make Handprint Turkeys – 4 Methods

One of the easiest and most effective ways to show children how to draw a Turkey is to have them trace their hand.  That method was used when I was a child and they still do it now.  Today I will show you 4 methods to make a Turkey…. all using the children’s handprint.  Try all 4 methods and see which handprint turkey you like best.  I can’t help myself…. I love them all.

Check out our other Thanksgiving Crafts


Method 1


use tempera paint to pain the palm and thumb of the child brown


Materials Needed:

Brown Tempera Paint

Different Colors of Tempera Paint for feathers

Paper

Googly Eyes

Construction Paper

Black Marker

Scissors

Glue


How To:

Use tempera paint to paint the palm and thumb of the child’s hand brown and the other fingers different colors for feathers. Then place the child’s hand on paper. Let dry and then add googly eye…a triangle for the beak…and oval for the wattle.  Also, draw legs and feet.


Method 2


Trace the child's hand on different colored paper


Materials Needed:

Brown, Red, Yellow, White and Green Construction Paper

Pencil

Googly Eyes

Scissors

Glue


How To:

Trace the child’s hand on different colored paper. Cut out brown circle and oval for body and head.  Add googly eyes…construction paper triangle beak…oval neck for the wattle….then paste the handprints in the back of turkey for feathers.


Method 3


Cut out a number 8 shape (a smaller circle on top of a bigger circle) out of brown paper


Materials Needed:

Brown Paper

Different Color Construction Paper

Googly Eyes (optional)

Glue

Scissors


How To:

Cut out a number 8 shape (a smaller circle on top of a bigger circle) out of brown paper…or just cut out 2 brown circles.  Cut out construction paper ovals for eyes or use googly eyes.  Cut out a diamond for beak…and then fold it into a triangle for the beak. Cut out oval for the wattle. Cut out lots of different colored construction paper handprints and glue them to the back for feathers.


Method 4


Cut out 2 different sized and colored circles for head and body


Materials Needed:

Different Color Construction Paper

Different Color Paint

Scissors

Glue


How To:

Cut out 2 different sized and colored circles for head and body. Cut out a diamond for beak…and then fold it into a triangle for the beak. Cut out oval for the turkey’s wattle.  Cut out thin rectangles to make the legs and feet. Paint the child’s hand and then place it on the paper for feathers. Use different colors for a nice effect.


There you have it…. 4 different methods for making handprint turkeys.  Which one are you going to make?  Oh heck…. make them all.

Technorati Tags: , , , , , , , , , , , ,

How to make a Monster Bookmark

Monsters can be scary, but some of them can be quite cute too.  There is nothing to be frightened of with the cute ones…. actually, they are very friendly.  In this post I will show you how to make a Monster Bookmark perfect for protecting over your spot when you are done reading.  And, this monster might look quite cute, but he is plenty tough to make sure your reading spot stays safe.

Check out our other Halloween Crafts.

Laura from  Dacian Moon Handmade  will show you, step by step how to make it.


CRAFT MATERIALS NEEDED:

– colored cardboard
– white cardboard
– ruler
– paints
– scissors
– paintbrush
– pencil
– pen (optional)
– glue


Step 1

Take the colored cardboard. Measure 10 cm on one side of it…


… and 10 cm on the other (near the same corner)


Measure 5 cm on both sides too, than draw two rectangles like in the picture.


Step 2

Unite two opposite corners on the exterior small rectangles…


… like this.


Later we will cut off the marked triangles.


Step 3

Cut out the drawing…


… and the two triangles.


Step 4

Using the paints and paintbrush decorate the central part.


I am making points with red paint…


Then, using a black pen I cover the space between the points…


… like that.


I want to create an illusion of scales, so I add some purple color.

Let it dry.


Step 5

Fold one triangle over the painted part…


… like this.


On the other triangle add a layer of glue…


… and bring it over the central part.


Step 6

Decorate this triangle too.


Step 7

Draw two circles on the white cardboard…


… cut them out…


… and glue them…


… on the new decorated triangle (after its dry, of course).


Step 8

Do the same with the colored cardboard (two circles a little smaller).


It will look like that.


Step 9

Now, we will make the monster teeth. You can measure with one colored triangle.


We must take care to have an extra place that will go inside. Apply a layer of glue on that extra place and fix it…


… like that.

Now you have a cute little monster who can’t wait to chew your book corners.


Isn’t that a terrific little bookmark?  You can count on the fact that no one will have the exact bookmark as you.  Stop turning down the corners of your books and instead make this Monster Bookmark.

Technorati Tags: , , , , , , , ,

How to Make a Squash Ghost Decoration for Halloween

If you are looking for a Halloween craft that is easy to do, doesn’t need much materials and is a great decoration…. then I have the perfect Halloween craft for you.  In this post I will show you how to make a Squash Ghost Decoration for Halloween.  And, as promised it doesn’t need many materials to make…. just a nice squash and some white and black paint.  That’s it!!

Check out our other Halloween Crafts.


How to Make a Squash Ghost Decoration for Halloween


Materials Needed

Tall Squash

White & Black Paint


Step 1


Paint a tall squash white


Paint a tall squash white.


Step 2


Now paint the face with black paint.  First, the eyes... Eyes are sideways letter D shapes


Now paint the face with black paint.  First, the eyes… Eyes are sideways letter D shapes.


Step 3


The smile can be drawn by drawing a letter U... closed at the top with a 2nd letter U


The smile can be drawn by drawing a letter U… closed at the top with a 2nd letter U.


Step 4


Now sit this on your front step as a decoration


Now sit this on your front step as a decoration.

See, that wasn’t difficult to make, was it?!  But yet, look at the finished product… you have an awesome Ghost decoration perfect to put out on Halloween.

Technorati Tags: , , , , , , , ,