How to Craft a Chinese Dragon Fridge Magnet Craft for Chinese New Year

In ancient China, dragons did not breathe fire. Dragons were wise and caring. They guarded the wind, the rain, the rivers, precious metals and gems. So dragons are an important part of many Chinese festivals, including Chinese New Year. Let’s celebrate it by crafting this fridge magnet with the mini version of the dragon used during holiday parades and festivities.This crafts ideas was contributed by Laura from Dacian Moon Handmade

You Might Also Like Our Other Chinese New Year Crafts


How to Craft a Chinese Dragon Fridge Magnet Craft for Chinese New Year

CRAFTS MATERIALS NEEDED:

– paper (not too thin)
– scissors
– design template (uncoloured dragon head and tail)
– 4 magnets
– craft glue
– ribbon (about 15 cm)
– paints
– paintbrush


Step 1.

Print the Head and tail of the dragon, then paint them in any way you want your dragon to be. My dragon will guard the rain so it will have colours inspired by it. Blue and white like raindrops, red and yellow like lightnings and a little bit of dark red because of the storm 🙂


Here are my dragon head and tail painted. Let them dry well.


Step 2.

With the scissor, cut out the head and the tail.


Now we are ready to the next step.


Step 3.

Cut a piece of paper of about 7.5 cm length and the same width as the ribbon (or a little bit larger)


Fold it to form a triangle (2 cm x 2 cm x 1 cm) and fold the remaining 2.5 cm around the triangle


Apply a layer of glue on it,


press and it should look like this:


Step 4.

Lay flat the ribbon and mark the places where the magnets will be (the magnets are corresponding to his head, legs and tail). Take care that two of them must be close to ribbon ends.


Apply a layer of glue on one magnet…


… and place it on it’s place.


Do the same with the other magnets.


Step 5.

Turn the ribbon with the magnets down.
Apply a layer of glue on one large face of the triangle…


… and place it on the ribbon, where you want the head to be. Let it dry.


Apply some glue on the head (on unpainted face)…


… and stick it to the triangle, like in this photo.


Now, our dragon have a head 🙂


Step 6.

Apply a layer of glue on the first part of the tail (on unpainted face, of course).


And stick it where you want the tail to be (usually on the other end of the ribbon).


And… That’s it!
This is my Dragon, Guardian of Rain, in his place on the fridge 😀


Technorati Tags: , , , , , , , , , , ,

How to Make Paper Lantern for The Chinese New Years Celebration

The Chinese New Year is coming up and this crafts project reminded me of a Chinese Paper Lantern. Today, we will show you how to make this easy-to-make arts and crafts project. These are also great for birthday parties, Christmas decorations, and other joyous get-together celebrations where you need fun decorations. Have fun..the instructions are below.

Here are Even More Chinese New Years Crafts


How to Make Paper Lantern for The Chinese New Years Celebration


How to Make Paper Lantern for The Chinese New Years Celebration

Crafts Materials Needed

– Sheet of colored paper 9 inches and 6 inches wide

– Scissors

– Ruler

– Glue or Paste

– ( Optional ) Jar Cover Lid and Tape

– String to String Up the Lantern to a Tree or Something Else

Step 1


Step 1 : Making Chinese Paper Lanterns Arts and Crafts Project Ideas


Take a sheet of colored paper 9 inches and 6 inches wide and draw 2 lines 1/2 inch from each edge as shown in Figure 1.

Step 2


Step 2 : Making Chinese Paper Lanterns Arts and Crafts Project Ideas


Then fold the paper in the middle lengthwise. Now cut the paper as shown by the dotted lines in Fig. 2. These lines measure 1/4 of an inch apart. After all the cuts have been made, cut off the left-hand strip marked A in Fig.2.


Step 3


Step 3 : Making Chinese Paper Lanterns Arts and Crafts Project Ideas


Now open the paper. Figure 3.


bend the cut paper to form a circle. Paste end tabs B and C to those marked D and E.


Put paste on the end tabs, marked B and C, and bend the cut paper to form a circle. Paste end tabs B and C to those marked D and E. When this has been done you will have a paper lantern like the one shown in Fig. 4. Add a handle to the lantern. It is then ready to be used for a Halloween, a Christmas tree, The Chinese New Year,  or garden party decoration.

If desired, a jar lid / cover may be used for a bottom to your paper lantern. This cover must fit exactly into the space at the bottom of the lantern, and be pasted or Scotch-taped into place.


String Up Your Paper Lanters for a Party


Now String up those paper lanterns to help celebrate The Chinese New Year, or other fun party get-together…such as a birthday party.

Here are Even More Chinese New Years Crafts

Technorati Tags: , , , , , , , , , , ,

I Have a Dream Wall Hanging “Poster” Martin Luther King Day Craft

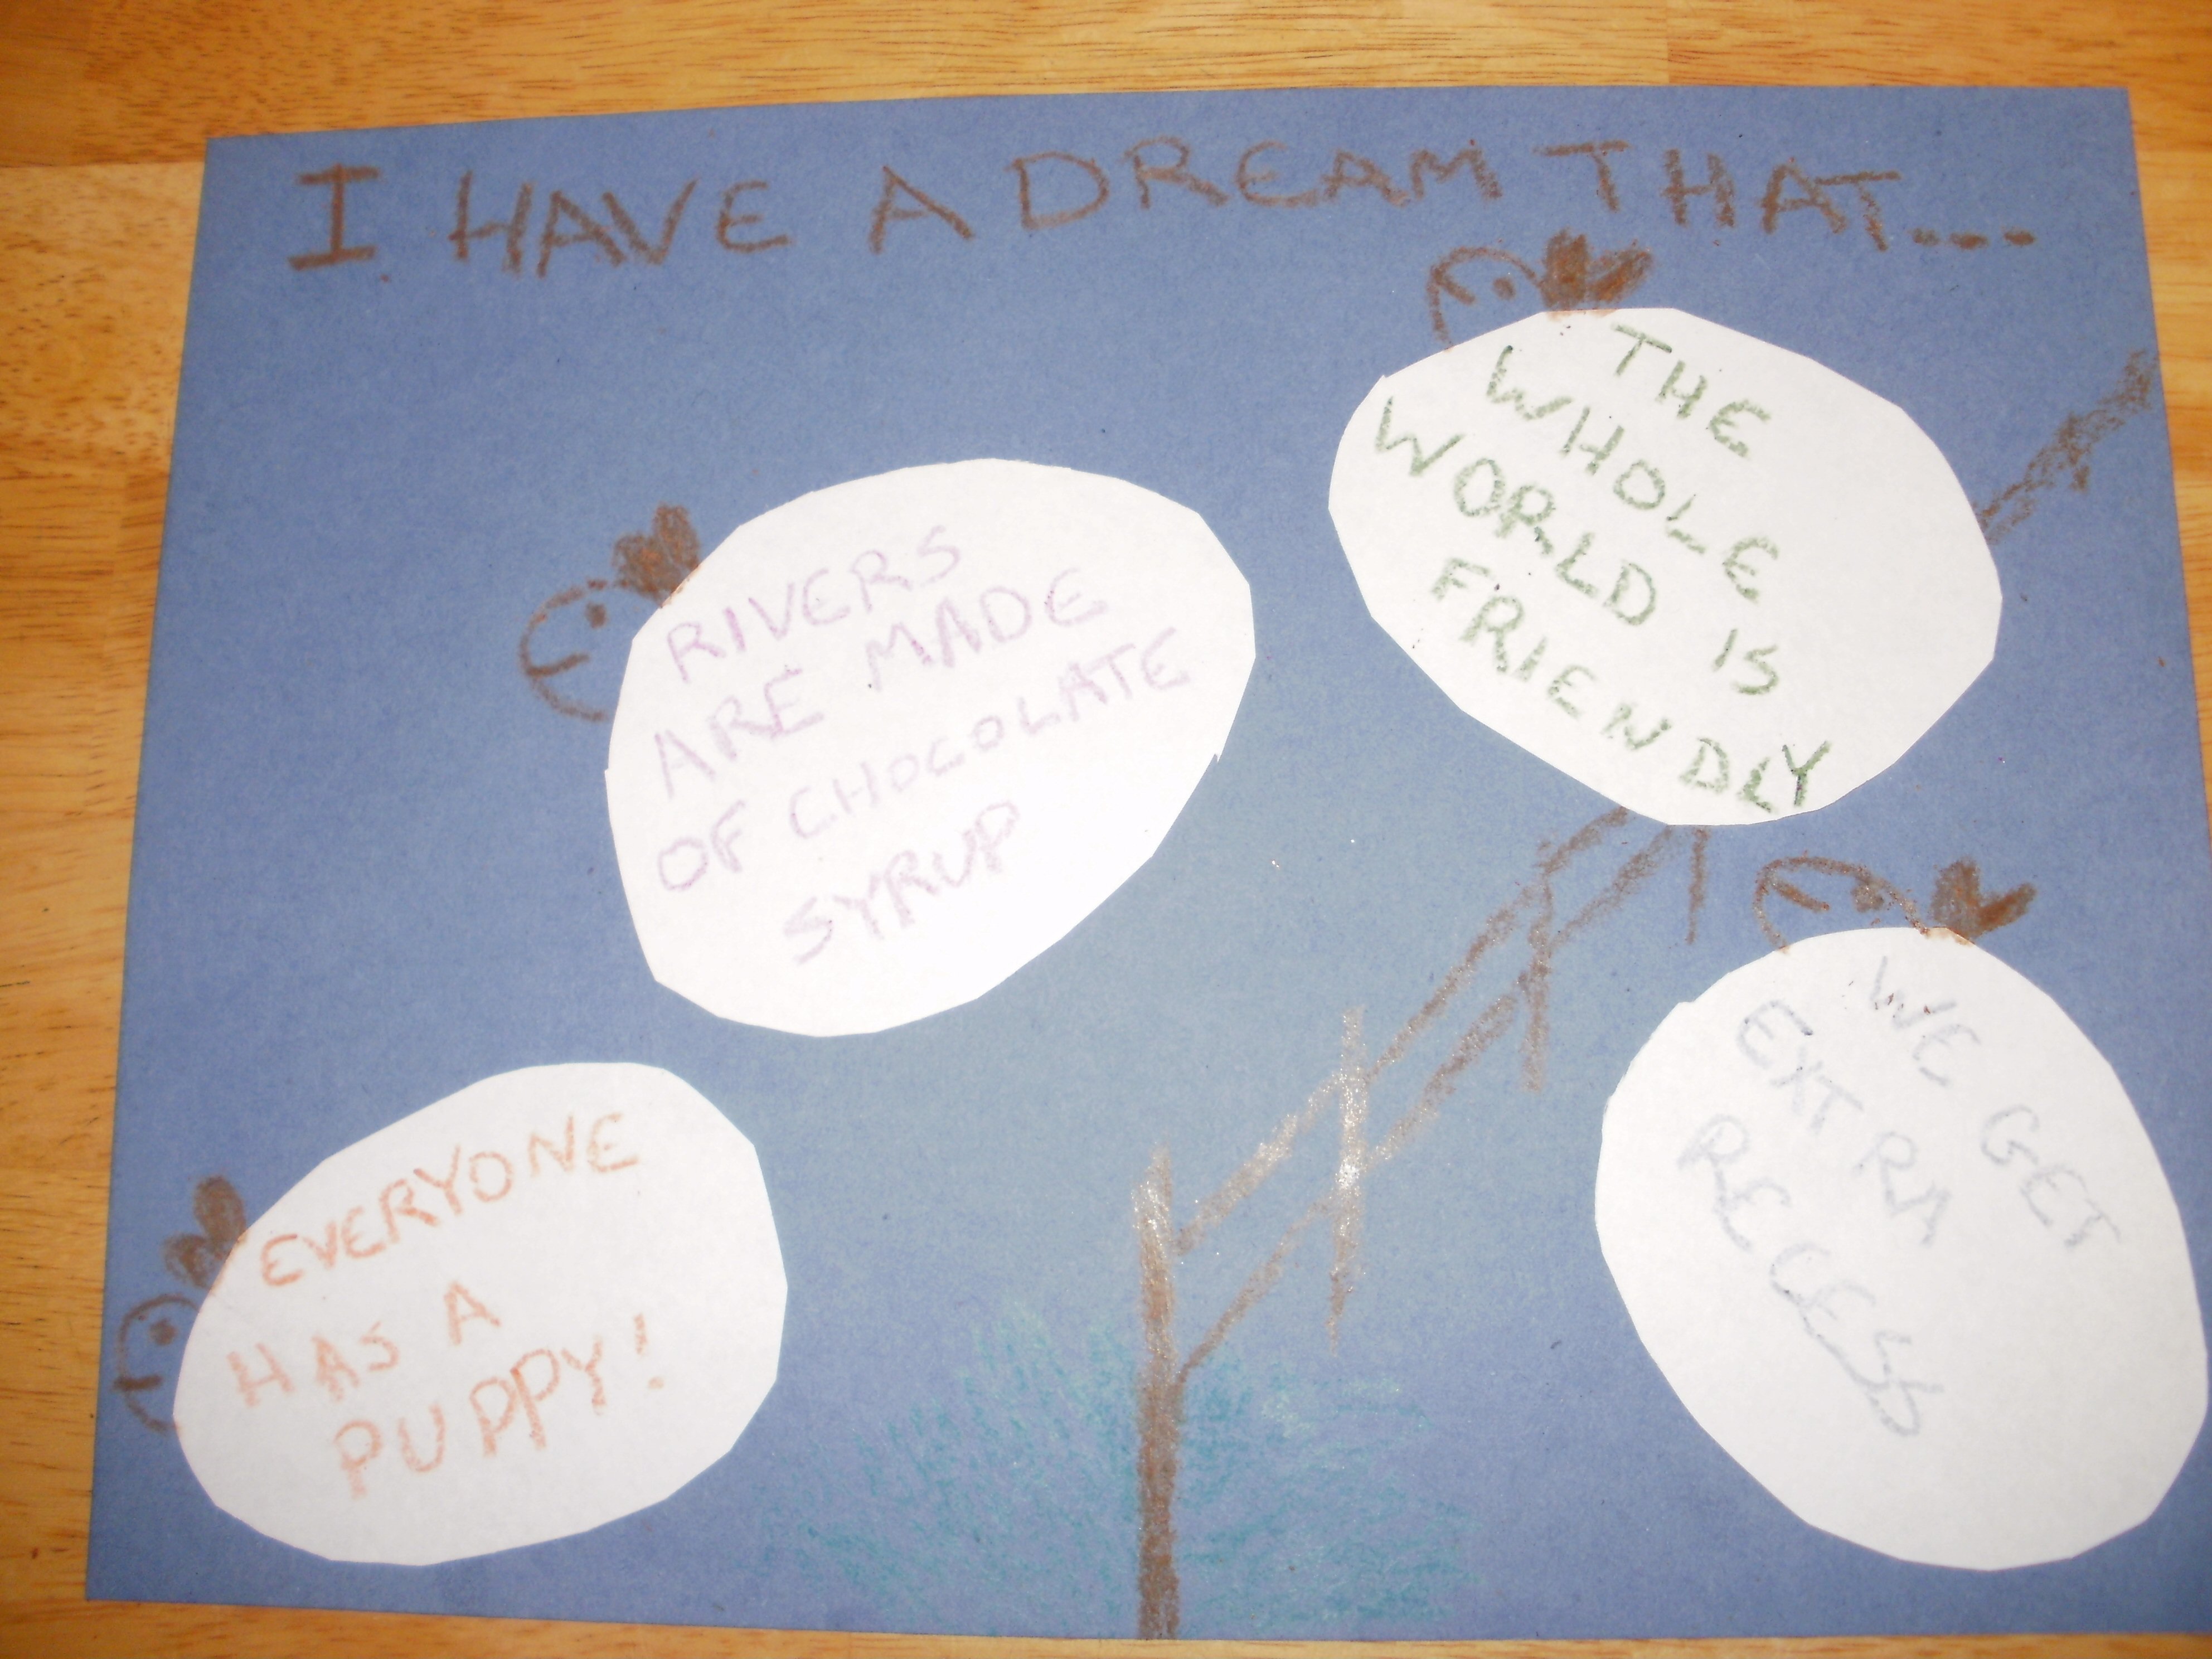
For Martin Luther King Jr’s Birthday, why not make a poster or wall hanging full of your dreams?  This craft can be done at home by one or two children on construction paper, as in the example, or as a class project, if you use poster board.  The age of the children doing the craft can decide what kind of “dreams” to fill it with.  A preschool or kindergarten child could put memories of bedtimes dreams they’ve had, whereas older children can put what they want to be when they grow up, wishes for their own future, or put dreams more like Martin Luther King’s.

You Might Like Our Other Martin Luther King Day Crafts as well.


Martin Luther King Day Crafts Activity for Kids Who Have a Dream


I Have a Dream Wall Hanging “Poster” Martin Luther King Day Craft

Craft Materials Needed:

  • Construction Paper or Poster Board (blue, for a sky)
  • Crayons, Colored Pencils, or Washable Markers (if you have permission to use markers)
  • White paper (for sheep)
  • Safety scissors (be sure to ask for help if you’re not allowed to use scissors by yourself)
  • Tape, glue stick, or glue

Step 1


Step 1: Cut out sheep. Using your imagination or a stencil, cut a few egg shapes out of the white paper.

Step 2


Step 2: Write your dreams. Using your writing utensil put your dreams on a few of the egg shapes. You don't have to use all of the shapes you cut out. I found out only four would fit on my paper.


Step 3


Step 3: Color background. Using your crayons (or whatever else you’re using) draw a fence for your sheep to jump over, and a little grass. This is just a suggestion, you can draw whatever you want. But, if you’re using crayons don’t cover the whole background or it will be harder for your sheep to stick.

Step 4


Step 4: Add tape (or glue) The least messy way to attach the sheep is to roll up a piece of tape, sticky side out, and put it in the middle of the sheep. You could also use a glue stick, or a little dab of school glue.

Step 5


Step 5: Attach the sheep. After you’ve put some tape or glue on the sheep, place them on the page. I put mine jumping over the fence, like I see them when I try to go to sleep at night. But you can put them however you want.

Step 6


Step 6: Add faces and text. Now decide which way they’re jumping and add faces and ears. At the top write “I Have A Dream That…” so that each of your dreams will finish the sentence. Don’t forget to have fun and enjoy yourself.

You Might Like Our Other Martin Luther King Day Crafts as well.

Technorati Tags: , , , , , , , , , , , ,

How to Make a People Peace Dance Paper Cutout Craft for Martin Luther King Day

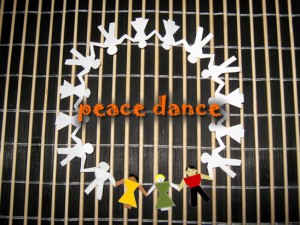
Because Martin Luther King Day is approaching, I think we should remember that, even if we are looking different, we are equals and we wish for the same things in life. One of those things is PEACE. Today, Laura from Dacian Moon Handmade will be showing you how to make a Peace Dance out of paper.

You Might Like Our Other Martin Luther King Day Crafts as well.


peace dance


CRAFTS MATERIALS NEEDED:

– paper
– scissors
– pencil
– colored pencils


Step 1.

Take one corner of the paper and bend it to the opposite side.


Step 2.

Press well the edge…


… and then, with the scissor cut the remaining part of paper.


Step 3.

Now, we have a triangle. Set it on the table with the peak to you. Bring the right corner over the left one, like in the picture.


We have now a smaller triangle. Press well the new formed edge.


Step 4.

Set the triangle on the table with the bigger edge to you.


Then bring again the right corner over the left one.


Now, we have an even smaller triangle who have on one side 3 corners one over the other, and on the other side, only one corner.


Step 5.

Let the triangle folded, with the 3 corners one over the other in the left.


Draw with the pencil two silhouettes – one girl and one boy, like in the following picture.


Step 6.

With the scissor cut out the silhouettes from the paper, following the contour. First the lower part…


… then the upper part. Take care at the hands of the silhouettes because they should be merged, so don’t cut them on the paper edge.


On this point you should have :


Step 7.

Look at the boy’s hand. You’ll see that can be opened:


Gently, pull the detachable corners and you’ll have 4 kids.


Repeat that and …


Mmm, it looks good. Look very carefully: can you open it more?


Yes, you can !
Now, you have the “peace dance”.


Step 8.

The last step:


You can play with coloured pencils, to make the dance full of joy. Don’t forget to make kids with different skin colours, because we are all equals, we like to play, to dance… we like Peace. I begin to play with colours. What are you waiting for?


… and most important: HAVE FUN!

You Might Like Our Other Martin Luther King Day Crafts as well.

Technorati Tags: , , , , , , , , , , , , ,

How to Make Hanukkah Decorations Star Ornaments Arts & Crafts Project for Jewish Kids

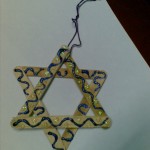
Hanukkah starts tonight so forgive me for not putting up some crafts earlier. Make  this adorable Hanukkah star with some Popsicle sticks and glitter glue. They’re so easy to make that you can make lots of them and hang them all over the house as you celebrate Hanukkah this year. Enjoy and have fun tonight and for the next week.


Image053


How to Make Hanukkah Decorations Star Ornaments Arts & Crafts Project for Jewish Kids

Craft materials required:

Popsicle sticks

Craft glue

Blue and silver glitter glue ( acrylic glitter glue is better)

Some thread


Image174


Step 1

Glue the ends of 3 sticks to form a triangle as shown


Image175


Step 2

Add a 4th and 5th stick as shown


Image177


Step 3

Glue the 6th stick as shown


Image178


Step 4

Use glitter glue to decorate the star. Allow it to dry


Image183


Step 5

Tie a thread through the top as shown. Now hang the star wherever you like.


Image184


HANUKKAH CRAFTS ACTIVITIES & IDEAS FOR JEWISH CHILDREN

It is almost Hanukkah time so check out Our Mega List of Hanukkah Crafts for KidsMega List of Crafts for Jewish Kids

Technorati Tags: , , , , , , , , , , , , ,

Make Totem Pole Mail & Notes Holder Gift for Dad’s Office on Father’s Day

This is a really cute idea to make a totem pole to hold letters and special notes. This would probably look really great in your Dad’s office…so why not make it for your Dad as a gift on Father’s Day? It is a tall totem pole of VIP’s handles letters, memos and notes. Find the instructions below.


Make Totem Pole Mail Holders Gift for Dad’s Office on Father’s Day

CRAFTS MATERIALS THAT YOU WILL NEED:

– Rubber Hose

– Scissor

– Paint or Glue

– Letters and Notes

HOW TO MAKE CRAFTS PROJECT : TOTEM LETTER POLE

Step #1


On a length of rubber garden hose cut downward slits every 1 & 1/2″ or so.

Step #2


Carve and paint on faces or glue on photos to identify each section.

Step #3

Arrange occupants in order of importance.


Your Dad can tack the totem pole on his bulletin board or wall and this totem pole and its’ creatures will put the bite on papers and letters according to what must be done first.

Technorati Tags: , , , , , , , , , , , , , , ,

How to Make Tri-Fold Picture Frame Present for Dad on Father’s Day

Do you want to learn how to make a unique picture frame? Most picture frame crafts are for one photograph, but this one holds 3 photos. This would be perfect to make as a gift for Dad or Mom for family photos…and it would look great on their office desk. If you want to learn how to make a tri-fold picture frame, then look at the directions below.

FYI…this craft is for older children – 9 and up….younger children can do it with help from an adult / parent / teacher.


How to Make Tri-Fold Picture Frame Gift That Holds 3 Photos for Dad’s Desk on Father’s Day

CRAFTS MATERIALS THAT YOU  WILL NEED:

– Cardboard, 15 by 5 inches
– 2 Pieces of felt, each 16 by 5′ inches
– 3 Snapshots (family photos)
–  Wool thread in contrasting color
–  Needle with large eye
–  Scissors
– Tape measure
– Glue Stick, Rubber Cement, or other Adhesive
– Chalk

HOW TO MAKE THIS CRAFT : TRI-FOLD FAMILY PICTURE FRAME

Step 1

Cut the cardboard into three pieces, each 5 by 5 inches. Paste one photography on each piece. Try to choose pictures that you father will look at and feel all mushy and sentimental.


Step 2


Arrange the three pieces side by side and lay one piece of felt over them. Leave 1/2 inch between the pieces of cardboard,since the felt is 1 inch wider than the three pieces of cardboard.


Step 3

Mark with chalk either an oval or square shape where the felt is to be cut out to show the underlying family photographs. Cut out these pieces of felt.


Step 4

Sew a long-and-short blanket-stitch border around each hole (see instructions on blanket stitching below) using the pretty wool thread.

Tip: How to Sew a Blanket Stitch


To blanket stitch, make a knot at the end of your piece of thread. Put your needle in 1/4 inch from the edge of the fabric, put the thread under the point of the needle and then pull the needle with the rest of the thread through. Repeat until finished.

Step 5

Glue the felt with the holes over the cardboard so the snapshots show through. Glue the other piece of felt to the back of the three pieces of cardboard.


Step 6

Sew a running stitch (see instructions for sewing the running stitch right below.) in places marked A and B in the illustration and then the frame is ready.


Tip : How to Make the Running Stitch


Begin sewing this stitch with three or four little stitches sewn one over the other, instead of making a knot in the thread. The running stitch itself is a small, even stitch, running on a straight line. Try to make each stitch about 1/8  inch long, though if it is closer to 1/4 of an inch no thunder or lightning are going to strike you. You can run up to six of these little stitches on the needle and then pull the needle through the fabric. Finish your seam with three or four little stitches sewn one on top of the other.

Below you can see what the finished picture frame will look like.


Technorati Tags: , , , , , , , , , , , , , , ,

Shadow Boxing : How to Make Shadow Boxes from Cardboard Boxes

This is a great crafts project idea for kids and teen who want to display their trophies, nick nacks,  pottery, and ornaments in these modern shadow boxes. You can make them from corrugated boxes that you find around your house. If you want to decorate your room, and at the same time de-clutter your desk or shelves, then shadow boxing if the crafts activity for you.


Shadow Boxing : How to Make Shadow Boxes from Cardboard Boxes : Arts and Crafts Idea for Kids and Teens

Crafts Materials Needed:

– corrugated cardboard box

– scissors

– tape

– paint and paint brush

Step 1


Find a square corrugated cardboard box (width and height about the same size) and cut it in to two pieces so that the depth of each box is about 3″ – 4″ deep.  See the picture above.


Step 2

On two sides of each frame, cut a slit one and a half inches deep exactly in the middle of the side. Reference the picture above.

Step 3

Place the slits of one square over the slits of the other. Press together.

Step 4

Tape the outside edges.

Step 5

Paint the frames attractively.

Step 6

Have Mom or Dad hang your shadow box frames / shelves to the wall.

Technorati Tags: , , , , , , , , , , , , , , , , ,

How to Make a Bunch of Flowers as a Gift for Mom on Mother’s Day

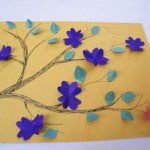
Make this beautiful branch full of flowers picture for your Mom, Aunt, or Grandma this Mother’s Day. This picture of a bunch of flowers looks much harder to make than it actually is. All you will need to make this beautiful piece of art is some colored paper, scissors and glue….oh, and lots of Love.

How to Make a Bunch of Flowers as a Gift for Mom on Mother’s Day with this Arts and Crafts Activity for Kids


Craft materials required:

Thick colored paper

Scissors

Glue

Markers


Step 1

On a thick colored paper, draw a branch as shown


Step 2

Cut a small square of colored paper about the size of the flower that you want


Step 3

Fold it twice to make a smaller square


Step 4

Draw out a heart shape as shown in the corner of the square where the fold is.


Step 5

Open it out to get a flower as shown.


Step 6

Fold the flower in the center as shown, fold again between the other two petals similarly.


Step 7

Press all the folds toward the inside as shown


Step 8

Take a green square of paper and fold into two


Step 9

Draw out half a leaf as shown.


Step 10

Cut it out.


Step 11

Fold one edge


Step 12

Glue it as shown. Apply glue on the center of the flower and on the folded part of the leaf.


Now you have a beautiful flower tree creation to give to your Mom for Mother’s Day. She will love it, guaranteed!!!

Technorati Tags: , , , , , , , , , , , , , , , ,

Make Bulletin Boards to Organize Family Events

It is so hard to get everything organized and de-cluttered when you have kids. If you have a lot of dates, appointments, grocery list items, messages, and other important facts straight, then why not make a family oriented family board. Making this family bulletin board can help you and your kids more organized and help you remember dates and other important information and appointments. The easy to make instructions are as follows…this is perfect for Moms and Dads to make or for kids to make as a gift for Mom or Dad … or to even make for their own room.


How to Make Bulletin Boards to Organize Family Events with the Following Arts & Crafts Activity for Kids

CRAFTS MATERIALS NEEDED:

*A large piece of heavy cardboard

*Thumbtacks

*Crayons

*Pad

*Pencils

*String

*Calendar

HOW TO MAKE THIS ARTS AND CRAFTS ORGANIZATIONAL PROJECT:

Everyone in the family will thank you for this cool idea!

Step 1

Cut a heavy piece of cardboard about 3 by 4 feet.

Step 2


Draw and color a simple border around the cardboard.

Step 3

Write “Family Bulletin Board”, or any other name you choose, in crayon across the top.

There are many ways you can decorate and arrange this easy-to-make bulletin board. Here are some suggestions:

Divide your board with crayon lines into three divisions. Print column headings like “Grocery List”, “Messages”, “Regular Chores”, etc. Under the Grocery List heading, tack up a pad. Tie two or three pencils to strings and tack them up next to the pad.

Draw a box in one corner and push about 20 thumbtacks in it. These will be used for tacking up messages. You might want to print the most important telephone numbers, like Daddy’s phone number or the doctor’s phone number in a space marked “Phone Numbers”.

Tack up a small calendar. Under the heading Chores, you can list the things that are to be done on certain days, like you’re to cut the grass on Fridays, or your sister is to take her piano lessons on Tuesdays, or the laundry is to be called for on Mondays.

It is nice to record family appointments like picnics and visiting grandma in a box headed “Special Announcements”. You’ll find that everyone in the family will make much use of your very practical bulletin board.

Technorati Tags: , , , , , , , , ,

Make Pot Holders Gift for Mom on Mother’s Day

This is a great craft for older children, girls, and teens. This is a more complicated arts and crafts project than many of our other crafts ideas, so read over the following craft before deciding to do it. This pot holder craft would make a great gift for Mom or Grandma on Mother’s Day. Pot holders are great gifts for anyone who loves their kitchen and cooking. Good luck.


Make Pot Holders Gift for Mom on Mother’s Day

CRAFTS MATERIALS THAT YOU WILL NEED:

*2 round scraps of decorative flannel, denim, or other heavy cotton fabric about 8 inches in diameter

*2 old wash cloths or good pieces of old toweling

*piece of ribbon, 5 inches long

*embroidery yarn

*thread

*bias tape

*scissors

*tape measure

*needle

*kitchen bowl, 8 inches in diameter

*chalk

*tracing paper

*pencil

*pins

DIRECTIONS FOR MAKING POT HOLDERS:

Step 1


Put the kitchen bowl on top of the decorative fabric and draw around it with chalk. Do the same with a double piece of old towel or two wash cloths.

Step 2


Cut the material where it is marked with chalk.


Step 3

Put one circle of decorative fabric on the table, then the two circles of toweling, and last the other circle of decorative fabric. Baste them all together.

Tip : How to Sew the Basting Stitch (How to Baste)


This is not a permanent stitch. It holds two pieces of material. together while another, stronger, stitch is being sewn. Make a knot at the end of your thread. Make large running stitches, about 1/2 inch apart, on a straight line. End with a few backstitches, sewn one on top of the other. When your permanent stitches have been made, cut the basting stitches every few inches and pull out all the threads.

Step 4

Sew the bias tape around the basted circles with a backstitch and be sure the needle catches both sides of the tape.

Tip : How to Sew the Backstitch


Begin sewing this stitch with three or four little stitches sewn one on top of the other. Make a little stitch backwards on the upper part of the two pieces of fabric you are sewing together, and then make a longer stitch forwards on the under part of the two pieces of fabric you are sewing together. Bring the needle back on the upper part of the two pieces of fabric where the last stitch ended and then push it forward again on the under part of the two pieces of fabric you are sewing. Do this until the seam is completely done and finish it with three or four small backstitches one on top of the other.

Step 5

Transfer with pencil the illustration of a cooking pot to your tracing paper. Pin the tracing paper in the center of the circle and embroider the outline of the pot with a running stitch. Be sure the needle and thread go through all the layers of fabric, because then the embroidering will also quilt the material. When the embroidery is done, take out the pins and gently tear off the tracing paper.

Tip : How to Sew the Running Stitch


Begin sewing this stitch with three or four little stitches sewn one over the other, instead of making a knot in the thread. The running stitch itself is a small, even stitch, running on a straight line. Try to make each stitch about 1/8  inch long, though if it is closer to 1/4 of an inch no thunder or lightning are going to strike you. You can run up to six of these little stitches on the needle and then pull the needle .through the fabric. Finish your seam with three or four little stitches sewn one on top of the other.

Step 6


Fold the 5-inch length of ribbon in half and sew it on the edge of the pot holder so it can be hung on a kitchen hook.

If you liked the pattern that we had on our pot holder, click on the image below, and print it out and transfer it to your pot holders’ fabric.


Click on This Image to Open it In a New Page to Print

Good Luck.

Technorati Tags: , , , , , , , , , , , , ,

Martin Luther King Day Decoration Making Craft Instructions for Kids

As we celebrate Martin Luther King Day this year, lets remember to Love all and Accept all, no matter what they look like and where they’re from. Here is a sweet decoration you can hang on your doorknob , or window to show everyone that you too believe in Martin Luther King’s dream. The hearts symbolize people from all different places. The simple steps to make this craft are as follows. You Might Also Like Our Previous Article : How to Make a Martin Luther King Day Poster Craft


Martin Luther King Day Decoration Making Craft Instructions for Kids


Craft materials required:

Thick  card paper-white, red, browns, yellows, black, pink

Scissors

Tape

decorative twine

marker

Step 1

on a piece of white card, write the words “LOVE  ALL ACCEPT ALL” as shown.


Step 2

Cut out small hearts in different colors


Step 3

Tape a small piece of twine to the back of the heart and the back of the cars as shown.


Step 4

Repeat the process for all the hearts.


Step 5

Tape some twine on the top of the card as shown.


Step 6

Your craft is ready. So hang it up in your home and celebrate Martin Luther King Day.


You Might Also Like Our Previous Article : How to Make a Martin Luther King Day Poster Craft

HERE ARE EVEN MORE MARTIN LUTHER KING JR. CRAFTS

Technorati Tags: , , , , , , , , , ,

Easy to Make Winter Snowflakes Paper Cutting Crafts Ideas for Kids

This Winter activity is quick, easy and a lot of fun.  It helps the little ones to develop their hand eye co-ordination skills and, if you’re so inclined, you can use it to teach older children about symmetry.  Or you can just have fun making pretty Winter  snowflakes to hang around the house! You can hang snowflakes on your windows, doors, or walls to decorate for Winter time fun.


Easy to Make Paper Snowflakes for Winter That You Cut Out of Paper


Easy to Make Paper Snowflakes for Winter That You Cut Out of Paper

Easy to Make Paper Snowflakes Arts and Crafts Activities for Kids for Kids, Teens, Preschoolers


Craft materials required:

  • Squares of paper
  • Scissors
  • Glue
  • Glitters, sequins, etc


100_0856


1.  Fold your square of paper in half, and then in half again. Rinse and repeat. Be sure you leave the square thin enough to cut.


100_0858


I like to round off the corners; it gives the final product a more snowflake-y look.

2. Cut out different and interesting shapes and designs.  Be careful about cutting too much from the joins.  Unfold… oooh, pretty!


100_0860


100_0861


3. Use your glitter and sequins to decorate your snowflake.


100_0862


These look great grouped together on black cardboard – or, you could thread some ribbon through the top corner and hang it on your tree:


100_0863


Experiment with different shapes and colours.  Before long, you’ll be walking in a winter wonderland!

CHRISTMAS CRAFTS ACTIVITIES & IDEAS FOR KIDS

It is almost Christmas time so check out our Christmas Coloring Pages & Christmas Crafts for Kids Page to find some great Christmas crafts project ideas for kids to celebrate Xmas such as .. Advent Calendar Crafts ..Candy Cane Crafts ..Christmas Angel Crafts ..Christmas Cards Crafts ..Christmas Bells Crafts ..Christmas Coloring Pages .. Santa Coloring Pages .. Christmas Elf Crafts .. Christmas Gift Bags Crafts ..Christmas Gift Tags Crafts .. Christmas Games & Activities .. Christmas Nativity Scenes .. Christmas Soda Can Crafts .. Christmas Placemat Crafts ..Christmas Poinsettias Crafts .. Christmas Sewing Patterns .. Christmas Tree Crafts ..Christmas Tree Ornament Crafts ..Christmas Wreath Crafts ..Gingerbread House Crafts ..Gingerbread Man Crafts .. Mittens and Gloves Crafts ..Recycle Christmas Cards to Make Other Crafts ..Reindeer Crafts .. Winter Penguin Crafts .. Winter Snow Crafts .. Winter Solstice / Yule Crafts ..Santa Clause Crafts .. Santa Hats Crafts .. Santa’s Sleigh Crafts ..Snowflake Crafts ..Snowman Crafts .. Stocking Crafts .. Wrapping Paper Craft

Technorati Tags: , , , , , , , , , , , , , ,

Christmas Paper Wreaths Craft for Kids : Easy to Make Christmas Wreaths

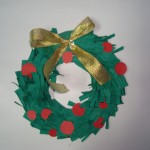
Here’s an easy Christmas wreath you can make with just some crepe paper, colored paper, a cereal box, and ribbons. This paper Christmas wreath is easy to make and great to hang on your doors at Christmas time. This easy step by step instructions are given below.


christmas wreath


Christmas Paper Wreath Craft for Kids

Easy to Make Christmas Paper Wreaths Arts and Crafts Activities for Kids for Kids, Teens, Preschoolers


Craft materials required:

Thick card ( you can use the cover of a notebook or a cornflakes box)

Green crepe paper

Red colored paper

Scissors

Glue

Tape

Gold ribbon

Step 1

Draw 2 circles as shown and cut them out to get a doughnut shape


wreath 1


Step 2

Cut a strip of crepe paper. Cut slits from top to halfway down as shown.


wreath2


Step 3

Tape one end of the strip to the doughnut shape and start rolling it around the shape as shown.


wreath4


Step 4

Roll around the whole shape. Make sure you overlap it a little every time. Once it is done, tape it in place. Now use your fingers to push the loose ends backwards to give more volume to the wreath.


Image128


Step 5

Make a bow out of gold ribbon and tape it on one side.


Image130


Step 6

Cut out small circles of red paper and stick them on the wreath. Hang it up on your door.


DSC04097


CHRISTMAS CRAFTS ACTIVITIES & IDEAS FOR KIDS

It is almost Christmas time so check out our Christmas Coloring Pages & Christmas Crafts for Kids Page to find some great Christmas crafts project ideas for kids to celebrate Xmas such as .. Advent Calendar Crafts ..Candy Cane Crafts ..Christmas Angel Crafts ..Christmas Cards Crafts ..Christmas Bells Crafts ..Christmas Coloring Pages .. Santa Coloring Pages .. Christmas Elf Crafts .. Christmas Gift Bags Crafts ..Christmas Gift Tags Crafts .. Christmas Games & Activities .. Christmas Nativity Scenes .. Christmas Soda Can Crafts .. Christmas Placemat Crafts ..Christmas Poinsettias Crafts .. Christmas Sewing Patterns .. Christmas Tree Crafts ..Christmas Tree Ornament Crafts ..Christmas Wreath Crafts ..Gingerbread House Crafts ..Gingerbread Man Crafts .. Mittens and Gloves Crafts ..Recycle Christmas Cards to Make Other Crafts ..Reindeer Crafts .. Winter Penguin Crafts .. Winter Snow Crafts .. Winter Solstice / Yule Crafts ..Santa Clause Crafts .. Santa Hats Crafts .. Santa’s Sleigh Crafts ..Snowflake Crafts ..Snowman Crafts .. Stocking Crafts .. Wrapping Paper Craft

Technorati Tags: , , , , , , , , , , , , , , , , , , , ,

Christmas Tree Angels Crafts for Kids : Easy to Make Angel Ornaments

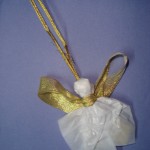
Here is a beautiful angel that you and your kids will love to be on your Christmas tree. The following crafts project includes simple instructions to make the Christmas angel ornaments arts and crafts project that  follows.


DSC04090


Easy to Make Christmas Tree Angel Ornaments Arts and Crafts Activities for Kids for Kids, Teens, Preschoolers


Craft materials required:

Wax paper

Gold wide ribbon

Gold Twine

Tape

Cotton


Image137


Step 1

Cut out a square of wax paper


Image103


Step 2

Put a ball of cotton in the center of the paper


Image105


Step 3

Fold around the cotton ball as shown


angel 5


Step 4

Tie the ribbon as shown, with the knot at the back


Image107


Step 5

Fold the wings backward and stick as shown


angel wings


Step 6

Cut a piece of twine as shown


Image108


Step 7

Tape the ends together as shown.


Image109


Step 8

Tape this to the back of the head.

angel wings

Your pretty angel is ready to hang on your tree


DSC04090


CHRISTMAS CRAFTS ACTIVITIES & IDEAS FOR KIDS

It is almost Christmas time so check out our Christmas Coloring Pages & Christmas Crafts for Kids Page to find some great Christmas crafts project ideas for kids to celebrate Xmas such as .. Advent Calendar Crafts ..Candy Cane Crafts ..Christmas Angel Crafts ..Christmas Cards Crafts ..Christmas Bells Crafts ..Christmas Coloring Pages .. Santa Coloring Pages .. Christmas Elf Crafts .. Christmas Gift Bags Crafts ..Christmas Gift Tags Crafts .. Christmas Games & Activities .. Christmas Nativity Scenes .. Christmas Soda Can Crafts .. Christmas Placemat Crafts ..Christmas Poinsettias Crafts .. Christmas Sewing Patterns .. Christmas Tree Crafts ..Christmas Tree Ornament Crafts ..Christmas Wreath Crafts ..Gingerbread House Crafts ..Gingerbread Man Crafts .. Mittens and Gloves Crafts ..Recycle Christmas Cards to Make Other Crafts ..Reindeer Crafts .. Winter Penguin Crafts .. Winter Snow Crafts .. Winter Solstice / Yule Crafts ..Santa Clause Crafts .. Santa Hats Crafts .. Santa’s Sleigh Crafts ..Snowflake Crafts ..Snowman Crafts .. Stocking Crafts .. Wrapping Paper Craft

Technorati Tags: , , , , , , , , , , , , , , , , , , , , , , ,

Thanksgiving Garlands Decorations Crafts for Kids

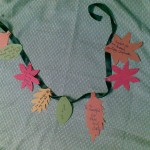
Here’s a beautiful Thanksgiving Fall leaves garland to decorate your home this Thanksgiving. What’s even better is that its a very meaningful craft to do , and will help you remember all that you’re thankful for. Its something your whole family can do together. So have fun doing it!!


Image108


Thanksgiving Garlands Decorations Crafts for Kids


Craft materials required:

Thick colored paper

markers

Black ribbon

Paper clips

scizzors


Image102


Step 1

Draw out different shaped leaved on different fall colored papers


Image103


Step 2

Cut them out as shown


Image104


Step 3

Distribute the leaves among all the members of your family . get each person to write something they’re thankful for.


Image105


Step 4

collect everyone’s leaves


Image106


Step 5

Use a paper clip to attach each leaf to the ribbon as shown


Image108


Step 6

Hang it somewhere where you can see it and be reminded of  all your blessings.

MORE THANKSGIVING COLORING PAGES AND THANKSGIVING ACTIVITIES & ARTS AND CRAFTS IDEAS BELOW

It is almost Thanksgiving time so check out our Thanksgiving Coloring Pages & Thanksgiving Crafts for Kids Page to find some great turkey and thanks-giving crafts project ideas for kids to celebrate Thanksgiving such as

Autumn / Fall Crafts ..
Cornucopia Crafts
..
Indian Corn Crafts
..
Pilgrim Crafts
..
Preschoolers & Toddlers Thanksgiving Crafts
..
Scarecrow Crafts
..
Thanksgiving Coloring Pages & Printouts
..
Thanksgiving Decorations Crafts
..
Thanksgiving Table Decorations Crafts ..
Thanksgiving Turkey Crafts ..
Thanksgiving Worksheets & Printouts

Technorati Tags: , , , , , , , , , , , , , , , , , , , ,