How to Make Christmas Tree Earrings

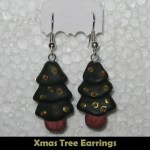
I have a fun and festive craft for you today.  I am going to show you how to make Christmas Tree Earrings.  They are perfect for a giftimagine how excited the receiver of this gift would be.  They would absolutely love them.  Or, they are so beautiful…. maybe you would like to keep them for yourself.  Either way…. the craft turns out lovely and perfect for this Holiday Season.

Check out our other Christmas Crafts.

Laura from Dacian Moon Handmade will show you how to make this, step by step.  You will need help from an adult for this tutorial.


MATERIALS NEEDED

– polymer clay: green and brown
– metallic gold paint (optional)
– cutter
– toothpick
– 2 pins with loop on one end
– 2 earring hooks
– baking tray
– baking paper


Step 1

Take a piece of brown polymer clay.


Condition it .

(Condition polymer clay by hand, simply mix it and squish it with your fingers. You may want to roll it into a log between your palms, fold it in half, and then roll again).

Part it in half.


Take one half and, with your nail or with the toothpick, make some creases on it – like bark.


Place it on a small piece of baking paper.


Step 2

Take a piece of green clay.


Condition it …


… and part it in three: one bigger, one a little bit smaller and the third even smaller.


Take the big one and flatten it.


Squish it gently between two fingers…


… then place it over the brown piece…


… like this.


Take the second piece of green clay…


And do the same…


… then put it over the first.


Do the same with the third piece of green clay – this will be the top.


Place it over the other two and the tree is ready.


Because we want to put it on an earring hook, we must place the pin through it.


Like this.


Step 3

Repeat the steps 1 and 2 to make another tree.


Step 4

Place them on the baking tray, and bake them according to the instructions on the polymer clay package (they depend on the brand you use: fimo, cernit, sculpey…, but usually it is one half hour at 230 F or 110 C) – this is the part when you could use a little help.

Let them cool down.


Step 5

Open the loop of the earring hook…


… and place the pin through it, like in the picture. Close the loop.


Do the same for the other tree and the earrings are ready.


Step 6 – optional

Use metallic gold paint to make points on the trees – they will look like globes.


The earrings are ready to be worn.


I told you these earrings are beautiful.  How did you earrings turn out?  Let me know in the comments below.  And, don’t forget to take a picture…. you can share your picture in the comment as well.  Now, go wear your Christmas Tree Earrings proudly.

Technorati Tags: , , , , , , , , , , , ,

How to make a Turkey Brooch

What is the most known symbol of Thanksgiving Day? The turkey, of course! Thanksgiving wouldn’t be Thanksgiving without the Turkey.  So, with that being said…. today I’m going to show you how to make a Turkey Brooch perfect for Thanksgiving.  What better way to show your love for the Thanksgiving Holiday than to parade around town wearing a Turkey Brooch?  So, let’s get started.

Check out our other Thanksgiving Crafts and Jewelry Crafts.

Tutorial offered by Laura from Dacian Moon Handmade . You will need help from an adult for this tutorial.


MATERIALS NEEDED

– white, red, green, terracotta polymer clay (and small parts of pink, black and blue)
– black paint
– craft glue
– cutter
– toothpick
– 1 brooch base


Step 1

Take a piece of white polymer clay.


Condition it .

(To condition polymer clay by hand… simply mix it and squish it with your fingers. You may want to roll it into a log between your palms, fold it in half, and then roll again).

Divide it in 4 parts.


Take 1 part, make a ball of it and flatten it…


Squish an end between two fingers, like this…


… then the other. Now it looks like a petal.


Repeat and make another 2 white petals.


Step 2

Take a piece of green polymer clay…


… condition it and divide it in 4 parts too.


Make two green petals and place them over the white ones, between them.


Step 3

Take the last piece of white clay…


… and make a bar under the petals with it…


… then continue with another two green petals, taking care that their edges are over the white bar too. This will make the brooch stronger.


Step 4

It’s time to make his head, so, take a piece of terracotta clay…


…condition it and make a ball with it. Flatten it.


Squish gently one end to look like this.


Place it in the middle of petals. This is the head.


Step 5

Take the blue clay and condition it. Make two bigger parts and one smaller of it.


Make a ball of one bigger part and flatten it.


Squish it gently on one end to look like this.


Place it beside the head and make two lines on it with the toothpick.


Make another one …


… and a small ball flattened in the middle. Now our turkey has a bow.


Step 6

Make a small heart of the pink clay…


… and place it in the middle of his face.


Over it we will put his nose, made of a small piece of red clay. Make it a roll …


… and squish an end.


Then, using the toothpick, place it over the small heart (this is his beak).


Step 7

Take a smaller piece of black clay…


… and part it in half. Those will be his eyes.


Step 8

Place it on the baking tray, and bake it according to the instructions on the polymer clay package (this depends on the brand you use: fimo, cernit, sculpey…, but usually it is one half of an hour at 230 F or 110 C) – this is the part when you could use a little help from an adult.


Let it cool down.


Step 9

The only thing you should do now is glue the brooch base on the back of our turkey… and, using the black paint and the toothpick, write something on the white bar. It can be anything but I think “How about a cheeseburger?” will be funny.


Now your brooch is ready.  Isn’t it adorable?  How did your turkey turn out?  Make sure to let me know in the comments below.  Add a picture to your comments so I can see your turkey.  I’d love to see how it turned out.

Technorati Tags: , , , , , , , , , , , , , ,

How to Make a Model Magic Yo-Yo

Yo-yo’s have been a popular toy since the 1920’s.  Kid’s love them now just as much as they loved them then.  When I was a kid I use to love playing with Yo-yo’s.  I actually got pretty good at it.  Well, today I’m going to show you how to make your very own yo-yo.  Made from Model Magic Clay and string you will be playing with your homemade Yo-yo in no time.

Check out our other Clay & Sculpting Crafts Ideas


How to Make a Model Magic Yo-Yo


Materials Needed

Model Magic Clay

Dull Butter Knife

2 Feet of String


Step 1


Roll Model Magic clay into a ball within the palms of your hand.


Roll Model Magic clay into a ball within the palms of your hand.


Step 2


Use a dull butter knife to cut two lines about a pinkie's width apart.


Use a dull butter knife to cut two lines about a pinkie’s width apart.  Dig out the clay… leave center intact.


Step 3


Let dry and then... Tie 2 feet of string onto center of the yo-yo.


Let dry and then… Tie 2 feet of string onto center of the yo-yo.


Step 4


Go play with your yo-yo.


That’s it…. you did it.  You just made a model magic yo-yo yourself.  Good for you!!  Now, go play with your yo-yo.

Technorati Tags: , , , , , , ,

How to make Ghost Earrings

Do you love Halloween like I do?  Do you love the dressing up and the scary Halloween characters?  Well good, today I have the craft for you.  Today I will show you how to make Ghost Earrings that you will surely enjoy wearing this Halloween….. and the future ones too.

Check out our other Halloween Crafts.

Tutorial offered by Laura from Dacian Moon Handmade . You will need help from an adult for this tutorial.


CRAFT MATERIALS NEEDED:

– night glow polymer clay
– eyes
– cutter
– toothpick
– jump-rings
– 2 earring hooks
– baking tray
– baking paper


Step 1

Take a piece of night glow polymer clay.


Cut it in half.


Condition it .

(Condition polymer clay by hand… simply mix it and squish it with your fingers. You may want to roll it into a log between your palms, fold it in half, and then roll again.)

Take the night glow polymer clay and make a ball of it and flatten it.


Squish an end between two fingers, like that.


Do the same with the other half.


Step 2

Using the toothpick or your nails…. make each ghost a mouth.


Make a hole on top of both ghosts…


… like that.


Step 3

Place them on the baking tray, and bake them according to the instructions on the polymer clay package (they depend on the brand you use: fimo, cernit, sculpey…, but usually it is one half  hour at 230 F or 110 C) – *Must have adult supervision.*


Let them cool down.


Step 4

Take one eye, remove the paper from its back…


And place it on its place.


Do the same with the other eye.


Do the same with the other ghost. Aren’t they cute?!


Step 5

Open one jump ring …


… and place it through the hole.


With it, link the ghost of the earring hook.

Do the same for the other and you have a pair of earrings that will glow in the night.


And, there you have it.  Two adorable earrings that will be so fun to wear this Halloween.

Technorati Tags: , , , , , , , , ,

How to make Halloween Glasses

I love making a big deal about Halloween…. dressing up in festive Halloween clothing and wearing funky Halloween jewelry.  But, have you ever thought of doing more?  Something that will undoubtedly get everyone’s attention?  How about wearing blinged out Halloween Glasses?  In this post I will show you how to transform everyday glasses into a fun pair of Halloween Glasses.

Check out our other Halloween Crafts.

Tutorial (a long one but easy to do) offered by Laura from Dacian Moon Handmade . You will need help from an adult for this tutorial.


CRAFT MATERIALS NEEDED:

– night glow polymer clay
– black polymer clay
– cutter
– toothpick
– glasses (they must be made of glass because we will bake them)
– baking tray
– baking paper


Step 1 – The Ghosts

Take a piece of night glow polymer clay.


Condition it .

(Condition polymer clay by hand, simply mix it and squish it with your fingers. You may want to roll it into a log between your palms, fold it in half, and then roll again)

Take the night glow clay and make a ball of it and flatten it… then squish an end between two fingers to form a ghost, like that.


Place it on the glasses frame, as if it is staying on the edge. You can see that it is not very firm, so we better add its hands.


Add a small night glow piece on one side…


… and split it in two on the lower part… like in the picture. These are her fingers.


Do the same on the other part. Now, the ghost is firm on her position.


Repeat making another ghost…


… and place it on the other side of the frame…


… like this


Using the toothpick …


Make them some mouths.


Step 2 – the Bats

Take the black polymer clay.


Split it in 3 parts. Two smaller and one bigger.


Take one smaller piece and condition it.


Lay a small piece aside… from the remainder make a ball.


Flatten it.


Using your nails mark the middle of it…


… then squish the new formed part like this…


… to form two corners.


Do the same on the lower part and on the side, until it looks like that.


Using your toothpick …


… define the center part.


This will be the body of the bat.


Use your nails to separate the body from the wings a little… in the lower part, like this.


Now, let’s make his wings. Press the toothpick on the sides to form the wing bones.


Like this.


Do the same on the other wing. Now it looks almost like a bat… he’s just missing his head.


Take the small part you left aside and make a little ball of it. Flatten it a little…


… and place it on the upper part.


Almost done. With two even smaller pieces of clay make its ears…


… and put them on their places.


You can make a mouth too.


Let’s put the bat on the frame corner, to mask it.


Repeat this step to make another bat for the other side.


Step 3 – The Cat

Take the bigger part of black polymer clay and condition it.


Make it in the form of a bread stick…


… then bend its ends.


Flatten it a little…


… and place it on the middle of the frame, between the ghosts.


Take a smaller part of black clay and make a ball with it.


Squish between two fingers to form a cat ear…


… then the other.


With your toothpick make her mouth and nose.


Make two small balls of white (or night glow) clay…


… to make her eyes.


And two even smaller black ones …


… to complete the eyes.


What do we still need? A tail!

So, let’s make another “bread stick” – a little thinner than the first one.


Curl it to look like a tail and put it on its place.


Then add the head… the black cat is ready.


Step 4 – the Baking

Place the glasses on the baking tray, and bake them according to the instructions on the polymer clay package (they depend on the brand you use: fimo, cernit, sculpey…, but usually it is one half hour at 230 F or 110 C).  *Must have adult supervision*


Let them cool down.


Now, the last thing is to make eyes for the ghosts, so use a paint marker to do that.


There you go…. you have finished your Halloween Glasses.


Now, those are some cool and unique Halloween Glasses.  You are going to look so festive this Halloween with your homemade Halloween Glasses.  Put them on and wear them proudly.

Technorati Tags: , , , , ,

How to make a Cute Ghost Brooch

My daughter loves breaking out the Halloween jewelry as soon as October hits.  She will wear all of her Halloween jewelry at the same time… she just loves Halloween so much.  One thing she didn’t have…. until now…. is a cute Halloween brooch to wear on her Fall coat.  This cute ghost brooch is perfect and she loves wearing it proudly for all to see.

Check out our other Halloween Crafts.

Tutorial offered by Laura from Dacian Moon Handmade.  You will need help from an adult for this tutorial.


CRAFT MATERIALS NEEDED:

– night glow polymer clay
– blue, red and pink polymer clay
– eyes
– cutter
– toothpick
– 1 brooch base
– baking tray
– baking paper


Step 1

Take a piece of night glow polymer clay.


Condition it .

(Condition polymer clay by hand… simply mix it and squish it with your fingers. You may want to roll it into a log between your palms, fold it in half, and then roll again).

Make a ball of it and flatten it, then squish an end between two fingers…


…like that.


Step 2

Turn it on its back… on the middle of it place the brooch base.


Put a small amount of night glow polymer clay on it, like in the picture. It will hold it in its place.


Step 3

Using the toothpick or your nails, make the ghost mouth.


Step 4

Take a small piece of blue polymer clay…


… and make a “snake” of it, moving your fingers back and forth like that.


When is ready, bend it…


… to make a “b”…


… then place it on the ghost, like this.


Do the same with the red polymer clay…


… and make an “o”


Place it near the “b” on the ghost.


With the pink polymer clay…


… make another “o”…


… and place it near the red “o”.


Step 5

We’ll use night glow again to make her hands.


Take a small piece and make it like that.


Place it on one side as it holds the pink “o”


Make another hand …


… and make her hold the “b”.


Step 6

Place it on the baking tray, and bake it according to the instructions on the polymer clay package (they depend on the brand you use: fimo, cernit, sculpey…, but usually it is one half hour at 230 F or 110 C)  ***Have an Adult help for this Step.***


Let it cool down.


Step 7

Take an eye and remove the paper on its back.


Place it where the eye belongs and do the same with the second eye.


Isn’t the Ghost Brooch adorable?  It will be so much fun to wear it this Halloween season…. almost as fun as it was to make.  Almost!!

Technorati Tags: , , , , , , , , ,

How to make a Fairy Crown

When my daughter was little all she could talk about were fairies.  She was fascinated with them and loved to dress up and imitate them.  My daughter would have loved this craft had I known about it then.  Today I will show you how to make a Fairy Crown.  It would be perfect for Halloween or dress-up any other day of the year.

Check out our other Halloween Crafts.

Tutorial offered by Laura from Dacian Moon Handmade . Children need help from an adult for this tutorial.


CRAFT MATERIALS NEEDED:

– black, green, red and white polymer clay (or any other color you want for the flowers)
– cutter
– toothpick
– soft wire
– baking tray
– baking paper


Step 1 – The Armature

Take the wire and measure how much you need for your crown (by putting it over your head). Cut the rest.


Make waves with the wire and make it circle.


On both ends make a small spiral – this will be the closing.


With the wire you cut before… make some new branches for the crown, like this.


Well, the armature is ready.


Step 2 – The Branches

Take a piece of black polymer clay and condition it.

(Condition polymer clay by hand, simply mix it and squish it with your fingers. You may want to roll it into a log between your palms, fold it in half, and then roll again)


Flatten it.


Start covering the wire with it…


… by turning it around the wire.


This is the armature completely covered. We will let the ending spirals uncovered because when it is baked the polymer clay is hard and you can’t bend it to close the crown.


Step 3- The Leaves

Condition the green clay.


Take a small piece of it and flatten it.


Squish it gently between two fingers on one end…


… then on the other end.


Using the toothpick make a crease on the middle of the leaf.


With the toothpick or with your nails make small creases like in the picture.


You will notice that the leaf had flatten again so squish the endings again to improve its form…


… and place it on the branch.


Add as many leaves you want to make it look good.


Step 4 – The Flowers

Condition the red clay.


Take a small piece of it, make a ball and flatten it.


Make a sign with your nail on it …


… then squish it between two fingers around the sign to make a petal. Like this.


Place it on the branch.


Add four more petals and you have a flower 😀


Add as many red flowers as you want.


Then take the white clay …


… and add white flowers.


Step 5 – The Baking

When you are satisfied with your crown place it on the baking tray… bake it according to the instructions on the polymer clay package (they depend on the brand you use: fimo, cernit, sculpey…, but usually it is one half hour at 230 F or 110 C) – this is the part when you could use a little help.


Let it cool down and you have a beautiful fairy crown.


I love this fairy crown…. it turned out so beautiful.  Any girl would love to play dress-up and wear the fairy crown. It would top off any fairy costume perfectly.  Also check out How to Make Fairy Wings craft that would go beautifully with this Fairy Crown.

Technorati Tags: , , , , , , , , ,

Mask Making Fun – How to Make 3 Different Style Masks

Everyone knows that Masks are a perfect craft for Halloween.  But, if your kids are anything like my two littlest ones…. Masks are fun ANY time of year.  My children LOVE masks… love them!!  So, today I’m going to show you how to make three different style masks….. make your favorite or make all three.  Plenty of mask making fun.

Check out our other Halloween Crafts.


How to Make 3 Different Style Masks


Mask 1


Mask 1 Directions


Materials Needed

Paper Bag

Chalk

Crayons

Scissors

Paint, Construction paper, yarn…. and anything you would like to decorate the mask with.

Directions:

  1. Put a paper bag over your head. Mark with chalk or crayon the places for eyes and mouth.
  2. Remove the bag and carefully cut these openings.
  3. Funny ears, a nose, and hair may be added by painting and pasting. Color with crayons or water colors.


Mask 2


Mask 2


Materials Needed

Firm Paper (butcher paper would work)

Paint, Construction paper, yarn…. and anything you would like to decorate the mask with.

Pencil

Scissors

Hole Punch

Notebook Reinforcements (makes holes stronger)

String

Rubber Bands

Paper Clips

Directions:

  1. Cut a piece of firm paper large enough to cover your face and reach your ears. Hold the paper to your face and mark places for your eyes and mouth.
  2. Remove the paper and cut the openings.
  3. Punch holes in the sides just above the ears. Put notebook reinforcements or paper rings over the holes.
  4. Decorate the mask however way you would like.
  5. Use string, rubber bands, and paper clips to fasten the mask around your head.


Mask 3


Directions for Mask 3


Materials Needed

Clay

Cardboard, Slate or Wood

Paper Towels

Bright Colored Paint

Directions:

  1. Model a face of clay on a firm base of heavy cardboard, slate, or wood.
  2. Let the model dry. Cover it with a layer of damp strips of paper toweling.
  3. Paste four more layers over the first layer. Each layer should be at right angles to the one under it. When the paper is dry and rigid, remove the mask from the clay model.
  4. Paint the mask with bright colors.

There you have it…. 3 different style masks.  Your child is sure to find a Mask craft that fits their needs.  Have fun!!

Technorati Tags: , , , , , , , ,

How to Make Wallpaper Wax Flower Sculptures

This craft is all about taking ugly wallpaper and transforming it into beautiful 3-dimensional flowers. This craft only has 3 steps and is pretty simple to complete once you get the hang of it. You will need an adult, such as mom or dad, to assist you with dipping the wallpaper flower structures into hot wax. But other than that, you can complete these on your own.

How to Make Wallpaper Wax Flower Sculptures


How to Make Wallpaper Wax Sculptures


CRAFTS MATERIALS NEEDED

Flowers cut from Wallpaper

Melted candles or parafin wax (adult supervision / assistance needed)

2 Pronged Paper Fasteners

MAKING THE WAX SCULPTURES

Step 1


wallpaper-wax-sculptures-01


Cut out flower cluster from wall paper, as in Figure 1.

Step 2


wallpaper-wax-sculptures-02


Cut out several single flowers of the same design. Cut hides of flower petals into center, as shown by broken line in Figure 2.

Step 3


wallpaper-wax-sculptures-03


With a two-pronged paper fastener, attach single flowers to center flower in flower cluster. (Figure 1) Bend petals of top flowers upward.

An adult should do this next part. Ask an adult to dip assembled flower into melted wax. These flower. will float, as in Figure 3.

Technorati Tags: , , , , , , , ,

How to Paint, Glaze, and Fire Ceramic Tiles without a Kiln

Do you want to learn how to make your own customized ceramic tile? Well, then you’re in luck because today we will show you how to take a pencil design and then transfer it to your tile. From there you can take your liquid glaze and paint your design onto the tile. You don’t need a kiln to fire your ceramic tile, you just need a normal kitchen oven. Learn all about firing & glazing your ceramic tiles at home in the step by step tutorial below.

How to Paint, Glaze, and Fire Ceramic Tiles without a Kiln


How to Paint, Glaze, and Fire Ceramic Tiles


Crafts Materials Needed:

Blank glazed tiles

Low Fire Liquid Glaze

Watercolor brush

Tracing paper

Pencil

Paints or crayons

How to Design and Paint on a Ceramic Tile

Step 1


How to Design and Paint on a Ceramic Tile


On a piece of paper that is the same size as tile, draw a design.  Color design with paints or crayons, as in picture above.

Step 2


With pencil and tracing paper, trace off colored design outline, omitting most of the details


With pencil and tracing paper, trace off colored design outline, omitting most of the details. Remove tracing paper and scratch the back with soft pencil


Step 3


Place tracing paper, scratched side down, over tile


Place tracing paper, scratched side down, over tile, and trace design on tile, as in picture above.

Step 4


Stir liquid glaze, and thin with reducer if necessary with watercolor brush, fill in tile


Stir liquid glaze, and thin with reducer if necessary with watercolor brush, fill in tile, as in picture above.

HOW TO FIRE A CERAMIC TILE


oven


Place tile in a cold oven and heat slowly to 250°F. Keep oven at the same temperature, with the oven slightly open, for 2 hours. Turn off oven, and leave tiles in oven until cool. Ask an adult to remove tile, and when thoroughly dry, wash with soap and water to remove all traces of pencil marks.

Technorati Tags: , , , , , , , ,

Make a Graduation Cap and Diploma Pin in 6 Easy Steps

Graduation day is very important and everyone wants to remember it. What are the symbols of this day? The graduation cap / hat and diploma … so, we will add those to our badge pin 🙂 Learn how to make the following decorative pin in easy step by step lesson below … great for the last day of school.

This step by step tutorial is offered by Laura from Dacian Moon Handmade


How to Make Graduation Cap and Diploma Pin Badges


How to Make Graduation Cap and Diploma Pin Badges

CRAFTS MATERIALS NEEDED:

– toothpick
– polymer clay : blue – or any other colour for the background – and black – for the hat
– cutter
– 1 badge base
– thread
– craft glue
– white paper
– baking paper
– baking tray


Step 1

Condition polymer clay by hand, simply mix it and squish it with your fingers. You may want to roll it into a log between your palms, fold it in half, and then roll again.

Fortunately, in the summer the clay is conditioning more easily.

So, condition the blue clay.


Let a small part and from the rest make a ball and flatten it on a piece of baking paper.


Step 2

Place the badge base on it and press.


Use the small piece of blue clay to fix the base…


… like that.


Turn it with the face to you.


Step 3

Take a half of the black clay, condition it…


… and make a almost square form of it.


Place it to the blue background.


From the other half, make a triangle form and place it on top of the square.


Step 4

Place the on the baking tray, and bake it accordingly to the instructions on the polymer clay package (they depend on the brand you use: fimo, cernit, sculpey…, but usually is one half of hour at 230 F or 110 C)

Let it cool down.


Step 5

Take the white paper, make a roll with it…


…and tie it with the thread.


Step 6

Apply a layer of glue on it…


…and place it on the badge.

You can use paints to add the year or anything else you want.


Now you can wear it on your shirt or coat proudly. Congratulations!

Technorati Tags: , , , , , , , , ,

How to Make Pretty Earrings or Ear studs Hearts for Valentines Day Craft

Learn how to make these adorable polymer clay stud hearts (aka heart earrings). You can give these stud hearts to your Mom, Grandma, friends, etc to show them how much you care about them…especially for Valentine’s Day, Mother’s day, or a birthday. But, because we’ll use polymer clay (oven-hardening) you’ll need a little help from an adult. This is an easy to do step by step tutorial offered by Laura from Dacian Moon Handmade

Here are Even More Valentines Day Crafts Ideas


How to Make Pretty Earrings or Ear studs Hearts for Valentine's Day Craft


How to Make Pretty Earrings or Ear studs Hearts for Valentine’s Day Craft

CRAFTS MATERIALS NEEDED:

– toothpick
– red polymer clay (I placed the toothpick beside it to see how much polymer clay you need)
– cutter
– 2 flat earstuds
– 2 earnuts
– craft glue
– baking paper
– baking tray


Step 1.

Polymer clay has to be conditioned prior to use. Conditioning in this case means thorough mixing. To make conditioning easier, start with warming up your clay. The gentlest way of doing it is to carry the clay in your pocket for a while. You are ready to start conditioning your clay once it feels pliable. To condition polymer clay by hand, simply mix it and squish it with your fingers. You may want to roll it into a log between your palms, fold it in half, and then roll again.


The smaller the piece of clay you are conditioning, the faster it will soften up.


Step 2.
Make a ball with it.


Step 3.
Cut the ball in half.


Like that.


Step 4.
Squish gently between two fingers to make the lower part of the heart.


Step 5.
On the upper part, use the toothpick to shape it…


… like this.


Step 6.
Repeat the step 4 and 5 for the other half of polymer clay ball.


Step 7.
This is the moment when you need help.
Place the hearts on a baking paper in a baking tray. Bake them accordingly to the instructions on the polymer clay package (they depend on the brand you use: fimo, cernit, sculpey…, but usually is one half of hour at 230 F or 110 C)


Step 8.
Let it cool down.


Step 9.
Apply a layer of glue on the back side of the hearts and place the earstuds in the middle.


After the glue is dry, you can wear the earrings and be special on Valentine’s Day 😉


Here are Even More Valentines Day Crafts Ideas

Technorati Tags: , , , , , , , , , , , , , , , , ,

How to Make a Polymer Clay Heart Keychain Crafts Idea for Kids on Valentines Day

Today we will show you how to make this cool polymer clay heart keychain…a perfect gift to give to somebody you love or a good friend on Valentine’s day or to Mom on Mother’s Day or for a birthday. This polymer clay key chain is a cute heart adorned with flowers … perfect to decorate your phone, backpack, purse, etc.Below you will find the  step by step tutorial offered by Laura from Dacian Moon Handmade. Just to let you know…because we’ll use oven-hardening polymer clay you will need a little help from an adult.

Here are Even More Valentines Day Crafts Ideas


How to Make a Polymer Clay Heart Keychain Crafts Idea for Kids on Valentines Day


How to Make a Polymer Clay Heart Key Chain Crafts Idea for Kids on Valentines Day

CRAFTS MATERIALS NEEDED

– toothpick
– red and white polymer clay (I placed the toothpick beside it to see how much polymer clay you need)
– roll (you can use anything tubular – I use a recipient for Vitamines 😀 )
– baking paper
– baking tray
– keychain cord
– 1 jumpring


Step 1.

Condition red polymer clay by hand, simply mix it and squish it with your fingers. You may want to roll it into a log between your palms, fold it in half, and then roll again.


Step 2.

Make a ball of it and flatten it.


Step 3.

Gently squish one part, to form the lower part of the heart.


Step 4.

Use the toothpick to shape the upper part of the heart.


This is the heart 🙂


Step 5.

Place it on a piece of baking paper.


Use the toothpick again to make a hole in the upper left side.


Take care that the toothpick goes through the heart and get out on the other part.


Step 6.

Condition the white polymer clay too.


Step 7.

Make a small roll of white…


… and place it on the heart. Make a crease on it to fix it on the heart, like in the picture:


Add three more white petals.


Step 8.

Make a tiny white ball…


… and place it in the middle of the petals.


Step 9.

If you like, place two more petals on the opposite corner, for balance.


Step 10.

Now you’ll need the help of an adult.
Place the heart (with it’s piece of baking paper) on the baking tray, and bake it accordingly to the instructions on the polymer clay package (they depend on the brand you use: fimo, cernit, sculpey…, but usually is one half of hour at 230 F or 110 C)


Step 11.

Let it cool down.


Step 12.

Open the jumpring (I use a pliers for that)…


… put it through the hole that you made in the heart…


And through the keychain cord base.


Step 13.

Close the jumpring and the keychain is ready 🙂


Here are Even More Valentines Day Crafts Ideas

Technorati Tags: , , , , , , , , , , , , , , , ,

Make Bowls & Pottery & Hot Plates with Crepe Paper Streamers

This is a really neat arts and crafts project to make a real, usable bowl, hot plates,  or other type of pottery from normal crepe paper party streamers. You might even have these hanging around the house already. This would make a great crafts project to make a gift for Mom or Grandma on Mother’s Day or for a present for them on their birthdays. Follow the easy directions below.

Make Bowls & Pottery & Hot Plates with Crepe Paper Streamers Craft for Kids


Crafts Materials Needed:

-Crepe Paper Streamers
-Glue or Paste
-Scissors
-Waterproof Varnish or Shellac

Step 1


Obtain several rolls of serpentine crepe paper, each one a different color. Select a roll. Rewind it very, very tightly. To start the rewinding, fold 2 inches of the paper back upon itself to provide extra thickness. You can see this in Fig. 1 .

Step 2


When you reach the end of the roll,select another roll of a different color. Glue the ends of the two rolls together by putting a dab of paste on the roll under the loose end and press the end down. Then place a second dab of paste on top and start the next colored streamer.


Step 3

Continue winding. Each new color is added in the same manner. Continue until you have a disk with a diameter large enough on which to set a hot dish, as you can see in Fig. 3.  Glue the tail of the last roll to the roll itself.

Step 4 – To Make a Hot Plate

Shellac the hotplate pad.

Step 5 – To Make a Bowl Instead


To make a bowl, wind a disk to measure from 4 to 5 inches in diameter. After the winding has been completed, hold the disk in one hand, carefully curve the sides with the thumb of one hand, keeping the bottom flat as you can see in  Fig. 4. It is at this point that you
may come to find out that the winding was not rolled tight enough.

After you are satisfied with the shape of the bowl give it 3 coats of white shellac.  Allow each coat to dry before another is added. Finish the bowl with 2 coats of very good waterproof varnish or shellac.

Technorati Tags: , , , , , , , , , , , , ,

George Washington’s Camp Paper Folding Crafts Model Craft for Kids to Make for President’s Day


George Washington’s Camp Paper Folding Crafts Model for Kids to Make for President’s Day


Presidents Day is coming up on February 15th this year (2010) and I am posting a great project for teachers to do with their classrooms full of students. This is a great group project to celebrate George Washington’s birthday. This project includes paper folding and cutting and the use of clay. See below for the instructions to make George Washington’s camp. Use this to teach the kids about the Revolutionary War and General George Washington who later became America’s first president.

Make the Soldier’s Tents from Washington’s Camp


Below is the paper folding instructions to make the tent. Get a 4 inch square piece of paper (or cut 4 inches by 4 inches out of a larger piece of paper)


(1) Fold into 16 squares

(2) Fold diagonals of the corner squares.

(3) Cut on these diagonal lines.

(4) Now cut on the solid lines.

(5) Paste square A to square B.

(6) Paste square C to square D.

(7) A slit may be cut in one end and the edges folded out to represent the opening of the tent.

Fold several tents …at least 5 of 6.

Make a Canon for Washington’s Camp


(1) Make the cannon by forming 2 thin circular pieces of clay.

(2) Join these 2 circular pieces of clay with a toothpick.

(3) Make the cannon’s stock with clay and place it between the 2 wheels that you just made.

(4) Make cannon with clay and place on top of the stock that you formed in step #3.

(5) Let clay dry.

Make a Drum and Drum Sticks for Washington’s Camp


Below is the paper folding instructions to make the drum. 


(1) Cut out a rectangle that is about 8 inches x 2 inches long

(2) Make a crease that is about 1/2 inch from the bottom (as seen above).

(3) Make vertical cuts (up and down) from edge to edge along this crease (see the image above).

(4) Paste ends together so that it forms a cylinder-like shape.

(5) Remember when you made all of those cuts along the bottom of this paper…now fold them in.

(6) Cut a circle that fits the cylinder shape that you just made.

(7) Paste this circle onto the slits of paper you just cut and folded in.

To Make the Drum Sticks, you can either use toothpicks or make them from clay.

Print Rifles & US Colonial Flag

Print out these military rifles by (1) right clicking on them to open them in a new window (2) Click on File > Print.


Print out this Colonial US Flag by (1) right clicking on them to open them in a new window (2) Click on File > Print.


Find a chopstick, a stick from outside or other sturdy stick-like object. Fold this Colonial US flag in half and past it around the stick.


Now let the groups of children place their tents and cannons on to the poster board (or cardboard) to represent George Washington’s camp. Attach the flag to the cardboard or poster board by punching it through the board and then placing the Cannons Around it. You can also cut out trees and place them around the camp and if you want, you can place rifles in formation (as seen in the picture above).

Good luck and Happy Presidents Day.

Here are More President’s Day Crafts for Kids

Technorati Tags: , , , , , , , , , ,

Sculpting with Fimo: The Goldfish Crafts Project for Kids


goldfish-finished


My husband is a toy sculptor and he can do some pretty amazing things with his sculpting medium and at times it can be rather depressing when my sculpting abilities are very basic. I mean, I can create with paper but I have a bit of a hard time creating anything that is three dimensional, which is why I always delight when I can create something that is worthy of even a little bit of praise.  For this reason, I love working with fimo or clay and I enjoy the time spent with my kids as we make little critters that can be hardened into masterpieces that I can enjoy for a lifetime.

Sculpting is a wonderful activity for children and most have some experience with it through playdough.  While I love playdough, I find that not being able to really keep the finished product can be disheartening at times so I find that giving children an opportunity to make some lasting pieces is worth the extra expense that clay or fimo can present (although fimo isn’t that expensive, usually around 5 dollars for a small block that goes a long way).

In this craft, I will teach you how to create a very basic fimo sculpture fish that most children will enjoy making again and again.

Sculpting with Fimo: The Goldfish : How to Make a Goldfish with basic supplies


supplies1


Gather all the materials you need:

  • Fimo (you can use any color, in the step by step I use grey so I can paint it later but in the finished product I used orange, white and black.)
  • Toothpicks
  • Paint Brush or a round chopstick (if you have any)
  • Paint (optional)

1.  Remove a 2 or 3 inch piece of the Fimo from the block and knead it until it softens.  Usually this doesn’t take too long but if the Fimo is harder, you should expect about 5 minutes of kneading to soften it enough.


ball


2.  Take a small piece from the softened Fimo and roll it into the a ball to form the body of your goldfish. This will be the biggest piece and the size you take will depend on how big you want your goldfish to be. Once you have rolled it into a ball, flatten the bottom slightly so it will rest on the table without falling over.


making-a-tail


3.  Now that you have the body, it is time to make the fins of your goldfish.  To do this, create a small triangle with the Fimo.


tail


4.  When the triangle is formed, cut away a small “v” in the largest part or base of the triangle and then cut away the excess from the top of the triangle.

5.  Using the toothpick, carve a small “v” design into the tail and then attach it to the end of the ball by gently pressing it into


making-the-fins


6.  Once the tail is attached, it is time to work on the fins.  To do this, create two small tear drop shapes with the Fimo and then draw a few lines on your fins before you attach them.


putting-on-a-fin


7.  Attach the fins to the ball and smooth the Fimo with the flat side of the toothpick.  Fix any of the lines that were erased.


making-the-mouth-part-one


8.  Roll a small ball with the Fimo for the mouth and place it onto the front of the ball.


making-the-mouth


9.  Using the rounded tip of a paint brush or chopstick, gently press it into the small ball until you have an indent that looks like fish lips.


fish-finished


10. Roll two more small balls, smaller than the mouth, and carefully press them into the large ball above the mouth. These are the eyes.  Finish them off with a smaller ball that works as the pupil.  If you are painting, you can do all of this in one color but if you don’t want to paint the finished piece, use white Fimo for the eyes and black Fimo for the pupils.

11.  Bake in the oven according to the package until the sculpture hardens.


goldfish-finished


12.  At this point you will be done, unless you used all one color.  If you did, take the time to paint the sculpture with acrylic paints.

Fimo is an excellent craft for children that are 8 and up but I have seen children as young as 4 make some truly spectacular sculptures with this medium.  One word of advice; however, is to make sure that the children wash their hands after they are finished using it.

Technorati Tags: , , , , , , , , , , ,