How to Make a 3D Carnation Mother’s Day Card

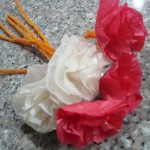
Mother’s Day is coming up next month.  That will be here before you know it.  So, in honor of the upcoming Mother’s Day Holiday today I will show you how to make a 3D Carnation Mother’s Day Card.   Any mom would love receiving a homemade card from their child.  And, this card is no exception.  Not only is this card made by you, but it is also 3D which makes it really cool.  You will use crepe paper to give this card a 3D effect.  So, grab the materials needed and let’s get started.

Check out our other Mother’s Day Crafts.


How to Make a 3D Carnation Mother's Day Card


Materials Needed

Red and Pink Crepe Paper

Construction Paper or Card Stock

Paste or Tape

Markers

Scissors


Step 1


Cut out a circle on red and pink crepe paper.


Cut out a circle on red and pink crepe paper.


Step 2


Fold in halves and then quarters.


Fold in halves and then quarters.  Snip edges irregularly to resemble a carnation.


It should look like this.


It should look like this.


Step 3


Take a piece of construction paper or card stock and draw 2 stems.


Take a piece of construction paper or card stock and draw 2 stems.  You will be pasting the carnations to the top of these stems.


Step 4


Paste or tape on carnations


Cut top of stem as shown and tuck in flower.  Paste or tape on carnations.  Write “Mom” or “Mommy” or “Mother”.


Finished Mothers Day Carnation Card


There you go….. you just finished making a 3D Carnation Mother’s Day Card.  Your mom is going to absolutely love it.  Do you know why?  Because you made it yourself.

Technorati Tags: , , , , , , , , , , , , , , , , , , , ,

How to Make a Notepad Pencil Gift Set

Today I’m going to show you how to make a Notepad Pencil Gift Set.  This Notepad Pencil Gift Set is a perfect gift for somebody that has a lot going on and needs some organizing.  It would make a great gift for anyone like this.  They could simply hang it up in plain sight and when a note is written on the notepad they are reminded of all the things they need to do.  Or, hang this next to the phone…. this item makes for a perfect place to leave messages for others.  So, let’s get started with this craft.

Check out our other Gift Crafts.


How to Make a Notepad Pencil Gift Set


Materials Needed

Cardboard

Colored Paper

Pencil

Glue

White Paper

Hole Punch

Black Marker

Stapler


Step 1


Cover a piece of cardboard with colored papers.


Cover a piece of cardboard with colored papers.


Step 2


Wrap paper around pencil to figure out where to glue.


Wrap paper around pencil to figure out where to glue.


Step 3


Fold white paper in fours ... then cut 4 pages apart.


Fold white paper in fours … then cut 4 pages apart.  Do this a few times to get a big enough bundle of paper for a pad.


Step 4


Staple paper to center of cardboard


Staple paper to center of cardboard;  Punch hold for hanging;  Glue or tape paper loop above paper pad;  Decorate the background paper with a nice design;  Write notes or something similar.


Finished Notepad Pencil Gift Set


And, there you have it…. you just finished your Notepad Pencil Gift Set.  How did it turn out for you?  Let me know in the comments below.  Also, take a picture of the Notepad and share that too in the comments…. I’d love to see it.

Here is our video on how to make a Notepad Pencil Set

Technorati Tags: , , , , , , , , ,

How to Make a Wire Hanger Book Holder

I have a great craft for you to make today.  It’s not only easy and fun…. but it is so useful too.  In this post I’m going to show you how to make a Wire Hanger Book Holder.   Book Holders are perfect for people who want to do something with their hands and yet read a book at the same time.  Like, for example, a cook book.  You can read the recipe while your hands are cooking the meal.  So, maybe you would like to make this craft to give as a gift…. or perhaps you want it for yourself.  Either way…. let’s get on with the craft.

Check out our other Wire Hanger Crafts.


How to Make a Wire Hanger Book Holder


Materials Needed

Wire Coat Hanger

Colorful Gummed Tape


Step 1


Squeeze the arms of the wire hanger together.


Squeeze the arms of the wire hanger together.


Step 2


Bend ends up and forward.


Bend ends up and forward.


Step 3


Fold hook down.


Fold hook down.


Step 4

Cover the hanger with the Gummed Tape.

That’s it…. you are finished.  You now have a Wire Hanger Book Holder.  Now, give it as a gift to someone who can really use it…. or enjoy it for yourself.

Here is our video on How to Make a Wire Hanger Book Holder.

Technorati Tags: , , , , , , , , , ,

How to Make Leaf Print Gift Wrap Paper

Celebrate spring by making this pretty wrapping paper with leaves from the garden. All you need is some paper, paint and a leaf.  It’s lots of fun to do, and it will be great to wrap your next birthday gift in.  I don’t know about you, but I never seem to have enough wrapping paper in the house.  Or, I have wrapping paper, but it is the same wrapping paper I use for everyone’s gift.  You can be rest assured that no one else will have this Leaf Print Gift Wrap.  So, let’s get started.


Materials Needed

Gold paint

Leaf

Black chart paper

Paintbrush


Step 1

Take a leaf with a pretty design and paint gold paint on the underside.


Step 2

Press the painted side on the black paper. You can use a piece of newspaper to press it on to the black paper.


Step 3

Repeat this process many times to make a beautiful pattern.


Step 4

Your gift paper is ready. Let it dry and store it for later use.  Imagine how impressed the receiver of this gift wrap will be?!  So impressed!!  The paper really turns out beautiful.

Technorati Tags: , , , , , , , ,

How to Make a “Be My Valentine” Owl

Today I’m going to show you how to make a stuffed Owl toy.  And, not just any stuffed Owl toy, but a “Be My Valentine” Owl that you can give to someone special this Valentines Day.  Imagine their surprise when they receive something that you made yourself.  Or, if you would prefer to keep it…. don’t even give it to someone.  Instead of writing “Be My Valentine” on the heart you can leave it blank or write whatever message you would like.  So, whether it is for you or someone special…. either way it is sure to be loved.  Let’s get started.

Check out our other Valentines Day Crafts.

Tutorial offered by Laura from Dacian Moon Handmade.


Materials Needed

– three pieces of fabric (a large piece – about 16 cm x16 cm – the color that the owl will have, a smaller piece in a contrasting color and a red piece of about 5 cm x 5 cm)
– small pieces of white and black (or brown) leather
– scissors
– pen
– stuffing material (I used some cotton pads)
– needle and thread


Step 1

Fold the large fabric piece in half.


Draw the outline of the owl using your pen. Like this.


Cut it out. You will find it useful to use some pins to keep the two parts together.


It will look like this.


Step 2

Start sewing the two parts together…


… like this.


Stop when you reach the ears.


Sew the other side too.


Step 3

Turn it inside out.


Prepare the stuffing material .


I tore the cotton pads into small fluffy pieces.


Stuff your little bird so that it has a wonderfully squishy and cuddly softness.


When you are satisfied, sew the top.


Like this.


Step 4

Draw two circles on the piece of white leather.


Cut them out.


Apply a layer of glue on the back of one…


… and place it where the eye should be. Do the same with the other one.


Take the black / brown leather…


… and cut out a diamond from it.


This is the beak and we will stick it between the two eyes.


Use the pen to give it some personality by finishing the eyes.


Step 5

Cut 2 wings from the fabric in contrasting color. Like this.


Then sew them on the two sides of the owl…


… like this.


Step 6

Draw a heart on red fabric.


Cut it out, then apply a layer of glue on its back.


Place it under the beak, like this.


Now you can let it like this, decorate it or write “Be my Valentine !” on it, like I did.


And, there you have it…. you just finished the “Be My Valentine” Owl.  Did you make your owl like mine or did you do something different?  Let me know in the comments below.  If you want, take a picture of the owl and share that too in the comments…. I’d love to see it.

Technorati Tags: , , , , , , , , , , ,

How to Make a Valentines Gift for Her

Today I’m going to show you how to make a Valentines Gift for Her.  It is a lace choker and the end result is just simply beautiful.  Any female would love to receive this as a gift.  It is a perfect gift for your Mom, Aunt or even your someone special.  We will even make a cardboard heart that the choker is placed on to make presenting this gift even more lovely.  So, grab the materials needed and let’s get started.

Check out our other Valentines Day Crafts.

Laura from Dacian Moon Handmade will show you how to make this lovely gift.


Materials Needed

– patterned cardboard
– organza (a rectangle of about 10 cm x 10 cm)
– lace (it will be a choker so you can measure to fit your neck )
– satin ribbon
– scissors
– needle and thread
– pencil
– card punch


Step 1

Cut the organza piece in half.


Take one half and fold it in two.


Now, sew the two parts (of the folded half) around the corners…


… like this.


Pull thread to form the petals.


Make a knot to keep it in place.


It will look like this.


Step 2

Repeat the first step to make anther one.


Step 3

Take about 12 cm of the satin ribbon…


And wrap it around your finger…


… like this.


When you reach the end, sew it to keep it in place.


Step 4

Put the satin part through the middle of one piece with petals and sew it there.


Like this.


Add the second part with petals…


And sew it.


Now the flower is ready.


Step 5

Take the lace…


… and find its middle.


Sew the flower there …


… like this.


Step 6

Cut the remaining satin ribbon in two…


… and sew them at lace ends.


The necklace is now ready.


Step 7

Take the cardboard…


… and draw a heart on it (about 12 cm x 12 cm)


Cut it out.


Make a hole in the upper right part…


… like this.


Fold the necklace like this…


… and place it on top of the heart, under the hole.


Mark a point under the folded necklace…


… and make another hole there.


We will put a small ribbon through these holes to keep the necklace on the base.


It is looking like this on the backside.


You can tie the two parts of ribbon or you can use a double adhesive band to keep them in place.


So, this is the gift…


… and this is the necklace.


Doesn’t this Choker Valentines Gift for Her turn out lovely?  Any girl would love receiving this as a gift.  How did your Choker turn out?  Let me know in the comments below.  And, don’t forget to add a picture…. I’d love to see it.

Technorati Tags: , , , , , , , , , ,

How to Make a Daisy Book Pendant

I know Valentines Day is coming up in 6 days…. and you were probably expecting a Valentines Day craft.  I took a break from showing you another Valentines Day craft to show you how to make this Daisy Book Pendant.  I thought this Daisy Book Pendant would make for a wonderful Valentines Day Present to someone special.  Anyone will surely love to wear it.  I will even show you later in the craft how to put a special hidden message inside the pendant.  So, let’s get started.

Check out our other Jewelry Crafts.

Laura from Dacian Moon Handmade  will show you how to make this, step by step.


Materials Needed

– cardboard (for the covers – I used green)
– white and yellow paper
– scissors
– thick thread and needle
– pencil
– paper glue


Step 1

Draw 9 squares on the white paper (6 cm size)


Cut them out.


Cut another 9 squares (6 mm size) from the yellow paper.


Step 2

Take one white square…


… and fold it diagonally from point to point. Press well.


Unfold it.


Fold paper in half…


… Unfold it…


… and then in half again the opposite way.


Unfold.


Step 3

Take a small square…


… and glue it in the middle of the creases.


Do the same for all 9 squares.


Step 4

Take one piece and place it with the clear diagonal in front of you (the one without a crease).


Press the sides back until they unite.


It will look like this.


Cut the corners round (except the yellow corner)


Like this. Do the same for the rest of pieces. Now we have 9 petals.


Step 5

Place one petal over cardboard and draw the cover…


… like this.


Cut it out and make the second one.


Turn one of them upside down and draw something simple. Because Valentines Day is coming up…. I am drawing a heart.


Use the needle to make some holes on the heart outline. Make another hole in the corner. (Do this for the other cover too)


Step 6

Apply a layer of glue on one side of a petal…


… and place the cover over it, aligning it to the yellow corner.


Press well. It will look like that.


Turn it over…


… and add another layer of glue on the petal.


Place another petal on top, aligning the yellow corners…


… and so on, until you add the last petal and the other cover. Let it dry well (it is better to use dry glue).


Step 7

Now… open up.  Surprise!!


Isn’t it beautiful ?!


And you can add a secret message too! With the book almost open, place a finger under one petal, like this, and push up.


A secret place is open where you can write the message.


Close the book, put the thread through the corner holes…


… and you can wear it or give it as a present to someone special.


And, there you have it.  How did your Daisy Book Pendant turn out?  Are you going to wear it yourself or give it to someone special this Valentines Day?   The choice is yours… either way people will surely love it.

Technorati Tags: , , , , , , , , , , ,

How to Make a Valentines Critter

I have a fun craft for you today.  I’m going to show you how to make a Valentines Critter.  This Valentines Critter is perfect to give your someone special as a gift this Valentines Day.  The critter holds on to the sweetest lollipops that any receiver will be sure to love.  Add a sweet and loving note and you have the perfect gift ready for giving to your someone special.  So, grab the materials needed and let’s get started.

Check out our other Valentines Day Crafts.

Laura from Dacian Moon Handmade  will show you how to make this critter, step by step.


Materials Needed

– cardboard (a rectangle of 7 cm x 5 cm)
– red paper
– scissors
– pen
– pencil
– 2 flexible straws
– lollipop
– card punch


Step 1

Draw two hearts on the red paper…


… and cut them out.


Using your pen draw eyes, nose, mouth on one of them and write “Happy Valentines Day” on the other one.


Step 2

Take the cardboard…


And make 4 holes in it, like this (using the card punch).


Apply a layer of glue on the lower part of the heart with eyes…


… like this…


… and place it over the cardboard, like this.


Step 3

Take a straw…


… measure the distance between two holes, like this…


… and bend it…


… to go through both holes.


It will look like that. Now the critter has one arm and one leg.


Bend the leg down…


… then bend it again at 2 cm of the straw end to make the foot.


Repeat this step to make the second arm and leg.


Step 4

Move the hands outward…


… and bend one from the middle inward (from the elbow)


This arm will support the lollipop.


Step 5

Using the scissors make a small cut on the other arm.


Put the second heart on this cut and the critter is ready.


Imagine the surprise of the receiver of this Valentines Day Gift…. they are sure to love it.  How did your Valentines Critter turn out?  Let me know in the comments below.  And, take a picture of your critter as well… you can share that too in the comments.  I’d love to see it.

Technorati Tags: , , , , , , , , , , , ,

How to Make a Candy Box for Valentines Day

Are you planning on giving your special someone something special for Valentines Day?  Is that something special some candy?  Well, instead of just giving your someone special an ordinary heart shaped box filled with candy…. why not give that person a handmade Candy Box this Valentines Day?  Imagine their surprise when they see that you gave them something you made yourself.  The craft is an easy one, but turns out really beautiful.  So, grab the materials needed and let’s get started.

Check out our other Valentines Day Crafts.

Laura from Dacian Moon Handmade  will show you this Candy Box tutorial step-by-step.


Materials Needed

– pattern cardboard (ideally with different pattern on the sides)
– assorted ribbon
– scissors
– card punch
– pencil


Step 1

Cut a square from the cardboard.


Divide your card into thirds.


Rotate the card 90 degrees and divide the card into thirds again. You now have 9 squares scored on your card.


Step 2

On each of the four corner squares, score a line diagonally, from the corner of the square in toward the center.


Fold along the horizontal lines …


… then along the vertical ones…


… and eventually along the diagonal lines.


It will look like this.


Punch a hole in each of the four corner squares…


… like this.


Take a piece of ribbon …


… and thread it through the punched holes.


Draw the ends of the ribbon together and tie a knot, or a bow if you like. Now fill it with candy.


And, that’s it!!  Easy Peasy Lemon Squeezy!!  You just finished your Candy Box for Valentines Day.  How did it turn out?  Now, fill with candy and give it to your favorite someone this Valentines Day.

Technorati Tags: , , , , , , , , , ,

How To Make Paper Carnations

Today I’m going to show you how to make Paper Carnations.  Paper Carnations can be used for many things…. Valentine’s Day, for example.  Valentine’s Day is coming up in just a couple of weeks.  These carnations would be beautiful in a bouquet as a gift for your someone special.  Or, for Mother’s Day…. what mother wouldn’t love receiving a bouquet of hand made paper carnations from their child?   They would certainly love it.  Or, just make these Paper Carnations any day of the week to give to someone special as a surprise.  No one could resist them!  So, let’s get started.

Check out our other Valentine’s Day Crafts.


Materials Needed

tissue papers (the one used for wrapping presents)

pipe cleaners/fuzzy wires

scissors


Step 1

Fold tissue paper into portions, enough to make 3 to 4-inch circles.


Step 2

Stack 7-10 pieces of circles and by folding it, make two small slits in the middle. This is where you slip in the tip of the pipe cleaner, then fold it to lock it in place.


Step 3

Starting in the middle, gently fold the paper up, until all the side are pulled upwards.  Continue doing the same for the other papers underneath.


Step 4

When all the papers are up, gently arrange it to form blooming petals of your carnation flowers.


Step 5

Make a bunch of these flowers and you can place it a flower vase for a more attractive look.

Or better yet, make a bouquet of carnation flowers and give it to somebody for Valentine’s Day.  They are sure to love it.  How did your carnation flowers turn out?  Let me know in the comments below.

Technorati Tags: , , , , , , , , , , , ,

How to Make a Lollipop Holder Gift for Valentine’s Day

Today I have a fun craft for you.  I’m going to show you how to make a Lollipop Holder Gift for Valentine’s Day.  It is a perfect gift for a friend, family or even a secret admirer.  Make several of these Lollipop Holder Gifts and give them to many people.  Whatever you would like to do.  The receiver is sure to love this gift.  So, grab the materials needed and let’s get started.

Check out our other Valentines Day Crafts.

Laura from Dacian Moon Handmade will show you this craft step-by-step.


Materials Needed

– colored paper (not too thin) – measure two and a half lollipop size (without the stick)
– white paper
– scissors
– paints
– paintbrush
– glue
– pencil
– lollipop


Step 1

Take the colored paper…


… and fold it leaving 2 cm on top.


Step 2

In the middle of the folded edge cut a triangle…


… like that:


Step 3

Fold the paper on one top of the cutted triangle…


… then on the other one.


Step 4

Bring the white paper on the short side of the colored paper and measure how big you want it to be.


Then cut it on the markings.


Step 5

Let’s decorate the white paper. With the pencil…  draw the middle of a flower, one petal…


… and many broken petals on the ground.


Step 6

With black paint and a toothpick paint the contour of your drawing.


It will look like this.


Step 7

Paint the petals as you wish.


Make the stem green and the middle orange.


Step 8

With black write on every petal “He loves me” or “He loves me not”, taking care that on the petal that is  still on the flower says, “He loves me”.


Like this:


Step 9

With red write,  “Happy Valentine’s Day”.  Let it dry.


Step 10

On the back side of the painted paper…apply a layer of glue…


… And place it on the colored paper, where you had measured.


Step 11

On the middle of the upper part make markings at 3 cm.


Starting on the markings make a circular cutting on the back part of the paper. Like this:


Step 12

Place the lollipop in the hole from the base …


… and close the box.


And there you have it…. you just made a Lollipop Holder Gift for Valentine’s Day.  Isn’t it just precious?  Imagine the surprise of the receiver when you tell them you made it from scratch…. they will love it!!

Technorati Tags: , , , , , , , , , ,

How to Make a Chocolate Bar Box for Valentine’s Day

Valentine’s Day is right around the corner.  It is on February 14th and it will be here before you know it.  Are you prepared yet?  Do you know what you are getting your friends and family for Valentine’s Day?  Or perhaps you have a special person you have been admiring from “a far”.  Either way I have the craft for you today.  In this post I’m going to show you how to make a Chocolate Bar Box for Valentine’s Day.   You are simply going to start off with your receiver’s favorite candy bar and go from there to construct the perfect chocolate bar box for this special occasion.  So, grab the materials needed and let’s get started.

Check out our other Valentine’s Day Crafts.

Laura from DacianMoon Handmade will show you how to make this chocolate box.


Materials Needed

– colored paper (not too thin)
– glitter glue
– scissors
– ribbon (about 40 cm)
– paint marker
– glue
– pencil
– chocolate bar


Step 1

Measure enough space for the chocolate (let’s say 2.5 cm on every side of the chocolate bar) and mark with a line.


Step 2

Fold on this line…


… and once again…


… like this:


Step 3

Cut the last part at 2 cm from the edge.


Step 4

On one of the small sides make a criss-cross cut.


Step 5

Unfold the paper.


Step 6

Apply a layer of glue on the back side of the chocolate bar…


… and place it in the middle.


Step 7

Apply a layer of glue on the ribbon too…


… as long as the width of the paper… then place the paper with the chocolate on top.


Step 8

Take the remaining paper…


… fold it in half…


… and draw a half of a heart on it.


Cut the drawing out.


Unfold.


Step 9

With the marker write in the middle of the heart “Happy Valentine’s Day”.


Step 10

Close the box and tie the ribbon making a knot on one side.


Step 11

Apply a layer of glue on the upper part of the back side of the heart, as I show in this picture.


Then place it on the box. Take care that the glued part does not touch the ribbon.


Step 12

Use glitter glue to decorate the heart.


Here is your elegant chocolate box…. ready to be given away to someone special.


Isn’t this chocolate box just fabulous to give out as a gift?  It really is.  Imagine how excited the receiver would be to receive it.  Now, the real question is….who are you going to give this awesome Chocolate Bar Box to for Valentine’s Day?

Technorati Tags: , , , , , , , , , , , ,

How to Make a Pressed Flower Card

Today I’m going to show you how to make a Pressed Flower Card.  This card can be used for any occasion that comes around.  Imagine the excitement of anyone who receives this greeting card.  They are sure to love it.  Made from flowers and construction paper your kids are sure to have a lot fun making this card.  So grab the materials needed and let’s get started.

Check out our other Greeting Card crafts.


Materials Needed

fresh flowers of your choice (can include a little stem and leaves)

Construction Paper (any preferred color and size)

book

glue

scissors

colored pen


Step 1

Make sure flowers are free from insects. Arrange flowers and gently press it against the pages of the book. Leave it there for 2 hours or more.


Step 2

Fold paper crosswise so it resembles a greeting card.


Step 3

When the flowers are ready, gently take them out and place them in the front side of the card… this is to roughly measure if there is enough space. Trimming stems and leaves may be necessary to fit in the card. Be careful when holding the flowers as they are fragile.


Step 4

With a glue, slowly start tracing the stems first. Let glue sit there for about a minute before placing flowers back. Then continue with the leaves, finishing with the flowers.


Step 5

With all parts glued to the paper, press it again with the book and leave it for 30 minutes or so.


Step 6

Check if all flower parts are properly glued. Then using a colored pen, write your message inside the card.


And your card is ready!   How beautiful is this card?!  And, it is unique from any other card…. that makes this greeting card even cooler.  You will find no other card like this.  Now, who are you going to send your first Pressed Flower Card to?

Technorati Tags: , , , , , , , ,

How to Make a Decorated Candle Jar

Today I’m going to show you how to make a decorated candle jar perfect to give as a gift for the Holiday Season.  Imagine how much your friends and loved ones would enjoy a gift that you made yourself.  They would totally love it.  And, this decorated candle jar turns out beautifully…. so you will be so proud to give this craft as a gift.  So, let’s get started.

Laura from  Dacian Moon Handmade will show you, step by step, how to make a decorated candle jar.


MATERIALS NEEDED

– tracing paper
– image from computer
– craft glue (that will be transparent when dry)
– scissors
– self-adhesive crystals
– paintbrush
– recycled jar – it shouldn’t be too tall, but large enough to place a tea candle inside


Step 1

Print the image on the tracing paper. You will need to print it twice because the image must go around the jar.


Cut off the images. I need 4 trees to cover my jar.


Step 2

Using the craft glue…


… cover one side of the jar…


Then place one image on it.


Repeat that until the whole jar is covered.

Let it dry.


Step 3

Over the image add glue again spreading it with the paintbrush…


… like that.

Wash your paintbrush immediately with water or else it will bind itself.


Let it dry well.

This layer of glue placed on top of the image will protect it and give you the chance to make some interesting patterns when you spread it.


Step 4

Take one self-adhesive crystal…


And place it on the upper part of the jar.


Decorate as you please…


… now you can light the candle or give as a gift.


Awesome job…. you just finished your decorated candle jar.  How did your candle turn out?  Take a picture and share it with us in the comments below.  Now, go wrap your decorated candle jar and get it ready to give as a gift.  Whoever you give it to will LOVE it!!

Technorati Tags: , , , , , , , ,

How to Make a Christmas Gift Bowl

Today I’m going to show you how to make a bowl perfect for a Christmas gift.  This bowl would make a special gift for your Mom, Grandma or Aunt this Christmas.  It will mean so much to them and they will surely treasure it for years to come.  You will simply take a plain glass or plastic bowl and use acrylic paint to paint a Christmas design on the front of the bowl.  This craft will be a lot of fun…. almost as fun as it will be to give it as a gift this Christmas.  So, let’s get started.

Check out our other Christmas Crafts.


Image089


Materials Needed

White plastic (or glass) bowl

acrylic glitter glue – gold and green

acrylic paint – red

paintbrush

pencil


Image060


Step 1

Draw a line near the edge of the bowl, around it as shown.


Image061


Step 2

Paint the space between the edge and the line as shown.


Image062


Step 3

Draw holly leaves with a pencil in a few places around the bowl.


Image063


Step 4

Go over the lines with acrylic glitter glue. Allow to dry.


Image089


Step 5

You are done… The bowls can be washed as the acrylic design will stay.

Now, you are ready to wrap your bowl to give as a gift.  You know what you can do….. make a set of 2, 4 or 6 and give them an entire set as a Christmas gift.  They can use them to decorate the table next year for Christmas.  Now, the real question is…. who is the lucky person who is going to receive this Christmas bowl as a gift?  Hmmmmm……

Technorati Tags: , , , , , , , , , , , , ,

How to Make a Rose Pendant

The Holidays are coming up really quickly.  And, with the Holidays comes the joy of gift giving.  For today’s craft I’m going to show you how to make a Rose Pendant perfect for giving to a special person this Holiday season.  Made from ribbon and a piece of leather….. this craft is sure to be loved by anyone receiving it as a gift.  So, let’s get started.

Step by step tutorial offered by Laura from Dacian Moon Handmade


MATERIALS NEEDED:

– pink satin ribbon
– some burgundy leather
– scissors
– needle and thread


Step 1

Take the ribbon and roll it tight for two – three times.


Secure the base by sewing it. This will make the work a lot easier.


Step 2

Now fold the ribbon against itself …


… and continue to gently roll around the center…


… like that.


Now secure again by sewing it.


Step 3

Repeat step 2: fold….


… and roll … then sew.


Step 4

Do that again and again until the ribbon is ending. It should look like that.


Step 5

Bring the last part of ribbon behind the rose and sew it there.


This is the rose.


Step 6

Take the burgundy leather and put it like that on the back of the rose.


Sew it there.


Now the pendant is ready.


And, there you go…. you made a Rose Pendant perfect for gift giving this Holiday Season.  How did your Rose Pendant turn out?  What color did you make your Rose?  Let me know in the comments below.  Now, the real question is…. who are you going to give it to this Holiday?  Whoever it is…. they are sure to love it.

Technorati Tags: , , , , , , , ,