How to Make a Coupon Organizer Case

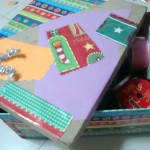
Mother’s Day is right around the corner.  Have you thought about a gift for your mother yet?  Well, if not I got a great Mother’s Day craft for you.  I’m going to show you how to make a Coupon Organizer Case.  There is not many things more frustrating that going shopping with a pile of coupons and no way of organizing them…. well, your mom won’t have that problem anymore.  With the number of envelopes you are going to be adding to this craft she will have more than enough places to organize her coupons.  So, let’s get started.

Check out our other Mother’s Day Crafts.


How to Make a Coupon Organizer Case


Materials Needed

Cardboard

Paper

Glue or Paste

Hole Punch

10-20 Envelopes

5 Binder Rings, Ribbon or Yarn

Markers, Crayons, Glitter Glue (items to decorate case)


Step 1


Cut 2 pieces of cardboard down to a size that is a tiny bit larger than a business envelope.


Cut 2 pieces of cardboard down to a size that is a tiny bit larger than a business envelope.


Step 2


Cover with paper.  Paste in place.


Cover with paper.  Paste in place.


Step 3


Use a hole punch to poke holes on left side.


Use a hole punch to poke holes on left side.


Step 4


Punch holes in 10-20 envelopes so they will match up with covers.


Punch holes in 10-20 envelopes so they will match up with covers.


Step 5


Bind 2 covers and all the envelopes together.


Bind 2 covers and all the envelopes together.  You can use binder rings, ribbon or yarn to bind them together.


Step 6


Decorate cover.


Decorate cover.


Finished Coupon Case


And there you have it…. you just finished making your Coupon Organizer Case.  Isn’t it a wonderful way to organize coupons?  Your mom is going to surely love this!!

Here is our video on How to Make a Coupon Organizer Case

Technorati Tags: , , , , , , , , , , , ,

How to Make a Hand Print Lamb

I have a fun and adorable craft for you today.  I’m going to show you how to make a Hand Print Lamb.  This craft is great for all ages….. even the youngest of crafters can enjoy this craft.  Made from cotton, a bow, a googly and of course your hand print…. this craft turns out super cute.  Any child will be so proud they made this.  So, grab the materials needed and let’s get started.

Check out our other Cotton Crafts.


How to Make a Hand Print Lamb


Materials Needed

Black Paint

Paper

Cotton

Googly Eye

Bow

Glue


Step 1


Put black paint on hand.


Put black paint on hand.


Step 2


Press hand on paper.


Press hand on paper.


Step 3


Leave print on paper.


Leave print on paper.


Step 4


Glue on cotton


Glue on cotton…. leave fingers showing.


Step 5


Add a googly eye and a bow.


Add a googly eye and a bow.

That’s all there is to it!!  You just finished making a Hand Print Lamb.  How did your lamb turn out?  Let me know in the comments below.  And, add a picture of it too to the comments…. I’d love to see it.

Here is a video on How to Make a Hand Print Lamb.  Watch our step-by-step tutorial.

Technorati Tags: , , , , , , , , , , , , , ,

How to Make Bunny Rabbit Treat Bags for Easter

Instead of using an Easter Basket to give out Easter treats to people, have you thought of using a Treat Bag?  Today I’m going to show you how to make a Bunny Rabbit Treat Bag for Easter.  These are great if you have a bunch of people to hand out candy to.  Instead of buying an Easter Basket for everyone…. why not just make these cute Bunny Rabbit Treat Bags.  They are super easy and a ton of fun…. plus they are super cute.  So, grab the materials needed and let’s get started.

Check out our other Easter Crafts.


How to Make Bunny Rabbit Treat Bags for Easter


Materials Needed

Brown Bag

Pencil

Scissors

Black Marker

2 Pom Poms

Treats

2 Ribbons


Step 1


Draw top of bunny's head all around a brown bag.


Draw top of bunny’s head all around a brown bag.


Step 2


After cutting out it will look like this.


Cut out the top of the bunny heads you just drew.  After cutting out it will look like this.


Step 3


Draw 2 ovals for eyes


Draw 2 ovals for eyes, draw 3 lines for whiskers and add 2 pom poms where shown.


Step 4


Add treats


Add treats.  Once you have added the treats tie both ears shut on each side.

That’s it!!  You just finished your Bunny Rabbit Treat Bags for Easter.  Now, give this Bunny Rabbit Treat Bag to the receiver….. they are sure to love it!!

Technorati Tags: , , , , , , , , , , , , , ,

How to Make a Woven Paper Easter Basket

I have a fun Easter Craft for you today….. In this post I’m going to show you how to make a Woven Paper Easter Basket.  This Easter Basket is made out of sheets of construction paper and ribbon and when put together correctly it makes for an awesome Easter decoration.  You can fill it with plastic Easter Eggs or Paper Easter Eggs you made yourself and display it proudly in your house for all to see.  So, grab the materials needed and let’s get this craft started.

Check out our other Easter Crafts.


How to Make a Woven Paper Easter Basket


Materials Needed

3 Sheets of Construction Paper

Stapler

Scissors

Ribbon or Construction Paper


Step 1


Fold 2 pieces of paper lengthwise.


Fold 2 pieces of paper lengthwise.


Step 2


Staple together.


Staple together.


Step 3


Fold in half again.


Fold in half again.


Step 4


Cut slits about an inch apart.


Cut slits about an inch apart.


Step 5


Unfold.  Push ribbon or strips of paper thru slits... over, under, over, under.


Unfold.  Push ribbon or strips of paper thru slits… over, under, over, under.


Step 6


Staple ends together.


Staple ends together.


Step 7


make a handle by cutting a strip of ribbon or construction paper and stapling it to the basket.


You can make a handle by cutting a strip of ribbon or construction paper and stapling it to the basket.

Step 8

This is a great craft for Saint Patrick's Day. Have you ever heard of pixel art...well it is drawing with blocks (pixels)...this is how graphic images that you see on the screen are made. Anyways, it is sort of like mosaics with tiles because tiles are square blocks as well. Even if you don't understand what I'm trying to say, you can appreciate this craft for its coolness factor. This is an interesting form of paper weaving as you will see when you take a look at the steps. Happy St. Patrick's Day everyone.     <a href="http://www.artistshelpingchildren.org/kidscraftsactivitiesblog/wp-content/uploads/2013/03/400x400-pixelated-paper-woven-shamrocks.png"><img class="alignnone size-full wp-image-18362" alt="Pixelated Shamrock with Paper Weaving Craft for Saint Patricks Day" src="http://www.artistshelpingchildren.org/kidscraftsactivitiesblog/wp-content/uploads/2013/03/400x400-pixelated-paper-woven-shamrocks.png" width="400" height="400" /></a> <h2>Crafts Materials Needed:</h2> White Paper  Green Paper  Scissor  Tape <h2>Template to Print</h2> <a href="http://www.artistshelpingchildren.org/kidscraftsactivitiesblog/wp-content/uploads/2013/03/shamrock-pixelated-template.png"><img class="size-medium wp-image-18369" alt="Pixelated Shamrock Template" src="http://www.artistshelpingchildren.org/kidscraftsactivitiesblog/wp-content/uploads/2013/03/shamrock-pixelated-template-285x175.png" width="285" height="175" /></a> Click on Image and It Will Open Larger. Then Save Image to Your Computer. <h2>Step 1</h2> <img class="alignnone size-full wp-image-18363" alt="step1" src="http://www.artistshelpingchildren.org/kidscraftsactivitiesblog/wp-content/uploads/2013/03/step11.png" width="500" height="361" />  Firstly, cut strips of paper. You can cut them to any width, but I cut them each 1/2 inch wide. Cut about 15 of each color. <h2> Step 2</h2> <img class="alignnone size-full wp-image-18364" alt="step2" src="http://www.artistshelpingchildren.org/kidscraftsactivitiesblog/wp-content/uploads/2013/03/step2.png" width="550" height="432" />  Now lay strips of white paper down as seen above. Tape either the right or left side down. I taped it down on the right.  <script type=
<h2> Step 3</h2> <img class="alignnone size-full wp-image-18365" alt="step3a" src="http://www.artistshelpingchildren.org/kidscraftsactivitiesblog/wp-content/uploads/2013/03/step3a1.png" width="450" height="430" /> Then start weaving. You just look at the paper template provided and see how many green are needed on each line. In the pic above, 2 blocks are needed. (I taped too many white strips down and that is why the green starts 5 blocks away instead of 3 like in the template). <h2> Keep Going</h2> <img class="alignnone size-full wp-image-18366" alt="step3b" src="http://www.artistshelpingchildren.org/kidscraftsactivitiesblog/wp-content/uploads/2013/03/step3b1.png" width="350" height="433" /> Keep going. <h2> Until Completed</h2> <img class="alignnone size-full wp-image-18367" alt="step3c" src="http://www.artistshelpingchildren.org/kidscraftsactivitiesblog/wp-content/uploads/2013/03/step3c1.png" width="350" height="502" /> This is what the shamrock looks like when completed. <h2> Step 4</h2> <img class="alignnone size-full wp-image-18368" alt="step4" src="http://www.artistshelpingchildren.org/kidscraftsactivitiesblog/wp-content/uploads/2013/03/step41.png" width="350" height="461" /> I taped the white strips to the green strips on the bottom and top ( as seen in the picture ). Now that it is secured, you can turn it over and tape it in place on the back as well. You then have a really cool shamrock. I hope that this was fun for you.

Technorati Tags: , , , , , , , , , , , , , , , ,

 ” src=”http://www.artistshelpingchildren.org/kidscraftsactivitiesblog/wp-content/uploads/2012/03/inside-basket.png” width=”400″ height=”393″ />

Then take the 3rd sheet of construction paper and trace the circle of the basket onto the paper. Then make a 2nd line outside this first circle. Then cut slits from the outside circle to the inside circle. Then fold these slits inwards. Then tape these inward slits to the inside of the basket.

Finished Basket


Finished woven paper Easter basket


There you go…. you just finished making your Woven Paper Easter Basket.  Now, fill it with Easter Eggs and put it out as an Easter Decoration.  It sure to be a big hit!!

Technorati Tags: , , , , , , , , , , , , , , , ,

How to Make Easter Egg Cards

Easter is just around the corner.  So, to get ready for the upcoming Easter Holiday I thought we would do a craft in honor of Easter.  Today I will show you how to make beautiful Easter Egg Cards.  These cards turn out really lovely.  They will be perfect to hand out to your loved ones and friends…. so make quite a few.   Each card can be written with a unique saying inside.  So, grab the materials needed and let’s get started with this craft.

Check out our other Easter Crafts.


How to Make Easter Egg Cards


Materials Needed

Printer & Paper

White Paper

2 Pieces of Colorful Paper

Crepe Paper, Sequins, Glitter (Items to Decorate Eggs)

Marker

Hole Punch

Scissors

Ribbon


Click on template image below to make larger and to print.


Easter Egg Card Template


Step 1


Print out template.


Print out template.


Step 2


Use egg template to trace 2 eggs on colorful paper and 1 egg on white paper.


Use egg template to trace 2 eggs on colorful paper and 1 egg on white paper.


Step 3


Decorate the Easter egg with crepe paper, sequins, glitter


Decorate the Easter egg with crepe paper, sequins, glitter or however you wish to.


Step 4


Write a message on the white egg.


Write a message on the white egg.


Step 5


Punch 2 holes on wide part of eggs.


Punch 2 holes on wide part of eggs.


Step 6


Now push ribbon thru both holes (in all 3 eggs) and tie a bow above the top egg


Now push ribbon thru both holes (in all 3 eggs) and tie a bow above the top egg… as seen above.

And, there you have it….. you just finished making an Easter Egg Card.  Now, make a few more and hand them out to loved ones or friends this Easter.  The receiver will be sure to love them.

Technorati Tags: , , , , , , , , , , ,

How to Make Paper Strip Belts and Bracelets

In this post I will be showing you how to make a Paper Strip Belt or Bracelet.   The choice is really yours weather you make a belt or a bracelet.  You simply will need to adjust the amount of colored paper you use for the project…. less for the bracelet and more for the belt.  Make a few and give them to your friends or loved ones…. anyone would be sure to enjoy them.  So, grab the materials needed and let’s get started with this fun craft.

Check out our other Friendship Bracelet Instructions.


How to Make Paper Strip Belts and Bracelets


Materials Needed

Thin Colored Paper, Magazine or Cellophane

Cord or Ribbon


Step 1


Thin colored paper, colored magazine pages or cellophane may be used.


Thin colored paper, colored magazine pages or cellophane may be used.  Plan 1 pattern for each inch.


Step 2


Fold on 'A' and 'B' toward 'C'.


Fold on ‘A’ and ‘B’ toward ‘C’.


Step 3


Fold again on 'C'.


Fold again on ‘C’.


Step 4


Fold on center.


Start with about 25 of these.  Fold on center.


Step 5


Fold both ends toward the center.


Fold both ends toward the center.  Completed.


Step 6


Slip one link through the loops of another like a hairpin.


Slip one link through the loops of another like a hairpin.


Step 7


Continue until the length you desire is completed.


Continue until the length you desire is completed.


Step 8


Tie a cord or ribbon on end loops.


Tie a cord or ribbon on end loops.


Completed Paper Link Belt or Bracelet


And, there you go…. you just finished making your Paper Strip Belt or Bracelet.  Wasn’t that fun?  The question I have for you though is…. Did you make a belt or a bracelet?  Let me know in the comments below.  Wear it proudly.

Technorati Tags: , , , , , , , , , , , , , ,

How to Make an Organizer out of Old Plastic Bottles

Today I have a super easy craft that is very useful.  I’m going to show you how to make an Organizer out of Old Plastic Bottles or Jars.  This craft is a great way to recycle those old plastic bottles and jars.  And, the outcome is a beautiful organizer.  You will need a little bit of adult help as you will need to use a cutter to cut the plastic bottles all different sizes.  So, grab the materials needed and let’s get this craft started.

Check out our other Plastic Bottle Crafts.


Materials Needed

Old plastic bottles and jars

Fabric

Glue

Scissors, cutters (Adult Help)

Ribbon


Step 1

Collect a few jars and cut them in different heights as shown.


Step 2

Cover the jars with fabric and glue it in place as shown. Place the jars together and glue them on a piece of cardboard.


Step 3

Draw around the jars and cut it out so that the base looks like it is shown


Step 4

Add a ribbon and your Organizer is finished.


And, that is it…. you have a beautiful organizer made simply out of old Plastic Bottles and Jars.  Now, the question is….. what are you going to organize?  What are you waiting for… get started.

Technorati Tags: , , , , , , , , , , ,

How To Make a Craft Box With a Used Gift/Shoe Box

A sturdy shoe or gift box can be transformed into a pretty craft box where you can store your art and craft materials and accessories. A few easy steps to follow, but feel free to use your own creativity.  No need to follow this craft step by step.  Each craft box made will look differently than anybody else’s craft box…. that’s how it should be.  So, grab the materials you need to make your craft box and let’s get started.


Materials Needed

Used cardboard box (gift/shoe)
Wrapping Papers
Colored Scratch Papers
Scissors
Glue/Glue Gun
Ribbons


Step 1

Prepare materials needed. Choose papers and ribbons to use.


Step 2

Place wrapping paper on the bottom and gently press it against the box to create the side’s dimension. With a pair of scissors, cut the paper giving about a half inch more on one side, and the exact measurement on the other side.


Step 3

Glue paper onto the box, folding the extra side to overlap the other side. Continue the same steps until all sides are covered. If your box has a hole handle, you may leave the wrapper until just below the handle.


Step 4

Be more creative when wrapping the box cover. You can partially cover one side and have your kid glue shaped pieces of papers and wrappers. Add a ribbon or two.

And that’s it! Your box is now ready for storing your craft accessories.  Now, you have all your craft supplies in one place so you can find them easily.

Technorati Tags: , , , , , , , , , ,

How to Make a Valentines Gift for Her

Today I’m going to show you how to make a Valentines Gift for Her.  It is a lace choker and the end result is just simply beautiful.  Any female would love to receive this as a gift.  It is a perfect gift for your Mom, Aunt or even your someone special.  We will even make a cardboard heart that the choker is placed on to make presenting this gift even more lovely.  So, grab the materials needed and let’s get started.

Check out our other Valentines Day Crafts.

Laura from Dacian Moon Handmade will show you how to make this lovely gift.


Materials Needed

– patterned cardboard
– organza (a rectangle of about 10 cm x 10 cm)
– lace (it will be a choker so you can measure to fit your neck )
– satin ribbon
– scissors
– needle and thread
– pencil
– card punch


Step 1

Cut the organza piece in half.


Take one half and fold it in two.


Now, sew the two parts (of the folded half) around the corners…


… like this.


Pull thread to form the petals.


Make a knot to keep it in place.


It will look like this.


Step 2

Repeat the first step to make anther one.


Step 3

Take about 12 cm of the satin ribbon…


And wrap it around your finger…


… like this.


When you reach the end, sew it to keep it in place.


Step 4

Put the satin part through the middle of one piece with petals and sew it there.


Like this.


Add the second part with petals…


And sew it.


Now the flower is ready.


Step 5

Take the lace…


… and find its middle.


Sew the flower there …


… like this.


Step 6

Cut the remaining satin ribbon in two…


… and sew them at lace ends.


The necklace is now ready.


Step 7

Take the cardboard…


… and draw a heart on it (about 12 cm x 12 cm)


Cut it out.


Make a hole in the upper right part…


… like this.


Fold the necklace like this…


… and place it on top of the heart, under the hole.


Mark a point under the folded necklace…


… and make another hole there.


We will put a small ribbon through these holes to keep the necklace on the base.


It is looking like this on the backside.


You can tie the two parts of ribbon or you can use a double adhesive band to keep them in place.


So, this is the gift…


… and this is the necklace.


Doesn’t this Choker Valentines Gift for Her turn out lovely?  Any girl would love receiving this as a gift.  How did your Choker turn out?  Let me know in the comments below.  And, don’t forget to add a picture…. I’d love to see it.

Technorati Tags: , , , , , , , , , ,

How to Make a Candy Box for Valentines Day

Are you planning on giving your special someone something special for Valentines Day?  Is that something special some candy?  Well, instead of just giving your someone special an ordinary heart shaped box filled with candy…. why not give that person a handmade Candy Box this Valentines Day?  Imagine their surprise when they see that you gave them something you made yourself.  The craft is an easy one, but turns out really beautiful.  So, grab the materials needed and let’s get started.

Check out our other Valentines Day Crafts.

Laura from Dacian Moon Handmade  will show you this Candy Box tutorial step-by-step.


Materials Needed

– pattern cardboard (ideally with different pattern on the sides)
– assorted ribbon
– scissors
– card punch
– pencil


Step 1

Cut a square from the cardboard.


Divide your card into thirds.


Rotate the card 90 degrees and divide the card into thirds again. You now have 9 squares scored on your card.


Step 2

On each of the four corner squares, score a line diagonally, from the corner of the square in toward the center.


Fold along the horizontal lines …


… then along the vertical ones…


… and eventually along the diagonal lines.


It will look like this.


Punch a hole in each of the four corner squares…


… like this.


Take a piece of ribbon …


… and thread it through the punched holes.


Draw the ends of the ribbon together and tie a knot, or a bow if you like. Now fill it with candy.


And, that’s it!!  Easy Peasy Lemon Squeezy!!  You just finished your Candy Box for Valentines Day.  How did it turn out?  Now, fill with candy and give it to your favorite someone this Valentines Day.

Technorati Tags: , , , , , , , , , ,

How to Make a Valentines Bee Mailbox

Today I’m going to continue with the Valentines Craft fun by showing you how to make a Valentines Bee Mailbox.  This Valentines Mailbox will be perfect for collecting all your Valentines Cards this Valentines Day.  Don’t just use a paper bag to collect your Valentines Cards…. that’s just boring.  Make something that you can be proud of…. imagine the comments all of your friends will have when they are adding their Valentines Cards to your Mailbox.  So, grab the materials needed and let’s get started.

Check out our other Valentines Day Crafts.

Laura from Dacian Moon Handmade  will show you, step by step, how to make this mailbox for Valentines Day.


Materials Needed

– white cardboard
– colored paper : yellow and red
– black pen (or marker)
– scissors
– black ribbon
– paper glue
– pencil
– black paint
– paintbrush
– black tape


Step 1

Draw lines across the yellow paper at about 2.5 cm distance.


Cut them out.


Cut a piece of tape, slightly longer than the yellow bands.


Step 2

Put a yellow band on the tape, as in the picture.


Do the same for the lower part of the tape. Take care to let enough tape uncovered.


Add another piece of tape.


Continue until you finish the yellow bands. The first band and the last one must be tape.


Step 3

Cut the cardboard a little smaller than the bands…


… and put it over, like this.


Measure the base. I made it a half of the main piece, and slightly longer.


Place it further over the yellow bands and tape, like this.


Bring the extra tape over the cardboard to fix it in place.


Make a cut on the tape in the front part, where the base is longer than the rest, then bring the tape over the cardboard.


It will look like this.


Step 4

Fold the base up…


… and add it to the other end, like this.


Press well to fix it.


This is the box body.


Step 5

Put it on a piece of cardboard, with the opening up …


… and draw the outline.


Cut it out and make another one (one for the front and one for the back)


Paint them black.


Step 6

Draw two circles (one big and one small) – head and nose, two half circles – the feet and two antennas (I made them in the shape of hearts).


Cut them out.


Place the big circle over cardboard and draw the outline.


Inside, draw an almost heart shape – the face.


Cut the face shape out.


Step 7

Apply a layer of glue on the back of the face…


… and place it over the head circle.


It will look like this.


Add glue on the small circle – the nose…


… and place it in the middle.


Draw the eyes…


… and make them black. Add a mouth too.


Next, add the feet…


… like this.


Next… add the antennas.


Isn’t it cute?!


Step 8

Fold up the extra part of the base.


Add glue on it…


… and place the front part on it. Bring the tape over the front part, like this. Then you will put the back part on its place and fix it with tape.


Step 9

Make a hole on the upper part of the box body, like this.


Make another one between the antennas, on the front part.


Take the ribbon and make a knot in both ends. Cut the ribbon in two.


Put it through the holes you made, like this.


Now tie the two part of ribbon. The mailbox is now closed. To open it untie the ribbon.


Step 10

Let’s add a bit of color. Draw 3 hearts on the red paper.


Cut them out.


Write “Valentines Mailbox” on one…


… and glue them …


… on the box.


That’s our cute bee mailbox for Valentines Day.


Doesn’t it turn out just simply BEE-utiful?!  Imagine collecting your Valentines Day Cards in this Mailbox…. you will get some wonderful comments on it, I’m sure.  Let me know how your Valentines Bee Mailbox turned out in the comments below.  You can share a picture as well in the comments…. I’d love to see how your Mailbox turned out.

Technorati Tags: , , , , , , , , , , , ,

How to Make a George Washington Wig for President’s Day

Lately I have been showing you some crafts to do for President’s Day.  Well, I’m going to continue with the President’s Day crafting fun by showing you how to make a George Washington Wig.  Made from cotton balls and a large paper shopping bag…. this craft turns out awesome.  Plus, the craft is a lot of fun…. almost as much fun as the child will have running around wearing the George Washington Wig he/she just made.  So, grab the materials needed and let’s get started with this crafting fun.

Check out our other President’s Day Crafts.


How to Make a George Washington Wig


Materials Needed

Large Paper Bag

Pen or Marker

Scissors

Cotton Balls

Glue

Blue Ribbon


Step 1


Draw a number 5 like shape on large bag.


Draw a number 5 like shape on large bag.


Step 2


Now, cut out the shape you drew in last step


Close the bag so it is not open.  Now, cut out the shape you drew in last step so you cut thru both sides.


Step 3


This is the part that will go over your head.


This is the part that will go over your head.


Step 4


Glue cotton balls over the outside of bag.


Glue cotton balls over the outside of bag.


Step 5


Tie ribbon around back for ponytail.


Tie ribbon around back for ponytail.


Finished George Washington Wig


Awesome job… you just finished making your George Washington Wig for President’s Day.  Wasn’t it fun to make?!  Now, put on your wig and act like George Washington.  Fun stuff!!

Technorati Tags: , , , , , , , , ,

How to Make a Pair of Doll Earrings

I have a fun craft for the girls today.  I’m going to show you how to make a Pair of Doll Earrings.  These earrings turn out so cute…. they really are fun and playful.  These earrings are simply made from a few pieces of ribbon, some crystals and a few other materials.  They are simple, but trust me the craft is fun.  The Doll Earrings turn out looking like little tiny rag dolls…. just adorable.  So, grab the materials needed and meet me back here so we can get started.

Check out our other Jewelry Crafts.

Laura from Dacian Moon Handmade will show this tutorial step-by-step.


Materials Needed

– 2 small rectangles of ribbon (about 3 cm x 3 cm)
– thread and needle
– scissors
– 4 crystals
– 2 earring hooks
– 2 head pins
– round nose pliers


Step 1

Take a rectangle and fold it in half…


… then again in half, to obtain a small rectangle.


Round cut the corner. Unfold. It will look like that.


Step 2

Place one crystal on one pin…


… then put it through the middle of the ribbon (it may be necessary to make a LITTLE hole with the scissors)


Step 3

Using the thread and needle sew under the crystal…


… like this…


… letting enough thread on both sides to tie it.


Cut the extra thread.


Step 4

Place another crystal on top of it.


Step 5

Using the round nose pliers, make a loop on top of the crystal…


… place the hook in it then close the loop.


This is the finished earring.


Repeat all the steps to make the second earring.


And, there you have it… your finished pair of Doll Earrings.  Aren’t they super cute?!   How did your earrings turn out?  Let me know in the comments below.  And, take a picture of the earrings and share them in the comment as well…. I’d love to see them.

Technorati Tags: , , , , , , , ,

How to Make a Chocolate Bar Box for Valentine’s Day

Valentine’s Day is right around the corner.  It is on February 14th and it will be here before you know it.  Are you prepared yet?  Do you know what you are getting your friends and family for Valentine’s Day?  Or perhaps you have a special person you have been admiring from “a far”.  Either way I have the craft for you today.  In this post I’m going to show you how to make a Chocolate Bar Box for Valentine’s Day.   You are simply going to start off with your receiver’s favorite candy bar and go from there to construct the perfect chocolate bar box for this special occasion.  So, grab the materials needed and let’s get started.

Check out our other Valentine’s Day Crafts.

Laura from DacianMoon Handmade will show you how to make this chocolate box.


Materials Needed

– colored paper (not too thin)
– glitter glue
– scissors
– ribbon (about 40 cm)
– paint marker
– glue
– pencil
– chocolate bar


Step 1

Measure enough space for the chocolate (let’s say 2.5 cm on every side of the chocolate bar) and mark with a line.


Step 2

Fold on this line…


… and once again…


… like this:


Step 3

Cut the last part at 2 cm from the edge.


Step 4

On one of the small sides make a criss-cross cut.


Step 5

Unfold the paper.


Step 6

Apply a layer of glue on the back side of the chocolate bar…


… and place it in the middle.


Step 7

Apply a layer of glue on the ribbon too…


… as long as the width of the paper… then place the paper with the chocolate on top.


Step 8

Take the remaining paper…


… fold it in half…


… and draw a half of a heart on it.


Cut the drawing out.


Unfold.


Step 9

With the marker write in the middle of the heart “Happy Valentine’s Day”.


Step 10

Close the box and tie the ribbon making a knot on one side.


Step 11

Apply a layer of glue on the upper part of the back side of the heart, as I show in this picture.


Then place it on the box. Take care that the glued part does not touch the ribbon.


Step 12

Use glitter glue to decorate the heart.


Here is your elegant chocolate box…. ready to be given away to someone special.


Isn’t this chocolate box just fabulous to give out as a gift?  It really is.  Imagine how excited the receiver would be to receive it.  Now, the real question is….who are you going to give this awesome Chocolate Bar Box to for Valentine’s Day?

Technorati Tags: , , , , , , , , , , , ,

How to Make an Origami Dove

Today I’m going to show you how to make an Origami Dove.  I thought since today is Martin Luther King Day that today would be a perfect time to make a dove craft.  After all a Dove represents Peace and Tranquility and bottom line….. isn’t that what Martin Luther King wanted for everybody?  Martin Luther King was a great man and today it is all about remembering how wonderful he was and what he represented….. equality for all.  So, gather up the materials needed and let’s get started.

Check out our other Origami & Paper Folding Crafts or Check out our other Martin Luther King Crafts.

Laura from Dacian Moon Handmade  will show you, step by step, how to make an origami dove decoration.


Materials Needed

– white paper
– colored pen
– scissors
– ribbon
– glue


Step 1

Cut a square of white paper.


Place it with a corner to you.


Bring the left part over the right one.


Step 2

Bring the upper corner over the middle one, like this.


Do the same for the lower corner.


Step 3

Turn it over.


Bring the upper corner over the lower one.


Fold the left corner over the piece, like this.


Unfold.


Fold the lower corner over the piece.


Unfold.

Let’s make the wings.

Open the right part like this…


And bring the lower corner to the left, following the crease you created. Press.


It will look like this.


Do the same on the other side.


Step 4

Now it is time for the beak. Fold the left corner on the back…


… like this. Press it well because it is thick enough that it will unfold itself.


Step 5

To make the tail, bring the right part down, like this…


… and press.


Step 6

We will fold one wing down, like this, to make it look better.


Step 7

Using the colored pen draw an eye and decorate it the way you like. I wrote “Peace” on one wing.


Step 8

Apply a layer of glue on the ends of the ribbon…


… and place it between the back wing and the body.


It will look like this.


Doesn’t the Dove turn out lovely?  It will be perfect to decorate a window or a doorknob this Martin Luther King Day.  After all a Dove represents Peace and Tranquility.  Isn’t that what Martin King longed for?

Technorati Tags: , , , , , , , , , , , , ,

How to Make a Rose Hairband

I have a fun craft for the girls today…. I am going to show you how to transform an old, ordinary looking hairband to a beautiful rose hairband that you can wear with your favorite dress.  Simply use your favorite piece of satin ribbon and grab an old hairband.  In this tutorial I am going to use green ribbon, but feel free to use your favorite satin ribbon.  So, let’s get started.


Materials Needed

An old hairband

Satin ribbon –  one inch thick

Scissors

Tape


Step 1

Take a piece of satin ribbon about 10 inches long and fold it in the center to make a 90 degree angle as shown.


Step 2

Take the ribbon end on the right side and cross it over to the left side as shown.


Step 3

Take the ribbon on the bottom and cross it over to the top as shown.  You can hold the center between your fingers to keep it all in place.


Step 4

Again take the ribbon on the left and bring it to the right.


Step 5

Alternatively repeat the process a few times till you get folds in the center line like this.


Step 6

Hold one ribbon end in your finger and gently tug on the other end. The folded ribbon will crunch together to form a rose shape like below.


Step 7

Tie the two ends twice to make 2 knots.


Step 8

The top of the rose will look like this.


Step 9

Place the rose as desired on the hairband. Roll the loose ends of ribbon around the hairband and tape the ends to the hairband.


Step 10

Make a second rose and place it as shown.


Step 11

Make a third rose as shown.


Step 12

Use ribbon to cover the leftover bits. Your satin rose hairband is now ready.


Doesn’t this satin rose hairband turn out gorgeous?  How did your hairband turn out?  Let me know in the comments below.  Make sure to take a picture and share that too in the comments…. I would love to see it.

Technorati Tags: , , , , , ,