How to Make an Elegant Pen Holder

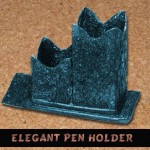
Since school is back in session I decided to show you how to make an Elegant Pen Holder.  This elegant pen holder will look wonderful on any desk and it is so useful.  No longer will you have pens and pencils floating around your desk…. you will now have a spot for all your pens and pencils.  This craft is so easy and a lot of fun.  It is made from recycled boxes so it is a great green craft too.  Add style to your desk with this elegant pen holder.  Let’s get started.

Check out our other Back to School Crafts.

Laura from Dacian Moon Handmade  will show you, step by step, how to make this craft.


Materials Needed

– recycled box
– cardboard
– pen
– craft glue
– scissors
– paint
– paintbrush
– aluminum foil


Step 1

From the recycled box we will make two holders.  Trace your shape on the box…  I made a wave shape.


Cut on the line…


… and you have the two pieces. You can adjust the edge until you are happy with the result.


Step 2

We will use aluminum foil to cover them. This way we will add a nice texture.


Cut a piece of foil (wide enough to cover the holder piece) and place one holder in the middle.


Cover it with foil.


Press well to preserve the shape of the holder.


Step 3

Apply a layer of glue on the base…


… and place it on the cardboard piece (also covered in foil).


Do the same with the other holder piece.  Flatten the foil well and let the glue dry.


Step 4

Use a wide paintbrush to cover it with paint. Apply as many layers that you need until it looks as you want.


I applied 3 layers of paint on mine and I think it looks good.


And, there you have it….. you now have an Elegant Pen Holder.  This pen holder will look great on any desk.

Technorati Tags: , , , , , , , , , , , , , ,

How to Make a Simple Desk Organizer

There is not much worse than doing your homework on a cluttered unorganized desk.  Who wants to hunt for the homework supplies you need on a messy desk?  Well, you don’t have to worry about that anymore.  Today I’m going to show you how to make a Simple Desk Organizer.  It will be perfect to hold on to some paper, pencils, erasers, and pretty much anything else you want to keep organized on your desk.  So, grab the materials needed and let’s get started.

Check out our other Back to School Crafts.


How to Make a Simple Desk Organizer


Tutorial offered by Laura from  Dacian Moon Handmade  .

Materials Needed

– recycled box
– white paint
– scissors
– pencils (one with eraser head)
– paper glue
– red paper


Step 1

Take the box…


… and draw the contour of our organizer on it, like in the picture.


Cut on the line.


It will look like this.


Step 2

Place the box on its side on the paper and draw the contour.


Turn it on the other side and continue the contour. It will look like this.


Apply a layer of glue on half of the paper…


… and place the box on it.


Then glue the other half.


Like this.


Continue covering  the sides of the box.


You can cover the inside of the sides too.


It will look like this.


Step 3

Put a little bit of paint on a piece of paper…


… and use the pencil with eraser head…


… to make white dots.


Decorate the box with white dots.


Finally, let’s add a thin band of paint on the edges.


Let it dry well.


Now you can use the organizer.


Isn’t this a great Desk Organizer?  And, it was so simple to make.  Now, you have a great way to organize your desk perfect for doing your homework.  Enjoy!!

Technorati Tags: , , , , , , , , , , , ,

How to Make a Homework Caddy

Did you ever feel like you were rummaging around to find your homework school supplies when it was time to do your homework?  Well, I have a craft for you today that will fix this problem.  In this post I’m going to show you How to Make a Homework Caddy.  This is a perfect way to keep all your homework school supplies in one place when you are ready to do your homework.  You can keep all your school supplies like crayons, pencils and scissors in once place and carry this caddy around where ever you want to do your homework.  So, grab the materials needed and let’s get started.

Check out our other Back to School Crafts.


How to Make Homework Caddy Cans


Materials Needed

4 Empty Cans

Glue

Yarn (4 different colors if you would like)

Cardboard Box (2 cans wide)

Scissors

Marker

Paint (optional)

Duct Tape


Step 1


Get 4 empty cans.


Get 4 empty cans.


Step 2


Take off the labels.


Take off the labels.


Step 3


 Add glue around bottom of the can.


Add glue around bottom of the can.


Step 4


Start winding yarn around can.


Start winding yarn around can.


Keep winding the yarn.


Keep winding the yarn.


Keep adding glue and winding until yarn is up to rim of can.


Keep adding glue and winding until yarn is up to rim of can.


Step 5


Find a box that is about 2 cans wide


Find a box that is about 2 cans wide… like this one.


Step 6


Cut the box in half.


Cut the box in half.


Step 7


Turn it so they are back to back.... like this.


Turn it so they are back to back…. like this.


Step 8


Draw a handle.


On the back of the box where the two boxes meet… Draw a handle.  This handle looks like a sideways letter ‘D’.


Step 9


Cut out handle and then trace handle onto back of the other box.


Cut out handle and then trace handle onto back of the other box.


Step 10


 If you want to... paint the box.


If you want to… paint the box.


Step 11


Roll up duct tape and place it on bottom of can and on one side of can.


Roll up duct tape and place it on bottom of can and on one side of can.


Step 12


Place cans in box.


Place cans in box.  Use duct tape to tape both handles together.

Now you have your homework caddy finished.  You are all ready to carry your homework caddy anywhere you want to do your homework.  Enjoy!!

Technorati Tags: , , , , , , , , , ,

How to Make a Cereal Box Paper Holder

I have a fun and useful back to school craft for you today.  In this post I will show you how to transform a cereal box into a Cereal Box Paper Holder.  This Cereal Box Paper Holder is perfect for holding all of your back to school materials.  It can hold your fun drawings, notebooks, homework, test results and basically anything you want to keep in a safe place.  Don’t let you school paperwork build up into unorganized piles…. keep them safe in this Cereal Box Paper Holder.  So, grab the materials needed and let’s get started.

Check out our other Back to School Crafts.


How to Make a Cereal Box Paper Holder


Materials Needed

Cereal Box

Scissors

Magazine Pics or Colorful Paper

Mod Podge or 1/2 Glue 1/2 Water Mixture

Paintbrush


Step 1


Get a cereal box


Get a cereal box…. the bigger the better.


Step 2


Cut off top flaps


Cut off top flaps…. now it looks like this.


Step 3


Cut a triangle shape from box.


Cut a triangle shape from box.


Step 4


Cut across to other side.


Cut across to other side.


Step 5


Cut on a diagonal on the other side too.


Cut on a diagonal on the other side too.


Step 6


Cut out pics from a magazine that you like.


Of course, you can cover the paper with colorful paper.  But, in this craft we use magazine pics.  Cut out pics from a magazine that you like.  My son loves Mario and Pokemon.


Step 7


You need either Mod Podge or a mixture of half glue and half water.


You need either Mod Podge or a mixture of half glue and half water.


Step 8


Put glue down in areas that you are immediately going to put a pic down.


Put glue down in areas that you are immediately going to put a pic down.


Step 9


Stick a pic down on the glue mixture


Stick a pic down on the glue mixture / mod podge…. then brush it over the pic as well.


Step 10


Keep doing this.... wrapping pics around edges.


Keep doing this…. wrapping pics around edges.  Brush Mod Podge / glue mixture over all at end.


Step 11


Let dry.


Let dry.  Place paper within.

And, there you have it…. Your Cereal Box Paper Holder is ready just in time for Back to School.  Now, you have a place to hold on to your important school paperwork.

Here is our video on How to Make a Cereal Box Paper Holder

Technorati Tags: , , , , , , , , , , , , , , ,

How to Make a Wearable Puppet Stage

Oh boy…. do I have a fun craft for you today!!  In this post I’m going to show you how to make a Wearable Puppet Stage.  Kids love putting on puppet shows.  Well, why not wear a puppet stage?  It just makes sense…. carry this puppet stage on your chest and you are all ready to put on a puppet show for your family and friends.  Keep in mind you will need a bit of help from an adult with the cutting of the box.  So, grab the materials needed and let’s get started.

Check out our other Puppet Crafts.


How to Make a Wearable Puppet Stage


Materials Needed

One cardboard box approximately 7″x9″x16″ with all flaps intact (small appliance boxes are good)

scissors

2 lengths woven nylon or cotton rope or clothesline 36″ long

large staples and stapler or glue

paint or something to decorate the box with


Step 1


Cut one flap off one long side of the box.


Cut one flap off one long side of the box. Cut flaps on short sides in half, as seen in above sketch.


Step 2


Staple or glue half flaps and remaining long flap together.


Staple or glue half flaps and remaining long flap together.


Step 3


Cut side (with flap removed)  down at both corners and fold down as in above illustration.


Cut side (with flap removed) down at both corners and fold down as in above illustration.


Step 4


Turn box upside down so the hole is now on the bottom.


Turn box upside down so the hole is now on the bottom.


Step 5


Ask an adult to help you cut an opening


Ask an adult to help you cut an opening that is about 4 1/2″ wide and 10″ or 11″ long. Also ask an adult to punch 3 holes in each side, as seen in picture.


Step 6


Tie a knot in one end of each piece of rope. Put rope through the 3 holes as in sketch above.


Tie a knot in one end of each piece of rope. Put rope through the 3 holes as in sketch above.


Step 7


Draw a Background on the back panel ... as seen in the picture.


Draw a Background on the back panel … as seen in the picture.

Optionally, you can Cover outside of puppet stage with adhesive plastic, paint it, cover it with colorful duct tape, cover with wall paper, or just leave it as is.


Step 8


Now you can Wear puppet stage as in above illustration.


Now you can Wear puppet stage as in above illustration. Or you can optionally set it on the table. This is a fun way to put on a puppet show!

Technorati Tags: , , , , , , , , ,

How to Make 3d Box Cover Shadow Box Framed Pictures

Don’t throw away those box lids because I have a fun use for them. Make these 3-dimensional pictures and use the box lids as the shadow box frame. The pictures seem to come out towards you and that is what makes them 3 dimensional. Find out how to make these with the step by step instructions found below.


How to Make 3d Box Cover Framed Pictures


Crafts Materials Needed

Box cover ( 2″ deep)

Paints

Pictures

Glue

Cardboard

Cork

Scissors

How to Make the 3D Frames

Step 1


Box Lids


Paint box cover, either oblong or square and 2″ deep, on both sides with a solid color paint, as in illustration above.

Step 2


3d-framed-box-cover-pictures-02


Inside the cover, as a background, either paint a scene, or cut a colorful scene from a magazine and glue to background, as in image above. If you want to make a barnyard scene like we did, the draw / paint a barn, some hills, and a tree.


Step 3


3d-framed-box-cover-pictures-03


Cut out or paint small pictures of people or animals. Mount on cardboard and glue to small slices of cork to make them stand (an adult should slice the cork for you), as in image above. If you want to make a barnyard scene, you might want to try some farm animals such as cows, chickens, pig, horses, sheep, and maybe some ducks. Here are some animal crafts that might help you.

Step 4


3d-framed-box-cover-pictures-04


Glue figures in place on floor of picture for 3-D effect, as in illustration above.

Technorati Tags: , , , , , , , ,

Coolest Earth Day Craft Ideas – Crafts Made from Recycled Materials


Coolest Earth Day Craft Ideas - Crafts Made from Recycled Materials


Earth Day will be here in just a couple of weeks.  In honor of Earth Day I thought I would scour the internet looking for cool ideas for Earth Day crafts.  All of the crafts that I found and have listed here are made from recycled materials.  Earth Day is a special day to celebrate the Earth and to increase awareness and appreciation of the Earth’s natural environment.  And, I think making crafts from recycled materials such as the ones found here is a great way to teach children about recycling and the importance of doing that to help save our Earth.  So, without further ado….

Coolest Earth Day Craft Ideas

(1)  Newspaper Roses


Newspaper Roses


Look how beautiful these Roses are?  They really are lovely & they are completely made from recycled newspapers.  Check out the craft and all its details over at Zakka Life.


(2)  Serving Tray


Serving Tray


I love, love, love this idea!!  Crafty Nest went to a Salvage Yard and noticed that there were old cupboards there.  She picked up a white one and with a little creativity and a lot of fun she was able to make this beautiful serving tray.  Check out her website so you too can make this.


(3)  Can-Do Robots


Can-Do Robots


Made from tin cans these robots are so freakin cute.  What is really cool is that their features are made of magnets, so they can be removed.  Which makes these robots like a Mr. Potato Head…. How fun is that?!  Check out the craft details over at Family Fun.


(4)  Cardboard Ottoman or Side Table


Cardboard Ottoman or Side Table


What a clever and creative idea!!  Made from recycled cardboard tubes you can choose to make either a side table or an ottoman…. or even make both.  When you look at them from above they are actually daisies.   Check out Esprit Cabane for all the crafting details.


(5)  Smashed Soda Can Animals


Smashed Soda Can Animals


Ok, this cow is really cute, isn’t he?!  But, wait till you check out Fave Crafts….. they have not only a cow, but they will show you how to make a pig and a bear too.  Make all three recycled can crafts and you will have a beginning to your very own recycled animal farm.


(6)  Milk Jug Shade


Milk Jug Shade


Now, this recycled craft turns out beautiful, doesn’t it?  Honestly, if I saw this I would have no idea it was actually made from recycled milk jugs.  But, it is.  I found this craft over at Mother Earth News.  Check out their site for all the wonderful craft details.


(7)  Recycled Picnic Basket


Recycled Picnic Basket


I found this recycled picnic basket over at bron marshall and for the main basket it is actually made from a recycled beer six-pack.  Isn’t that a clever idea?  They other container is actually made from a recycled half dozen egg carton…. they simply added a handle.  Make sure to check out their site for the full craft details.


(8)  Newspaper Basket


Newspaper Basket


This is an amazing basket!!  And, it is completely made from Newspaper.  Look how sturdy it looks too…. I love it.   How About Orange shows you step-by-step how to make this basket yourself.


(9)  Recycled Glass Chandelier


Recycled Glass Chandelier


Oh I just love this recycled craft idea…. it might just be my favorite.  I found this recycled craft over at Casa Sugar.    With a few recycled materials and some tea lights  you too can have this stunning glass chandelier.  I love the way they show this chandelier being outside…. it would be perfect for a fun outside party.


(10)  Creative Notepads


Creative Notepads


Here is a creative way to recycle those leftover notebook pages and even those left over paper scraps.  Esprit Cabane shows us how to take those leftover paper products and make them into cute little pocket size notepads.  Check out her site for the full details.


(11)  Toilet Paper Tube Albums


Toilet Paper Tube Albums


These Toilet Paper Tube Albums are just precious.  They are a beautiful way to store special keepsakes and pictures of events that you don’t want to lose.  Those Northern Skies shows you step-by-step how you too can make these albums from recycled toilet paper tubes.


(12)  Magazine Boxes


Magazine Boxes


Here is a creative and imaginative way to recycle those stacks of magazines you keep at home.  When made like the tutorial on Abstract Octopus you can actually store things in these boxes.  Check out the site for the full craft details.


(13)  Plastic Cup Earrings


Plastic Cup Earrings


Aren’t these earrings adorable?  You would never realize they were made from a plastic cup unless I told you.  I found this idea over at Punk Projects and I think it is a great way to recycle plastic cups… plus the craft is fun to do.  Make sure to check out her website for the details.

Technorati Tags: , , , , , , , , ,

How to Make a Notepad Pencil Gift Set

Today I’m going to show you how to make a Notepad Pencil Gift Set.  This Notepad Pencil Gift Set is a perfect gift for somebody that has a lot going on and needs some organizing.  It would make a great gift for anyone like this.  They could simply hang it up in plain sight and when a note is written on the notepad they are reminded of all the things they need to do.  Or, hang this next to the phone…. this item makes for a perfect place to leave messages for others.  So, let’s get started with this craft.

Check out our other Gift Crafts.


How to Make a Notepad Pencil Gift Set


Materials Needed

Cardboard

Colored Paper

Pencil

Glue

White Paper

Hole Punch

Black Marker

Stapler


Step 1


Cover a piece of cardboard with colored papers.


Cover a piece of cardboard with colored papers.


Step 2


Wrap paper around pencil to figure out where to glue.


Wrap paper around pencil to figure out where to glue.


Step 3


Fold white paper in fours ... then cut 4 pages apart.


Fold white paper in fours … then cut 4 pages apart.  Do this a few times to get a big enough bundle of paper for a pad.


Step 4


Staple paper to center of cardboard


Staple paper to center of cardboard;  Punch hold for hanging;  Glue or tape paper loop above paper pad;  Decorate the background paper with a nice design;  Write notes or something similar.


Finished Notepad Pencil Gift Set


And, there you have it…. you just finished your Notepad Pencil Gift Set.  How did it turn out for you?  Let me know in the comments below.  Also, take a picture of the Notepad and share that too in the comments…. I’d love to see it.

Here is our video on how to make a Notepad Pencil Set

Technorati Tags: , , , , , , , , ,

How to Make an Organizer out of Old Plastic Bottles

Today I have a super easy craft that is very useful.  I’m going to show you how to make an Organizer out of Old Plastic Bottles or Jars.  This craft is a great way to recycle those old plastic bottles and jars.  And, the outcome is a beautiful organizer.  You will need a little bit of adult help as you will need to use a cutter to cut the plastic bottles all different sizes.  So, grab the materials needed and let’s get this craft started.

Check out our other Plastic Bottle Crafts.


Materials Needed

Old plastic bottles and jars

Fabric

Glue

Scissors, cutters (Adult Help)

Ribbon


Step 1

Collect a few jars and cut them in different heights as shown.


Step 2

Cover the jars with fabric and glue it in place as shown. Place the jars together and glue them on a piece of cardboard.


Step 3

Draw around the jars and cut it out so that the base looks like it is shown


Step 4

Add a ribbon and your Organizer is finished.


And, that is it…. you have a beautiful organizer made simply out of old Plastic Bottles and Jars.  Now, the question is….. what are you going to organize?  What are you waiting for… get started.

Technorati Tags: , , , , , , , , , , ,

How To Make a Craft Box With a Used Gift/Shoe Box

A sturdy shoe or gift box can be transformed into a pretty craft box where you can store your art and craft materials and accessories. A few easy steps to follow, but feel free to use your own creativity.  No need to follow this craft step by step.  Each craft box made will look differently than anybody else’s craft box…. that’s how it should be.  So, grab the materials you need to make your craft box and let’s get started.


Materials Needed

Used cardboard box (gift/shoe)
Wrapping Papers
Colored Scratch Papers
Scissors
Glue/Glue Gun
Ribbons


Step 1

Prepare materials needed. Choose papers and ribbons to use.


Step 2

Place wrapping paper on the bottom and gently press it against the box to create the side’s dimension. With a pair of scissors, cut the paper giving about a half inch more on one side, and the exact measurement on the other side.


Step 3

Glue paper onto the box, folding the extra side to overlap the other side. Continue the same steps until all sides are covered. If your box has a hole handle, you may leave the wrapper until just below the handle.


Step 4

Be more creative when wrapping the box cover. You can partially cover one side and have your kid glue shaped pieces of papers and wrappers. Add a ribbon or two.

And that’s it! Your box is now ready for storing your craft accessories.  Now, you have all your craft supplies in one place so you can find them easily.

Technorati Tags: , , , , , , , , , ,

How to Make a Leprechaun Finger Puppet for St. Patrick’s Day

Oh boy, do I have a fun craft for you today!!  I don’t know if the craft is more fun or the playing with the finished craft once it is done.  Today I’m going to show you how to make a Leprechaun Finger Puppet.  We give you the template… you just simply print it off and your craft is halfway done.  You can choose to print off the black & white template and color the Leprechaun yourself…. or, if you would prefer, you could print off the color template and continue with the craft from there.  The choice is yours.  So, let’s get started.

Check out our other St. Patrick’s Day Crafts.


How to Make a Leprechaun Finger Puppet


Materials Needed

Printer & Paper

Scissors

Cardboard

Glue


Click on the template image to make larger and to print.

Black & White Template


Black & White Template


Color Template


Color Leprechaun Template


Step 1


Print out template.


Print out template.


Step 2


Cut out Leprechaun.


Cut out Leprechaun.


Step 3


Glue him to cardboard.


Glue him to cardboard.


Step 4


Let dry.... then cut out.


Let dry…. then cut out.


Step 5


Finished Leprechaun


Now put your fingers thru the finger holes.  Your fingers are the little guy’s legs.  Have fun playing.

Technorati Tags: , , , , , , , , , , , , , ,

How to Make a Cardboard Box Lantern

I have a fun and creative craft for you today.  In this post I will be showing you how to make a Cardboard Box Lantern.  That’s right…. it is a lantern that you can use outside that it made from a cardboard box.  The box is simply decorated with colored sheets of paper and the box is fitted over a light bulb.  This Cardboard Box Lantern will be a great addition to any light fixtures you use outside during a party.  It is sure to help get the festivities going.  So, let’s get started with the craft.

Check out our other Cardboard Box Crafts.


Materials Needed

A square box

scissors

glue

butter paper

some wire

colored paper


Step 1

Draw lines as shown on two opposite flaps of the box.


Step 2

Cut the edges of the cardboard box equally on two opposite sides as shown.


Step 3

Now, when you bring all 4 flaps together, it will form a shape as shown below.


Step 4

On the bottom of the box, cut out a small square as shown below.


Step 5

On every side of the box, draw and cut out a diamond shape as shown below.


Step 6

Cover the box with butter paper


Step 7

Cut out colored paper strips as shown below


Step 8

Fix some wire on the top as shown to hang the lantern.


Step 9

Cover the lantern with paper strips as shown.


Step 10

Put a bulb in the lantern and hang it up on your porch.  That’s it…. the Cardboard Box Lantern is finished.  Now, set it outside for your next party….. it is sure to be a conversation piece.

Technorati Tags: , , , , , , , , ,

How to Make a St. Patrick’s Day Matching Game

St. Patrick’s Day will be here before you know it…. so in the spirit of that this craft is all about St. Patrick’s Day.  In this post I will be showing you how to make a St. Patrick’s Day Matching Game.  This craft is perfect for the Preschool crafter as this game is all about matching the size of each shape of the shamrocks.  Get a couple Preschoolers together and listen to them giggle as they try to match the shape of the shamrocks.  So, with that being said…. let’s get started.

Check out our other St. Patrick’s Day Crafts.


Materials Needed

Crayons

Markers

Scissors

Thick paper

Cardboard/ thick paper for base


Step 1

Draw and color shamrocks of different shapes and sizes.


Step 2

Cut them out as shown below.


Step 3

Place them on your cardboard/ thick paper which is going to be your base and trace the outline of each shamrock on it.


Step 4

The game is to match each shamrock to its outline.


Now grab some friends or your parents and start playing the St. Patrick’s Day Matching Game.  Enjoy!!

Technorati Tags: , , , , , , , , , , , , , ,

How to Make an Owl Mailbox for Valentines Day

Valentines Day is coming up in less than a week.  If you don’t have a Mailbox to collect your Valentines Day Cards in then you are missing out.  No worries…. in this post I’m going to show you how to make an Owl Mailbox for Valentines Day.  This mailbox is perfect for collecting all your Valentines Day Cards.  Don’t be stuck holding a brown paper bag to collect your Valentines in…. that’s just boring.  So, grab the materials needed and let’s get started.

Check out our other Valentines Day Crafts.

Laura from Dacian Moon Handmade will show you, step by step, how to make this.


Materials Needed

– recycled box
– beautifully patterned wrapping paper
– white and red paper
– scissors
– pen
– glue
– glitter glue
– cutter


Step 1

Take the recycled box and draw a “window” on it (a rectangle in the middle) … like this.


Draw another “window” on top. Be careful to not draw too close to the edge.


Cut the “windows” out. Take care not to cut yourself.


It will look like this.


And the “window” on top.


Step 2

Put wrapping paper under the the lid with the “window” and draw its outline.


Cut it out, like this.


Apply a layer of glue on the back of it…


… and stick it in place.


Step 3

Glue wrapping paper on the other sides of the box too.

For the top do the same as in step 2.


Apply a layer of glue inside the box and cover it with white paper (you can cover only the back, because only this part is visible through windows).


Like this.


Step 4

Now, let’s decorate it.  Draw a simple owl outline and 2 wings on white paper.


Draw another one on red paper.


Cut them out.


Now let’s prepare a tree branch to stand on.


You can use your pen to give it some color, like this.


Cut  it out and glue it on a lower corner of the front window.


Step 5

Now you have to assemble owls. We’ll start with the white one. First, color its eyes.


Then, put glue on the upper side of one red wing…


… and stick it in place. Do the same with the other one.


Make sparkling points on its body with glitter glue…


… like this.


What’s missing? Cut a small triangle from the red paper to make its beak.


Do the same with the other owl. Aren’t they cute?!


Step 7

Apply glue where you want to place the owl.


I put them on the left side of the window. To keep them on sturdy, cover a little of the lid with one of them, like this.


The other one will stay near the first, holding hands (or wings). They look so cute together.


Step 8

Draw one circle on white paper and one on red paper (slightly bigger).


Cut them out.


On the white one write “Happy Valentines Day”.


Apply glue on the opposite corner of the window…


… and stick the red circle there.


Over it place the white one.


Your mailbox is now ready to be used.


There you go…. your Owl Mailbox for Valentines Day is ready.  Now, you are all set to collect all your Valentines Day Cards.  Enjoy!!

Technorati Tags: , , , , , , , , , , , , , ,

How to Make a Candy Box for Valentines Day

Are you planning on giving your special someone something special for Valentines Day?  Is that something special some candy?  Well, instead of just giving your someone special an ordinary heart shaped box filled with candy…. why not give that person a handmade Candy Box this Valentines Day?  Imagine their surprise when they see that you gave them something you made yourself.  The craft is an easy one, but turns out really beautiful.  So, grab the materials needed and let’s get started.

Check out our other Valentines Day Crafts.

Laura from Dacian Moon Handmade  will show you this Candy Box tutorial step-by-step.


Materials Needed

– pattern cardboard (ideally with different pattern on the sides)
– assorted ribbon
– scissors
– card punch
– pencil


Step 1

Cut a square from the cardboard.


Divide your card into thirds.


Rotate the card 90 degrees and divide the card into thirds again. You now have 9 squares scored on your card.


Step 2

On each of the four corner squares, score a line diagonally, from the corner of the square in toward the center.


Fold along the horizontal lines …


… then along the vertical ones…


… and eventually along the diagonal lines.


It will look like this.


Punch a hole in each of the four corner squares…


… like this.


Take a piece of ribbon …


… and thread it through the punched holes.


Draw the ends of the ribbon together and tie a knot, or a bow if you like. Now fill it with candy.


And, that’s it!!  Easy Peasy Lemon Squeezy!!  You just finished your Candy Box for Valentines Day.  How did it turn out?  Now, fill with candy and give it to your favorite someone this Valentines Day.

Technorati Tags: , , , , , , , , , ,

How to Make a Heart Filled Vase for Valentine’s Day

Have you started decorating for Valentine’s Day yet?  After all, Valentine’s Day is just a couple of weeks away.  Well, if you haven’t started decorating yet for Valentine’s Day…. don’t panic yet.  I have the perfect craft for you today.  In this post I’m going to show you how to make a Heart Filled Vase for Valentine’s Day.  It will look beautiful as a decoration in your house.  Or, another idea…. give this Vase to your someone special this Valentine’s Day.  I have no doubt they will absolutely love it.  So, grab the materials needed and let’s get started.

Check out our other Valentine’s Day Crafts.


How to Make a Heart Filled Vase for Valentine's Day


Materials Needed

Corrugated Cardboard (cardboard box)

Pen or pencil

Scissors

Red Paper (many pieces)

Glue

Pipe Cleaners

Tape


Step 1


corrugated cardboard has holes inside of it


Do you see how corrugated cardboard has holes inside of it?  Remember this because you will be using these holes later.


Step 2


Trace a heart on corrugated cardboard.


Trace a heart on corrugated cardboard.


Step 3


Cut heart out.


Cut heart out.


It should look like this.


Like this.


Step 4


Cut our red paper hearts a bit bigger than the cardboard heart


Cut our red paper hearts a bit bigger than the cardboard heart.  Glue them on.


Step 5


Cut out different sized hearts.


Cut out different sized hearts.  Tape to pipe cleaners… cut to different sizes.


Step 6


Cut a piece of cardboard about the width of the heart vase.


Cut a piece of cardboard about the width of the heart vase.


Step 7


Cover cardboard with red paper.


Cover cardboard with red paper.  Cut slot in center of board.


Step 8


Stick heart flowers into holes in heart vase.


Stick heart flowers into holes in heart vase.  This is where those holes in step 1 get used.  Stick heart vase into cardboard rectangle’s slot.


Step 9


If heart vase doesn't stand on own you can reinforce it like this


If heart vase doesn’t stand on own you can reinforce it like this…. Cut a strip of cardboard and bend it and tape to back of red heart and bottom of rectangle board.


Finished heart vase.


And there you have it….. your finished Heart Filled Vase for Valentine’s Day.  Doesn’t it turn out just absolutely beautiful?  It is a perfect decoration for this upcoming Valentine’s Day.

Technorati Tags: , , , , , , , , , , , , ,