How to Make a Christmas Fairy Ornament

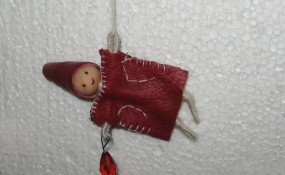
I have a special little Christmas craft for you older kids and adults.  Today I’m going to show you how to make a Christmas Fairy Ornament.  This cute fairy even has a crystal light she is holding.  The crystal will look as it is really lit when the Christmas tree’s lights shine through it.  This Christmas Fairy Ornament will be sure to get you in the Christmas spirit…. after all Christmas is less than a month away.  So, grab the materials needed and let’s get started.

Check out our other Christmas Crafts.

Tutorial offered by Laura from Dacian Moon Handmade .


Materials Needed

– red leather
– thick thread
– 1 wooden bead (big enough to be the head)
– scissors
– needle and thread
– 2 toothpicks
– craft glue
– black and red paint
– crystal (preferably drop)
– wire
-1 pin


Step 1

Take the wooden bead and put a toothpick through it (if doesn’t stay by itself, glue it).


Cut two pieces of wire, one slightly bigger than the other.


Take the smaller one and bend its ends, like this.


Coil it once around the toothpick – those will be her arms.


Step 2

Take the thick thread – you don’t need to cut it for that – and start to roll it over the toothpick.


When you arrive at the wire, cover the intersection in “x”, like this. That will make the arms stay fixed.


Continue covering one arm, and the loop at the end of it. When it is covered, press the end of the wire well and cover it with the other part…


… like this. Continue to roll over back to the toothpick and go on on the second arm.


Cover it the same way and from the middle go down covering the toothpick until you think it is the place for the legs.


Step 3

Take the other piece of wire and bend its ends.


Then bend the wire like this, with one part a little bit longer than the other.


Now bend again the longer part, so she has a leg fold at the knee.


Place the legs over the toothpick and fix them with thread as you did for the arms.


Cover them in an “x” then go down over one leg.


Secure the end and go up again.


Cut the toothpick, keeping a small part to keep the legs in place…


… and cover this part too.


Go down on the second leg, then up until you reach the head.


Here cut the thread and make a knot.


Step 4

Place the figurine on leather and measure her coat.


Mark it on the leather.


Cut double the part you measured…


… and cut that in two…


… one of them will be the front and the other the back of her coat. Make a small “v” cut in the front and back parts, where the head will be.


Start sewing the two parts together, using the cross stitch technique…


… like this.


When you reach the “v” sew only the front part, like this.


Place the fairy inside…


… and continue stitching the front and back together.


Step 5

Sew the two parts together under the arms…


… like this.


Then make a “L” stitch to mark out the arm and the body of the fairy.


It will look like this.


Step 6

Cut a triangle of leather to make her a cap.


Apply a layer of glue on the upper part of the head…


… like this…


… then put the leather on her head, making a cone.


Keep it in place until it is dry.


Step 7

Take a little black paint with a toothpick…


… and draw her eyes.


And some red paint to make her mouth.


Take the pin…


… and put the crystal on it.


Bend it and hang it on her hand. Like this. Then close the loop.


The last thing that must be done is to put a thick thread through her other hand and the fairy ornament is ready.


How adorable is this Christmas Fairy Ornament?  So cute!!  And, it will look even better hung on the Christmas tree.

Technorati Tags: , , , , , , , , , , ,

How to Make a Fairy Crown for Halloween

Girls love pretending to be Fairys.  They can pretend to be Fairys on any day of the year, but they especially love dressing up as a Fairy on Halloween.  Well, a fairy just can’t truly be a fairy without their Fairy Crown.  In this post I will show you how to make a Fairy Crown for Halloween.  Add this to your Fairy Skirt and Fairy Mask to have the most perfect Fairy Costume this Halloween.  Or, use the Fairy Costume to play dress-up all year long.  Let’s get started with the craft.  NOTE: you will need a little bit of help from an adult for this tutorial.

Check out our other Halloween Crafts.

Laura from  Dacian Moon Handmade  will show you, step by step, how to make this.


fairy-crowns-necklaces


Materials Needed

– 2 pieces of tulle: green and cream colored
– ribbon
– red beads
– needle and thread
– pen
– scissors
– a piece of brown cord
– lighter and pliers or tweezers (with Adult help)


Step 1

Draw 5 circles on cream tulle.


Cut them out.


Do the same with green tulle but make those circles smaller.


Step 2

This is the step where you need help. Fold a circle in quarter


… hold it with pliers and burn it a very little on the edges…. enough to wrinkle a bit.  (Must Have Adult Help.)  It is a very quick move with the lighter.


Do the same for all the circles. If you skip this step, the circles will remain flat.


Step 3

Set the pattern and make a mark where you should have the first circle (flower).


Using needle and thread sew the end of the ribbon…


… twist the ribbon…


… and sew it loose.


It will look like this.


Step 4

When you reach the marker, put a white circle on the needle…


… then a red bead …


and sew it to the spot.


Continue twisting the ribbon and sewing it loose, then add a green circle with a red bead… and so on.


Like this.


Step 5

Take the brown cord and put it through the tube of ribbon, under the first stitch.


Let enough cord free and make a knot.


This will keep the cord in place.

Begin to wrap loosely around the necklace…


… along with flowers, like this.


When you reach the other end pass the cord through the ribbon tube again.


The crown will be tied at the back…


… and it is ready to complete your Fairy costume.


Isn’t this Fairy Crown adorable?  Any Fairy would love to wear this crown.  Make sure to make the Fairy Skirt and Fairy Mask to accompany this Fairy Crown.

Technorati Tags: , , , , , , , , , , , ,

How to Make a Spider Pendant for Halloween

I have a treat for you crafters today….. I’m going to show you how to make a Spider Pendant for Halloween.  Made from jewelry wire and beads this Spider Pendant turns out beautifully.  Make it for yourself or as a gift for someone special…. they will surely love it.  What is awesome about this Spider Pendant is that you can wear it all year long…. not just for Halloween.  It turns out that amazing….. you don’t want to just save it for Halloween.  So, grab the materials needed and let’s get started.

Check out our other Halloween Crafts.

Laura from  Dacian Moon Handmade  will show you, step by step, how to make this Spider Pendant.


How to make Spider Pendants for Halloween


Materials Needed

– black crystal
– red coral (you can use any red bead, just keep in mind it should be bigger than the black one)
– 2 little beads (seed beads)
– one piece of wire (about 3 cm)
– 3 pieces of wire (about 4.5 cm)
– chain
– round nose pliers

NOTE: Wire should be neither too soft nor too hard.


Step 1

Take the small piece of wire…


…and begin making a loop on one end.


Put the 2 seed beads on it…


… and close the loop. These will be the eyes.


Step 2

Add the black crystal…


… and the red coral bead.


Using the pliers make another loop on the other end.


Take care to let about 5mm between the black bead and the red one.


Step 3

Take the 3 pieces of wire…


… and bend them in half, like this.


Continue to press on the ends until it looks like this.


Put the spider body through it, like this…


… and tighten the knot.


Press on the ends again…


… and make another knot, like this.

NOTE: It is not actually a knot. You just wrap the 3 wire around the spider body 2 times.


Step 4

Separate spider legs.


Fold down the first leg almost half (smallest side towards the body)…


… and make a little loop on the end, using the pliers.


Repeat for all the legs…


… and your spider is ready.


Add a chain to it (you can put it through the head – between the eyes) and is ready to be worn.


Ok, how awesome is this Spider Pendant?  It is perfect for the Halloween season…. or really any time of year.  It is that beautiful to wear… wear it all year long.

Technorati Tags: , , , , , , , , , , ,

How to Make Jack-o-Lantern Beads

Oh boy… Do I have a fun Halloween Craft for you today!!  In this post I’m going to show you how to make Jack-o-Lantern Beads.  These Jack-o-Lantern Beads are so much fun and yet so easy.  They are perfect even for the young kids.  Just make sure your child isn’t too young that they still put things in their mouth…. beads can be choking hazards.  If you make a bunch of these Jack-o-Lantern Beads they will be perfect to add to a clear bowl and make a Halloween Centerpiece.  So, let’s get started.

Check out our other Halloween Crafts.


How to Make Jack-o-Lantern Beads


Materials Needed

Orange Bead (if have no orange bead… paint the bead orange)

Dark Orange Paint

Black Paint or Marker

Green Pipe Cleaner

Scissors


Step 1


Get an orange bead.


Get a bead.  If it isn’t orange…. paint it.


Step 2


Paint a darker orange stripe all around the bead


Paint a darker orange stripe all around the bead… in both directions.


Step 3


Draw more lines around the bead.


Draw more lines around the bead.


Step 4


Draw a triangle for each eye.


Draw a triangle for each eye.


Step 5


Draw a triangle for the nose.


Draw a triangle for the nose.


Step 6


Start drawing the mouth


Start drawing the mouth…


Step 7


Draw bottom of the mouth


Draw bottom of the mouth…


Step 8


Fill in the mouth


Fill in the mouth…


Step 9


Take a piece of green pipe cleaner and fold it in half


Take a piece of green pipe cleaner and fold it in half.


Step 10


Put the closed side of pipe cleaner into bottom of pumpkin


Put the closed side of pipe cleaner into bottom of pumpkin.


Step 11


Cut off the pipe cleaner at bottom of pumpkin


Cut off the pipe cleaner at bottom of pumpkin.


Step 12


Turn pipe cleaner to the side


Turn pipe cleaner to the side…. to look like this…


Finished Jack-o-Lantern Bead


So, there you have it…. a simple and fun Halloween Craft.  Make a bunch of Jack-o-Lantern Beads and add them to a bowl for a wonderful Halloween Centerpiece.

Technorati Tags: , , , , , , , , , , ,

How to Make a Cheerful Lunch Box

In this post I’m going to show you how to make a fun and cheerful lunch box.  School has just started and one of the kids favorite times of day is lunch time.  You know what would make it more memorable for them is to make this lunch box craft with your child.  Your child will be so proud to take their homemade lunch box to school with them.  Plus, there will surely be no other person with a matching lunch box.  So, grab the materials needed and let’s get started.

Check out our other Back to School Crafts.

Laura from Dacian Moon Handmade   will show you, step by step, how to make this cheerful and girlish lunch box.


Materials Needed

– recycled box
– cotton cloth
– pen
– craft glue
– scissors
– tulle pieces
– bead
– needle and thread
– auto-adhesive crystal bead


Step 1

Cut 3 squares of tulle…


… place one on top of the other…


… and sew the bead on the middle…


… like this.


Step 2

Place the cloth over the box lid and mark the contour.


Cut it out…


… like this.


Sew the tulle flower on the middle of it…


… like this.


Step 3

Remove (as much as you can) the label on the lid, then add glue on it…


… like this…


… and place the decorated cloth on it.


Step 4

Now, that the lid is ready, is time to decorate the box.


Place the cloth over it and measure the height.


Cut a strip that measures that height.


Apply a layer of glue on it…


… and cover the box. I made some folds on the front to make it less plain.


Take the auto-adhesive crystal…


… and use it to highlight the folds.


Now the decorated lunch box is ready.


Now you have no ordinary lunch box.  You have a very girly and fun lunch box that no other person will have.  Enjoy it!!

Technorati Tags: , , , , , , , ,

How to Make a Bookmark of Memories

Throughout the year you have a lot of things that you do with your friends that you would probably like to remember.  For example…. School, Summer Camp, Sports, Work, etc.  With each of these things you make new friends and build new memories.  That is a wonderful thing….. but wouldn’t you like to remember each of these things?  Well, today I’m going to show you how to do just that….. I’m going to show you how to Make a Bookmark of Memories.  So, grab your friends and let’s get started.

Check out our other Keepsake Craft Ideas.

This tutorial offered by Laura from Dacian Moon Handmade.


Materials Needed

– yellow and green paper (or any other colors)
– crystal sticker
– ruler
– scissors
– colored pens
– glue
– friends


Step 1

Cut a piece of green paper, as big as your bookmark will be.


Cut a yellow piece of paper about 1cm shorter than the green one.


Step 2

Apply a layer of glue on the yellow paper…


… and place it on top of the green one.


Step 3

Cut a square of green paper, with the same size width of the bookmark.


Fold it two times on diagonal until you have this small triangle.


Cut one corner in zigzag…


… like this.


Unfold.


Glue this piece on the upper edge of the bookmark.


Step 4

Cut a yellow square about the size of the width of the yellow part of the bookmark and fold it like this.


Cut a heart shape from it.


Cut the margins like in the picture, but don’t cut the corner.


Unfold.


Glue the yellow flower on top of the green one.


Step 5

Place the crystal sticker in the middle of the flower.


Write on petals “Memories Bookmark” and the year.


Decorate it as you please.


Step 6

Ask your friends to write a quote and to sign your bookmark.


Isn’t this a great Keepsake Memories craft?  Keep this in your photo album, memory box or your favorite book to remember the good times you shared with your friends for years to come.

Technorati Tags: , , , , , , ,

How to Make a Kissing Dangle Decoration for Valentines Day

Are you still looking for decorations for Valentines Day?  If so, then I have the craft for you today.  In this post I’m going to show you how to make a Kissing Dangle Decoration for Valentine’s Day.  It’s an easy craft, but turns out really beautiful to hang up for Valentines Day.  Plus, making this craft is a lot of fun…. almost as much fun as it will be seeing people’s reactions when they find out you made this decoration yourself.  So, grab the materials needed and let’s get started.

Check out our other Valentines Day Crafts.

Laura from Dacian Moon Handmade  will show you how to make this, step by step.


Materials Needed

– 4 recycled valentines cards
– white paper
– scissors
– thick thread
– pencil
– paper glue
– assorted color beads (I used blue, red and white)


Step 1

Take the card with the smaller width and draw its width on the white paper.


Do the same with the card with the smaller height.


Complete the rectangle…


… then cut it out. This is the maximum size that can be used on all the cards.


Draw a heart inside this rectangle. Make it as large as you can.


Cut it out.  This is our heart template.


Step 2

Place the template on a card …


… and draw the outline.


Cut it out, then fold it in half.


Do the same for all 4 cards.


Step 3

Apply a layer of glue on one half of one heart (on the back)…


… then place another heart over it. Press well.


Do the same to add another heart. Now we have only one left.


Step 4

Take the thread and make a knot on its end.


Add the blue bead…


… and make another knot over it.


Add the red bead …


… and make another knot.


Step 5

Apply a layer of glue on the center of hearts.


Put the thread there…


… add glue and the last heart over it, like this.


Make another knot.


Add the last bead and make the last knot.


Now your kissing dangle is ready! Hang it where people can see and enjoy it.


How did your Kissing Dangle Decoration turn out?  Let me know in the comments below.  And, take a picture of the decoration too and share that in the comment as well.  I’d love to see it.  Now, go hang up your Kissing Dangle.

Technorati Tags: , , , , , , , , ,

How to Make a Kokeshi Doll

Kokeshi are Japanese dolls, originally from northern Japan. They are handmade from wood, have a simple trunk and an enlarged head with a few thin, painted lines to define the face. One characteristic of kokeshi Dolls is their lack of arms or legs.  So, with that being said…. today I’m going to show you how to make a Kokeshi Doll.  It will be a lot of fun…. almost as much fun as it will be showing to people the Kokeshi Doll you made yourself.  So, grab the materials needed and let’s get started.

Check out our other Doll Making Crafts.

Laura from Dacian Moon Handmade will show you how to make a kokeshi doll step-by-step.


Materials Needed

– 1 cylinder wooden bead – I use a cork – this will be the body
– 1 round wooden bead – I use a walnut – this will be the head (she would be prettier if you’ll use a wooden ball in place of the walnut)
– a piece of paper with flowers
– a piece of white paper
– a piece of red paper (or a ribbon)
– craft glue
– paints (red and black)
– paintbrush


Step 1

Cut the paper with flowers a little bit (with 1 or 2 mm) shorter then the cylinder.


Apply a layer of glue on the back of this paper…


… and roll it around the cylinder.


Step 2

Take the white paper and cut it the same length as the first one, but shorter. Apply a layer of glue on it…


… and place it in the middle of the paper with flowers …


… like this.


Step 3

Apply a layer of glue on the red paper / ribbon too …


… and place it on the middle…


… like this.


Step 4

Now is the time to make the head.


Take the walnut / ball and, using the black paint, make her hair and eyes. Remember that her face should be made of simple, thin lines. Let it dry.


Step 5

Apply a layer of glue on the bottom of the head…


… and place it on top of the body.


Step 6

You can add blush and a mouth… and your doll is ready!


Isn’t this Kokeshi Doll just adorable?  Imagine how cute she would look sitting on your dresser.  How did your Kokeshi Doll turn out?  Let me know in the comments below.  And, make sure to take a picture of your Kokeshi Doll and post that in the comment as well… I’d love to see it.

Technorati Tags: , , , , , , , ,

How to Make a Pair of Doll Earrings

I have a fun craft for the girls today.  I’m going to show you how to make a Pair of Doll Earrings.  These earrings turn out so cute…. they really are fun and playful.  These earrings are simply made from a few pieces of ribbon, some crystals and a few other materials.  They are simple, but trust me the craft is fun.  The Doll Earrings turn out looking like little tiny rag dolls…. just adorable.  So, grab the materials needed and meet me back here so we can get started.

Check out our other Jewelry Crafts.

Laura from Dacian Moon Handmade will show this tutorial step-by-step.


Materials Needed

– 2 small rectangles of ribbon (about 3 cm x 3 cm)
– thread and needle
– scissors
– 4 crystals
– 2 earring hooks
– 2 head pins
– round nose pliers


Step 1

Take a rectangle and fold it in half…


… then again in half, to obtain a small rectangle.


Round cut the corner. Unfold. It will look like that.


Step 2

Place one crystal on one pin…


… then put it through the middle of the ribbon (it may be necessary to make a LITTLE hole with the scissors)


Step 3

Using the thread and needle sew under the crystal…


… like this…


… letting enough thread on both sides to tie it.


Cut the extra thread.


Step 4

Place another crystal on top of it.


Step 5

Using the round nose pliers, make a loop on top of the crystal…


… place the hook in it then close the loop.


This is the finished earring.


Repeat all the steps to make the second earring.


And, there you have it… your finished pair of Doll Earrings.  Aren’t they super cute?!   How did your earrings turn out?  Let me know in the comments below.  And, take a picture of the earrings and share them in the comment as well…. I’d love to see them.

Technorati Tags: , , , , , , , ,

How to Make a Paper Bead Bracelet

If you love making jewelry I have a fun craft for you today.  I’m going to show you how to make a Paper Bead Bracelet.  That’s right…. it’s a bracelet made out of paper.  With paper you actually make the beads that make up this bracelet.  Surprisingly enough….. by simply rolling paper and adding glue it creates a very strong and durable bead.  Choose your favorite color paper to make the beads and the result is a beautiful bracelet you will be proud to wear with your favorite outfit.  So, let’s get started.

Check out our other Jewelry Crafts.


Materials Needed

Colored paper

Scissors

Glue

Ruler

Pencil

Needle

Thread


Step 1

Using a ruler, on one edge of a rectangular piece of paper, mark points that are 1.5 inches apart… starting from the edge.


Step 2

On the other end of the paper, mark a point 0.8 inch away from the edge of the paper. Draw a second point 1.5 inches from this point. Mark a few more points, each 1.5 inch away from the last point. After you are done, draw lines joining the points on both ends as shown below.


Step 3

Cut along the lines to get long triangles as shown below.


Step 4

Fold the edge near the wide end of the triangle and start rolling it as tight as possible.


Step 5

Apply some glue to the end of the triangle and roll to form a bead as shown below.


Step 6

Make many beads as shown below and thread them together into a bracelet using a needle and thread.


Step 7

Wear the pretty bracelet around your wrist and show it off to all your friends.


Isn’t it unbelievable that you can make such an awesome bracelet simply out of paper and glue?  How did your Paper Bead Bracelet turn out?  Let me know in the comments below.  Take a picture of your bracelet and share it in the comment as well…. I’d love to see it.

Technorati Tags: , , , , , , , , ,

How to make Decorated Pencils

In the last post I was talking about how 100 days of school will be arriving soon, and that got me thinking…. if you are almost at 100 days of school your pencils must be getting old and it is time for some new ones.  Well, instead of just using the same old standard pencils for school… why not take it up a notch.  Let’s make our pencils fancy and fun with some decorations.  Today I’m going to show you how to make decorated pencils.  The craft will be so much fun…. almost as much fun as these pencils will be to use.  So, let’s get started.

Check out some Pencil Topper Crafts.

Laura from Dacian Moon Handmade  will show this tutorial step-by-step.


Materials Needed

– pencils
– fluffy feathers
– craft glue
– paint
– metallic powder
– beads


Step 1

Let’s place some beads on a piece of paper.


Apply a layer of glue on the upper part of a pencil…


… like this. Spread it well.


Step 2

To begin, press the pencil over the beads…


… then pour more beads over the pencil.  Do that until it is well covered all around.

Let it dry well.


Meanwhile let’s make the second pencil.


Step 1

Take the eraser out.


Fill its place with glue…


… like this.


Step 2

Place the feather where the glue is.  While it dries you can paint the pencil.


We will paint it all black.


Step 3

Take metallic powder on the paintbrush and spread it over the paint… do this before it is dried.


Like this:


Let it dry completely.


Now, both your pencils are finished.  Don’t they look fun?!  They are so much better than using just plain, ordinary pencils.  It almost makes you excited to do some homework, doesn’t it?   hmmmmmm…..

Here is our video on How to Make Decorated Pencils

Technorati Tags: , , , , ,

14 Fun Snowflake Crafts for Winter


14 Fun Snowflake Crafts for Winter


Winter is well on its way….. and when you think of Winter what do you think of?  I know what I think of….. snow.  So, in honor of Winter and snow today’s craft is all about snowflakes.  I scoured the internet to find some really awesome snowflake crafts.  And, there are some really cool snowflake crafts out there.  So, today I’m going to present you with 14 Fun Snowflake Crafts for Winter.  For some of these crafts you will need to know how to make a snowflake, so check out these great snowflake patterns.

Check out some of our Snowflake Crafts.

14 Fun Snowflake Crafts for Winter

(1) Multicolor Snowflake Wreath


Snowflake Wreath


Here is a really cute Wreath perfect for the Winter Season.  It turns out quite beautiful.  BHG shows you how you too can make this Winter Wreath.  Made from left over card stock from all those Christmas Cards you got during the Christmas Season.  What a great way to recycle those greeting cards.


(2) Sparkly Snowflake


Sparkly Snowflake


Now this is a beautiful snowflake craft.  Made from long and short sparkly beads this winter craft turns out lovely…. perfect for decorating the house for this Winter Season.  CountryLiving shows you how to do this Snowflake craft step-by-step…. you have to scroll to Slide #2.


(3) Wooden Snowflake


Wooden Snowflake


Now this is a fun Snowflake Craft perfect for the youngest of crafters.  Made from Popsicle sticks, glue and fake snow…. this craft promises to be a lot of fun.  You can learn how to do this craft by going to Crafts-for-all-Seasons.


(4) Pipe Cleaner Snowflake


Pipe Cleaner Snowflake


What child doesn’t like a pipe cleaner craft.  Pipe Cleaners are just so much fun to make crafts with…. and this Snowflake craft is no exception.  Check out the MarthaStewart site to get the entire step-by-step tutorial.


(5) Snowflake Window Clings


Snowflake Window Clings


I don’t know about your kids, but I know my kids love window clings.  They love decorating the windows for all the Holidays.  Well, winter is no exception.  Imagine decorating the windows with Snowflakes that you and your child made yourself.  FamilyFun shows you how to achieve this.


(6) Recycled Plastic Ring Snowflake Craft


Recycled Plastic Ring Snowflake Craft


Here is a very cool snowflake craft because it is made out of recycled materials.  FreeKidsCrafts shows you how you can take those 6-pak ring holders from soda and make them into beautiful snowflakes that you can hang proudly this Winter Season.


(7) Q-Tip Snowflakes


Q-Tip Snowflakes


It’s hard to believe that something made from Q-Tips can turn out so beautifully…. but it does.  Made with Q-Tips, glitter and glue this Snowflake craft is not only fun…. but it also turns out perfect to hang up this Winter Season.  Check out AllFreeCrafts for the step-by-step “how-to”.


(8) Snowflake Puzzle


Snowflake Puzzle


Here is an interesting Snowflake Craft.   This easy craft is made from Popsicle sticks and black marker.  BusyBeeKidsCrafts shows you how you can simply take a Snowflake picture and make it into a puzzle just by adding it to a row of Popsicle sticks and cutting the picture with scissors…… this makes it into a puzzle.  Simply mix up the pieces and try to put it back together again.


(9) Woven Snowflake


Woven Snowflake


This woven snowflake is a great craft for kids of all ages.  Made from Popsicle sticks, yarn and glue…. you will have this snowflake craft finished in no time.  Make a few and decorate the whole house this Winter Season.  Check out the “how-to’s” of this craft over at ActivityVillage.


(10) Button Snowflakes


Button Snowflakes


HandMadeBeginnings has the right idea for a Snowflake Craft…. make the snowflakes out of Popsicle sticks and Buttons.  The idea is so easy, but yet very creative.  I love it.  And, I love how the snowflakes turn out.  She explains how taking these snowflakes and adding string will make for great window decorations.  I have to agree.


(11) String Snowflake


String Snowflake


Here is a great snowflake craft for the older children.  Basically this snowflake is made from white string and some fabric stiffener, but look how magnificent it turns out.  The snowflake craft would look awesome hanging in a window by itself or in groups.  Check out FreeCraftUnlimited for the details.


(12) Sparkly Snowflake Mobile


Sparkly Snowflake Mobile


This is a cool craft that when done looks great hung from the ceiling.  Made from paper and glitter this snowflake craft will look festive this Winter Season hung in a classroom or even a child’s bedroom.  Get all the craft details over at Kaboose.


(13) Beaded Snowflake


Beaded Snowflake


I love, love, love this snowflake craft.   I dig that they used pearls in this craft….. it just gives this beaded snowflake a really wintery look.  I found this craft over at Crafts-For-All-Seasons and they did a really beautiful job putting this snowflake craft together.  Make sure to check it out.


(14) Lace Snowflakes


Lace Snowflakes


Who would have thought that Lace can look so much like a snowflake?  But, when put together the right way…. it really does.  AllFreeCrafts did a really great job coming up with this snowflake craft.   They simply added lace to wire to create this beautiful snowflake.  Now, that’s creative.

Technorati Tags: , , , , , , ,

How to Make a Charm Bracelet with Wishes

Here is a jewelry craft perfect for the New Year.  I am going to show you how to make a Charm Bracelet…. but not just any charm bracelet.  This charm bracelet is made up solely of wishes…. your wishes.  How beautiful would that be to wear?  So beautiful!!  We all have wishes for the New Year…. and you can proudly wear your wishes around your wrist.  So, come up with your wishes, grab the craft materials… and let’s get started.

Check out our other New Years Crafts and Jewelry Crafts.

Laura from Dacian Moon Handmade will show you how to make it, step by step.


MATERIALS NEEDED

– white cardboard
– crystals
– pins
– jump rings
– chain
– round nose pliers
– pen
– 1 lobster clasp
– optional: varnish – can be even nail polish


Step 1

Draw 6 circles on the cardboard (diameter ~2cm).


Cut them out.


Step 2

Write on them, on the lower part, wishes for the new year.  Some examples: love, hope, laugh, live, happy, dream.


Like this.


Step 3 – optional

Apply a layer of varnish on them – first on one side, let them dry, then on the other. This will extend the life of the bracelet and will protect it from water.

Let them dry well.


Step 4

Using a pin make holes on top of the circles. You can make the holes before varnishing them (it’s easier).


Step 5

Use the pliers to open a jump ring and put it through one circle. Like this.


Do the same for all circles.


Step 6

Place the chain in front of you – it should be of the right size to fit your wrist. (You could use a cord in place of the chain, but then you should make a knot around every jump ring and circle…you will then tie the bracelet to your arm.)


Arrange all the pieces (circle with jump ring) along the chain, to see where all of them will be.


When you know their places, put the jump rings through the chain eyes… like this.


This is the bracelet with all the pieces linked.


Step 7

Take a pin…


… and put a crystal on it.


Make a loop (using the pliers) on the pin end, like this.


Now, put it on one jump ring, in front of the circle.


Close the loop.


Add crystals to all the pieces.


Step 8

Now the only thing you have to do is to add the closure part. Open a new jump ring…


… and link the clasp…


… to the chain. Like this.


The bracelet is ready!


I told you this bracelet turns out beautifully.  Don’t you agree?  How proud would you be to wear this Charm Bracelet around town?  I imagine so proud…. as you made this Charm Bracelet with Wishes yourself.  Enjoy wearing it!!

Technorati Tags: , , , , , , , , , , , , ,

How to Make a New Years Noisemaker

What does every child love to do when the ball drops and we hit the New Year???  Make lots of noise.  And, what’s the best way to make lots of noise on New Years Eve?!  With noisemakers, of course.  Well, instead of buying the store bought Noisemakers…. why not make your own.  The craft is a fun one and the Noisemaker turns out so much better than the store bought ones.  Plus, you get to tell everyone at the New Years Party that you made them yourself.  How cool is that?!  So, let’s get started.

Check out our other New Years Crafts.

Laura from Dacian Moon Handmade  will show you how to make a noisemaker, step by step.


MATERIALS NEEDED:

– a piece of cardboard (a rectangle of about 20 cm x 7 cm)
– 2 tin lids
– craft glue
– scissors
– 1 piece of thick thread (about 15 cm)
– 2 beads
– 2 pins
– round nose pliers (to make the loops on the pins)


Step 1

Place a bead on one pin…


… then make a loop at the end of the pin.


Do the same with the second bead.


Tie them on the ends of the thread.


Like this.


Step 2

Place the thread over one lid, on the middle, like in the picture.


Fold the cardboard until you have a bar.


On the last fold add glue to keep it in place.


Step 3

Apply glue on the middle of the lower part of the lid. Here we will put the handle.


Place the cardboard bar over this glue…


… then put glue on the edge of the lid, over the thread and cardboard, like in the picture.


Place the other lid on top of this and keep it pressed for a couple of minutes, until it is dry.


It will look like this. Let it dry well.


Now you can paint the lids or, like me, glue a cute image over them… and the noisemaker is ready.


Now you are all set to make some noise this New Years Eve.  Why not make a few more and hand them out at your New Years Party.  Your party goers are sure to love them.  Happy New Years!!

Technorati Tags: , , , , , , , , , ,

How to Make a Pony Bead Christmas Tree Ornament

Today I’m going to show you how to make a Pony Bead Christmas Tree ornament.  It’s a fun beaded craft that has a purpose… for decorating your Christmas Tree.  Imagine how proud you will be to know you made a beautiful ornament worth hanging on the tree.  If you are feeling energetic you could even make a few and hang them around your tree.  How beautiful would that be?

Check out our other Christmas Crafts.


How to Make a Pony Bead Christmas Tree Ornament


Materials Needed

Plastic Lace – 3 Feet

Beads – Yellow, Green and Red

Scissors


Step 1


Cut about 3 feet of plastic lace.


Cut about 3 feet of plastic lace.  Fold in half.


Step 2


Tie a knot down a bit to leave a loop


Tie a knot down a bit to leave a loop to hang as a decoration.


Step 3


string a yellow bead on right side lace


The top of the tree is the star… so string a yellow bead on right side lace.


Step 4


you are going to lace the left strand of lace thru the left side of bead


Now you are going to lace the left strand of lace thru the left side of bead.  This will keep the bead in place.  Pull both strands to bring yellow bead up to the top.


it looks like this


When pulled up…. it looks like this.


Step 5


Lace a green bead on the left side.


You switch the side you put the bead on each time.  Last time was on the right… this time it’s on the left.  Lace a green bead on the left side.


Step 6


take the right strand and put it thru the right side of the bead.


When the bead is on the left… you take the right strand and put it thru the right side of the bead.


Step 7


Pull both strands outwards to bring both beads up


Pull both strands outwards to bring both beads up like this.


Step 8


Place 2 green beads on right strand


Now on right side again.  Place 2 green beads on right strand.


Step 9


put the left strand thru left side of both beads


Since beads are on the right strand… you will put the left strand thru left side of both beads like so.


Step 10


Pull both strands out to bring beads up


Pull both strands out to bring beads up like this.


Step 11


lace 3 green beads on left


Then lace 3 green beads on left strand since you laced on the right last time.


Step 12


take right strand and put it thru right side of beads


When beads are on left… take right strand and put it thru right side of beads.


Step 13


Pull strings out to bring beads up like this.


Pull strings out to bring beads up like this.


Step 14


Look at the above diagram.  Arrows show the way lace goes thru beads.


Look at the above diagram.  Arrows show the way lace goes thru beads.  The R and L are to help you remember which side to lace the bead on.


Step 15


Knot both laces


Knot both laces… cut remaining of lace off.

There you have it…. you just finished making your Pony Bead Christmas Tree Ornament.  How did yours turn out?  Let me know in the comments below.  Now, go hang up your ornament.

Technorati Tags: , , , , , , , , , , , , , , ,

How to Make a Santa Claus Perler Bead Christmas Ornament

Today I have a fun Christmas craft for you.  I’m going to show you how to make a Santa Claus Perler Bead Christmas Ornament.  You don’t need much in the way of materials…. just some plastic lace and some perler beads and you are good to go.  Follow the pattern in the tutorial and you will have a Santa Claus Christmas Ornament to hang on your tree in no time.  So, let’s get started.

Check out our other Christmas Crafts.


How to Make a Santa Claus Perler Bead Christmas Ornament


Materials Needed

3 Feet of Plastic Lace

Perler Beads (White, Red, Pink and Black)


Step 1


Cut about 3 feet of plastic lace.  Fold in half.


Cut about 3 feet of plastic lace.  Fold in half.


Step 2


Tie a knot down a bit to leave a loop to hang as decoration.


Tie a knot down a bit to leave a loop to hang as a decoration.


Step 3


place 2 white beads on right strand.


The top of Santa’s hat is white so place 2 white beads on right strand.


Step 4


put the left strand thru the left side of the beads


Since the beads are on the right strand… put the left strand thru the left side of the beads.


Step 5


pull both strands outwards so that the beads move upwards in place.


Now pull both strands outwards so that the beads move upwards in place.


It should look like this.


It should look like this now.


Step 6


String 2 beads on the left side


The last time you strung the bead on the right side so this time you will string it on the left side.  String 2 beads on the left side.


Step 7


put the right strand thru the right side of the beads


Since you strung the bead on the right side this time… you will put the right strand thru the right side of the beads.


Step 8


Pull strands outwards to make the beads go up to the top.


Pull strands outwards to make the beads go up to the top.


Step 9


Put one red bead on the right strand.


You stranded the bead on the left last time, so this time you strand the bead on the right side.  Put one red bead on the right strand.


Step 10


Pull strands outwards to move red bead to top and center.


Pull strands outwards to move red bead to top and center.


Step 11


The letters show you which side to thread the bead on.


The above letters show you which side to thread the bead on.  Just continue as I showed you and you will have a beautiful ornament.


Step 12


Knot both laces.


Knot both laces.

There you have it…. you just finished making your Santa Claus Perler Bead Christmas Ornament.  Now, go hang it up on your Christmas Tree for all to see.

Technorati Tags: , , , , , , , , , , , , , ,