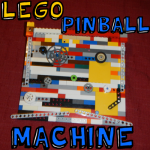
How to Make Lego Pinball Machines with Step by Step Instructions

This is a craft idea that my 14 year old son, Ben, came up with. He actually made a Lego pinball machine when he was about 11 and I was so impressed with it that I asked if he could build one for the site. I hope that you enjoy it.

You Might Also Like VCR Tape Pinball Machines and Making Simple Pinball Machines Craft


How to Make Lego Pinball Machines with Step by Step Instructions


NOTE ABOUT THIS CRAFT: This craft is meant to push you into creatively thinking for yourself. As you probably won’t have the same Lego pieces that we have, you should push yourself to think outside the box and use trial and error to make the best Lego pinball machine for yourself from the Lego pieces that you have available. Have fun.


Step 1


step1


Make a tall stack of one block-wide blocks. Make sure that you put a lot of blocks in that have the circle holes within them. You don’t need to exactly copy what is in this picture…you can use your creativity.

 Step 2a


step2a


Now make a few rows of double width blocks (as seen in the pic below). One of these blocks should be a hinge block (circled in the pic). Soon we will place them on top of the single width blocks (from the last step).

 Step 2b


step2b


Now put this type of block on the hinge block (as seen in pic above).

 Step 2b


step2c


Now use this hinge Lego as the stand in the back of the Pinball Machine. This will give the Pinball Machine its downward slant.


 Step 3a


step3a


Find a long Technic Beam (as seen in pic above)…ours has 15 holes, but whatever you decide to use will be fine. Then connect the legos shown above to the Technic Beam.

 Step 3b


step3b


Now stick a Lego connector in the other end, as seen above.

 Step 3c


step3c


Now we will stick this one one side of the Pinball Machine base. Make one of these for the other side too.

Step 4a


step4


Now we will finally stick the double width blocks (from step 2a) on top of the single width blocks.

 Step 4b


step5a


Now connect the tower (#1) to the Legos that are connected to the Technic Beam (#2) with a 4 length block (#3).

 Step 4c


step5b


Now it Looks Like This.

 Step 5


step6


Now use connector pegs to attach Technic Beams to the bottom of the Pin Ball machine base.

 Step 6


step7


Now use connector pegs to put barriers in the way…be creative and use trial and error to create best pinball machine for you.

 More Trial and Error


step8


I like to add spinners and other barriers.

 Change it Up Some More


step9


Or just change things around to make your older brother mad. My older son made this pinball machine and wasn’t too happy that his younger brother was adding to it. 🙂

To play with the Pinball machine…find a bead that is the right size and use the levers at the bottom to make the ball go. Have fun.

You Might Also Like VCR Tape Pinball Machines and Making Simple Pinball Machines Craft

Technorati Tags: , , , , , , , , , ,

How to Make a Stand-Up Dress-Up Doll

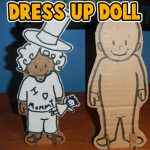
When I was a little girl I would have so much fun dressing up paper dolls.  You know…. the paper dolls you buy in a book at the store where you cut out the clothes to put on them?  I loved them.  I used to spend hours dressing up the paper dolls and changing their clothes over and over again.  Well, today I’m going to show you how to make with your children a stand-up dress-up doll.  I got the idea from a post I saw on another site ( ikatbag.com). You are going to make the doll out of cardboard… it is much stiffer and will hold up to many, many clothes changes.  Also, in this craft you will find 4 different template sheets of different accessories for your dress-up doll.  That means hours of fun for you and your children dressing up the doll.  So, grab the few materials needed and let’s get started.

Check out our other Doll Making Crafts.


How to Make a Stand-Up Dress-Up Doll


Materials Needed

Printer & Paper

Scissors

Black Marker

Cardboard

Paste or Glue (optional)

Glue Dots


Click on template images below to open and to print off.

Accessories Template 1


Accessories Template 1


Accessories Template 2


Accessories Template 2


Accessories Template 3


Accessories Template 3


Accessories Template 4


Accessories Template 4


Stand Up Dress Up Doll Template


Stand Up Dress Up Doll Template


Step 1


Print out template.  Cut it out.  Then trace it or paste it onto cardboard.


Print out template.  Cut it out.  Then trace it or paste it onto cardboard.


Step 2


Draw a face on the doll.


Draw a face with ovals for eyes.  A letter “C” for the nose.  A curved line for the smile.


Step 3


Cut around the figure.


Cut around the figure.


Step 4


 Cut two cardboard rectangles out.  Cut slits as the image shows you.


Cut two cardboard rectangles out.  Then cut the following slits out…. On one cardboard cut a slit on the top and a slit on the bottom.  On the other cardboard rectangle cut two slits on the top.


Step 5


Now put the cardboard rectangle's slits into the doll's feet slits.


Now put the cardboard rectangle’s slits into the doll’s feet slits.


Step 6


Turn doll around.  Put these two slits into each other.


Turn doll around.  Put these two slits into each other.  One rectangle has a slit on the bottom and one has a slit on the top.


It should look like this.


Like this.


Here is a different view.


Here is a different view.


Step 7


It should stand.


It should stand.


Step 8


Print out accessories.


Print out accessories.


Step 9


Cut them out.


Cut them out.


Step 10


I used glue dots to stick the clothes on the doll.


I used glue dots to stick the clothes on the doll.  They stay sticky time after time of changing clothes.


Here are some examples of how to dress up your new stand up dress up doll.

Example 1


Example 1


Example 2


Example 2


Example 3


Example 3


Example 4


Example 4


Example 5


Example 5


I bet you and your children had fun making these stand up dress up dolls….. but wait till you see the amount of fun they have dressing them up too.  They will love it.  I gave you 5 examples of ways to dress up your doll…. How many other ways can your child come up with?  Have fun!!

Technorati Tags: , , , , , , , , , , , , , , , , , ,

How to Make a Fast Straight Paper Airplane

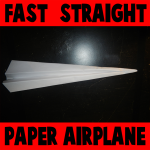
I have a wonderfully fun craft for you today.  And, you only need one material for this craft…. paper.  I’m going to show you how to make a fast straight paper airplane.  It’s so much fun and it will give you hours of enjoyment well after you are finished making it.  Here I will show you step-by-step how to make this paper airplane.  Also, if you scroll down to the bottom of the steps you will see there is a video on how to make this paper airplane as well.  So, grab a piece of paper and let’s get started.

Check out our other Paper Folding Crafts.


How to Make a Fast Straight Paper Airplane


Materials Needed

Paper


Step 1


Fold a piece of paper in half the long ways.


Fold a piece of paper in half the long ways.


Fold a piece of paper in half the long ways.


Like this.


Step 2


Open the paper back up


Open the paper back up…. like this.


Step 3


Fold the top corners in towards the center.


Fold the top corners in towards the center.


Step 4


 Fold in towards center line another time.


Fold in towards center line another time.


Step 5


Fold inwards again.


Fold inwards again.


Step 6


Now fold the entire plane in half.


Now fold the entire plane in half.


Step 7


Now fold down both sides as shown above.


Now fold down both sides as shown above.


And the other side too.


And the other side too.


Step 8


There it is.  Watch the video below if you have any issues.


There it is.  Watch the video below if you have any issues.

Here is our video on How to Make a Fast Straight Paper Airplane

Technorati Tags: , , , , , , , , ,

How to Make a Snowman from Socks

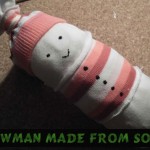
When you think of winter time what do you think of?  Snow, of course.  Well, what is the one thing that children love to make in the snow?  A snowman.   Today I’m going to show you how to make a snowman from socks.  This is an adorable snowman stuffed toy that any child will love to snuggle with.  And, if the child helped your make it…. they will enjoy it even more.  This is a great winter time craft that can be enjoyed by children young and old.

Check out our other Winter Crafts and Sock Crafts.

Step by step tutorial offered by Laura from Dacian Moon Handmade


Materials Needed

– striped sock
– white fabric
– filling material (I used some cotton pads broken into pieces)
– scissors
– ribbon
– black paint
– needle and thread


Step 1

Measure the width of the socks on the fabric folded in two…


… and cut it out.


Sew the two sides together, letting an opening on the upper part.


Like this.


Turn it to the other side.


Step 2

Shred the cotton pads into small pieces…


… and fill the sewed white fabric with it.


Like this.


Tie the open end with the ribbon.


Step 3

Use a thread to separate the 3 snowballs of the snowman.


Like this.


Step 4

Cut off the upper part of the sock …


… then cut that part in half.


Dress the snowman with one, as a shirt.


Put the other one on its head, as a cap.


Use the ribbon to tie the cap to keep it in place.


Draw eyes, mouth and buttons on your snowman using black paint.


Check out this adorable sock snowman.  You can give this to a friend or family member…. or enjoy it for yourself.

Technorati Tags: , , , , , , , , , , , ,

How to Make Clothespin People Figures

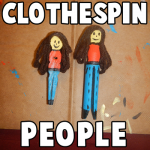
I have a fun craft for you today that you can make out of any kind of wooden clothespin.  In this post I’m going to show you how to make a Clothespin People Figure.  Grab a few clothespins and you can even make an entire clothespin family.  Simply use your imagination to make each figure a little bit different.  The kids will love this craft because it is so much fun and you will love how your children use their imagination to create their clothespin figures.

Check out our other Clothespin Crafts.


How to Make Clothespin People Figures


Materials Needed

Wooden Clothespin (Any Type)

Glue

Paint (Colors for Face, Clothes & Skin)

Black Paint

Paintbrush

Yarn


Step 1


Get either type of clothespin


Get either type of clothespin as above picture.


Step 2


If you have the clothespin with the metal parts take it apart like above.


If you have the clothespin with the metal parts take it apart like above.


glue the pieces like this.


And then glue the pieces like this.


If you have the above type you don't have to do anything.


If you have the above type you don’t have to do anything.


Step 3


 Paint clothes and skin.


Paint clothes and skin.


Step 4


Paint a face.


Paint a face.


Step 5


It looks good to outline shirt in black.


It looks good to outline shirt in black.


Step 6


Draw three sides of rectangle for sleeve.


Draw three sides of rectangle for sleeve.


And a circle for hand.  Color it the same color as face.


And a circle for hand.  Color it the same color as face.


Step 7


Paint details you want.


Paint details you want.


Step 8


Wind some yarn up like above.


Wind some yarn up like above.


Step 9


Wind some yarn up like above.


Glue on top of head and cut loops at bottom.

And, there you have it…. you just finished a Clothespin people figure.  Make a few more and you got yourself a Clothespin family.

Technorati Tags: , , , , , , ,

How to Make a Christmas Paper Toy

I have a fun Christmas craft for even the youngest of crafters.  Today I’m going to show you how to make a Christmas Paper Toy.  With just some paper, printer, scissors and a few other materials you and your child will be able to make this cute Christmas paper toy that they will enjoy playing with…. just as much fun as they will have making the craft.  If you want, feel free to color the templates before cutting them out to add even more fun to this craft.  So, let’s get started.

Check out our other Christmas Crafts.


How to Make a Christmas Paper Toy


Materials Needed

Printer

White Paper

Green Paper

Scissors

Tape

Pen

Glue

Cereal Box


Click on the template images below to open a new page and to print.

Christmas Background Template


Christmas Background Template


Christmas Presents Template


Christmas Presents Template


Christmas Table Template


Christmas Table Template


Christmas Characters Template


Christmas Characters Template


Christmas Tree Extras Template


Christmas Tree Extras Template


Step 1


Print templates


Print Templates.


Step 2


Cut out items from template.


Cut out items from template.


Step 3


This is the background.


This is the background.


Bend both dotted lines away from you.  Crease.


Bend both dotted lines away from you.  Crease.


Now fold the next line (solid) towards you.


Now fold the next line (solid) towards you.  Crease.  Do this on both sides.


Fold both of these tabs away from you so it acts as a stand.


Fold both of these tabs away from you so it acts as a stand.


Cut slits.


Cut slits.


Fold tabs up.


Fold tabs up.


Place the paper in the slits on both sides.


Place the paper in the slits on both sides.


Step 4


 Place each character in the stands.


Place each character in the stands.


Step 5


To make the Christmas tree... get some green paper and... Fold green paper in half twice.


To make the Christmas tree… get some green paper and… Fold green paper in half twice.


Use the template to... draw half of the tree along fold.


Use the template to… draw half of the tree along fold.


Cut both trees apart between both of them.


Cut both trees apart between both of them.


Cut down center... one on top of one and one at bottom of the other.


Cut down center… one on top of one and one at bottom of the other.


Now use the slits to slide the tree together to look like the tree above.


Now use the slits to slide the tree together to look like the tree above.


Tape some seams together.  Draw on tree if you want to.


Tape some seams together.  Draw on tree if you want to.


Write family member's names on ornaments or draw a design on each one.


Write family member’s names on ornaments or draw a design on each one.


Glue both stars together and put on top of tree.  Glue ornaments on tree.


Glue both stars together and put on top of tree.  Glue ornaments on tree.


Step 6


Cut out each of the legs.


Cut out each of the legs.


Glue on cereal box cardboard.


Glue on cereal box cardboard.


Cut out and fold and crease very well.


Cut out and fold and crease very well.


Cut out cardboard long and wide enough for legs.


Cut out cardboard long and wide enough for legs.


Glue on white paper like this.


Glue on white paper like this.


Have adult cut slits in the top of the table.


Have adult cut slits in the top of the table.


Put the food tabs in the slit.


Put the food tabs in the slit.


On the bottom of table push tabs in opposite directions.


On the bottom of table push tabs in opposite directions.


Step 7


 Cut out presents.


Cut out presents.


Fold on dotted lines and cut on slits.


Fold on dotted lines and cut on slits.


Put tab in slit.


Put tab in slit.


Completed present.


Completed present.


Step 8


Finished.


Finished.

Awesome job!!  You just finished making your Christmas Paper Toy.  Have fun playing with it…. Christmas will be here in no time.

Technorati Tags: , , , , , , , , , , , , , , , ,

How to Make a Hanukkah Dinner Paper Craft Toy

Hanukkah will be here before you know it.  After all, Hanukkah begins on the evening of December 8th.  Today I will show you how to make a craft that is perfect for Hanukkah.  I’m going to show you how to make a Hanukkah Dinner Paper Craft Toy that any child will enjoy playing with.  Your children will enjoy cutting out all the characters and images from the template…. folding them and gluing them together.  Even the youngest of crafters will enjoy this craft…. with just a little help from an adult.  So, let’s get started.

Note to everyone…I know in the picture the menorah only has 7 candles…I used the wrong type of menorah. A Hanukkah menorah has 9 candles…I updated it in the template. Thank you!

Check out our other Hanukkah Crafts.


How to Make a Hanukkah Dinner Paper Craft Toy


Materials Needed

Printer & Paper

Scissors

Glue


Click on template images below to open a new window and to print off.

Hanukkah Paper Characters Template


Hanukkah Paper Characters Template


Hanukkah Presents Template


Hanukkah Presents Template


Hanukkah Room Template


Hanukkah Room Template


Hanukkah Table & Menorah Template


Step 1


 Print out templates.


Print out templates.


Step 2


Fold the background scene.


Fold the background scene.


Step 3


Cut out characters and rectangles.


Cut out characters and rectangles.


Cut slits.


Cut slits.


Fold tabs up.


Fold tabs up.


Put a character in the slits... This is a stand for the character.


Put a character in the slits… This is a stand for the character.


Step 4


Cut out table, rug and menorah.


Cut out table, rug and menorah.


Fold on dotted lines.  Cut on slits.


Fold on dotted lines.  Cut on slits.


Glue together.


Glue together.


Step 5


Fold and glue together bottom of table.


Fold and glue together bottom of table.


Here it is from the side.


Here it is from the side.


Have an adult cut a slit in middle of table.


Have an adult cut a slit in middle of table.


Place menorah in the slit.


Place menorah in the slit.


Bend one tab forward and one tab back.


Bend one tab forward and one tab back.


Now the menorah should stand up.


Now the menorah should stand up.


Step 6


Cut out presents.


Cut out presents.


Fold on dotted lines and cut on slits.


Fold on dotted lines and cut on slits.


Put tab in slit.


Put tab in slit.


Completed present.


Completed present.


Step 7


Completed present.


Finished paper toy.

And there you have it…. you just made a Hanukkah Dinner Paper Craft Toy.  Enjoy it.

Technorati Tags: , , , , , , , , , , , , , ,

How to Make Paper Thanksgiving Table Toys

Many people wonder how to keep the kids at the children’s Thanksgiving table entertained.  Sure, you will have the Thanksgiving meal which will occupy them for a little bit.  But, what about all the other time they will spend at the table?  How do you keep them entertained and safe from boredom?  Well, today I have a craft for you and the children that will keep the little ones entertained.  In this post I will show you how to make Paper Thanksgiving Table Toys.  This will surely keep them happy…. for a little while anyway.

Check out our other Thanksgiving Crafts.


How to Make Paper Thanksgiving Table Toys


Materials Needed

Printer & Paper

Scissors

Tape

Glue

Cereal Box

White Paper


Click on template images below to make larger and to print.

People Template 1


People Template 1


People Template 2


People Template 2


People Template 3


People Template 3


People Template 4


People Template 4


People Template 5


People Template 5


Pilgrims Table Food Template


Pilgrims Table Food Template


Step 1


Print out the templates.


Print out the templates.


Step 2


Cut out each individual piece.


Cut out each individual piece.


Step 3


Fold on each line.


Fold on each line…


Fold like this.


Fold like this.


Step 4


Tape in back.


Tape in back.


Step 5


Now it stands.


Now it stands.


Step 6


For the two guys who have arms... glue together.


For the two guys who have arms… glue together.


Glue basket on hands.


Glue basket on hands.

Step 7


Print template.


Print template.


Step 8


Cut out each of the legs.


Cut out each of the legs.


Step 9


Glue on cereal box cardboard.


Glue on cereal box cardboard.


Step 10


Cut out and fold and crease very well.


Cut out and fold and crease very well.


Step 11


Cut out cardboard long and wide enough for legs.


Cut out cardboard long and wide enough for legs.


Step 12


Glue on white paper.


Glue on white paper.


It should look like this.


Like this.


Step 13


Have an adult cut a few slits on the table top... spaced out.


Have an adult cut a few slits on the table top… spaced out.


Step 14


Cut out bowls of food and put tabs into slit.


Cut out bowls of food and put tabs into slit.


On bottom of table push tabs in.


On bottom of table push tabs in.


It should look like this.


Like this.

Step 15


Finished Paper Thanksgiving Table Toy


And, there you go…. you just finished your Paper Thanksgiving Table Toy.  This will be perfect for the children at the Thanksgiving kids table to play with.  They will really enjoy it.

Technorati Tags: , , , , , , , , , , , , ,

How to Make a Mayflower Walnut Boat

I have a fun craft for you…. it is a Thanksgiving craft.  Today I’m going to show you how to make a Mayflower Walnut Boat.  This boat will actually float.  So, it is a craft that will not only be a ton of fun making, but will also be loads of fun playing with.  You will need a bit of help from an adult.  Have an adult break open the walnut with a nutcracker.  It needs to be broken in half…. not crushed.  So, an adult will be able to help you with this.  Let’s get started with this fun craft…. grab the materials needed and we will get to it.

Check out our other Thanksgiving Crafts.


How to Make a Mayflower Walnut Boat


Materials Needed

Walnut

Nutcracker

Paper

Pen or Pencil

Scissors

Clay, Play Doh, Gum or Wax

Toothpick


Step 1


Get a nice walnut.


Get a nice walnut.


Step 2


Adult should split shell without cracking.


Adult should split shell without cracking.


Step 3


Draw a shape that is like a square, but wider at the bottom.


Draw a shape that is like a square, but wider at the bottom.  Now cut it out.


Step 4


Fill with clay, play doh, gum or wax


Fill with clay, play doh, gum or wax (with help).


Step 5


Now take a toothpick and stick it into the gum (or clay or wax) as well as thru the paper twice (as seen).


Now take a toothpick and stick it into the gum (or clay or wax) as well as thru the paper twice (as seen).


Step 6


The boat actually works.... set it to sail in the bathtub.


The boat actually works… set it in the bathtub and blow on its sail.

Technorati Tags: , , , , , , , , , , , ,

How to Make a Toy Sword for Halloween or for Play

With Halloween right around the corner, you might be looking to buy or make a toy sword for your costume. Well don’t go out and buy one, today we will tell you how to make a pretty cool toy sword. Laura from  Dacian Moon Handmade  will show you, step by step, how to make a sword fit for every knight 😉


How to Make Toy Swords


CRAFTS MATERIALS NEEDED:

– ruler
– tinfoil
– tape
– auto-adhesive crystal
– permanent markers : black
– scissors


Step 1.

Place ruler over foil…


… and begins to wrap.


Fold the upper corner like this to make the sword pointy.


It will look like this.


Step 2.

Take another piece of foil…


… and crumples it until you get a bar.


Place it over the sword to form the hilt.


Cut some stripes of foil…


… and wrap the hilt in „x” around the sword.


When you reach the lower part again…


continue to wrap the ruler…


until you feel it comfortable in hand.


Step 3.

Wrap the hilt in tape. Cover a little bit over the horizontal bar to keep it in place.


Like this.


Step 4.

Color the hilt in black…


… like this.


Add the self-adhesive crystal…


And your sword is ready.


Have fun trick or treating.

Technorati Tags: , , , , , ,


How to Make a Haunted House Treat Holder for Halloween

Halloween is coming up quickly.  Before you know it it will be the end of the month and Halloween will be here.  Today we are going to make a Halloween craft.  In this post I’m going to show you how to make a Haunted House Treat Holder for Halloween.  Load it with candy and use it as a Halloween party favor.  Or, if you would prefer…. use it as a Halloween decoration for inside the house.  The kids will love putting on display something they made themselves.  So, let’s get started.

Check out our other Halloween Crafts.


How to Make a Haunted House Treat Holder for Halloween


Materials Needed

Milk Carton

Candy

Tape

A Couple Pieces of White Paper

Colored Construction Paper

Paste / Glue

Scissors

Pencil

Crayons, Markers or Colored Pencils


Step 1


If your milk carton has a circle spout, we will take that out.


If your milk carton has a circle spout, we will take that out.


Step 2


Open up the carton


Open up the carton like this…


Step 3


Push out circle spout.


Push out circle spout.  Then add candy.  Tape shut.


It should look like this.


Like this…


Step 4


Wrap paper around base of carton.


Wrap paper around base of carton.  Paste in place.


It should look like this.


Like this…

Step 5


If there is a lot of excess paper at bottom... cut most of it off.


If there is a lot of excess paper at bottom… cut most of it off.


Push two opposite sides inwards and glue in place.


Push two opposite sides inwards and glue in place.


Then push other 2 sides in and paste.


Then push other 2 sides in and paste.


Step 6


Push corner of paper into triangle on milk carton.


Push corner of paper into triangle on milk carton.  Draw a line where you need to cut.


Cut off excess and glue triangle in place.


Cut off excess and glue triangle in place.

Step 7


 Cut out a long, thinnish piece of paper.


Cut out a long, thinnish piece of paper.  It should be long enough to be the roof.


Fold in half.... draw line on fold.  Then draw squiggly lines for roof's design.


Fold in half…. draw line on fold.  Then draw squiggly lines for roof’s design.


Center roof on top of carton


Center roof on top of carton.  Glue in place.


Step 8


Draw a design on the haunted house.


Draw a design on the haunted house.


Step 9


Finished Haunted House Treat Holder


And there you have you…. you just finished your Haunted House Treat Holder for Halloween.  If you want to use your Haunted House as a toy…. no problem.  You can even go to How to Make a Trick-or-Treat Paper Toy craft and print off the Trick-or-Treat figures you see in the above picture.

Technorati Tags: , , , , , , , , , , , , , , , , ,

How to Make Cardboard Little People Figures

Yesterday I showed you how to make a Glue Stick Man out of your recycled glue sticks.  Today I’m going to continue showing you how to make toy figures out of recycled materials.  In this post I’m going to show you how to make Cardboard Little People Figures.  Just simply use pieces of used cardboard boxes.  This craft is a great way to recycle those cardboard boxes that you would normally throw away.  These Cardboard Little People Figures are fun to make…. almost as much fun as they will be to play with.  So, let’s get started.

Check out our other Green Environmental Crafts.


How to Make Cardboard Little People Figures


Materials Needed

Thin Cardboard

Small Circles to Trace…. One Smaller than the Other (like buttons)

Pencil

Scissors

Glue

A Couple Different Colors of Paint

Button


Step 1


Trace a bunch of circles onto thin cardboard.


Trace a bunch of circles onto thin cardboard.


Step 2


The thinner the cardboard, the more circles you will need to cut.


The thinner the cardboard, the more circles you will need to cut.

Step 3


Cut them out.


Cut them out.


Step 4


Glue together all pieces.


Glue together all pieces.


Step 5


Press down until dry.


Press down until dry.


Step 6


Get a smaller circle to trace and trace a bunch of these circles.


Get a smaller circle to trace and trace a bunch of these circles.


Step 7


Glue together.


Glue together.


Step 8


Glue smaller circles on top of large circles.


Glue smaller circles on top of large circles.


Step 9


Paint it.


Paint it.


Step 10


Paint other details.


Paint other details…


Step 11


Add button or other item for hat or hair.


Add button or other item for hat or hair.


Step 12


Make them all different sizes.


Make them all different sizes.

Aren’t these adorable little people?  Make a whole family of little people figures to play with your friends.  They will surely love it.

Technorati Tags: , , , , , , , , , , ,

How to Make a Glue Stick Man out of your Recycled Glue Sticks

With all the crafts that I do  I go through a lot of glue sticks.  I always hate the idea of throwing them away…. I always try to find crafts that I can make out of recycled items.  And, glue sticks are no exception.  Here is a great craft you can make with your used glue sticks.  Today I’m going to show you how to make a Glue Stick Man out of your recycled glue sticks.  You will see what a great feeling you get from making something out of recycled materials.  Plus, you get a very cool toy man.

Check out our other Green Environmental Crafts.


How to Make a Glue Stick Man


Materials Needed

Empty Glue Stick

Glue

Paint, Paper, Foam or Felt

Black & White Paint


Step 1


Take an empty Glue Stick and peel the label off of it.


Take an empty Glue Stick and peel the label off of it.


Step 2


Glue the cap in place like this.


Glue the cap in place like this.


Step 3


Paint on clothes or glue on clothes with paper, foam or felt.


Paint on clothes or glue on clothes with paper, foam or felt.


Step 4


If painted clothes, then use black paint to outline.


If painted clothes, then use black paint to outline.


Step 5


Paint a sleeve on each side.


Paint a sleeve on each side.  Also, draw a dot for each eye.


Step 6


Draw a circle for each hand.


Draw a circle for each hand.


Step 7


Paint each hand white.


Paint each hand white.  Also, paint white buttons on the shirt.

How adorable is this little guy?  So adorable!!  Make a few of these Glue Stick people and you can have a small family.  What a great way to recycle those used glue sticks.

Technorati Tags: , , , , , , , , ,

Haunted House Crafts Perfect for Halloween


Haunted House Crafts Perfect for Halloween


Halloween is coming up quickly.  After all, it is at the end of this month.  When you think of Halloween what do you think of?  Probably bats, jack-o-lanterns and witches.  But, don’t forget the place they all live.  That’s right…. I’m talking about a Haunted House.  There is not much scarier than a Haunted House.  So, with that being said I am dedicating today’s craft to Haunted Houses.  I scoured the internet looking for an assortment of different kinds of Haunted House crafts perfect for Halloween.  With all 17 of these Haunted House crafts I have listed here you are sure to find one you will love.  So, without further ado….

Haunted House Crafts Perfect for Halloween

(1)   Haunted House Centerpiece


Haunted House Centerpiece


If you are throwing a Halloween party and you are looking for something to have as a centerpiece…. then I have the perfect craft for you.  Busy Bee Kids Crafts shows you how to make this spooky Haunted House Centerpiece step-by-step.


(2)  Paper Bag Haunted House


Paper Bag Haunted House


This Paper Bag Haunted House is perfect for decorating your house for Halloween, but it is also wonderful to use as party favors for a Halloween party.  You can fill these bags with goodies for the kids…. they will love it.  I found this craft over at Kaboose and it looks like a ton of fun.


(3) Haunted House Milk Carton (You can Fill This One with Treats)


Haunted House Milk Carton for Treats


This one is on our site and is made from a simple milk carton or creamer carton. All you have to do is fill with treats or candy, tape closed, wrap with paper, and decorate. Here are the craft instructions.

(4)   Popsicle Stick Haunted House


Popsicle Stick Haunted House


Here is a great Haunted House craft perfect for the youngest of children.  All Kids Network shows you how to make this Halloween craft and it is almost totally made up of Popsicle sticks.  And, we all know how much kids love making things with Popsicle sticks…. almost as much as they love eating the Popsicles.


(5)   Haunted Gingerbread House


Haunted Gingerbread House


Now, tell me how awesome this Haunted House is!!  It is just incredible…. and it is totally edible.  Gotta love that!!  I found this Haunted House craft over at Sisteroo and I hope you love it as much as I do.  This Gingerbread Haunted House makes for a perfect decoration or an edible treat for a Halloween party.

(6) Haunted House Pop Up Cards


Haunted House Pop Up Cards


Here is another Haunted House craft this from this site. Everyone loves pop up cards and this is one of the simplest types that you can make. We will teach you how to make these with just a few slits and a bit of folding. Find out the instructions here.


(7)  Cardboard Box Haunted House


Cardboard Box Haunted House


How cute is this Haunted House?  So cute!!  And, it is made out of an item you probably have laying around the house…. a cardboard box.  I found this Halloween craft over at Spoonful and it is a great find.  Check out this craft and get all the haunted details.


(8)  Spooky S’mores Haunted House


Spooky S'mores Haunted House


YUMMY!!  Here is another edible Haunted House craft.  I love the edible crafts.    If you love S’mores then you are going to surely love this craft.  Check out Kitchen Fun with my 3 Sons for all the yummy spooky details.


(9)  Shoe Box Haunted House


Shoe Box Haunted House


I just love those crafts where you can find the materials needed right in your home.  And, this craft is one of them.  Scribble Press shows you step-by-step how to make this creepy Haunted House out of a shoe box….. very clever!!


(10)  Poster Board Haunted House


Poster Board Haunted House


I love this Haunted House craft!!  I think what I love so much is the fact that this Haunted House is very narrow and tall…. it gives it a very creepy vibe.  Perfect for a Halloween decoration.  I found this Haunted House craft over at Crissy’s Crafts.  You have to check it out for yourself.


(11)  Paper Mâche Haunted House


Paper Mache Haunted House


Kids love working with Paper Mâche…. and making this Paper Mâche Haunted House will be no exception.  And, this haunted house really turns out amazing.  Get all the Halloween craft details over at Woman’s Day.


(12)  Mod Podge Haunted House


Mod Podge Haunted House


How amazing is this Haunted House?  So amazing!!  Mod Podge is a material that kids love working with…. they just do.  I know my children do.  Here B-Inspired Mama shows you how you too can make this incredible Haunted House using Mod Podge.


(13)  Spooky Haunted House


Spooky Haunted House


 AllYou shows you how to take an old dollhouse and make it into this awesome Haunted House.  Your kids are sure to get a kick out of using their old dollhouse and making it into a Haunted House.  Check out the website for all the craft details.


(14)  Heebie Jeebie Haunted House


Heebie Jeebie Haunted House


I found this Haunted House craft over at Crayola.  This Halloween craft is perfect if you are having a Halloween party.  Make a bunch of these Haunted Houses and use them to store candy…. hand them out as a Halloween Party favor.  How fun is that?!


(15)  Cardboard Boxes & Rolls Haunted House


Cardboard Boxes & Rolls Haunted House


Isn’t this a rock’n Haunted House?!  Or, should I say…. Haunted Mansion?!  I love it.  Patheos used different sized cardboard boxes and cardboard rolls to make this Haunted House craft.  It is a clever idea and it came out amazing.  Check out her site to see it for yourself.


(16)  Cereal Box Haunted House


Cereal Box Haunted House


What a great Haunted House.  And, what it totally cool about this Halloween craft is that it is simply made from a cereal box.  I love when you can find your craft materials right at home…. and in this case you can.  Check out Fun Lab Blog for all the Haunted House Craft details.


(17)  Glow in the Dark Haunted House


Glow in the Dark Haunted House


You know what is spooky?  Something that glows in the dark….. like this Haunted House.  I’m not sure why, but an item that has a glowing effect is just 10 times spookier.  And, it’s perfect for Halloween.  Make sure to check out Craft Project Ideas for the step-by-step “how-to” on making this Glow in the Dark Haunted House.

Technorati Tags: , , , , , , , ,

How to Make a Trick-or-Treat Paper Toy

Today I have a fun and festive Halloween craft.  It can be either a spooky Halloween decoration as well as a fun Halloween toy for the little ones.  In this post I’m going to show you how to make a Trick-or-Treat Paper Toy.  Using the 4 templates included in this craft you are going to make a little town with people that you can actually pretend they are going Trick-or-Treating.  Kids love pretending and even more than that they will love pretending to trick-or-treat with this toy because they made it themselves.  Let’s get started.

Check out our other Halloween Crafts.


How to Make a Trick-or-Treat Paper Toy


Materials Needed

Printer & Paper

Scissors

Cereal Box

Tape

Black Paint

Glue

Thread


Click on template images below to make larger and to print off.

Template 1


Template 1


Template 2


Template 2


Template 3


Template 3


Template 4


Template 4


Step 1


Print out first three templates.


Print out first three templates.


Step 2


Cut out parts.


Cut out parts.


Step 3


Cut both slits.  Then fold sides in to center.


Cut both slits.  Then fold sides in to center.


It should look like this.


Like this.


Step 4


Place a person in the slots.


Place a person in the slots…


Step 5


Here's the line up of figures.


Here’s the line up of figures.


Step 6


The cat and pumpkin just need to be folded in half.


The cat and pumpkin just need to be folded in half.


Step 7


Cut everything out.


Cut everything out…. Leave a white outline around the edges…


Step 8


Cut off the front of a cereal box so you get this


Cut off the front of a cereal box so you get this…


Step 9


Tape outside of box together.


Tape outside of box together.


Step 10


Paint the inside of box black.


Paint the inside of box black…


Step 11


Glue pieces of cardboard to back of paper cutouts so they appear like they are sticking out from box.


Glue pieces of cardboard to back of paper cutouts so they appear like they are sticking out from box.


Step 12


It should look like this.


Like this.


Step 13


Tape thread to back of moon and clouds and tape to top of box.


Tape thread to back of moon and clouds and tape to top of box.  Now, they pop out at you.


Step 14


Print out houses paper


Print out houses paper (template 4).


Step 15


Cut out like this... then fold on the dotted lines.


Cut out like this… then fold on the dotted lines.


Step 16


If first dotted line is folded towards you... then fold the next away from you.


If first dotted line is folded towards you… then fold the next away from you.


Step 17


Notice you also fold the right and left side away from you


Like this…. Notice you also fold the right and left side away from you…


Step 18


Here are all the pieces... Now you can play pretend Trick-or-Treat games.


Here are all the pieces… Now you can play pretend Trick-or-Treat games.

Technorati Tags: , , , , , , , , , , , ,

How to Make Recycled Crayons

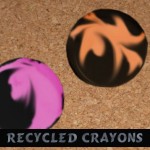
I have a super fun craft for you that is perfect for the back to school season.  Today I am going to show you how to make Recycled Crayons.  If you are unsure what to do with all those tiny crayons left over this is the perfect craft for you.  Take those tiny crayons and shred them into little pieces…. as many colors as you would like…. we will melt them down into colorful recycled crayon cupcakes.  You will need help from an adult for this craft.  So, let’s get started.

Check out our other Back to School Crafts.

Laura from  Dacian Moon Handmade  will show you, step by step, how to make this craft.

Materials Needed

– recycled crayons (I have pink, black, orange, brown)
– cupcake liners
– grater
– oven


Step 1

Remove the paper cover from the pink crayon.


Step 2

Shred the crayon into little pieces using the grater.


… put them in a cupcake liner.


Add black little pieces from the black crayon.


Do the same for the orange and brown crayons.


Step 3

Ask an adult to help you preheat the oven to 275 degrees.

When the oven is ready, have the adult place the crayon cupcakes in the oven for 10 minutes (or until they look melted ).


When they are finished, take them out and let them cool for about 15-20 min.

After they have cooled they pop out very easily and are ready to be used.


So, what are you going to color first?  Share them with your friends at school…. they are sure to love them.

Here is our video on How to Make Recycled Crayons

Technorati Tags: , , , , , , ,