How to Sew a “Lucky Cat” for Saint Patrick’s Day

This is a cute and funny toy made especially for St. Patrick’s Day! 
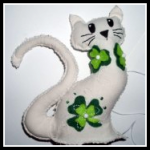
Do you want to learn how to make and sew a stuffed animal named “Lucky Cat” for Saint Patrick’s Day? This stuffed cat is covered in shamrocks and isn’t too tough to make. Learn how to make this kitty cat in the following craft tutorial.

Laura from Dacian Moon Handmade  will show you how to make it, step by step.


How to Sew a Shamrock Lucky Cat


CRAFTS MATERIALS NEEDED:

– white or cream-colored fabric
– light green and dark green felt
– filling material (I use some cotton pads broken into pieces)
– scissors
– needle and threads (white and black)
– black paint marker
– pen
– 3 small white beads
– pencil
– green beads (optional)


IMG_4668


Step 1.

Fold the fabric in half.


IMG_4669


Draw a cat outline, like this…


IMG_4673


… and the tail.


IMG_4674


Cut them out, without unfolding the fabric. This way you will have two cats and two tails.


IMG_4675


Step 2.

Place one cat over the other and start sewing them together. Start on the lower part.


IMG_4676


Go up until you reach the ear.


IMG_4678


Step 3.

Draw one big clover and some smaller on dark green felt. Also, draw them a little bit smaller on light green felt.


IMG_4679


Cut them out.


IMG_4680


Group one big dark clover with one big light clover, and the smaller ones in the same way.


IMG_4681


Step 4.

Choose one place for the big clover…


IMG_4683


… and sew it in place, using white thread.


IMG_4685


Add one white bead in the middle. Be careful not to sew both cats when you sew decorations.


IMG_4687


You can let it like this or you can make some decorative stitches with white thread and green beads


IMG_4689


Like this.


IMG_4691


Choose a place for the small clovers also.


IMG_4693


I put two of them around the cat’s neck, just like a necklace. Don’t forget to add white beads in the middle and to sew only one cat.


IMG_4696


Step 5.

Is time to decorate the head. Place a folded paper or a piece of cardboard between the two cats…


IMG_4698


… and color the eyes and nose with black paint marker.


IMG_4699


Like this.


IMG_4700


Change the thread, and using the black one…


IMG_4701


Sew the whiskers.


IMG_4702


Like this.


IMG_4703


Step 6.

Change the thread back to white and continue to sew the two cats together.


IMG_4705


When you reach the neck is time to fill the head.


IMG_4706


Tamp the filling to fill all the head and the ears. Like this.


IMG_4707


Continue to sew until you almost get down. Here will be the tail, so we must prepare it.


IMG_4709


Step 7.

Place the two tails one over the other…


IMG_4710


.. and start sewing them together from the lower part.


IMG_4711


Go until you reach the tip of the tail and start to sew the other part.


IMG_4712


Stop when you make about 10 cm. Take a piece of filling and roll it between your hands.


IMG_4713


Press it on the stitched part of the tail.


IMG_4714


Continue to fill the tail while sewing the two sides together. It will look like this.


IMG_4715


Step 8.

Place the tail between the two cats, like this.


IMG_4716


Sew it in place.


IMG_4717


Step 9.

Fill the cat’s body.


IMG_4718


sew the two parts together…


IMG_4720


And the cat is ready 😀


IMG_4721


Isn’t this cat adorable!!! I hope you enjoyed the tutorial!

Technorati Tags: , , , , , , , , , , , , ,

How Mommy and You Make Spaghetti Octopus Dogs

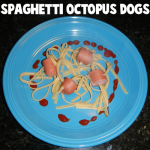
Do you want a fun cooking craft to make with your kids? Here is a super easy and tasty edible craft to make. You can call these Octopus or Squid Dogs – Either way, they are super cool to look at and super yummy to eat. Find out how to make these below. This is a craft that the parent / adult does most of the work.


Spaghetti Octopus Dogs


Crafts Materials Needed:

Hot Dogs, Spaghetti or Linguini, Large Pot, Water, Stove

Step 1


Step 1 Hot Dog Squids Octopus Dogs


Cut up each hot dog into quarters.


Step 2


Step 2a Hot Dog Squids


Now you can stick spaghetti or linguini into the hot dogs. To make a squid, just push the spaghetti thru the center. To make an octopus (like we did), push the spaghetti in both directions (2 one way and 2 the other).


A View of All of Them Done


Step 2b Hot Dog Squids


Step 3


Step 3 Hot Dog Squids


Have Mom or Dad put them into large pot of boiling water. Take them out when spaghetti is finished.


Step 4


Hot Dog Squids Octopus Dogs


Place them on a plate and eat them … yummy.

OR Eat Them on a Hot Dog Bun


step5 Hot Dog Squid Sandwiches


Or eat them in a hot dog bun and call it an Octopus Sandwich or a Squid Sandwich. Yummy.

Technorati Tags: , , , , , , , , , , , , , ,


How to draw a Valentine Dragoness Valentine’s Card

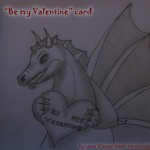
Today I will show you how to draw a fantasy style Valentine’s Day Card…. specifically a Valentine Dragoness Valentine’s Day card.  You can use regular paper for this craft or if you would like something more durable feel free to use Card Stock.  Whatever you have in your house is fine.  I will show you how to make every detail of this Valentine Dragoness perfect for your someone special.  So grab a paper and pencil and let’s get started.

Check out our other Valentine’s Day Crafts.

Laura from Dacian Moon Handmade will show you step-by-step how to make this.


Materials Needed

Paper or Card Stock

Pencil

Black Pen or Thin Marker


Step 1

Let’s start with one simple circle (is not necessary to be perfect). Now draw the X’s below.


Step 2

We’ll draw the basic parts of her face: eyebrow, jaw and snout.


Step 3

Now outline the head, over the new added parts, and then add the neck.


Step 4

Now we will sketch the nose…


And the mouth.
The mouth should be from the edge of the snout to the jaw.


Step 5

Let’s give her life: add the eye.
It should be drawn keeping the shape of the eyebrow.
Add definition to the nose, the jaw and the mouth.


Step 6

The basics are done so we can start adding details. Let’s give her horns and a little crest.


Step 7

Her head is ready but feel free to add as many details as you want – this will make your dragoness one of a kind.
It’s time to sketch the heart she is holding…


… and the hands.


Step 8

Let’s complete her with some wings. We draw it the same way we drew the crest, just bigger.


Step 9

Of course, she has claws. So, we draw them.  Also, draw her crest to go down over her back (between the wings), and add the last details.

Now our sketch is ready.


Step 10

Clean the unneeded lines. If you want you can copy it on a new paper (by placing it up against a window and tracing it).


Step 11

You’ll see that after cleaning… the lines are too thin… so outline and emphasize the important features, especially the eye.


Step 12

Apply shadows with thin and light lines.


Step 13

Now, with a little piece of paper, smudge the shadows.


Step 14

Add “Be my Valentine” on the heart and our dragoness is ready.


Give this handmade Valentine Dragoness to someone special this Valentine’s Day.  They will love it.

Technorati Tags: , , , , , , , , , , ,

How to Make a Thankful Turkey for Thanksgiving

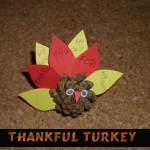
Thanksgiving is all about giving thanks.  Sometimes we tend to forget the true meaning of Thanksgiving…. being thankful for what you have.  This craft is a great way to teach your kids about the true meaning of thanksgiving.  And, your kids will have so much fun doing this.  This turkey’s feathers will tell everyone what you are thankful for.  Plus, it makes for a great Thanksgiving decoration.  Made from a pine cone and some construction paper this craft is sure to be a lot of fun.  So, let’s get started.

Check out our other Thanksgiving Crafts.

Tutorial offered by Laura from Dacian Moon Handmade


Materials Needed

– pine cone
– white, yellow and red paper
– pencil
– pen
– scissors
– craft glue


Step 1

Draw 4 feathers (only outline) on yellow paper and 3 on red paper.


Cut them out.


Step 2

On the three red ones write “thank”, “you” and “for”…


… and on the yellow ones write the things you are thankful for.


Step 3

Take the pine cone…


… and begin to stick into it the red “feathers”. “Thank” is the first…


… then “you” …


… and “for”. Like this.


Then start adding the yellow ones…


… like this.


Step 4

Draw 2 eyes on white paper.


Draw a red beak also, then cut them out.


Apply a little bit of glue on the back of the eyes…


… and glue them in place.


Add the beak in the middle of the face… and your thankful turkey is ready.


Isn’t this turkey a cute one?  And, he’s so smart too…. he tells everyone what you are thankful for.

Technorati Tags: , , , , , , , , , , , , ,

How to Make Pinecone Turkeys

Oh boy, do I have a fun craft for you today perfect for the Thanksgiving season.  Today I’m going to show you how to make Pinecone Turkeys perfect for Thanksgiving.  These pinecone turkeys will look great around the house as Thanksgiving decorations.  Plus, your kids will love to make them.  They are a lot of fun and your kids will have great pride in knowing they made items you could actually put around the house as decorations.  So, grab the materials needed and let’s get started.

Check out our other Thanksgiving Crafts.


How to Make Pinecone Turkeys


Materials Needed

Pinecone

Tan Puffball

Glue

Googly Eyes

Yellow Felt or Foam

Red Felt

Orange Pipe Cleaner

Different Color Pipe Cleaner, Construction Paper or Craft Feathers


Step 1


Get a pinecone.


Get a pinecone.


Step 2


Glue a tan puffball to the top of pinecone.


Glue a tan puffball to the top of pinecone.


Step 3


Glue googly eyes on.


Glue googly eyes on.


Step 4


Cut yellow triangle out of felt or foam and glue on face.


Cut yellow triangle out of felt or foam and glue on face.


Step 5


Draw a #7 like shape on red felt like above picture.  Glue red felt on top of beak.


Draw a #7 like shape on red felt like above picture.  Glue red felt on top of beak.


Step 6


Wrap orange pipe cleaner around pinecone.


Wrap orange pipe cleaner around pinecone.  Then take smaller pieces of pipe cleaner to make claws.


Step 7


Loop pipe cleaners and stick into back of pinecone for feathers.


Loop pipe cleaners and stick into back of pinecone for feathers.  Or, use paper or craft feathers.

And, now you are all finished.  You just made your Pincone Turkey.  Now, use it to decorate your house for Thanksgiving.  Actually, make a few to put around the house….. everyone will love it!!

Technorati Tags: , , , , , , , , , , , ,

How to Make Gloves with Claws for Halloween

Are you still trying to figure out how to add an extra scary effect to your Halloween costume this year?  Well, I just might have the perfect idea for you.  Why not make these Gloves with Claws for Halloween?  They are sure to make any costume you are planning to wear even more scary.  Even if you are planning to be a cat this year…. you can’t do it without claws or your costume is just not finished.  Add these scary Gloves with Claws for a truly scary effect this Halloween.  Let’s get started.

Check out our other Halloween Crafts.

Laura from Dacian Moon Handmade  will show you, step by step, how to make this craft.


How to make a Glove with claws for Halloween


Materials Needed

– gloves
– a piece of black canvas
– scissors
– needle and thread


Step 1

Cut 5 rounded triangles from the canvas.


Like this.


Step 2

Using the needle and thread, sew the lower part of one triangle to one glove finger (where the nails should be)…


… like this.


Do the same for all the triangles / fingers. Repeat for the other glove…


… and they are ready to be worn.


There is something about adding claws to any costume that makes it scary.  Add these scary gloves with claws to your costume and give it an extra creepy effect.

Technorati Tags: , , , , , , , , , ,

How to Make a Paper Owl Decorations for Halloween

Although owls are known as being wise, they are also known as a spooky part of Halloween. They don’t seem very creepy, but walking thru a dark forest with owls hooting can be a pretty creepy experience. However, this owl is more a cute tribute to Halloween. and can also be used as a cover for glasses or whatever else you choose to use it for. Happy Halloween.

Laura from  Dacian Moon Handmade  will show you, step by step, how to make it.


How to make a Paper Owl decoration for Halloween


CRAFTS MATERIALS NEEDED:

– recycled paper roll
– red paper
– white paper
– paper glue
– permanent markers : black, gold
– pencil
– scissors


Step 1.

Take the paper roll…


…and flatten it.


Fold one part inside, like in the picture…


… then the other. Now the owl have ears 😀


Step 2.

Color it with black…


… like this.


Step 3.

Draw drops on red paper.


Cut them out.


Step 4.

Apply a layer of glue on the top of a drop…


… and place it on the black roll, like this. Must start at the bottom for feathers to sit well.


Continue to glue red feathers on the owl till close up.


Step 5.

Draw 2 bigger wings on red paper.


Cut them out and applying a layer of glue on the top of them…


… stick them on their places.


Step 6.

Draw another drop and 2 circles on white paper.


Cut them out.


The new drop will be the beak, so you’ll paint it with gold.


The circles will be the eyes and you should paint them black, like this.


Glue the beak on the middle of the „face”…


… and eyes on one side and the other.

The paper owl is ready.


Technorati Tags: , , , , , , , ,

Black Cat Foldable Paper Toy Craft for Halloween

Halloween is just around the corner so I put together a bunch of Halloween characters that you can fold out of paper. These are Halloween figurines that are very easy to print out, fold, and paste together. This specific character is a black cat, however I decided to make the cat cute instead of scary. Find out how to make this cute kitty cat below.

More Halloween Crafts.

Here are the Other Halloween Paper Toys in This Collection


black-cat-paper-foldable-toy-first-pic


Materials Needed

Paper or Card Stock

Scissors

Glue


The Template to Print Out:


black-cat-paper-foldable-toy-template


CLICK ON THIS PICTURE TO OPEN TEMPLATE. Then Save the Template to Your Computer and Print.

How To: Step 1


Cut Out Cat Template


Cut Out the Template.

Step 2


Fold Paper Cat Toy on the Lines


Fold on the lines.

Step 3


Fold Paper Cat Toy on the Tabs


Fold the Tabs too.

Step 4


Now Glue Together


Glue the cat together on the tabs.


Foldable Paper Cat Figurine Pasted Together


To look like the above picture.

Step 5


Glue the Tail and Ears on


Glue the ears on the top of the cat. Glue the tail onto the back of the cat.

Now enjoy your black cat for Halloween. Print out the other foldable paper Halloween toys in this collection too.

More Halloween Crafts.

Here are the Other Halloween Paper Toys in This Collection

Technorati Tags: , , , , , , , ,

How to Make Crepe Paper Mache Rock Sculptures

HAVE you ever wished you could suggest a use for the interesting stones that children bring home? Here is an idea. By adding crepe-paper mache to these rocks, the children can produce interesting creatures of the imagination. These can be used for paperweight gifts, but the experience of making them has its own reward. With crepe-paper mache children can make rocks into birds, animals, vehicles, fruit, vegetables, holiday novelties.  Sounds fun, right?  Sure does.  So, let’s get started.

Check out our other crafts made from stones and rocks.


How to Make Crepe Paper Mache Rock Sculptures


Materials Needed

Crepe Paper of Different Color

1 Cup Measuring Cup

Bowl

Water

Mixing Spoon

Flour

Salt

Rock


Step 1


Cut up crepe paper into tiny pieces.


Cut up crepe paper into tiny pieces.


Step 2


Make about one cupful of crepe paper.


Make about one cupful of crepe paper.


Step 3


Add enough water to cover paper... soak overnight.


Add enough water to cover paper… soak overnight.


Step 4


Mix and rub wet paper into into fine pulp.


Mix and rub wet paper into into fine pulp.


Step 5


Mix in 4 or 5 tablespoons of flour and 2 tablespoons of salt.


Mix in 4 or 5 tablespoons of flour and 2 tablespoons of salt.  Work until texture of clay.  Add more flour or salt as needed.  Make a different batch for each color.


Step 6


Use the mixture as if it were clay.


Use the mixture as if it were clay.  Use rock as base, and crepe clay as head, wings, feet, tails, or whatever else your sculpture needs.  It will dry as hard as the rock.


Here are more ideas


Here are some more ideas.


And, there you have it.  A great way to mold many different items simply by making Crepe Paper Mache Rock Sculptures.  What did you land up sculpting?  Let me know in the comments below.  And, don’t forget to take a picture of your item as well…. you can add the picture to the comment.  I’d love to see it.

Technorati Tags: , , , , , , , ,

How to Make a Wire Giraffe

I have a fun and creative craft for you today.  In this post I’m going to show you how to make a Wire Giraffe using a wire hanger and some crepe paper.  This craft is a great way to use those wire hangers that you have, but no longer use to hang up your clothes.  You will need a little bit of adult supervision for cutting the wire so make sure to have an adult around during this craft.  So, grab the materials needed and let’s get started.

Check out our other Wire Hanger crafts.


How to Make a Wire Giraffe


Materials Needed

Cutting and slip joint pliers

Scissors

Wire coat hangers

Raffia or crepe paper

Glue, Paste, or Rubber cement


Step 1


Cut the hanger.


(Parental Supervision / Help for younger children) Using cutting pliers cut a wire coat hanger in the following places: (1) at each end of the straight bottom piece (2) one side, at the point where the sides join to form the hook. This cutting results in three pieces of wire.


Step 2


Using piece that has the hook on one end, shape to form the body of giraffe.


Using piece that has the hook on one end, shape to form the body of giraffe.


Step 3


Cut longest wire in half and form legs.


Cut longest remaining piece of wire in half.  Each piece is bent in half and placed in the proper place over the body to form the legs.  Make one complete turn of each wire around the body and with pliers squeeze tightly in place.


Step 4


Using raffia or narrow strips of crepe paper completely wrap each wire.


Using raffia or narrow strips of crepe paper completely wrap each wire.  Ends of paper or raffia may be secured in place by pasting.


for additional thickness to appropriate portions of the figure, merely wrap with additional layers of raffia or crepe paper


In order to provide for additional thickness to appropriate portions of the figure, merely wrap with additional layers of raffia or crepe paper.


Step 5


To make mane wrap with more raffia.


The mane of the giraffe is constructed by using a 24-inch length of raffia or one-quarter inch strip of crepe paper. Paste one end of strip on top of head and form one-inch high loop.


Finishing making mane by wrapping loops.


Using second piece of raffia or one-quarter inch crepe paper strip, wrap loop in place. Continue making loops down neck of giraffe until 24-inch length of raffia or crepe paper is consumed. Eyes can be cut from appropriately colored raffia or crepe paper and glued in place.


Finished Wire Giraffe


Awesome job!!  You just finished your wire giraffe…. didn’t it turn out cute?  Let me know how your wire giraffe turned out for you in the comments below.  And, don’t forget to take a picture too… you can add that to the comment as well.

Technorati Tags: , , , , , , , , , , , ,

How to Make 3d Box Cover Shadow Box Framed Pictures

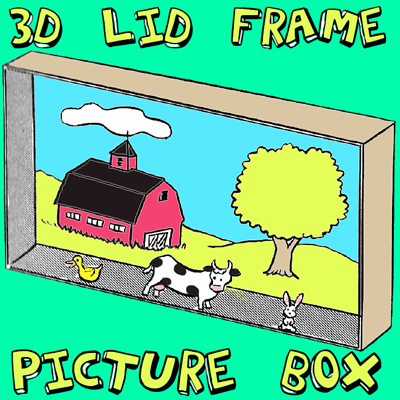
Don’t throw away those box lids because I have a fun use for them. Make these 3-dimensional pictures and use the box lids as the shadow box frame. The pictures seem to come out towards you and that is what makes them 3 dimensional. Find out how to make these with the step by step instructions found below.


How to Make 3d Box Cover Framed Pictures


Crafts Materials Needed

Box cover ( 2″ deep)

Paints

Pictures

Glue

Cardboard

Cork

Scissors

How to Make the 3D Frames

Step 1


Box Lids


Paint box cover, either oblong or square and 2″ deep, on both sides with a solid color paint, as in illustration above.

Step 2


3d-framed-box-cover-pictures-02


Inside the cover, as a background, either paint a scene, or cut a colorful scene from a magazine and glue to background, as in image above. If you want to make a barnyard scene like we did, the draw / paint a barn, some hills, and a tree.


Step 3


3d-framed-box-cover-pictures-03


Cut out or paint small pictures of people or animals. Mount on cardboard and glue to small slices of cork to make them stand (an adult should slice the cork for you), as in image above. If you want to make a barnyard scene, you might want to try some farm animals such as cows, chickens, pig, horses, sheep, and maybe some ducks. Here are some animal crafts that might help you.

Step 4


3d-framed-box-cover-pictures-04


Glue figures in place on floor of picture for 3-D effect, as in illustration above.

Technorati Tags: , , , , , , , ,

13 Cool Bubble Wrap Crafts for Kids


13 Cool Bubble Wrap Crafts for Kids


Bubble Wrap can have many uses.  You can use bubble wrap to package items so they deliver safely…. you can use bubble wrap as a stress reliever…. you can even use bubble wrap as a noise maker.  But, did you know that bubble wrap is an awesome material to use in crafts?  It really is.  This week I was scouring the internet looking for some cool bubble wrap crafts for kids…. and I found 13 of them.  I couldn’t help but show these bubble wrap crafts to you as they are as much fun as they are creative.  So, scroll through these 13 bubble wrap crafts… you are sure to find quite a few that you will enjoy making.

13 Cool Bubble Wrap Crafts for Kids

(1)  Bubble Wrap Hopscotch

Bubble Wrap Hopscotch

This is a fabulously cool idea…. I just love it!!  I found this awesome bubble wrap craft over at Givers Log.   Here she uses bubble wrap to create this fun activity that kids have been doing for years…. hopscotch.  What child doesn’t love jumping on bubble wrap… now there is plenty of chances to do just that.


(2)  Bubble Wrap Fish


Bubble Wrap Fish


Bubble Wrap is a great medium to paint with.  Bubble wrap has tons of cuts and grooves giving this fish a bunch of texture.  Make sure to check out Free Kids Crafts to get all this crafts details.


(3)  Bubble Wrap Greeting Cards


Bubble Wrap Greeting Cards


Check out these beautiful Greeting Cards…. and for each of them bubble wrap was used.  I found this bubble wrap craft over at Creative Jewish Mom… and as she says, she is very creative.  In this post she shows you how to make Rosh HaShana Cards with bubble wrap.  Keep in mind with this technique you can make any greeting card you wish.


(4)   Tactile Letters using Bubble Wrap


Tactile Letters using Bubble Wrap


I found this really cool site that in order to help teach children the letters and the sounds they make they integrate the letter of the week with a sensory experience…. in this case they used bubble wrap and glued it to a letter B to help teach the children the Letter B and its sound.  Check out Teach Preschool for all the details.


(5)  I Don’t Want to Stay Down Doll


Bubble Wrap Doll


Here is one of our posts that we made a few months back.  Here we used bubble wrap to make a “I Don’t Want to Stay Down” Doll.   This doll is a traditional Romanian Toy.  It is called a “Hopa Mitica” Doll and it won’t stay down no matter how hard you try…. it keeps popping back up.  Check it out to make one for yourself.


(6)  Bubble Wrap Travel Game


Bubble Wrap Travel Game


Here is a creative way to use bubble wrap….. Create Bubble Wrap Bingo.  Using the large bubble wrap Apartment Therapy shows you how to make this awesome Bubble Wrap Travel Game.  Make this craft and carry it in the car for long trips…. the kiddos can pop the bubbles every time they see one of the items.  Check out the site for all the crafting fun.


(7)  Roller Pin & Bubble Wrap Painting


Roller Pin and Bubble Wrap Painting


This is a great way to have children paint…. after all look at the great texture bubble wrap and the rolling pin create.  This is such a great idea.  I found this bubble wrap craft over at Teach Preschool and it looks super fun to me.  Imagine all the great paintings your kids could make.  Check out the site for yourself.


(8)  Bubble Wrap Butterflies


Bubble Wrap Butterflies


Aren’t these butterflies just simply magnificent?  And, they are made from bubble wrap…. which of course makes them perfect for this post.  Teaching the Little People came up with this idea and it is such a great one…. she points out how making Bubble Wrap Butterflies are a perfect way to teach your little ones the letter B.  Check out her site for all the details.


(9)  Bubble Wrap Snakes


Bubble Wrap Snakes


These bubble wrap snakes are sssssssssoooo…. cute!!  They are fun, colorful and they even spring to life.  I found this bubble wrap craft over at Fun Art 4 Kids and I love it.   She used bubble wrap, paint and a popsicle stick to create this springy snake.  Make sure to check out her site to get all the details.


(10)  Bubble Wrap Advent Calendar


Bubble Wrap Advent Calendar


Here is another bubble wrap craft that is from our site.  We showed you this craft last year just in time for the Christmas Holidays.  In this particular post we showed you how to make an Advent Calendar out of Bubble Wrap.  What better way to count down to the Holidays than to do it with a advent calendar you made yourself.  Make sure to check it out.


(11)  Bubble Wrap Crocs


Bubble Wrap Crocs


This bubble wrap craft has got to be one of my favorite bubble wrap crafts I found.  Just look how adorable these crocs are!!  I found this super creative bubble wrap craft at Positively Splendid and it is pretty incredible.   Amy at Positively Splendid shows you step-by-step how to create these bubble wrap crocs so check it out for yourself.


(12)  Bubble Wrap Corn


Bubble Wrap Corn


Look how amazing this bubble wrap corn looks…. it really looks like Indian Corn.  I found this bubble wrap craft at Parents and it looks like a lot of fun.  This bubble wrap Indian Corn makes the perfect decoration for the Thanksgiving Holiday.  Make sure to check out the website for the step-by-step tutorial.


(13)  Bubble Wrap Egg Dyeing


Bubble Wrap Egg Dyeing


Here is a super duper creative way to use Bubble Wrap.  Use Bubble Wrap to dye an egg.  I would have never thought to do this…. but Family Fun did.  They will show you how you too can make your Easter Eggs using Bubble Wrap.  Cool idea!!

Technorati Tags: , , , , , , , , ,

How to Make a Hand Print Lamb

I have a fun and adorable craft for you today.  I’m going to show you how to make a Hand Print Lamb.  This craft is great for all ages….. even the youngest of crafters can enjoy this craft.  Made from cotton, a bow, a googly and of course your hand print…. this craft turns out super cute.  Any child will be so proud they made this.  So, grab the materials needed and let’s get started.

Check out our other Cotton Crafts.


How to Make a Hand Print Lamb


Materials Needed

Black Paint

Paper

Cotton

Googly Eye

Bow

Glue


Step 1


Put black paint on hand.


Put black paint on hand.


Step 2


Press hand on paper.


Press hand on paper.


Step 3


Leave print on paper.


Leave print on paper.


Step 4


Glue on cotton


Glue on cotton…. leave fingers showing.


Step 5


Add a googly eye and a bow.


Add a googly eye and a bow.

That’s all there is to it!!  You just finished making a Hand Print Lamb.  How did your lamb turn out?  Let me know in the comments below.  And, add a picture of it too to the comments…. I’d love to see it.

Here is a video on How to Make a Hand Print Lamb.  Watch our step-by-step tutorial.

Technorati Tags: , , , , , , , , , , , , , ,

How to Make Bunny Rabbit Treat Bags for Easter

Instead of using an Easter Basket to give out Easter treats to people, have you thought of using a Treat Bag?  Today I’m going to show you how to make a Bunny Rabbit Treat Bag for Easter.  These are great if you have a bunch of people to hand out candy to.  Instead of buying an Easter Basket for everyone…. why not just make these cute Bunny Rabbit Treat Bags.  They are super easy and a ton of fun…. plus they are super cute.  So, grab the materials needed and let’s get started.

Check out our other Easter Crafts.


How to Make Bunny Rabbit Treat Bags for Easter


Materials Needed

Brown Bag

Pencil

Scissors

Black Marker

2 Pom Poms

Treats

2 Ribbons


Step 1


Draw top of bunny's head all around a brown bag.


Draw top of bunny’s head all around a brown bag.


Step 2


After cutting out it will look like this.


Cut out the top of the bunny heads you just drew.  After cutting out it will look like this.


Step 3


Draw 2 ovals for eyes


Draw 2 ovals for eyes, draw 3 lines for whiskers and add 2 pom poms where shown.


Step 4


Add treats


Add treats.  Once you have added the treats tie both ears shut on each side.

That’s it!!  You just finished your Bunny Rabbit Treat Bags for Easter.  Now, give this Bunny Rabbit Treat Bag to the receiver….. they are sure to love it!!

Technorati Tags: , , , , , , , , , , , , , ,

How to Make a Glove Bunny for Easter

Get ready for a fun and creative craft because I have just that for you today.  In this post I am going to show you how to make a Glove Bunny for Easter.  That’s right…. it’s an Easter bunny made out of a Glove.  This is a great craft to do to actually use that glove that you no longer have the pair for.  After stuffing the glove you have a nice, cuddly Easter Bunny that would be perfect as an Easter decoration or a nice cuddly friend.  The choice is yours.  So, let’s get started.

Check out our other Easter Crafts.


How to Make a Glove Bunny for Easter


Materials Needed

Glove

2 Safety Pins

Stuffing

Glue

Clothespins or Clips

Cap

yarn

Construction Paper

Ribbon or Twist Tie

Cotton Ball


Step 1


Get a glove.


Get a glove.  Then fold middle finger down and the two outside fingers can be pushed to the back.


This is what the other side looks like.


This is what the other side looks like.


Step 2


Pin middle finger down from inside of glove.


Pin middle finger down from inside of glove.


Step 3


Fill with stuffing.


Fill with stuffing.


Step 4


Fold bottom part inside glove.


Fold bottom part inside glove.


Step 5


Glue and clip shut.


Glue and clip shut.


Step 6


Get a cap.


Get a cap.


Fill cap with glue.


Fill cap with glue.  Fill with tiny, cut pieces of yarn… as well as tiny little paper eggs that you cut out.


For a tiny handle use a ribbon or twist tie.


For a tiny handle use a ribbon or twist tie.


Step 7


Put tiny basket handle over one arm and then pin both arms together.


Put tiny basket handle over one arm and then pin both arms together.  Pin from behind arms.


Step 8


Glue cotton ball to back.


Glue cotton ball to back.

And, that’s it…. you just finished making your Glove Bunny for Easter.  Isn’t he a cutie patootie?!  Let me know how your Glove Bunny turned out in the comments below.  And, take a picture of it too and post that with the comment as well…. I’d love to see it.

Technorati Tags: , , , , , , , , , ,

How to Make a Handkerchief Bunny Cup Cover

Today I’m going to show you how to make a Handkerchief Bunny Cup Cover.  If you don’t have a Handkerchief available…. you might have to ask one of your grandparents to borrow one for this craft.  You are going to be folding the handkerchief to create an Easter Bunny.  Once completed, this craft is perfect to use as an Easter decoration this Easter.  It would look great on any tabletop.  So, grab the materials needed and let’s get started.

Check out our other Easter Crafts.


How to Make a Handkerchief Bunny Cup Cover


Materials Needed

Handkerchief

Cup


Step 1


Fold hankie over.


Fold hankie over.


Step 2


It should look like this.


It should look like this.


Step 3


turn so fold is at bottom.


First, turn so fold is at bottom.  Then… Fold up bottom about 2 inches.  Turn over.


Step 4


Fold B & C over as seen.


Fold B & C over as seen.


It should look like this.


It should look like this.  Turn over.


Step 5


It should look like this.


It should look like this.


Step 6


Bend A down.


Bend A down.


Step 7


Now tie a bow around the neck ….and for a face, draw eyes and nose or cut out felt shapes for facial features. Then put it over a cup or glass.

There you have it…. you just finished your Handkerchief Bunny Cup Cover.  Now, use it to decorate your tabletop for Easter.  People will love it!!

Technorati Tags: , , , , , , , , , , , ,