How to Make Candy Corn Stalks for Thanksgiving Treats

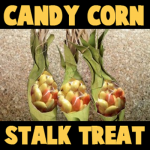
Who says that you can only have candy for Halloween. Here is a great treat to use as placeholders at the Thanksgiving table. You make these cute little cornstalks out of candy corn and cardboard tubes from paper towel rolls. This is a  fun way to give treats on Thanksgiving. This tutorial is offered by Laura from Dacian Moon Handmade


How to make Candy Corn Stalks for Thanksgiving treats


How to make Candy Corn Stalks for Thanksgiving treats

Crafts Materials Needed:

– recycled paper roll
– green paint
– yellow and orange candies
– paintbrush
– scissors
– bag


Step 1.

Cut a rectangle with rounded corners out of the paper roll…


… like this.


Step 2.

Using green paint…


… and paintbrush, color the roll.


Let it dry.


Step 3.

Cut triangles on the lower part…


Like this.


Step 4.

Put the candies in the bag…


… and place it inside the tube.


Step 5.

Take the rest of tube (the part that was not painted)…


… and cut thin strips of it.


Like this.


Put them in the tube above the candies, so that a part to go over the edge, outside ..


Step 6.

Squeezes the top to remain fixed (if doesn’t work, you can tie with a cord of similar color, or you can stick it.)


Then bend inward at the bottom…


And that’s all 😀


Technorati Tags: , , , , , , ,

How to make Floating Ghosts for Halloween

Picture Trick-or-Treaters coming to your house, and you coming to the door. When you open the door, they see glowing ghosts behind you. They scream until they realize that they didn’t see a real ghost; all they saw was just a floating balloon. Laura from  Dacian Moon Handmade  will show you, step by step, how to make a cool decoration for Halloween: a floating ghost :D.

How to Make Floating Glow in the Dark Ghosts for Halloween


How to make Floating Ghosts for Halloween


CRAFTS MATERIALS NEEDED:

– balloon
– black permanent marker
– glow in the dark acrylic paint (I use orange glow paint with gold balloon. If you have white glow paint, use a white balloon)
– paintbrush


Step 1.

Put some paint on a cardboard…


… and apply it with the paintbrush…


… on the balloon.


Like this.


Let it dry well.


Step. 2

Use the permanent marker to add eyes and mouth. Let it dry.


Now, on daylight the balloon is gold, but in the dark, it glows.

Note:

If for some reason the paint is peeling, clean the balloon and repeat the steps above on the inflated balloon.


Technorati Tags: , , , , , ,


How to Make Cute Halloween Candy Bats

You can’t have Halloween without the treats! So we might as well make them cute 😉  Laura from  Dacian Moon Handmade  will show you, step by step, how to turn a normal candy bar into vampire bats. This bat can close his wings around the candy bar.


Candy Bats


CRAFTS MATERIALS NEEDED:

– black cardboard
– little chocolate
– pen
– scissors
– paper glue
– self adhesive eyes


Step 1.

Measuring the right size, we leave 2 cm above and below the chocolate. On the sides we let 4 cm.


Cut the cardboard to the right size.


Step. 2

We measure chocolate on board, marking the corners.


Draw two lines from the upper markings to the edges, like this.


Step 3.

Draw a bat wing on the right side, based on the markings. Like this.


Draw another one on the left side.


Step 4.

Next, we will draw some feet for our bat – not too complex because you’ll find it hard to cut when is ready.


The feet looks like this, because the bat has claws 😀


To finish our design we must add the head…


… so, draw it as a half of a circle with two pointy ears.


Step 5.

Cut it out.


It will look like this.


Step 6.

Add the eyes.

Bend the wings up…


… like this.


Step 7.

Add a layer of glue on the chocolate…


… and place it on its place.


Join the wings in front and you have the cutest treat ever 😀


Technorati Tags: , , , , ,


How to Make Pencil Pendants or Necklaces for Back to School

August is here and school is drawing nearer. This is a great Back-To-School Craft … make a cute pendant with a pencil that can still be used. Laura from Dacian Moon Handmade will show you, step by step, how to make it.

How to Make Pencil Pendants or Necklaces for Back to School


How to Make Pencil Pendants or Necklaces for Back to School


CRAFTS MATERIALS NEEDED:

– pencil
– glue
– scissors
– white thick thread
– khaki thick thread


Step 1.

Apply a good layer of glue on the pencil (not on the sharpened part)


Step 2.

Begin to cover the bottom of the pencil, wrapping around it the white thread.


Let the center uncovered and make another white part near the other end.


Step 3.

If the glue on the uncovered part is already dry, add another layer. Glue the end of the khaki thread beside the  white thread, and begin to cover the other parts.


The middle one…


… and the upper one (you will go with a khaki thread over the white for that). When you reach the top, make a loop of khaki thread and put glue on it to set it on top of the pendant…


… like this.

Now you can wear it on a chain or cord and, if you forget your pencils… you can use it 😉


Technorati Tags: , , , , , , ,

How to Make Doll Pencil Toppers for Back to School

Do you want to create an adorable companion for your time back at school? Here is an easy-to-make doll that can be stored on the top of your pencil. Laura from  Dacian Moon Handmade  will show you, step by step, how to make it.


how to make doll pencil toppers for back to school


CRAFTS MATERIALS NEEDED:

– pencil
– thick tread
– wooden beads (one white and 6 brown)
– small cloth piece
– matching cord
– a piece of wire
– needle
– rubber tube


Step 1.

Take the thread …


… and spin it on your fingers, like this.


Step 2.

Tie it on the middle with the wire…


… like this.


Put the wire through the white bead – this will be the head of our doll.


Step 3.

Take the rubber tube…


… and make two holes in it with the needle.


Place it under the head, put the wire through the holes you made.


Step 4.

Is time to form her arms.


Add three brown beads like this…


… and put the wire end through the last bead one more time. That way the beads will not fall.


Repeat for the other arm.


Step 5.

Is time to place the topper on the pencil…


Like this.


Let’s dress her. Roll the piece of cloth over the rubber tube, under the arms…


… like this.


Tie it with the cord…


… and that is our doll.


You can use markers to make her eyes and mouth too. And she will make your classes easier 😉


Technorati Tags: , , , , , ,

How to make and Sew a Bear Pencil Case for Back to School

Although school isn’t starting for at least a month or more, I thought I would share a project to get in the spirit of Back-to-School time. Here is a simple sewing project, that a first-time-sewer can accomplish with a little help from a parent. Laura from  Dacian Moon Handmade  will show you, step by step, how to make this cute bear pencil bag / case…a great way to organize your school pencils and pens.

How to make and Sew a Bear Pencil Case for Back to School


How to make and Sew a Bear Pencil Case for Back to School


CRAFTS MATERIALS NEEDED:

– light blue cotton cloth
– dark blue cotton cloth
– canvas – to double the bag
– pen
– scissors
– one black button, two beads
– needle and thread
– zipper


Step 1.

Take the light blue cloth and fold it in half…


… then draw an oval on it. Like this.


Cut it out.


… like this.


Now the two sides are united by the lower part.


Step 2.

Draw the muzzle and two ovals for the ears on dark blue cloth…


… then cut the out.


Step 3.

Open the light blue oval and place it on top of the canvas…


… and cut the form on it. I did the same for the ears but then I didn’t use the canvas on ears so you don’t need to.


Place the canvas on the light blue cloth…


… and fold in half to have the head of the bear.


Step 4.

Sew the two parts together, using a blanket stitch along the sides. (To make a blanket stitch, push the needle through the fabric then pull the needle through the loop.)


Like this.


Sew 2/3 of it then prepare one ear. Take an ear oval and fold it in half…


… then continue to sew over it…


… like this.


Step 5.

Place the muzzle on the lower part of the head…


… and sew it here.


Like this.


In the upper part of the muzzle sew the black button…


… as a nose.


Step 6.

Mark the places for the eyes…


And sew the beads there…


… like this.


Step 7.

Start on the lower part and sew the other part of the head and the other ear.


Step 8.

We will add a zipper from one ear to the other…


…sewing it on place.


Like this.


That’s all. Now you have a blue bear pencil bag !:)


Technorati Tags: , , , , , , , , , ,

Puppets for Thumb wrestling: Father’s Day Gift

Here’s a Father’s day gift that guarantees hours of fun. Make a set of thumb puppets for your dad and yourself, and play thumb wrestling. The simple illustrated instructions to make the thumb puppets follow:


Craft materials required:

-White fabric

-black yarn

-ribbon

-scissors

-needle and thread

-fabric glue

-Permanent marker


Step 1:

Cut out a piece of cloth double the length of your thumb and about an inch wider than the width of your thumb.


Step 2:

Fold it into half and stitch along the two sides as shown.


Step 3:

Fold it inside out as shown:


Step 4:

Glue small pieces of yarn to make hair


Step 5:

Glue a strip of ribbon along the bottom as shown


Step 6:

Add facial features with a marker.


Make another one for your dad in the same way. Make sure its big enough for your dad’s thumb. Your dad is sure to enjoy this Father’s day gift.

Technorati Tags: , , , , , , , , , ,

How to Make Paper Flowers – Make a Daisy for Mom on Mothers Day

Oh no! Mother’s Day is coming up and you didn’t make your Mom a Mother’s Day present!!! No worries…here is a fun and easy craft that will knock the socks off of your mother. This paper flower craft sort of looks like a daisy, but you can use any colors you want to make it look like any type of flower. Find out how to make this paper daisy below.


How to Make Paper Flowers - Make a Daisy for Mom on Mothers Day


Crafts Materials Needed:

Colorful Paper

Scissors

Step 1


step1


Take a long strip of colorful paper and roll it up as in the picture seen above. Now paste the rolled paper shut.

Step 2


step2


Now cut slits in one end of the rolled paper tube.


Step 3


step3


Now flatten out the slitted side and turn it upside down, as seen in the picture above.

Step 4


step4


This part is a little hard to explain, but basically take a small piece of colorful paper (in the finished picture this part would be orange) and twist it into a rounded stump.

 Step 5


step5


Now put this rounded stump into the center of the flatten flower.

Step 6


step6


Now take a narrow strip of green paper. Paste one end on the short stump below the flower. Start twisting the strip round and round, each time a little more downward, in a spiral fashion…as seen in the pic above.

Step 7


step7


Now get a green piece of paper and fold it forwards/backwards/forwards/backwards, etc like an accordion.

 Step 8


step8


Now draw the shape of half of a leaf on top of the fold and then cut it out. You will now gets tons of leaves out of this.

Step 9


step9


Flatten out the leaves and then work them into the spiral folds on the stem as seen in the picture above.

Finished Paper Daisy Craft


Finished paper flower for mom on mothers day


Now you have a beautiful paper flower or daisy for your Mom on Mother’s Day. I hope you enjoyed this craft!

Technorati Tags: , , , , , , , , ,


How to Make a Free Printable Paper Easter Bunny Candy Holder

Here is a free printable template that you can use to make an adorable Easter Bunny that holds candy in his mouth. This could be used as an Easter decoration or to give candy to your friends. Either way, it is simple enough to make with a little effort. Find the free printable template below as well as the instructions for putting it together.


How to Make a Free Printable Paper Easter Bunny Candy Holder


Crafts Materials Needed:

Paper or Card Stock

Printer

(Optional) Cereal Box

Scissors

Ruler

Butter Knife

TEMPLATE


How to Make a Free Printable Paper Easter Bunny Candy Holder


Click on thumbnail and then the template will open up. You can then save the image to your computer and print it out then.

Step 1


step1


Firstly, Print out the template, found above. It works best if you can print it out on card stock, but paper is fine too.

Step 2


step2


Cut out all the pieces and then glue them onto cereal box cardboard. If you are able to print out the template on card stock, this step is not necessary.


Step 3a


step3a


Use the back of a butter knife to score lines. You put a ruler up to the line and then drag the back of the butter knife along the line. This is called scoring and makes it easier to fold upon the line in a neat fashion. Do this, without the ruler, along the curved line at the top of the bunny’s head.

Step 4


step4


Have your parents cut out the inside of the mouth… as well as the 2 slits that are needed on the head. If you are able to do this with a scissor yourself, then you may do it as well.

Step 5


step5


Fold all of the tabs inward.

Step 6


step7


Glue all of the tabs together.

Step 7


step8


Push the ears into the slits at the top of the box. Also place candy inside of the box.

Step 8


step9


Now glue the head down and glue or tape legs to the back of the box like seen in the picture.

 Step 9


step10


Now bend hands at the wrist and glue them on both sides of the box, so that the hands are over the mouth.

Finished Bunny Rabbit with Candy in His Mouth


How to Make a Free Printable Paper Easter Bunny Candy Holder


There you have it – a paper foldable Easter Bunny – holding all of the candy in his mouth. I think anyone you give this too will love it!!! I hope that you had fun.

[tag]easter bunny crafts, bunny crafts, bunnies, easter bunnies, bunny rabbits, bunny rabbit crafts, paper templates, paper foldables, free paper foldables, free paper teplates, easter crafts, free easter crafts, easter paper foldables[/tags]


Using Legos to Learn Sight Words and How to Read and Sound Out Words

My youngest daughter is in Kindergarten and she is learning how to read. Her teacher sends home lists of sight words that she has to learn and although we use flash cards to help her learn them, using Legos / Duplo Blocks  sounds a lot more fun to her. I saw someone else online use Legos to make sight words fun and I just loved the idea. Legos are also great for alphabet letters. The child can snap the Legos together to form and sound out words.

My daughter was getting bored with playing with these ‘little kid’ blocks as she now only wants to play with the little Lego blocks that older kids use. So this is a great way to recycle these Duplo / Lego blocks.


1st-pic-learning-sight-words-and-reading-with-legos


Crafts Materials Needed

Legos / Duplo Blocks

Labels (These are the ones I used   … Avery Removable Rectangular Labels, 0.5 x 0.75 Inches, White, Pack of 525  -6737  )

Step 1


Write Sight Words and Alphabet Letters on Labels


If you want to use the Legos to practice sight words and making sentences, then write sight words on the labels. If you want your child to practice creating words and sounding out letter combinations, then write alphabet letters on labels. I repeated consonants a few times and I repeated vowels many times.


Step 2


Add Alphabet Letters to 4 Sides of Blocks


I used the 4 peg Duplo squares for the Alphabet letter blocks. I put a letter on each side, so then the child can spin the blocks to make different words. My child loved forming words with the letters. I used blank squares to for spaces.

Step 3


Put Word Labels on the blocks


Then I put sight words on bigger Duplo blocks. They would fit on the square blocks but I didn’t have any more left. I put a label on 2 sides of the blocks, but you can definitely put them on all 4 sides if you want to. I also added other words that my child knows. I also made several blocks with words such as ‘I’, ‘and’, ‘my’, ‘too’, and ‘the’. I also added labels for people and animals that she knows so that she can talk about specific people. She LOVES playing with these blocks now.


Turn a Deck of Cards into a 52 Reasons I Love You Book for a Valentines Day Gift

I am sure that you can think of way more than 52 reasons that you love someone. However, it will only take those 52 reasons to make your loved-one break down into tears of happiness. Take the time to tell your Mom / Dad / Sister / Brother / Grandparents etc how much you love them with this special project. Versions of this craft are all over the Internet…each a little different from the other, and I am not sure who was the first craftster to come up with this idea…but it is super cool. So know that I didn’t come up with this idea, however, it isn’t exactly the same as others.


Turn a Deck of Cards into a 52 Reasons I Love You Book for a Valentines Day Gift


Crafts Materials Needed:

A Deck of Cards

Glue or Paste

Jump Rings

Paper / Printer (or you can write out by hand)

Hole Puncher

Templates


template 3 - 52 ways i love you template 1


Click on Pic and Save Pic That Opens Up


template 1 - 52 ways i love you template 1


Click on Pic and Save Pic That Opens Up


template 2 - 52 ways i love you template 1


Click on Pic and Save Pic That Opens Up


template 4 - 52 ways i love you template 1


Click on Pic and Save Pic That Opens Up

Step 1


step1


Download and then print out the 4 pages of templates. Then write something for each number. Each thing should be something you love about the person you are writing the book for.

Step 2


step2 : 52 reasons why I love you


Cut each number rectangle out.


Step 3


step 3 : 52 reasons why I love you


Paste each number rectangle on a playing card.

Step 4


step4a


Now take a hole puncher and punch 2 holes in each card. Line cards up so holes are in about the same place on each card.


step4b


Here is what the holes look like on the other side of the cards.

Step 5


step 5 : 52 reasons why I love you


Open jump rings and thread it through all the cards…2 this for both holes.

Now Your Loved One Can Flip Thru Pages


step6d


step6c


step6b


step6a


This might be the most special gift you ever give any one. Your loved one will cherish this book forever.

Technorati Tags: , , , , , , , , , ,

How to Make Valentines Day Cards with Fist Holding Lollipops

I saw somewhere a handmade Valentine’s Day card with a little girl or boy holding a lollipop and I thought it was so cool. It stuck in my mind and I decided to try it out for my daughter’s Valentine’s Day card that goes out to her classmates. This is a great way to personalize your child’s Valentine’s Day card … as it display’s your child within the card. Now in a perfect situation, I would have printed this card out with colors, but of course I ran out of ink. And, I also would have printed this out on white card stock, however Walmart only had card stock in bright colors. So, decided for yourself which elements you want your card to have. Have fun.

Also, this is a craft that has to be mostly done by and adult…as a craft knife is needed. Also, you need to prepare the image on the computer…so if you have an older child and they know how to do this, then by all means, let them help.


How to Make Valentines Day Cards with Fist Holding Lollipops


Crafts Materials Needed:

Computer, Printer, Card Stock, Lollipops, Scissors, Craft Knife (for Only Mom or Dad to Use)

Step 1


step1 : Take a Picture of Your Child


Ask your child to hold out their hand in a fist. Do a better job than I did. I am an awful photographer. Oh well.

Step 2


step2 : Print Out Pictures of Child


I too k my picture into Adobe Photoshop. I then cut her cute little arm off and made it bigger so the hand looked closer / larger. This is NOT a necessary step if you are a better photographer. 🙂

Then make 4 of them so they are the right size for a Valentine’s day card.


Step 3


step3 Cut Cards Into Separate Cards


Cut into 4 separate cards.

Step 4


step4 Cut Slits in Card and Put Lollipops Thru


(For Parents / Adults Only). Take a craft knife. and cut on the left AND right side of the fist. Then put the lollipop thru like this.

Step 5


step5 : Hand Out Your Cards


Once you get the hang of it, they are really easy to make. Make sure to make enough for all of your child’s classmates.

Technorati Tags: , , , , , , , , ,

How to Make a Santa Claus Milk Carton Gift Box

Christmas is the Season for gift giving.  Well, today’s craft is right down that alley.  In this post I will show you how to make a Santa Claus Milk Carton Gift Box.  Made from a Milk Carton and a Paper Template this is a perfect way to wrap your gifts this Holiday Season.  Imagine the look on your family and friends’ face when they receive their gift wrapped in this gift box….. they are sure to love it.

Check out our other Christmas Crafts.


How to Make a Santa Claus Milk Carton Gift Box


Materials Needed

Printer & Paper

Milk Carton

Tape

Scissors

Glue Stick


Step 1


Print out Templates


Print out Templates.  Click on this link to open up a new web page to templates and to print off.


Step 2


Line up all the papers


Line up all the papers to see where each one should go.


Step 3


trim off the excess white trim and tape pieces together.


You should now trim off the excess white trim and tape pieces together.


Tape on the back too.


Tape on the back too.


Do this until all 4 sheets line up and are taped.


Do this until all 4 sheets line up and are taped.


Step 4


Cut out on outline AND on dashed lines.  Cut out the yellow parts too


Cut out on outline AND on dashed lines.  Cut out the yellow parts too…  However, if you plan to make a box without a milk carton leave the yellow parts there.


It should look like this.


So, if gluing to milk carton… you should cut out like this.


Step 5


Fold on lines.


Fold on lines.


Step 6


open up the milk carton and then tape closed


To make it easier for gift opener, open up the milk carton and then tape closed.  ***Place gift inside before taping closed.


Tear out spout.


If yours has a spout… You can ask Mom or Dad to tear it out.


Step 7


Put glue stick on milk carton.


Put glue stick on milk carton.


Step 8


Wrap the paper template around milk carton.


Wrap the paper template around milk carton.


Step 9


Finished Santa Claus Gift Box


You just finished your Santa Claus Milk Carton Gift Box.  How did it turn out for you?  Now, go put it under the tree for someone special.  The receiver is sure to love it.

Technorati Tags: , , , , , , , , , , , ,

How to Make a Paper Strip Dreidel – With Dreidel Game Instructions

I have a cool craft for you today.  I’m going to show you how to make a Paper Strip Dreidel.  This Dreidel craft actually produces a Dreidel that actually spins.  Not just spins…. but spins amazingly well.  So well in fact that I also am giving you the Dreidel game instructions so that you can use your Paper Strip Dreidel to play with your friends.  So grab the materials needed and let’s get started.

Check out our other Hanukkah Crafts.


How to Make a Paper Strip Dreidel


Materials Needed

Paper of All Different Colors

Scissors

Glue

Toothpick

Marker


Step 1


Cut some long strips of  paper.


Cut some long strips of  paper.  Mine were 1/4 inch wide.


Step 2


Add glue to the tip of one of the strips of paper.


Add glue to the tip of one of the strips of paper.


Step 3


Wrap paper strip tightly around the bottom of the toothpick.


Get a toothpick.  Wrap paper strip tightly around the bottom of the toothpick… but leaving some of the tip sticking out.


Step 4


glue the end of another strip to the 1st strip


When you near the end of one of your paper strips, then glue the end of another strip to the 1st strip.


Step 5


Keep rolling tightly.


Keep rolling tightly.


Step 6


Add more strips.


Add more strips.


Step 7


Add still more strips.


Add still more strips.


Step 8


It is looking like this.


It is looking like this.


Step 9


Glue the tip of the last strip down.


Glue the tip of the last strip down.  Hold tightly for a few minutes to let completely dry.


Step 10


Pull strips of paper slowly up to look like this.


After dries… Pull strips of paper slowly up to look like this.


Look how pretty.


Look how pretty.


Step 11


Each side of the dreidel has a different letter from the Hebrew alphabet.


Each side of the Dreidel bears a letter of the Hebrew alphabet:  נ (nun), ג (gimel), ה (hei) and ש (shin).


Draw these Hebrew letters on the sides of your paper strip Dreidel.


Draw these Hebrew letters on the sides of your paper strip Dreidel.


Step 12


It spins really well.


Your paper Dreidel should spin really well.


Dreidel Game Instructions

Each player begins with an equal number of game pieces (usually 10–15). The game pieces can be any object, such as chocolate gelt, pennies, or raisins.

At the beginning of each round, every participant puts one game piece into the center “pot”. In addition, every time the pot is empty and sometimes if it has one game piece left, every player puts one in the pot. Each player spins the dreidel once during their turn. Depending on which player side is facing up when it stops spinning, they give or take game pieces from the pot:

  1. If נ (nun) is facing up, the player does nothing.
  2. If ג (gimel) is facing up, the player gets everything in the pot.
  3. If ה (hei) is facing up, the player gets half of the pieces in the pot. (If there is an odd number of pieces in the pot, the player takes half the pot rounded up to the nearest whole number)
  4. If ש (shin) or פ (pei) is facing up, the player adds a game piece to the pot.

If the player is out of pieces, they are either “out” or may ask another player for a “loan”.

There you have it.  You just made your very own Paper Strip Dreidel and have the instructions for playing the Dreidel game….. now go grab your friends and play the game of Dreidel.  Let me know how you did in the comments below…. I’d love to hear about it.

Technorati Tags: , , , , , , , , , , , , , , ,

How to Make a Button Santa Claus Ornament

Today I’m going to show you how to make a Button Santa Claus Ornament.  This Santa ornament is like no other….this Santa ornament is made up of buttons of different sizes and colors.  Use your creativity to make your ornament look like Santa.  This craft is a lot of fun…. so grab your buttons and a pipe cleaner and let’s get started.

Check out our other Christmas Crafts.


How to Make a Button Santa Claus Ornament


Materials Needed

Pipe Cleaner

Buttons – White, Black, Red & Skin Color Assorted Buttons

Scissors

Black Marker (optional)


Step 1


Take a pipe cleaner and string buttons on the pipe cleaner.


Take a pipe cleaner and string buttons on the pipe cleaner.  You won’t have the same ones as me, so you will have to be creative.


Step 2


Now make a loop at the top and then push the pipe cleaner into the 2nd hold on each button until you hit bottom.


Now make a loop at the top and then push the pipe cleaner into the 2nd hold on each button until you hit bottom.


Step 3


Twist it to lock in place


When you have pushed the pipe cleaner thru to the bottom… Twist it to lock in place.


Step 4


It should look like this.


Like this.


Step 5


Cut off extra.


Cut off extra.


Step 6


You can draw a face on Santa


You can draw a face on Santa if you want to.

Isn’t that Santa ornament original?  I can guarantee that no one else will have a Santa ornament like this one.  How did your Santa ornament turn out?  Make sure to let me know by taking a picture of your ornament and adding it to the comments below…. I’d love to see it.

Technorati Tags: , , , , , , , , , , ,

How to Make an Origami Santa Claus

I have another Origami craft for you today.  This time it is an Origami Santa Claus perfect for the Christmas Holiday.  Origami and other paper folding crafts are challenging, but they are also a ton of fun.  You don’t need much in the way of materials…. Simply grab a piece of red origami paper and you are good to go.  You will also need some crayons or colored pencils if you want to give your Santa a face…. but that is it.  So, let’s get started.

Check out our other Christmas Crafts and other Origami and Paper Folding Crafts.


How to Make an Origami Santa Claus


Materials Needed

Origami Paper – Red

Crayons or Colored Pencils (optional)


Step 1


Start off with a red piece of origami paper.


Start off with a red piece of origami paper.


Step 2


Fold paper in half... connecting the bottom point to the top point


Fold paper in half… connecting the bottom point to the top point.


Step 3


Open back up to reveal a crease.


Open back up to reveal a crease.


Step 4


Now fold paper in half from left corner to right.


Now fold paper in half from left corner to right.


Step 5


Now open up to reveal both creases.


Now open up to reveal both creases.


Step 6


Now turn over to the red side.


Now turn over to the red side.


Step 7


Fold both the left and right corners to center of creases.


Fold both the left and right corners to center of creases.


Like this.


Like this.


Step 8


Take each triangle and bend bottom of it over to form a red triangle.


Now you have two white triangles.  Take each triangle and bend bottom of it over to form a red triangle.


It should look like this.


It should look like this.  Notice that the red triangles are perfectly straight across as well as on the sides.


Step 9


unfold yet again


Sounds crazy…. but unfold yet again!


Step 10


Fold over left corners so that it looks like this


Fold over left corners so that it looks like this.  Do it on the right too.


Step 11


Now bend over the paper again so that it looks like this.


Now bend over the paper again so that it looks like this.  Do it on right too.


Step 12


Now fold paper in half


Now fold paper in half… top corner touching bottom corner.


Step 13


Fold bottom corner up to top of paper


Fold bottom corner up to top of paper.


Step 14


Fold only the front sheet of paper down at the top


Fold only the front sheet of paper down at the top… not quite to the bottom.


Step 15


Now fold back sheet of paper forward too


Now fold back sheet of paper forward too… but not quite as far down… leaving a bit of white outline like so.


Step 16


Now fold a bit of the tip (of front sheet) up.


Now fold a bit of the tip (of front sheet) up.


Step 17


Fold tip of it behind big triangles.


Fold tip of it behind big triangles.


Step 18


Fold left side up in a diagonal


Fold left side up in a diagonal so it meets the top edge and the left side of the middle triangle.


Do the same thing with the right side


Do the same thing with the right side.  Unfold left side to reveal the crease.


Unfold right side too... so creases are on both sides.


Unfold right side too… so creases are on both sides.


Step 19


Now fold down on diagonal


Now fold down on diagonal so each side touches top corners of middle triangle.


Step 20


Fold them over towards the center like this.


Fold them over towards the center like this.


Step 21


Use your fingers to push the right side to the back of Santa.


Use your fingers to push the right side to the back of Santa.


See now it is behind Santa and coming out the bottom like a leg.


See now it is behind Santa and coming out the bottom like a leg.


Push the left side behind Santa


Push the left side behind Santa like you did on the right.

Step 22


For the right leg push your finger up under the leg and push part of it up and to the right to form a sleeve.


This is the tricky part.  You might have to play around till you figure out what I’m talking about.

For the right leg push your finger up under the leg and push part of it up and to the right to form a sleeve.  Some of the leg will remain sticking out.


Step 23


Do the same with the left leg.


Do the same with the left leg.  You are now done.  Unless you want to…


Step 24


draw a face on Santa


… draw a face on Santa.

Awesome job…. you just finished your Origami Santa Claus.  Did you decide to draw a face on Santa?  Take a picture of your Santa and post it in the comments below.  I would love to check out your Origami Santa Claus.

Technorati Tags: , , , , , , , , , , , , ,